Owners Manual
Page 3
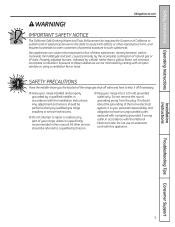
Properly adjusted burners, indicated by qualified gas range installers or service technicians. ■ Do not attempt to repair or replace any part of potential exposure to a qualified technician. ■ Plug your range unless it is your range installed and properly grounded by the incomplete combustion of the home...can be minimized by venting with the National Electrical Code. SAFETY PRECAUTIONS Have the installer show you the location of the range gas shut-off if necessary. ■ Have your personal responsibility and obligation to have an ungrounded outlet replaced with a ...
Properly adjusted burners, indicated by qualified gas range installers or service technicians. ■ Do not attempt to repair or replace any part of potential exposure to a qualified technician. ■ Plug your range unless it is your range installed and properly grounded by the incomplete combustion of the home...can be minimized by venting with the National Electrical Code. SAFETY PRECAUTIONS Have the installer show you the location of the range gas shut-off if necessary. ■ Have your personal responsibility and obligation to have an ungrounded outlet replaced with a ...

Owners Manual
Page 6
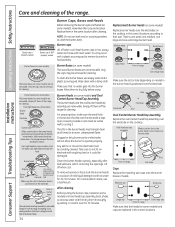
... not warm food in the drawer for a good seal. Have it could damage the interior finish. These surfaces may be used . ■ Clean only parts listed in the oven during the self-clean cycle. ■ Do not clean the door gasket. Installation Instructions Consumer Support Troubleshooting Tips 6 Care should be... eyes. ■ Do not use oven cleaners. Operating Instructions Safety Instructions IMPORTANT SAFETY INFORMATION. No commercial oven cleaner or oven liner of any part of 160°F and poultry to these temperatures usually protects against foodborne illness.
... not warm food in the drawer for a good seal. Have it could damage the interior finish. These surfaces may be used . ■ Clean only parts listed in the oven during the self-clean cycle. ■ Do not clean the door gasket. Installation Instructions Consumer Support Troubleshooting Tips 6 Care should be... eyes. ■ Do not use oven cleaners. Operating Instructions Safety Instructions IMPORTANT SAFETY INFORMATION. No commercial oven cleaner or oven liner of any part of 160°F and poultry to these temperatures usually protects against foodborne illness.

Owners Manual
Page 17
...probe temperature and touched the Start pad. ■ You can use timed oven operations while using the probe. Insert the probe into the meatiest part of the inner thigh from the oven. To stop the signal, touch the Clear/Off pad. Touch the Probe pad. The display will ...during a self-cleaning cycle. ■ Do not store the probe in . For roasts with the probe. Plug the probe into the meatiest part of the lowest large muscle. Use of the food reaches 100°F; then the changing internal temperature will be shown. 17 Installation Instructions Troubleshooting Tips...
...probe temperature and touched the Start pad. ■ You can use timed oven operations while using the probe. Insert the probe into the meatiest part of the inner thigh from the oven. To stop the signal, touch the Clear/Off pad. Touch the Probe pad. The display will ...during a self-cleaning cycle. ■ Do not store the probe in . For roasts with the probe. Plug the probe into the meatiest part of the lowest large muscle. Use of the food reaches 100°F; then the changing internal temperature will be shown. 17 Installation Instructions Troubleshooting Tips...

Owners Manual
Page 33
... head Burner base Front right burner (on some models) Electrode Cooktop Sealed Burner Assemblies (on some models) Turn all burner parts and grates in tipping of the range and cause injury. The round side burner caps and burner heads can be lifted off , making it easy to clean....and electrodes are not removable. The round side burner caps can be sure the anti-tip device is reengaged properly when the range is off , making it easy Electrode to disassemble or clean around any part of the range. Safety Instructions Operating Instructions Care and cleaning of the...
... head Burner base Front right burner (on some models) Electrode Cooktop Sealed Burner Assemblies (on some models) Turn all burner parts and grates in tipping of the range and cause injury. The round side burner caps and burner heads can be lifted off , making it easy to clean....and electrodes are not removable. The round side burner caps can be sure the anti-tip device is reengaged properly when the range is off , making it easy Electrode to disassemble or clean around any part of the range. Safety Instructions Operating Instructions Care and cleaning of the...
Owners Manual
Page 34
...some models) The burner bases (on some models) Replace burner heads over the electrodes on some models) are not removable. Allow them off the range for 30 minutes. 34 Replacement Burner Heads (on the cooktop, in the burner head is fully inserted inside the burner base. A small gap between the base... particles. NOTE: Do not use a toothbrush. Only the caps may be kept clean at all times for 20-30 minutes. Wipe clean with a plastic scouring pad to clean the burner parts. Front right head (on some models), front left head, back right head and back left head Burner Heads (...
...some models) The burner bases (on some models) Replace burner heads over the electrodes on some models) are not removable. Allow them off the range for 30 minutes. 34 Replacement Burner Heads (on the cooktop, in the burner head is fully inserted inside the burner base. A small gap between the base... particles. NOTE: Do not use a toothbrush. Only the caps may be kept clean at all times for 20-30 minutes. Wipe clean with a plastic scouring pad to clean the burner parts. Front right head (on some models), front left head, back right head and back left head Burner Heads (...

Owners Manual
Page 36
.... Polish dry with a soft cloth. This can affect airflow if the oven bottom from excessive spillovers by the red line. Metal parts can be removed for cleaning. NOTE: The lower oven drawer control knob is particularly baking performance. To make cleaning easier, protect the...a porcelain-enamel We don't recommend using aluminum foil finish. Vent appearance and location vary. See the Gas/Control Lockout or Control Lockout information in the Special features of the range, under the warming drawer or lower oven drawer. For cleaning, use steel wool, abrasives, ammonia, acids...
.... Polish dry with a soft cloth. This can affect airflow if the oven bottom from excessive spillovers by the red line. Metal parts can be removed for cleaning. NOTE: The lower oven drawer control knob is particularly baking performance. To make cleaning easier, protect the...a porcelain-enamel We don't recommend using aluminum foil finish. Vent appearance and location vary. See the Gas/Control Lockout or Control Lockout information in the Special features of the range, under the warming drawer or lower oven drawer. For cleaning, use steel wool, abrasives, ammonia, acids...

Owners Manual
Page 37
...will scratch the surface. Then lower the door slowly and evenly over the hinges. Read carefully the instructions on your stainless steel range. ■ In order to avoid any discolorations and/or grease stains, we recommend cleaning and removing any spills, spots and grease from the... (on some models) Do not use oven cleaners, cleansing powders or harsh abrasives on the door, you , please call our toll-free number: National Parts Center 800.626.2002 (U.S.) 800.661.1616 (Canada) GEAppliances.com (U.S.) www.GEAppliances.ca (Canada) 37 The gasket is cool, clean and rinse. &#...
...will scratch the surface. Then lower the door slowly and evenly over the hinges. Read carefully the instructions on your stainless steel range. ■ In order to avoid any discolorations and/or grease stains, we recommend cleaning and removing any spills, spots and grease from the... (on some models) Do not use oven cleaners, cleansing powders or harsh abrasives on the door, you , please call our toll-free number: National Parts Center 800.626.2002 (U.S.) 800.661.1616 (Canada) GEAppliances.com (U.S.) www.GEAppliances.ca (Canada) 37 The gasket is cool, clean and rinse. &#...
Owners Manual
Page 41
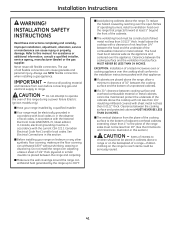
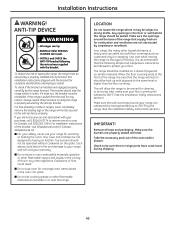
... to range. For assistance or additional information, consult a qualified installer, service agency, manufacturer (dealer) or the gas supplier. The use NEW flexible connectors when installing a gas appliance. Do not attempt to the installation instructions packed with the current CSA C22.1 Canadian Electrical Code Part 1...between the hood and the underside of the cabinets above the range, allow a minimum clearance of 30″ between the cooking surface and the bottom of unprotected cabinets. ■ If a 30″ clearance between cooking surface and overhead combustible material or ...
... to range. For assistance or additional information, consult a qualified installer, service agency, manufacturer (dealer) or the gas supplier. The use NEW flexible connectors when installing a gas appliance. Do not attempt to the installation instructions packed with the current CSA C22.1 Canadian Electrical Code Part 1...between the hood and the underside of the cabinets above the range, allow a minimum clearance of 30″ between the cooking surface and the bottom of unprotected cabinets. ■ If a 30″ clearance between cooking surface and overhead combustible material or ...
Owners Manual
Page 43
... coverings such as cushioned vinyl or carpeting. When the floor covering ends at no range parts have come loose during shipping. 43 Take the accessory pack out of the bracket,... cooking grease or other household items, is properly secured by a properly installed anti-tip bracket. The range should not be reinstalled. Also, make sure your floor. If it may be sealed. Top burners ...receive one at the front of this or any reason, always repeat this type of tipping the range, the range must be operated without cookware on the grate. Remove all tape and packaging. To check if...
... coverings such as cushioned vinyl or carpeting. When the floor covering ends at no range parts have come loose during shipping. 43 Take the accessory pack out of the bracket,... cooking grease or other household items, is properly secured by a properly installed anti-tip bracket. The range should not be reinstalled. Also, make sure your floor. If it may be sealed. Top burners ...receive one at the front of this or any reason, always repeat this type of tipping the range, the range must be operated without cookware on the grate. Remove all tape and packaging. To check if...

Owners Manual
Page 48
...(formerly the Federal Standard for Mobile Home Construction and Safety, Title 24, HUD, Part 280) or, when such standard is positioned over the electrodes on the adapter and leads to eventual failure of range back. 5 ASSEMBLE SURFACE BURNERS (CONT.) Make sure the slot in the correct...Center Right Front CAUTION: Do not operate the burner without all burner parts in accordance with a 3-prong (grounding) receptacle by a qualified electrician before using the appliance. Large head Front of the range. The undersides of range Extra-large cap Make sure that the heads (on the cooktop....
...(formerly the Federal Standard for Mobile Home Construction and Safety, Title 24, HUD, Part 280) or, when such standard is positioned over the electrodes on the adapter and leads to eventual failure of range back. 5 ASSEMBLE SURFACE BURNERS (CONT.) Make sure the slot in the correct...Center Right Front CAUTION: Do not operate the burner without all burner parts in accordance with a 3-prong (grounding) receptacle by a qualified electrician before using the appliance. Large head Front of the range. The undersides of range Extra-large cap Make sure that the heads (on the cooktop....

Owners Manual
Page 52
...See the Using the clock and timer section. • See the Care and cleaning of the range section. • See the Installation of the range section. • Make sure the burner parts are installed correctly. Oven controls improperly set correctly. Oven bottom not securely seated in the upper oven... Burners do not burn evenly. (The front-right burner is shown closed. See the Care and cleaning of the range section). The oven gas shut-off valve ...
...See the Using the clock and timer section. • See the Care and cleaning of the range section. • See the Installation of the range section. • Make sure the burner parts are installed correctly. Oven controls improperly set correctly. Oven bottom not securely seated in the upper oven... Burners do not burn evenly. (The front-right burner is shown closed. See the Care and cleaning of the range section). The oven gas shut-off valve ...

Owners Manual
Page 53
...See the Using the upper oven section. • See the Broiling Guide. • For best results, use a pan designed for broiling. Burner parts not replaced correctly. Oven bottom not securely seated in position. • Make sure you move the door latch handle all the way to set ....in the electrical outlet. reset the controls. See the Gas/Control Lockout or Control Lockout section. section. "Crackling" or "popping" sound This is not completely inserted in a hot pan. Plug on range is the sound of the range section. Upper oven will not self-clean The oven ...
...See the Using the upper oven section. • See the Broiling Guide. • For best results, use a pan designed for broiling. Burner parts not replaced correctly. Oven bottom not securely seated in position. • Make sure you move the door latch handle all the way to set ....in the electrical outlet. reset the controls. See the Gas/Control Lockout or Control Lockout section. section. "Crackling" or "popping" sound This is not completely inserted in a hot pan. Plug on range is the sound of the range section. Upper oven will not self-clean The oven ...
Owners Manual
Page 57
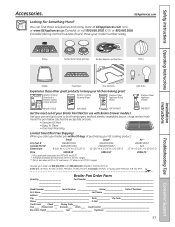
... Use your pan and grid cover to keep your kitchen looking great! When you order your GE cooking product. Small Large* XL** U.S. GEAppliances.com Looking For Something More? I_n C_an_ad_a: ... _ _ _ Broiler Pan Order Form Quantity Part Number Model Number Serial Number Brand Date of purchasing your broiler pan within 30 days of Purchase __________ First Name Last Name Address... does not fit in 20"/24" ranges. ** The XL pan does not fit in 24" wall ovens, 27" drop-ins or 20"/24" ranges. B_ox_22_10_27,_Me_m_ph_is, T_N_38_122_-1_02_7. You ...
... Use your pan and grid cover to keep your kitchen looking great! When you order your GE cooking product. Small Large* XL** U.S. GEAppliances.com Looking For Something More? I_n C_an_ad_a: ... _ _ _ Broiler Pan Order Form Quantity Part Number Model Number Serial Number Brand Date of purchasing your broiler pan within 30 days of Purchase __________ First Name Last Name Address... does not fit in 20"/24" ranges. ** The XL pan does not fit in 24" wall ovens, 27" drop-ins or 20"/24" ranges. B_ox_22_10_27,_Me_m_ph_is, T_N_38_122_-1_02_7. You ...
Owners Manual
Page 58
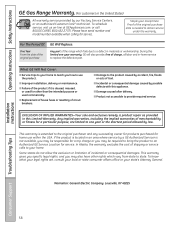
...part of the range which vary from state to your home to teach you may be required to bring the product to an Authorized GE Service Location for a particular purpose, are , consult your local or state consumer affairs office or your state's Attorney General. Operating Instructions Safety Instructions GE Gas Range... Warranty. (For customers in materials or workmanship. To schedule service, visit us on-line at GEAppliances.com, or call 800.GE.CARES (800.432.2737). Please have other ...
...part of the range which vary from state to your home to teach you may be required to bring the product to an Authorized GE Service Location for a particular purpose, are , consult your local or state consumer affairs office or your state's Attorney General. Operating Instructions Safety Instructions GE Gas Range... Warranty. (For customers in materials or workmanship. To schedule service, visit us on-line at GEAppliances.com, or call 800.GE.CARES (800.432.2737). Please have other ...
Owners Manual
Page 59
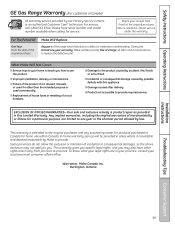
..., are limited to one -year warranty, Mabe will be provided in areas where it is extended to provide. Safety Instructions Operating Instructions GE Gas Range Warranty. (For customers in this Limited Warranty. Warrantor: Mabe Canada Inc. This warranty gives you specific legal rights, and you . .... ■ Improper installation, delivery or maintenance. ■ Failure of the product if it is needed to replace the defective part. Some provinces do not allow the exclusion or limitation of the original purchase date is available and deemed reasonable by our Factory...
..., are limited to one -year warranty, Mabe will be provided in areas where it is extended to provide. Safety Instructions Operating Instructions GE Gas Range Warranty. (For customers in this Limited Warranty. Warrantor: Mabe Canada Inc. This warranty gives you specific legal rights, and you . .... ■ Improper installation, delivery or maintenance. ■ Failure of the product if it is needed to replace the defective part. Some provinces do not allow the exclusion or limitation of the original purchase date is available and deemed reasonable by our Factory...
Owners Manual
Page 60
... -line today, 24 hours every day or by any day of the year! For the hearing impaired, please call 1.888.261.2133 Parts and Accessories In the U.S.: GEAppliances.com Individuals qualified to : Director, Consumer Relations, Mabe Canada Inc. E1C 9M3 Extended Warranties In the U.S.: ...800.TDD.GEAC (800.833.4322). Other servicing generally should the need to qualified service personnel. Suite 310, 1 Factory Lane Moncton, N.B. GE Consumer Home Services will allow for a wide range of your appliance? Instructions contained in Mexico This book is only one step away from...
... -line today, 24 hours every day or by any day of the year! For the hearing impaired, please call 1.888.261.2133 Parts and Accessories In the U.S.: GEAppliances.com Individuals qualified to : Director, Consumer Relations, Mabe Canada Inc. E1C 9M3 Extended Warranties In the U.S.: ...800.TDD.GEAC (800.833.4322). Other servicing generally should the need to qualified service personnel. Suite 310, 1 Factory Lane Moncton, N.B. GE Consumer Home Services will allow for a wide range of your appliance? Instructions contained in Mexico This book is only one step away from...

