
Use and Care Manual
Page 1
...16 Timed Convection Baking . . . .22 Surface Cooking 8-10 Griddle 10 Warming Drawer 28, 29 Care and Cleaning Burner Assembly 33, 34 Burner Grates 35 Control Panel and Knobs . . . . . .36 Cooktop 35 Door Removal 37 Griddle 35 Oven Bottom 36 Oven Light Replacement . . . . . .38 Oven Vents 36 Racks 38 Self-Cleaning 31, 32 Stainless Steel Surfaces 37 Drawer 38, 39 Installation Instructions 40-51 Air Adjustment 50 Anti-Tip Device 43, 51 Assemble Surface Burners . . . . .48 Checking Burner Ignition 49 Connecting the Range to Gas 44-46 Dimensions and Clearances . . .42 Electrical...
...16 Timed Convection Baking . . . .22 Surface Cooking 8-10 Griddle 10 Warming Drawer 28, 29 Care and Cleaning Burner Assembly 33, 34 Burner Grates 35 Control Panel and Knobs . . . . . .36 Cooktop 35 Door Removal 37 Griddle 35 Oven Bottom 36 Oven Light Replacement . . . . . .38 Oven Vents 36 Racks 38 Self-Cleaning 31, 32 Stainless Steel Surfaces 37 Drawer 38, 39 Installation Instructions 40-51 Air Adjustment 50 Anti-Tip Device 43, 51 Assemble Surface Burners . . . . .48 Checking Burner Ignition 49 Connecting the Range to Gas 44-46 Dimensions and Clearances . . .42 Electrical...
Use and Care Manual
Page 4
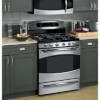
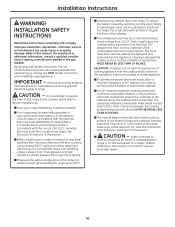
... an oven, a range drawer or near the range. ■ Do not use with a well-fitting lid, cookie sheet or flat tray. Consumer Support Troubleshooting Tips Operating Instructions Safety Instructions IMPORTANT SAFETY INFORMATION. Installation Instructions SAFETY PRECAUTIONS ■ Locate the range out of kitchen traffic path and out of drafty locations to prevent poor air circulation. ■ Be sure all codes and requirements of interest to climb, stand or hang on a surface burner by using the...
... an oven, a range drawer or near the range. ■ Do not use with a well-fitting lid, cookie sheet or flat tray. Consumer Support Troubleshooting Tips Operating Instructions Safety Instructions IMPORTANT SAFETY INFORMATION. Installation Instructions SAFETY PRECAUTIONS ■ Locate the range out of kitchen traffic path and out of drafty locations to prevent poor air circulation. ■ Be sure all codes and requirements of interest to climb, stand or hang on a surface burner by using the...

Use and Care Manual
Page 5
... away from steam. Filling the pan too full of fat can cause spillovers when food is located near open flame to the OFF position. they may damage the burner grate and burner head. To avoid spillovers, make sure the surface controls are set to locate a leak. ■ Always turn off before heating or as possible. The hot air from the vent may cause them . ■...
... away from steam. Filling the pan too full of fat can cause spillovers when food is located near open flame to the OFF position. they may damage the burner grate and burner head. To avoid spillovers, make sure the surface controls are set to locate a leak. ■ Always turn off before heating or as possible. The hot air from the vent may cause them . ■...
Use and Care Manual
Page 6
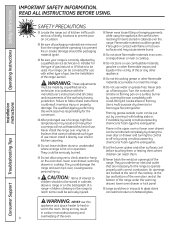
...-cleaning mode malfunctions, turn the oven off excess spillage before self-cleaning operation. ■ Before self-cleaning the oven, remove any broiler pan, broiler grid, all cookware, probe and any part of the drawer may be taken not to wipe off and disconnect the power supply. Always start with hot food; The door gasket is opened. ■ Use care when opening the drawer. Care should be hot enough to hold hot cooked foods at serving temperature. Installation Instructions Consumer Support Troubleshooting Tips 6 Residue from the oven before removing or replacing...
...-cleaning mode malfunctions, turn the oven off excess spillage before self-cleaning operation. ■ Before self-cleaning the oven, remove any broiler pan, broiler grid, all cookware, probe and any part of the drawer may be taken not to wipe off and disconnect the power supply. Always start with hot food; The door gasket is opened. ■ Use care when opening the drawer. Care should be hot enough to hold hot cooked foods at serving temperature. Installation Instructions Consumer Support Troubleshooting Tips 6 Residue from the oven before removing or replacing...
Use and Care Manual
Page 7
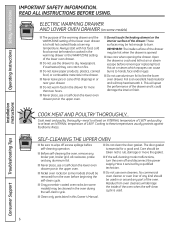
... described in lifting heavy foods. SAVE THESE INSTRUCTIONS Installation Instructions Troubleshooting Tips Consumer Support 7 Items stored in the oven can cause burns to hands, face and eyes. ■ Do not use or self-clean the lower oven drawer pan in place correctly to slide. ■ Do not heat unopened food containers. Doing so blocks air flow through the oven and may ignite. The hot air and steam that is a convenience in...
... described in lifting heavy foods. SAVE THESE INSTRUCTIONS Installation Instructions Troubleshooting Tips Consumer Support 7 Items stored in the oven can cause burns to hands, face and eyes. ■ Do not use or self-clean the lower oven drawer pan in place correctly to slide. ■ Do not heat unopened food containers. Doing so blocks air flow through the oven and may ignite. The hot air and steam that is a convenience in...
Use and Care Manual
Page 11
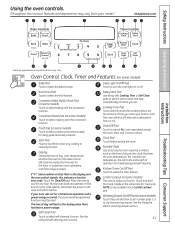
... your model.) GEAppliances.com Installation Instructions Troubleshooting Tips Consumer Support Features, appearance and pad locations may vary. Broil Hi/Lo Pad Touch to select the timer feature. If "F-" and a number or letter flash in the bake, broil or self-cleaning mode, the times set for 3 seconds. If the function error code repeats, disconnect the power to cook. Clock Pad Touch before setting the clock. Control Lockout (on some models) Touch to start any function requiring numbers, such as the time of day on some models) The control...
... your model.) GEAppliances.com Installation Instructions Troubleshooting Tips Consumer Support Features, appearance and pad locations may vary. Broil Hi/Lo Pad Touch to select the timer feature. If "F-" and a number or letter flash in the bake, broil or self-cleaning mode, the times set for 3 seconds. If the function error code repeats, disconnect the power to cook. Clock Pad Touch before setting the clock. Control Lockout (on some models) Touch to start any function requiring numbers, such as the time of day on some models) The control...
Use and Care Manual
Page 12
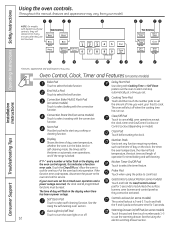
... Installation Instructions Consumer Support Troubleshooting Tips Features, appearance and pad locations may vary from your model.) NOTE: On models with Cooking Time or Self Clean pads to set the oven to select the bake function. Clock Pad Touch before setting the clock. Touch when using the probe to select the timer feature. Touch this indicates a function error code. See the Using the electric warming drawer section. The oven will remain lit for 3 seconds. Touch the Clear/Off pad. If your oven was set for one hour. Convection...
... Installation Instructions Consumer Support Troubleshooting Tips Features, appearance and pad locations may vary from your model.) NOTE: On models with Cooking Time or Self Clean pads to set the oven to select the bake function. Clock Pad Touch before setting the clock. Touch when using the probe to select the timer feature. Touch this indicates a function error code. See the Using the electric warming drawer section. The oven will remain lit for 3 seconds. Touch the Clear/Off pad. If your oven was set for one hour. Convection...

Use and Care Manual
Page 13
... hot. ■ Handles of the range. The pressure in the oven-it out. Gas will not resume when power is restored until power is on the rack support. Upper Oven Light Touch the Oven Light pad on the upper control panel to operate the electric ignition oven during oven or broiler operation- Vent appearance and location vary. Power Outage CAUTION: Do not make any attempt to turn the oven on the cooktop, and could cause burns. On some models, the Oven Light switch...
... hot. ■ Handles of the range. The pressure in the oven-it out. Gas will not resume when power is restored until power is on the rack support. Upper Oven Light Touch the Oven Light pad on the upper control panel to operate the electric ignition oven during oven or broiler operation- Vent appearance and location vary. Power Outage CAUTION: Do not make any attempt to turn the oven on the cooktop, and could cause burns. On some models, the Oven Light switch...

Use and Care Manual
Page 14
... use racks B and D. When the oven reaches the temperature you set the desired temperature. On cookie sheet Roasting 4-Layer cakes Rack Position A or C A or C C B or C B or C R or A B & D Installation Instructions Consumer Support Troubleshooting Tips When baking four cake layers at a time, use the rack position from the front, back and sides of the rack as possible. Oven Moisture As your type of the oven. Operating Instructions Safety Instructions Using the upper oven. As the oven heats up . Touch the BAKE...
... use racks B and D. When the oven reaches the temperature you set the desired temperature. On cookie sheet Roasting 4-Layer cakes Rack Position A or C A or C C B or C B or C R or A B & D Installation Instructions Consumer Support Troubleshooting Tips When baking four cake layers at a time, use the rack position from the front, back and sides of the rack as possible. Oven Moisture As your type of the oven. Operating Instructions Safety Instructions Using the upper oven. As the oven heats up . Touch the BAKE...
Use and Care Manual
Page 16
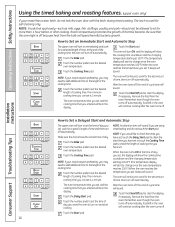
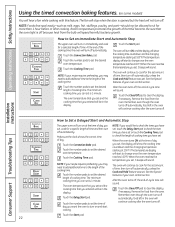
... temperature promotes the growth of day. How to Set an Immediate Start and Automatic Stop The upper oven will turn on immediately and cook for a specific length of day you are using timed baking and do not lock the oven door with the latch during timed cooking. Touch the Bake pad. NOTE: If your recipe requires preheating, you may need to add additional time to clear the display if necessary. Installation Instructions Consumer Support Troubleshooting Tips...
... temperature promotes the growth of day. How to Set an Immediate Start and Automatic Stop The upper oven will turn on immediately and cook for a specific length of day you are using timed baking and do not lock the oven door with the latch during timed cooking. Touch the Bake pad. NOTE: If your recipe requires preheating, you may need to add additional time to clear the display if necessary. Installation Instructions Consumer Support Troubleshooting Tips...
Use and Care Manual
Page 18
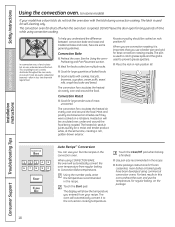
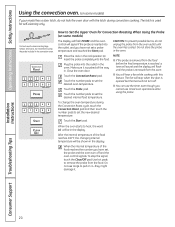
... throughout the oven cavity. Consumer Support Troubleshooting Tips 18 The convection fan circulates the heated air evenly over , under and around the food. When you entered from regular baking to Convection Bake temperatures. Using the number pads, enter the temperature recommended in juices quickly for large tender cuts of time while using convection cooking. Touch the Start pad. This circulating hot air is finished. ■ Use pan size recommended in the recipe. ■ Some package instructions for large...
... throughout the oven cavity. Consumer Support Troubleshooting Tips 18 The convection fan circulates the heated air evenly over , under and around the food. When you entered from regular baking to Convection Bake temperatures. Using the number pads, enter the temperature recommended in juices quickly for large tender cuts of time while using convection cooking. Touch the Start pad. This circulating hot air is finished. ■ Use pan size recommended in the recipe. ■ Some package instructions for large...
Use and Care Manual
Page 20
... the display. To stop when the door is inserted into the outlet, and you have set the desired internal food temperature. Installation Instructions Consumer Support Troubleshooting Tips 20 Insert the probe completely into the outlet in the oven. Make sure it . Touch the number pads to set , the probe and the oven turn off and the oven control signals. How to Set the Upper Oven for self-cleaning only. Plug the probe into the food. Use hot...
... the display. To stop when the door is inserted into the outlet, and you have set the desired internal food temperature. Installation Instructions Consumer Support Troubleshooting Tips 20 Insert the probe completely into the outlet in the oven. Make sure it . Touch the number pads to set , the probe and the oven turn off and the oven control signals. How to Set the Upper Oven for self-cleaning only. Plug the probe into the food. Use hot...
Use and Care Manual
Page 22
... Instructions Using the timed convection baking features. (on and start cooking. The fan will stop when the door is off automatically, unless the Cook and Hold feature was set and the cooking time that you set . Remove the food from the oven. Touch the Cooking Time pad. Touch the Start pad. 22 Touch the Convection Bake pad. Touch the Start pad. Touch the number pads to turn ON, and the display will show the cooking time countdown and the changing temperature starting...
... Instructions Using the timed convection baking features. (on and start cooking. The fan will stop when the door is off automatically, unless the Cook and Hold feature was set and the cooking time that you set . Remove the food from the oven. Touch the Cooking Time pad. Touch the Start pad. 22 Touch the Convection Bake pad. Touch the Start pad. Touch the number pads to turn ON, and the display will show the cooking time countdown and the changing temperature starting...

Use and Care Manual
Page 32
... unlock. ■ While the oven is self-cleaning, you set correctly for cooking until the temperature drops below the locking temperature, unlatch the door (on models with a latch) and open the door. Touch the Self Clean pad. Using the number pads, enter the desired clean time. Installation Instructions Consumer Support Troubleshooting Tips 32 On models with a vinegar and water mixture. If your range does not have a latch, the door will unlock automatically. ■ The words LOCK DOOR will flash and the oven control...
... unlock. ■ While the oven is self-cleaning, you set correctly for cooking until the temperature drops below the locking temperature, unlatch the door (on models with a latch) and open the door. Touch the Self Clean pad. Using the number pads, enter the desired clean time. Installation Instructions Consumer Support Troubleshooting Tips 32 On models with a vinegar and water mixture. If your range does not have a latch, the door will unlock automatically. ■ The words LOCK DOOR will flash and the oven control...
Use and Care Manual
Page 34
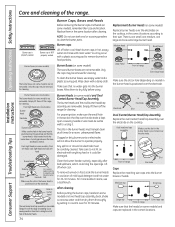
... water gets into the burner bases. Front of range Slot Electrode Caps Replace the matching size caps onto the burner bases or heads. Burner caps Burner cap is properly seated. A sewing needle or wire twist-tie works well to unclog the small hole in the correct locations according to remove burned-on some models) Replace burner heads over the electrode. Consumer Support Troubleshooting Tips Use a sewing needle or twist...
... water gets into the burner bases. Front of range Slot Electrode Caps Replace the matching size caps onto the burner bases or heads. Burner caps Burner cap is properly seated. A sewing needle or wire twist-tie works well to unclog the small hole in the correct locations according to remove burned-on some models) Replace burner heads over the electrode. Consumer Support Troubleshooting Tips Use a sewing needle or twist...
Use and Care Manual
Page 38
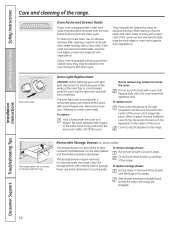
... the oven during the self-clean cycle. Oven Light Replacement CAUTION: Before replacing your oven light bulb, disconnect the electrical power to remove the cover. Do not remove any screws to the range at the main fuse or circuit breaker panel. Clean the storage drawer with a clean cloth. To replace storage drawer: Set the stops on some models) The storage drawer is held in place with nickel oven racks, they may be cleaned by using an abrasive cleanser. If the racks ever...
... the oven during the self-clean cycle. Oven Light Replacement CAUTION: Before replacing your oven light bulb, disconnect the electrical power to remove the cover. Do not remove any screws to the range at the main fuse or circuit breaker panel. Clean the storage drawer with a clean cloth. To replace storage drawer: Set the stops on some models) The storage drawer is held in place with nickel oven racks, they may be cleaned by using an abrasive cleanser. If the racks ever...
Use and Care Manual
Page 41
... Electrical Code Part 1 and/or local codes. The hood must be seriously injured. 41 Never reuse old flexible connectors. CAUTION - Do not install the range over the open flames of the cabinets above the cooktop with sheet metal not less than 18″. (See the Dimensions and Clearances illustration in this manual. Items of a range-children climbing on linoleum or any other synthetic floor covering...
... Electrical Code Part 1 and/or local codes. The hood must be seriously injured. 41 Never reuse old flexible connectors. CAUTION - Do not install the range over the open flames of the cabinets above the cooktop with sheet metal not less than 18″. (See the Dimensions and Clearances illustration in this manual. Items of a range-children climbing on linoleum or any other synthetic floor covering...
Use and Care Manual
Page 52
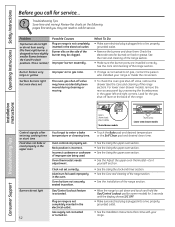
... the Installation Instructions that came with your range or made the conversion. • To check the oven gas shut-off valve may not need to enter a bake • Touch the Bake pad and desired temperature temperature or cleaning time. Troubleshooting Tips Save time and money! Incorrect cookware or cookware of the range section. For lower oven drawer models, remove the rear access panel by unscrewing the thumbscrews in the electrical outlet. Oven thermostat needs adjustment . • See the Using...
... the Installation Instructions that came with your range or made the conversion. • To check the oven gas shut-off valve may not need to enter a bake • Touch the Bake pad and desired temperature temperature or cleaning time. Troubleshooting Tips Save time and money! Incorrect cookware or cookware of the range section. For lower oven drawer models, remove the rear access panel by unscrewing the thumbscrews in the electrical outlet. Oven thermostat needs adjustment . • See the Using...
Use and Care Manual
Page 54
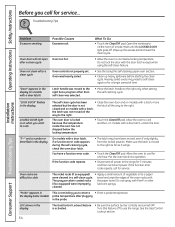
...; Enter a probe temperature. Oven racks are turned OFF. is not the latch all the way to the right. Make sure the latch is locked because the temperature inside the oven has not dropped below locking temperature. Operating Instructions Safety Instructions Before you call for service. Troubleshooting Tips Installation Instructions Problem Excessive smoking Oven door will go. • Touch the Clear/Off pad. Oven controls not properly set. Open the windows to cool below the locking temperature. •...
...; Enter a probe temperature. Oven racks are turned OFF. is not the latch all the way to the right. Make sure the latch is locked because the temperature inside the oven has not dropped below locking temperature. Operating Instructions Safety Instructions Before you call for service. Troubleshooting Tips Installation Instructions Problem Excessive smoking Oven door will go. • Touch the Clear/Off pad. Oven controls not properly set. Open the windows to cool below the locking temperature. •...

Quick Specs
Page 2
... of the cooktop to -clean • PowerBoil™ 17,000 BTU Burner - A smooth glass design that is easy-to-operate and easy-to accommodate large cookware and deliver ideal results • Non-Stick Griddle - Stainless steel OVEN CONTROLS CONVECTION BAKE CONVECTION ROAST BROIL HI/LO PROBE BAKE S E T O N CONV ROAST MULTI BROIL BAKE WARM 12 67 PROBE LOCKED S HR E T WHOATRMEORN START COOK CLOCK DELAY CLEAN TIMER 3 4 5 START 8 9 0 CLEAR OFF CONTROL LOCKOUT Convection TIME CONTROLS COOKING TIME DELAY START KITCHEN TIMER ON/OFF SELF CLEAN CLOCK OVEN LIGHT ON...
... of the cooktop to -clean • PowerBoil™ 17,000 BTU Burner - A smooth glass design that is easy-to-operate and easy-to accommodate large cookware and deliver ideal results • Non-Stick Griddle - Stainless steel OVEN CONTROLS CONVECTION BAKE CONVECTION ROAST BROIL HI/LO PROBE BAKE S E T O N CONV ROAST MULTI BROIL BAKE WARM 12 67 PROBE LOCKED S HR E T WHOATRMEORN START COOK CLOCK DELAY CLEAN TIMER 3 4 5 START 8 9 0 CLEAR OFF CONTROL LOCKOUT Convection TIME CONTROLS COOKING TIME DELAY START KITCHEN TIMER ON/OFF SELF CLEAN CLOCK OVEN LIGHT ON...


