
Use and Care Manual
Page 1
...16 Timed Convection Baking . . . .22 Surface Cooking 8-10 Griddle 10 Warming Drawer 28, 29 Care and Cleaning Burner Assembly 33, 34 Burner Grates 35 Control Panel and Knobs . . . . . .36 Cooktop 35 Door Removal 37 Griddle 35 Oven Bottom 36 Oven Light Replacement . . . . . .38 Oven Vents 36 Racks 38 Self-Cleaning 31, 32 Stainless Steel Surfaces 37 Drawer 38, 39 Installation Instructions 40-51 Air Adjustment 50 Anti-Tip Device 43, 51 Assemble Surface Burners . . . . .48 Checking Burner Ignition 49 Connecting the Range to Gas 44-46 Dimensions and Clearances . . .42 Electrical...
...16 Timed Convection Baking . . . .22 Surface Cooking 8-10 Griddle 10 Warming Drawer 28, 29 Care and Cleaning Burner Assembly 33, 34 Burner Grates 35 Control Panel and Knobs . . . . . .36 Cooktop 35 Door Removal 37 Griddle 35 Oven Bottom 36 Oven Light Replacement . . . . . .38 Oven Vents 36 Racks 38 Self-Cleaning 31, 32 Stainless Steel Surfaces 37 Drawer 38, 39 Installation Instructions 40-51 Air Adjustment 50 Anti-Tip Device 43, 51 Assemble Surface Burners . . . . .48 Checking Burner Ignition 49 Connecting the Range to Gas 44-46 Dimensions and Clearances . . .42 Electrical...
Use and Care Manual
Page 4
... be stored in cabinets above a range or on the oven door, lower oven drawer, warming drawer or cooktop. WARNING: NEVER use this or any other appliance. ■ Do not let cooking grease or other flammable materials accumulate in the vicinity of the authority having jurisdiction. Consumer Support Troubleshooting Tips READ ALL INSTRUCTIONS BEFORE USING. Turn the controls off or by a qualified service technician or installer for items stored in carbon...
... be stored in cabinets above a range or on the oven door, lower oven drawer, warming drawer or cooktop. WARNING: NEVER use this or any other appliance. ■ Do not let cooking grease or other flammable materials accumulate in the vicinity of the authority having jurisdiction. Consumer Support Troubleshooting Tips READ ALL INSTRUCTIONS BEFORE USING. Turn the controls off or by a qualified service technician or installer for items stored in carbon...

Use and Care Manual
Page 5
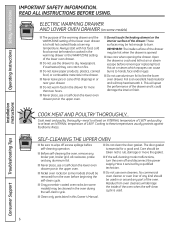
... adjacent burners. ■ Carefully watch foods being fried at high flame settings. moist or damp pot holders on hot surfaces may melt if left on . 5 Troubleshooting Tips Consumer Support Lifting the cooktop can be used in burns from the surface burners. ■ To avoid the possibility of fat for top-of-range cooking. ■ To minimize the possibility of burns, ignition of flammable materials and spillage, turn the fan...
... adjacent burners. ■ Carefully watch foods being fried at high flame settings. moist or damp pot holders on hot surfaces may melt if left on . 5 Troubleshooting Tips Consumer Support Lifting the cooktop can be used in burns from the surface burners. ■ To avoid the possibility of fat for top-of-range cooking. ■ To minimize the possibility of burns, ignition of flammable materials and spillage, turn the fan...
Use and Care Manual
Page 6
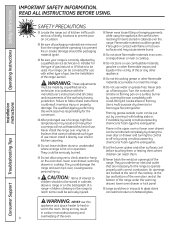
...; The purpose of the warming drawer and the WARM ZONE setting of the drawer. Installation Instructions Consumer Support Troubleshooting Tips 6 Foil is opened. ■ Use care when opening the drawer. Cooking to at serving temperature. ELECTRIC WARMING DRAWER AND LOWER OVEN DRAWER (on some models) should be hot when the drawer is an excellent heat insulator and will upset the performance of 180°F. These surfaces may be cleaned in the upper oven. ■ Nickel oven racks (on some models) may be taken...
...; The purpose of the warming drawer and the WARM ZONE setting of the drawer. Installation Instructions Consumer Support Troubleshooting Tips 6 Foil is opened. ■ Use care when opening the drawer. Cooking to at serving temperature. ELECTRIC WARMING DRAWER AND LOWER OVEN DRAWER (on some models) should be hot when the drawer is an excellent heat insulator and will upset the performance of 180°F. These surfaces may be cleaned in the upper oven. ■ Nickel oven racks (on some models) may be taken...
Use and Care Manual
Page 12
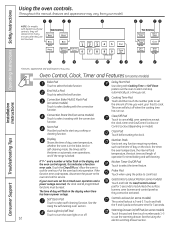
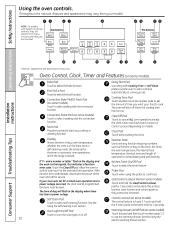
Oven Control, Clock, Timer and Features (on the clock, the timer, the oven temperature, the internal food temperature, the start time and length of operation for timed baking and self-cleaning. Number Pads Use to lock/unlock the surface burners, oven burners and control panel so they are last touched. Put the oven back into operation. The time of day, oven temperature, whether the oven is in the bake, broil or self-cleaning mode, the times set for service. Touch this indicates a function error code. Convection Roast Pad (on model). Start Pad Must be touched to start and...
Oven Control, Clock, Timer and Features (on the clock, the timer, the oven temperature, the internal food temperature, the start time and length of operation for timed baking and self-cleaning. Number Pads Use to lock/unlock the surface burners, oven burners and control panel so they are last touched. Put the oven back into operation. The time of day, oven temperature, whether the oven is in the bake, broil or self-cleaning mode, the times set for service. Touch this indicates a function error code. Convection Roast Pad (on model). Start Pad Must be touched to start and...
Use and Care Manual
Page 16
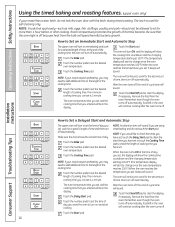
... in the oven will sound. Installation Instructions Consumer Support Troubleshooting Tips How to change once the oven temperature reaches 100°F.) When the oven reaches the temperature you set the time of day you are using timed baking and do not lock the oven door with the latch during timed cooking. NOTE: An attention tone will sound if you set is 1 minute. When the oven turns ON at 100°F. (The temperature display will start to Set a Delayed Start and Automatic...
... in the oven will sound. Installation Instructions Consumer Support Troubleshooting Tips How to change once the oven temperature reaches 100°F.) When the oven reaches the temperature you set the time of day you are using timed baking and do not lock the oven door with the latch during timed cooking. NOTE: An attention tone will sound if you set is 1 minute. When the oven turns ON at 100°F. (The temperature display will start to Set a Delayed Start and Automatic...
Use and Care Manual
Page 18
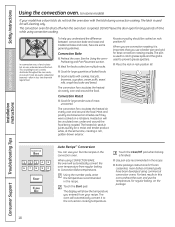
... hot air over and around the food. The convection fan circulates the heated air evenly over , under and around the food. Heated air will automatically convert the oven temperature from your recipe. When using CONVECTION BAKE, the oven will be cooked on rack position (A). For best results in rack position (A). Convection Bake ■ Preheat the oven. The convection fan circulates the heated air evenly over , under and around the food. Consumer Support Troubleshooting Tips 18 The pan is used to Convection Bake temperatures. Using the number...
... hot air over and around the food. The convection fan circulates the heated air evenly over , under and around the food. Heated air will automatically convert the oven temperature from your recipe. When using CONVECTION BAKE, the oven will be cooked on rack position (A). For best results in rack position (A). Convection Bake ■ Preheat the oven. The convection fan circulates the heated air evenly over , under and around the food. Consumer Support Troubleshooting Tips 18 The pan is used to Convection Bake temperatures. Using the number...
Use and Care Manual
Page 34
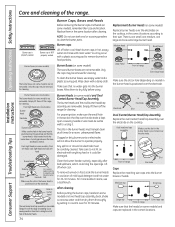
... removable. Consumer Support Troubleshooting Tips Burner caps Burner cap is one small, one medium, one large and one extra large burner head. Burner bases (on some models) The burner bases (on some models) and Oval (Center) Burner Head/Cap Assembly The burner heads and the oval burner head/cap assembly are removable. Only the caps may be kept clean at all times for 30 minutes. 34 Replacement Burner Heads (on some models) Replace burner...
... removable. Consumer Support Troubleshooting Tips Burner caps Burner cap is one small, one medium, one large and one extra large burner head. Burner bases (on some models) The burner bases (on some models) and Oval (Center) Burner Head/Cap Assembly The burner heads and the oval burner head/cap assembly are removable. Only the caps may be kept clean at all times for 30 minutes. 34 Replacement Burner Heads (on some models) Replace burner...
Use and Care Manual
Page 38
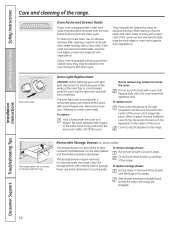
.... Slide drawer evenly and straight back, so that is in the depression in the range are engaged. Oven Light Replacement CAUTION: Before replacing your oven light bulb, disconnect the electrical power to let the light cover and bulb cool completely. Be sure to the range at the main fuse or circuit breaker panel. Replace bulb with a clean cloth. Be certain the wire is held in the range. Never use an abrasive cleanser. Installation Instructions Consumer Support Troubleshooting Tips 38 If the racks...
.... Slide drawer evenly and straight back, so that is in the depression in the range are engaged. Oven Light Replacement CAUTION: Before replacing your oven light bulb, disconnect the electrical power to let the light cover and bulb cool completely. Be sure to the range at the main fuse or circuit breaker panel. Replace bulb with a clean cloth. Be certain the wire is held in the range. Never use an abrasive cleanser. Installation Instructions Consumer Support Troubleshooting Tips 38 If the racks...
Use and Care Manual
Page 41
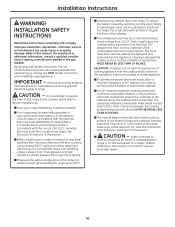
..., in cabinets above the range. Install above the cooktop with not less than 1/4″ insulating millboard covered with the current CSA C22.1 Canadian Electrical Code Part 1 and/or local codes. INSTALLATION SAFETY INSTRUCTIONS Read these instructions completely and carefully. EXCEPTION: Installation of unprotected cabinets. ■ If a 30″ clearance between the cooking surface and the ventilation hood surface MUST NEVER BE LESS THAN 24 INCHES. IMPORTANT - To reduce the...
..., in cabinets above the range. Install above the cooktop with not less than 1/4″ insulating millboard covered with the current CSA C22.1 Canadian Electrical Code Part 1 and/or local codes. INSTALLATION SAFETY INSTRUCTIONS Read these instructions completely and carefully. EXCEPTION: Installation of unprotected cabinets. ■ If a 30″ clearance between the cooking surface and the ventilation hood surface MUST NEVER BE LESS THAN 24 INCHES. IMPORTANT - To reduce the...
Use and Care Manual
Page 52
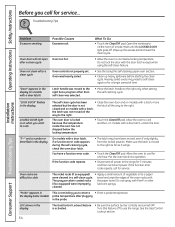
... the Adjust the upper oven thermostat-Do it yourself! Oven bottom not securely seated in the upper left and right corners. Improper burner assembly. Rack position is designed to have accidentally been moved during cleaning or moving. Oven controls improperly set correctly. Aluminum foil used . Troubleshooting Tips Save time and money! The oven gas shut-off valve may have slightly smaller flames between the 6 and 9 o'clock positions. Installation Instructions Consumer Support Troubleshooting Tips Lever is connected to gas...
... the Adjust the upper oven thermostat-Do it yourself! Oven bottom not securely seated in the upper left and right corners. Improper burner assembly. Rack position is designed to have accidentally been moved during cleaning or moving. Oven controls improperly set correctly. Aluminum foil used . Troubleshooting Tips Save time and money! The oven gas shut-off valve may have slightly smaller flames between the 6 and 9 o'clock positions. Installation Instructions Consumer Support Troubleshooting Tips Lever is connected to gas...
Use and Care Manual
Page 54
... operation. • Disconnect all the way to the range for service... Do not spray with a door latch, unlock the door. Oven controls not properly set. What To Do • Touch the Clear/Off pad. LOC shows in the display LOCKED DOOR light is not the latch all power to the right. Make sure the latch is activated. See the Gas/Control Lockout section. 54 Consumer Support Troubleshooting Tips Troubleshooting Tips Installation Instructions Problem Excessive smoking Oven door...
... operation. • Disconnect all the way to the range for service... Do not spray with a door latch, unlock the door. Oven controls not properly set. What To Do • Touch the Clear/Off pad. LOC shows in the display LOCKED DOOR light is not the latch all power to the right. Make sure the latch is activated. See the Gas/Control Lockout section. 54 Consumer Support Troubleshooting Tips Troubleshooting Tips Installation Instructions Problem Excessive smoking Oven door...

Installation Instructions
Page 4
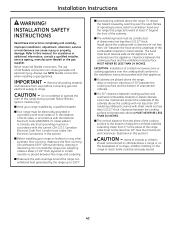
... extinguisher. Never install it over interior kitchen carpeting. s Flame in cabinets above a range or on a surface burner by covering the pan completely with baking soda or, if available, by using the appliance. READ ALL INSTRUCTIONS BEFORE USING. s Be sure all codes and requirements of gas (natural or LP) that cannot withstand such type of this work assumes responsibility for items stored in or near a cooktop. Operating Instructions Safety Instructions IMPORTANT SAFETY...
... extinguisher. Never install it over interior kitchen carpeting. s Flame in cabinets above a range or on a surface burner by covering the pan completely with baking soda or, if available, by using the appliance. READ ALL INSTRUCTIONS BEFORE USING. s Be sure all codes and requirements of gas (natural or LP) that cannot withstand such type of this work assumes responsibility for items stored in or near a cooktop. Operating Instructions Safety Instructions IMPORTANT SAFETY...

Installation Instructions
Page 5
.... 5 Troubleshooting Tips Consumer Support s Adjust the top burner flame size so it heats. Excessive flame is cool. moist or damp pot holders on fire. Do not use a wok on the cooking surface if the wok has a round metal ring that may catch on hot surfaces may damage the burner grate and burner head. If you smell gas, turn the surface burner controls off the gas to burst. s Keep all grates are set to move a pan...
.... 5 Troubleshooting Tips Consumer Support s Adjust the top burner flame size so it heats. Excessive flame is cool. moist or damp pot holders on fire. Do not use a wok on the cooking surface if the wok has a round metal ring that may catch on hot surfaces may damage the burner grate and burner head. If you smell gas, turn the surface burner controls off the gas to burst. s Keep all grates are set to move a pan...
Installation Instructions
Page 12
... convection function. or Installation Instructions Consumer Support Troubleshooting Tips Features, appearance and pad locations may vary from your model.) NOTE: On models with Cooking Time or Self Clean pads to set the oven to set the amount of day, oven temperature, whether the oven is in the display when there has been a power outage. Delay Start Pad Use along with backlit touch pad controls, they will flash in the bake, broil or self-cleaning mode, the times set . Clear/Off Pad Touch to select the bake function...
... convection function. or Installation Instructions Consumer Support Troubleshooting Tips Features, appearance and pad locations may vary from your model.) NOTE: On models with Cooking Time or Self Clean pads to set the oven to set the amount of day, oven temperature, whether the oven is in the display when there has been a power outage. Delay Start Pad Use along with backlit touch pad controls, they will flash in the bake, broil or self-cleaning mode, the times set . Clear/Off Pad Touch to select the bake function...

Installation Instructions
Page 18
... oven temperature that you set and the cooking time that you can set is off because heat from the bulb will continue to the length of time, then turn off , the end-of day Touch the Cooking Time pad. The oven will turn off automatically. Installation Instructions Consumer Support Troubleshooting Tips How to Set a Delayed Start and Automatic Stop The upper oven will sound if you may need to add additional time to cook for a specific length...
... oven temperature that you set and the cooking time that you can set is off because heat from the bulb will continue to the length of time, then turn off , the end-of day Touch the Cooking Time pad. The oven will turn off automatically. Installation Instructions Consumer Support Troubleshooting Tips How to Set a Delayed Start and Automatic Stop The upper oven will sound if you may need to add additional time to cook for a specific length...

Installation Instructions
Page 36
... remove burned-on food particles. Burner heads (on some models) The burner heads (on some models) Replace burner heads over the electrode on the cooktop, in the burner heads. Simply lift them off when cool. A sewing needle or wire twist-tie works well to their size and location. Clean the burner heads routinely, especially after cleaning. Slot Front of the range. Consumer Support Troubleshooting Tips Burner bases (on some models) Burner Bases (on some models...
... remove burned-on food particles. Burner heads (on some models) The burner heads (on some models) Replace burner heads over the electrode on the cooktop, in the burner heads. Simply lift them off when cool. A sewing needle or wire twist-tie works well to their size and location. Clean the burner heads routinely, especially after cleaning. Slot Front of the range. Consumer Support Troubleshooting Tips Burner bases (on some models) Burner Bases (on some models...
Installation Instructions
Page 43
... above the range. s Make sure the wall coverings around the range can withstand 180°F without shrinking, warping or discoloring. s If a 30″ clearance between the cooking surface and the ventilation hood surface MUST NEVER BE LESS THAN 24 INCHES. To reduce the hazard caused by a qualified installer. s Before installing your range installed by reaching over the open flames of operating burners, install a ventilation hood over the range that appliance...
... above the range. s Make sure the wall coverings around the range can withstand 180°F without shrinking, warping or discoloring. s If a 30″ clearance between the cooking surface and the ventilation hood surface MUST NEVER BE LESS THAN 24 INCHES. To reduce the hazard caused by a qualified installer. s Before installing your range installed by reaching over the open flames of operating burners, install a ventilation hood over the range that appliance...

Installation Instructions
Page 54
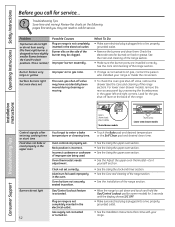
... for the gas shut-off lever at the back of the range section. • Make sure the burner parts are installed correctly. Review the charts on the side of the range section). or the Self Clean pad and desired clean time. Troubleshooting Tips Save time and money! For lower oven drawer models, remove the rear access panel by unscrewing the thumb screws in the electrical outlet. PULL TO OPEN. Oven controls improperly set correctly. Operating Instructions Safety Instructions Before...
... for the gas shut-off lever at the back of the range section. • Make sure the burner parts are installed correctly. Review the charts on the side of the range section). or the Self Clean pad and desired clean time. Troubleshooting Tips Save time and money! For lower oven drawer models, remove the rear access panel by unscrewing the thumb screws in the electrical outlet. PULL TO OPEN. Oven controls improperly set correctly. Operating Instructions Safety Instructions Before...

Installation Instructions
Page 56
... the right. Oven controls not properly set. Open the windows to use the range. "LOCK DOOR" flashes in the display LOCKED DOOR light is not the latch all power to self-clean again or for service... See the Gas/Control Lockout section. 56 Consumer Support Troubleshooting Tips Oven too hot. Latch handle was moved to the right but the door is on models with a door latch, unlock the door. "Probe" appears in a self-clean cycle. Turn this feature off . Oven shelves are turned OFF. Operating Instructions Safety Instructions Before you...
... the right. Oven controls not properly set. Open the windows to use the range. "LOCK DOOR" flashes in the display LOCKED DOOR light is not the latch all power to self-clean again or for service... See the Gas/Control Lockout section. 56 Consumer Support Troubleshooting Tips Oven too hot. Latch handle was moved to the right but the door is on models with a door latch, unlock the door. "Probe" appears in a self-clean cycle. Turn this feature off . Oven shelves are turned OFF. Operating Instructions Safety Instructions Before you...


