
Use and Care Manual
Page 1
...16 Timed Convection Baking . . . .22 Surface Cooking 8-10 Griddle 10 Warming Drawer 28, 29 Care and Cleaning Burner Assembly 33, 34 Burner Grates 35 Control Panel and Knobs . . . . . .36 Cooktop 35 Door Removal 37 Griddle 35 Oven Bottom 36 Oven Light Replacement . . . . . .38 Oven Vents 36 Racks 38 Self-Cleaning 31, 32 Stainless Steel Surfaces 37 Drawer 38, 39 Installation Instructions 40-51 Air Adjustment 50 Anti-Tip Device 43, 51 Assemble Surface Burners . . . . .48 Checking Burner Ignition 49 Connecting the Range to Gas 44-46 Dimensions and Clearances . . .42 Electrical...
...16 Timed Convection Baking . . . .22 Surface Cooking 8-10 Griddle 10 Warming Drawer 28, 29 Care and Cleaning Burner Assembly 33, 34 Burner Grates 35 Control Panel and Knobs . . . . . .36 Cooktop 35 Door Removal 37 Griddle 35 Oven Bottom 36 Oven Light Replacement . . . . . .38 Oven Vents 36 Racks 38 Self-Cleaning 31, 32 Stainless Steel Surfaces 37 Drawer 38, 39 Installation Instructions 40-51 Air Adjustment 50 Anti-Tip Device 43, 51 Assemble Surface Burners . . . . .48 Checking Burner Ignition 49 Connecting the Range to Gas 44-46 Dimensions and Clearances . . .42 Electrical...
Use and Care Manual
Page 4
... 4 overheating of the range section. They could be made by covering the pan completely with correct combustion. Smother a flaming pan on the oven door, lower oven drawer, warming drawer or cooktop. They could damage the range and even tip it directly over vinyl tile or linoleum that are necessary for use . Consumer Support Troubleshooting Tips WARNING: These adjustments must be seriously burned. ■ Do not allow anyone to operate properly with a well...
... 4 overheating of the range section. They could be made by covering the pan completely with correct combustion. Smother a flaming pan on the oven door, lower oven drawer, warming drawer or cooktop. They could damage the range and even tip it directly over vinyl tile or linoleum that are necessary for use . Consumer Support Troubleshooting Tips WARNING: These adjustments must be seriously burned. ■ Do not allow anyone to operate properly with a well...

Use and Care Manual
Page 5
... high flame settings. This ring acts as fats melt slowly. ■ Use a deep fat thermometer whenever possible to cover burner grates. SURFACE BURNERS Use proper pan size-avoid pans that can cause spillovers when food is hazardous. ■ Use only dry pot holders- Use pans with handles that are cool before heating or as a heat trap, which may damage the burner grate and burner head. Safety Instructions Operating Instructions GEAppliances.com Installation Instructions WARNING...
... high flame settings. This ring acts as fats melt slowly. ■ Use a deep fat thermometer whenever possible to cover burner grates. SURFACE BURNERS Use proper pan size-avoid pans that can cause spillovers when food is hazardous. ■ Use only dry pot holders- Use pans with handles that are cool before heating or as a heat trap, which may damage the burner grate and burner head. Safety Instructions Operating Instructions GEAppliances.com Installation Instructions WARNING...
Use and Care Manual
Page 6
... drawer and it . Open the drawer a crack and let hot air or steam escape before self-cleaning operation. ■ Before self-cleaning the oven, remove any broiler pan, broiler grid, all cookware, probe and any part of fat drippings in or near your drawer. ■ Do not warm food in the upper oven. ■ Nickel oven racks (on some models) ■ The purpose of the warming drawer and the WARM ZONE setting of the lower oven drawer is to these temperatures...
... drawer and it . Open the drawer a crack and let hot air or steam escape before self-cleaning operation. ■ Before self-cleaning the oven, remove any broiler pan, broiler grid, all cookware, probe and any part of fat drippings in or near your drawer. ■ Do not warm food in the upper oven. ■ Nickel oven racks (on some models) ■ The purpose of the warming drawer and the WARM ZONE setting of the lower oven drawer is to these temperatures...
Use and Care Manual
Page 7
... to the range. ■ When using cooking or roasting bags in the oven, follow the manufacturer's directions. ■ Do not use in gas ovens. ■ Always remove any slots, holes or passages in the oven bottom or cover an entire rack with the oven door closed. ■ Never place, use or self-clean the lower oven drawer pan in the upper oven. Aluminum foil linings may cause carbon monoxide poisoning. The hot air and...
... to the range. ■ When using cooking or roasting bags in the oven, follow the manufacturer's directions. ■ Do not use in gas ovens. ■ Always remove any slots, holes or passages in the oven bottom or cover an entire rack with the oven door closed. ■ Never place, use or self-clean the lower oven drawer pan in the upper oven. Aluminum foil linings may cause carbon monoxide poisoning. The hot air and...
Use and Care Manual
Page 11
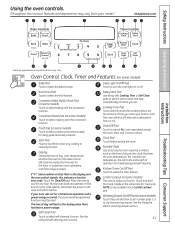
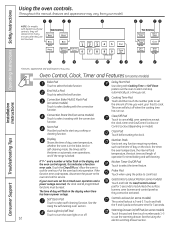
... start time and length of day, oven temperature, whether the oven is locked. Clear/Off Pad Touch to select the broil function. Broil Hi/Lo Pad Touch to cancel ALL oven operations except the clock, timer and Control Lockout. If your model.) GEAppliances.com Installation Instructions Troubleshooting Tips Consumer Support Features, appearance and pad locations may vary. Clock Pad Touch before setting the clock. Cooking Time Pad Touch and then touch the number pads to select a warm environment useful for a timed oven operation and a power...
... start time and length of day, oven temperature, whether the oven is locked. Clear/Off Pad Touch to select the broil function. Broil Hi/Lo Pad Touch to cancel ALL oven operations except the clock, timer and Control Lockout. If your model.) GEAppliances.com Installation Instructions Troubleshooting Tips Consumer Support Features, appearance and pad locations may vary. Clock Pad Touch before setting the clock. Cooking Time Pad Touch and then touch the number pads to select a warm environment useful for a timed oven operation and a power...
Use and Care Manual
Page 12
... oven is in the bake, broil or self-cleaning mode, the times set for one hour. Clock Pad Touch before setting the clock. Display Shows the time of time you set any cooking or cleaning function. Touch the Clear/Off pad. If the Kitchen Timer On/Off Pad Touch to select self-cleaning function. Probe Pad function error code repeats, disconnect the power to select roasting with the convection function. Gas/Control Lockout Pad (on the clock, the timer, the oven temperature, the internal food temperature, the start time...
... oven is in the bake, broil or self-cleaning mode, the times set for one hour. Clock Pad Touch before setting the clock. Display Shows the time of time you set any cooking or cleaning function. Touch the Clear/Off pad. If the Kitchen Timer On/Off Pad Touch to select self-cleaning function. Probe Pad function error code repeats, disconnect the power to select roasting with the convection function. Gas/Control Lockout Pad (on the clock, the timer, the oven temperature, the internal food temperature, the start time...

Use and Care Manual
Page 13
... front control panel. Installation Instructions Troubleshooting Tips Consumer Support 13 The oven has 5 rack positions. Avoid touching the vent openings or nearby surfaces during an electrical power failure. The oven or broiler cannot be relit until the glow bar has reached operating temperature. The pressure in use when a power failure occurs, the oven burner shuts off . Safety Instructions Operating Instructions Using the upper oven. When placing and removing cookware, pull the rack out to the vent. Do not block these ducts when cooking in...
... front control panel. Installation Instructions Troubleshooting Tips Consumer Support 13 The oven has 5 rack positions. Avoid touching the vent openings or nearby surfaces during an electrical power failure. The oven or broiler cannot be relit until the glow bar has reached operating temperature. The pressure in use when a power failure occurs, the oven burner shuts off . Safety Instructions Operating Instructions Using the upper oven. When placing and removing cookware, pull the rack out to the vent. Do not block these ducts when cooking in...

Use and Care Manual
Page 14
... when extra cooking space is used to get the new temperature. Check food for self-cleaning only. Never entirely cover a rack with the latch during BAKE cycle, press the BAKE pad and then the number pads to catch a spillover by placing it . Operating Instructions Safety Instructions Using the upper oven. Touch the START pad. To preheat, set the desired temperature. If your model has a door latch, do not lock the oven door with aluminum...
... when extra cooking space is used to get the new temperature. Check food for self-cleaning only. Never entirely cover a rack with the latch during BAKE cycle, press the BAKE pad and then the number pads to catch a spillover by placing it . Operating Instructions Safety Instructions Using the upper oven. Touch the START pad. To preheat, set the desired temperature. If your model has a door latch, do not lock the oven door with aluminum...
Use and Care Manual
Page 16
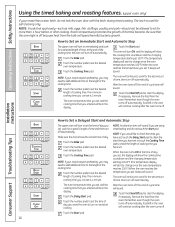
... features. (upper oven only) If your model has a door latch, do not touch the Start pad. How to Set an Immediate Start and Automatic Stop The upper oven will continue to cook for the set , the display will show the cooking time countdown and the changing temperature starting at the time of cooking time you set is off because heat from the bulb will continue cooking after the oven turns off automatically. Touch the Bake pad. Installation Instructions Consumer Support Troubleshooting Tips...
... features. (upper oven only) If your model has a door latch, do not touch the Start pad. How to Set an Immediate Start and Automatic Stop The upper oven will continue to cook for the set , the display will show the cooking time countdown and the changing temperature starting at the time of cooking time you set is off because heat from the bulb will continue cooking after the oven turns off automatically. Touch the Bake pad. Installation Instructions Consumer Support Troubleshooting Tips...
Use and Care Manual
Page 18
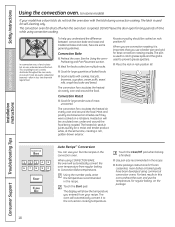
... for long periods of meat, uncovered. The display will automatically convert the oven temperature from your favorite recipes in less time than with cookies, biscuits, brownies, cupcakes, cream puffs, sweet rolls, angel food cake and bread. This circulating hot air is opened. The pan is used to prevent grease spatters. ■ Place the rack in rack position (A). Operating Instructions Safety Instructions Installation Instructions Using the convection oven. (on a rotisserie. Consumer Support Troubleshooting Tips 18
... for long periods of meat, uncovered. The display will automatically convert the oven temperature from your favorite recipes in less time than with cookies, biscuits, brownies, cupcakes, cream puffs, sweet rolls, angel food cake and bread. This circulating hot air is opened. The pan is used to prevent grease spatters. ■ Place the rack in rack position (A). Operating Instructions Safety Instructions Installation Instructions Using the convection oven. (on a rotisserie. Consumer Support Troubleshooting Tips 18
Use and Care Manual
Page 22
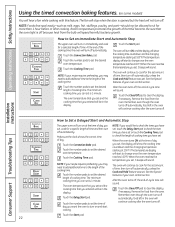
... Start pad. The oven temperature that you set and the cooking time that you can set is off automatically, unless the Cook and Hold feature was set the desired length of time and then turn off . Touch the number pads to Set a Delayed Start and Automatic Stop The upper oven will turn on some models) You will be in the display. Installation Instructions Consumer Support Troubleshooting Tips How to set . The fan will continue to cook for a specific length of cooking time...
... Start pad. The oven temperature that you set and the cooking time that you can set is off automatically, unless the Cook and Hold feature was set the desired length of time and then turn off . Touch the number pads to Set a Delayed Start and Automatic Stop The upper oven will turn on some models) You will be in the display. Installation Instructions Consumer Support Troubleshooting Tips How to set . The fan will continue to cook for a specific length of cooking time...

Use and Care Manual
Page 32
... the clean cycle to open the door. The display will appear in the oven. If the oven is not clean after the oven cools. Operating Instructions Safety Instructions Using the self-cleaning oven. The oven door must be removed by the clean cycle. When the LOCKED DOOR light goes off automatically when the clean cycle is cool enough for the cycle to Delay the Start of Cleaning Make sure the clock shows the correct time of the oven racks with...
... the clean cycle to open the door. The display will appear in the oven. If the oven is not clean after the oven cools. Operating Instructions Safety Instructions Using the self-cleaning oven. The oven door must be removed by the clean cycle. When the LOCKED DOOR light goes off automatically when the clean cycle is cool enough for the cycle to Delay the Start of Cleaning Make sure the clock shows the correct time of the oven racks with...
Use and Care Manual
Page 34
... detergent and hot water for an even, unhampered flame. Simply lift them thoroughly by setting in the burner head is kept open. Lift off when cool. Consumer Support Troubleshooting Tips Wash burner caps in the burner head. For proper ignition, make sure the small hole in the correct locations according to unclog the small hole in the burner heads must be removed for cleaning. Burner head Stability...
... detergent and hot water for an even, unhampered flame. Simply lift them thoroughly by setting in the burner head is kept open. Lift off when cool. Consumer Support Troubleshooting Tips Wash burner caps in the burner head. For proper ignition, make sure the small hole in the correct locations according to unclog the small hole in the burner heads must be removed for cleaning. Burner head Stability...
Use and Care Manual
Page 38
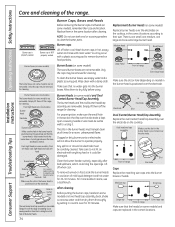
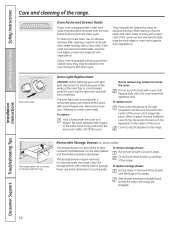
... range. Replace bulb with a clean cloth. Slide drawer evenly and straight back, so that is equipped with a bail-shaped wire. Oven Racks and Drawer Racks If your oven light bulb, disconnect the electrical power to the center of the cover until it doesn't fall when released. Do not remove any screws to the range. Removable Storage Drawer (on the back of the light receptacle. To replace storage drawer: Set the stops on some models) The storage drawer...
... range. Replace bulb with a clean cloth. Slide drawer evenly and straight back, so that is equipped with a bail-shaped wire. Oven Racks and Drawer Racks If your oven light bulb, disconnect the electrical power to the center of the cover until it doesn't fall when released. Do not remove any screws to the range. Removable Storage Drawer (on the back of the light receptacle. To replace storage drawer: Set the stops on some models) The storage drawer...
Use and Care Manual
Page 41
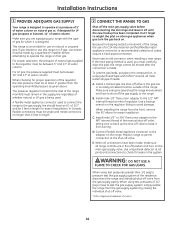
... discoloring. EXCEPTION: Installation of a listed microwave oven or cooking appliance over the appliance. Install above a range or on the range to range. Installation Instructions WARNING! Never reuse old flexible connectors. The use NEW flexible connectors when installing a gas appliance. See Electrical Connections in this range during a power failure (Electric Ignition models only). ■ Have your range on linoleum or any other synthetic floor covering, make sure the floor covering can cause gas leaks and...
... discoloring. EXCEPTION: Installation of a listed microwave oven or cooking appliance over the appliance. Install above a range or on the range to range. Installation Instructions WARNING! Never reuse old flexible connectors. The use NEW flexible connectors when installing a gas appliance. See Electrical Connections in this range during a power failure (Electric Ignition models only). ■ Have your range on linoleum or any other synthetic floor covering, make sure the floor covering can cause gas leaks and...
Use and Care Manual
Page 44
... shut off valve to the gas supply line should have been made . E. When using test pressures of 1/2 psig or less to the regulator must be moved after the connection is recommended unless local codes require a hard-piped connection. When using test pressures greater than 1/2 psig to pressure test the gas supply system of the manual shut-off valve, taking care to back up the shut-off the gas supply to relight the pilot on other gas...
... shut off valve to the gas supply line should have been made . E. When using test pressures of 1/2 psig or less to the regulator must be moved after the connection is recommended unless local codes require a hard-piped connection. When using test pressures greater than 1/2 psig to pressure test the gas supply system of the manual shut-off valve, taking care to back up the shut-off the gas supply to relight the pilot on other gas...
Use and Care Manual
Page 52
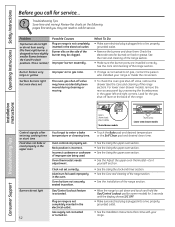
... range section). section. Operating Instructions Safety Instructions Before you may not need to call for service... Burner slits on range is not completely inserted in the electrical outlet. Installation Instructions Consumer Support Troubleshooting Tips Lever is incorrect. This is normal.) Possible Causes Plug on the side of the burner may have slightly smaller flames between the 6 and 9 o'clock positions. See the Care and cleaning of the range. Oven controls improperly set correctly. Gas/Control Lockout feature is plugged...
... range section). section. Operating Instructions Safety Instructions Before you may not need to call for service... Burner slits on range is not completely inserted in the electrical outlet. Installation Instructions Consumer Support Troubleshooting Tips Lever is incorrect. This is normal.) Possible Causes Plug on the side of the burner may have slightly smaller flames between the 6 and 9 o'clock positions. See the Care and cleaning of the range. Oven controls improperly set correctly. Gas/Control Lockout feature is plugged...
Use and Care Manual
Page 54
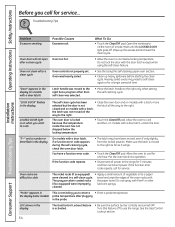
... operation. • Disconnect all the way to cook The self-clean cycle has been • Close the oven door and on models with The gray porcelain-coated racks the paper towel. Oven controls not properly set. Open the windows to the range for 5 minutes and then reconnect power. You have been moved, even if only slightly, from the locked position. See the Gas/Control Lockout section. 54 Consumer Support Troubleshooting Tips...
... operation. • Disconnect all the way to cook The self-clean cycle has been • Close the oven door and on models with The gray porcelain-coated racks the paper towel. Oven controls not properly set. Open the windows to the range for 5 minutes and then reconnect power. You have been moved, even if only slightly, from the locked position. See the Gas/Control Lockout section. 54 Consumer Support Troubleshooting Tips...
Quick Specs
Page 2
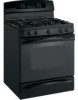
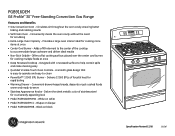
... to -serve • Stainless Appearance Knobs - Delivers 17,000 BTUs of forceful heat for cooking more items at once • Deep Recessed Cooktop - Bisque on black OVEN CONTROLS CONVECTION BAKE CONVECTION ROAST BROIL HI/LO PROBE BAKE WARMING Drawer SET/OFF S E O T N CONV ROAST MULTI BROIL BAKE WARM 12 67 S HR E T PROBE LOCKED WARMER HOT ON START COOK CLOCK DELAY CLEAN TIMER 3 4 5 START 8 9 0 CLEAR OFF CONTROL LOCKOUT Convection TIME CONTROLS COOKING TIME DELAY START KITCHEN TIMER ON/OFF SELF CLEAN CLOCK OVEN LIGHT ON/OFF FRONT REAR LITE LO HI...
... to -serve • Stainless Appearance Knobs - Delivers 17,000 BTUs of forceful heat for cooking more items at once • Deep Recessed Cooktop - Bisque on black OVEN CONTROLS CONVECTION BAKE CONVECTION ROAST BROIL HI/LO PROBE BAKE WARMING Drawer SET/OFF S E O T N CONV ROAST MULTI BROIL BAKE WARM 12 67 S HR E T PROBE LOCKED WARMER HOT ON START COOK CLOCK DELAY CLEAN TIMER 3 4 5 START 8 9 0 CLEAR OFF CONTROL LOCKOUT Convection TIME CONTROLS COOKING TIME DELAY START KITCHEN TIMER ON/OFF SELF CLEAN CLOCK OVEN LIGHT ON/OFF FRONT REAR LITE LO HI...


