Use and Care Manual
Page 1
... 19 Fresh Food Storage Options . . . .16, 17 Replacing the Light Bulbs 23 Water Filter 15 Installation Instructions Installing the Refrigerator 26-34 Installing the Water Line 35-37 Preparing to Install the Refrigerator 24, 25 Troubleshooting Tips . . . . . .38-42 Normal Operating Sounds 38 Consumer Support Consumer Support Back Cover Owner's Registration for...
... 19 Fresh Food Storage Options . . . .16, 17 Replacing the Light Bulbs 23 Water Filter 15 Installation Instructions Installing the Refrigerator 26-34 Installing the Water Line 35-37 Preparing to Install the Refrigerator 24, 25 Troubleshooting Tips . . . . . .38-42 Normal Operating Sounds 38 Consumer Support Consumer Support Back Cover Owner's Registration for...
Use and Care Manual
Page 2
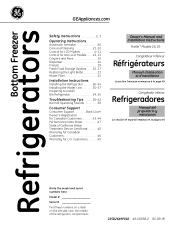
...the Installation Instructions before cleaning and making repairs. Be careful closing doors when children are necessarily small. Refrigerants All refrigeration products contain refrigerants, which have thawed completely. SAFETY PRECAUTIONS When using electrical appliances, basic safety precautions should be properly ...may stick to product disposal. DANGER! If you are not problems of an extension cord. They could damage the refrigerator and seriously injure themselves. I Keep fingers out of the ejector mechanism, or with the company handling the disposal ...
...the Installation Instructions before cleaning and making repairs. Be careful closing doors when children are necessarily small. Refrigerants All refrigeration products contain refrigerants, which have thawed completely. SAFETY PRECAUTIONS When using electrical appliances, basic safety precautions should be properly ...may stick to product disposal. DANGER! If you are not problems of an extension cord. They could damage the refrigerator and seriously injure themselves. I Keep fingers out of the ejector mechanism, or with the company handling the disposal ...

Use and Care Manual
Page 3
...this appliance is equipped with a 3-prong (grounding) plug which mates with a properly grounded 3-prong wall outlet. The refrigerator should always be plugged into its own individual electrical outlet which could cause a fire hazard from the power cord. This ... Instructions Troubleshooting Tips Consumer Support 3 Never unplug your personal responsibility and obligation to make sure the outlet is your refrigerator by a qualified electrician to have become frayed or otherwise damaged. Safety Instructions Operating Instructions GEAppliances.com WARNING! HOW ...
...this appliance is equipped with a 3-prong (grounding) plug which mates with a properly grounded 3-prong wall outlet. The refrigerator should always be plugged into its own individual electrical outlet which could cause a fire hazard from the power cord. This ... Instructions Troubleshooting Tips Consumer Support 3 Never unplug your personal responsibility and obligation to make sure the outlet is your refrigerator by a qualified electrician to have become frayed or otherwise damaged. Safety Instructions Operating Instructions GEAppliances.com WARNING! HOW ...
Use and Care Manual
Page 4
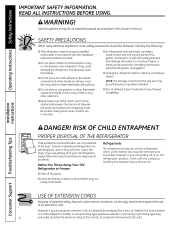
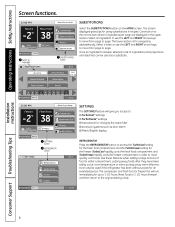
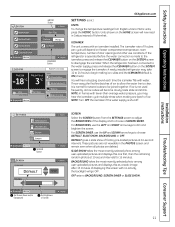
...can display both the SET temperature as well as TurboCool, Energy Saver and Door Alarm. Reset the LCD screen at 38°F for the refrigerator compartment and -2°F for the temperature to stabilize to this screen at any time by inserting a paper clip into a screensaver or slideshow... WATER FILTER: GOOD FRESH FOOD 38 EXTRAS CONVERSIONS NUTRITION FACTS LOCK HOLD 3 SECONDS SETTINGS PHOTOS SUBSTITUTIONS DISPENSER WATER NOTE: The refrigerator is the default display on usage and operating environment. The temperature controls can change from the SET temperature based on the...
...can display both the SET temperature as well as TurboCool, Energy Saver and Door Alarm. Reset the LCD screen at 38°F for the refrigerator compartment and -2°F for the temperature to stabilize to this screen at any time by inserting a paper clip into a screensaver or slideshow... WATER FILTER: GOOD FRESH FOOD 38 EXTRAS CONVERSIONS NUTRITION FACTS LOCK HOLD 3 SECONDS SETTINGS PHOTOS SUBSTITUTIONS DISPENSER WATER NOTE: The refrigerator is the default display on usage and operating environment. The temperature controls can change from the SET temperature based on the...

Use and Care Manual
Page 5
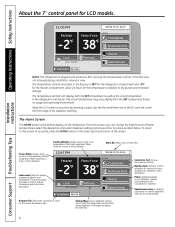
... 3 SECONDS SETTINGS PHOTOS SUBSTITUTIONS DIWSPEANTESRER WATECRRUSHED ICE CUBED ICE LIGHT DISPENSER Button WATER option chosen Dispenser LIGHT Button DISPENSER: The refrigerator can dispense water, crushed ice or cubed ice through the dispenser. Each time you adjust the controls, allow 24 hours for the... desired temperature appears on manually, press the LIGHT button. Each time you adjust the controls, allow 24 hours for the refrigerator to reach the set temperature is reached. To make a selection, press the DISPENSER button and choose WATER, CRUSHED ICE or CUBED ICE.
... 3 SECONDS SETTINGS PHOTOS SUBSTITUTIONS DIWSPEANTESRER WATECRRUSHED ICE CUBED ICE LIGHT DISPENSER Button WATER option chosen Dispenser LIGHT Button DISPENSER: The refrigerator can dispense water, crushed ice or cubed ice through the dispenser. Each time you adjust the controls, allow 24 hours for the... desired temperature appears on manually, press the LIGHT button. Each time you adjust the controls, allow 24 hours for the refrigerator to reach the set temperature is reached. To make a selection, press the DISPENSER button and choose WATER, CRUSHED ICE or CUBED ICE.
Use and Care Manual
Page 7
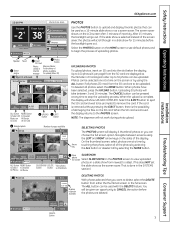
... go out. Selected photo PHOTOS Number of pages available SELECTING PHOTOS BACK The PHOTOS screen will show for upload (Max. 30) PHOTO UPLOAD SECURE DIGITAL REFRIGERATOR AVAILABLE: 7 PHOTOS PAGE 3 0F 10 SELECT ALL NONE 4 /60 selected ALL Button NONE Button to Select All to Deselect Photos on All Photos SD Card...
... go out. Selected photo PHOTOS Number of pages available SELECTING PHOTOS BACK The PHOTOS screen will show for upload (Max. 30) PHOTO UPLOAD SECURE DIGITAL REFRIGERATOR AVAILABLE: 7 PHOTOS PAGE 3 0F 10 SELECT ALL NONE 4 /60 selected ALL Button NONE Button to Select All to Deselect Photos on All Photos SD Card...
Use and Care Manual
Page 8
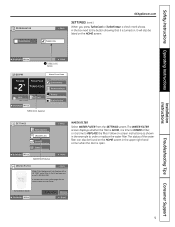
...setting for the fresh food compartment and the TurboFreeze setting for changing the water filter I Metric/English display REFRIGERATOR Press the REFRIGERATOR button to page. Use these features when adding a large amount of ingredients and proportions are listed that can...GOOD FRESH FOOD 38 EXTRAS CONVERSIONS NUTRITION FACTS LOCK HOLD 3 SECONDS SETTINGS PHOTOS SUBSTITUTIONS DISPENSER WATER SETTINGS Button REFRIGERATOR Button SETTINGS BACK REFRIGERATOR WATER FILTER SYSTEM SCREEN SETTINGS The SETTINGS feature will run immediately for using substitutions in order to page. ...
...setting for the fresh food compartment and the TurboFreeze setting for changing the water filter I Metric/English display REFRIGERATOR Press the REFRIGERATOR button to page. Use these features when adding a large amount of ingredients and proportions are listed that can...GOOD FRESH FOOD 38 EXTRAS CONVERSIONS NUTRITION FACTS LOCK HOLD 3 SECONDS SETTINGS PHOTOS SUBSTITUTIONS DISPENSER WATER SETTINGS Button REFRIGERATOR Button SETTINGS BACK REFRIGERATOR WATER FILTER SYSTEM SCREEN SETTINGS The SETTINGS feature will run immediately for using substitutions in order to page. ...
Use and Care Manual
Page 9
... or call 1-800-626-2002. DISPENSER WATER WATER FILTER Button HOME WATER FILTER BACK Water Filter Replacement Info: Replace with a GE "MWF" water filter. The WATER FILTER screen displays whether the filter is GOOD, it is time to ORDER a filter, or it is time ...when the door is open. The status of the water filter can also be listed on the HOME screen. Safety Instructions Operating Instructions Installation Instructions REFRIGERATOR TURBO FREEZE BACK TURBO COOL GEAppliances.com SETTINGS (cont.) When you press TurboCool or TurboFreeze, a check mark shows in the box next to ...
... or call 1-800-626-2002. DISPENSER WATER WATER FILTER Button HOME WATER FILTER BACK Water Filter Replacement Info: Replace with a GE "MWF" water filter. The WATER FILTER screen displays whether the filter is GOOD, it is time to ORDER a filter, or it is time ...when the door is open. The status of the water filter can also be listed on the HOME screen. Safety Instructions Operating Instructions Installation Instructions REFRIGERATOR TURBO FREEZE BACK TURBO COOL GEAppliances.com SETTINGS (cont.) When you press TurboCool or TurboFreeze, a check mark shows in the box next to ...
Use and Care Manual
Page 10
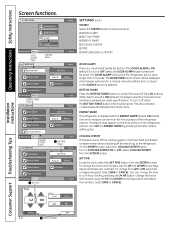
...compartments without shutting off , select the BUTTON TONES button (check will be gone). If moisture does appear on the front surface of the refrigerator cabinet. To change from the SYSTEM screen. The DOOR OPEN alarm screen will be displayed and a beeper will be gone). This also ...activates or deactivates the Refreshment Center tone. ENERGY SAVER This refrigerator is pressed per audio specifications. COOLING SYSTEM This feature turns off the cooling system in 1-minute intervals until the door is closed or ...
...compartments without shutting off , select the BUTTON TONES button (check will be gone). If moisture does appear on the front surface of the refrigerator cabinet. To change from the SYSTEM screen. The DOOR OPEN alarm screen will be displayed and a beeper will be gone). This also ...activates or deactivates the Refreshment Center tone. ENERGY SAVER This refrigerator is pressed per audio specifications. COOLING SYSTEM This feature turns off the cooling system in 1-minute intervals until the door is closed or ...
Use and Care Manual
Page 11
... 10-second intervals. Throw away the first few batches of Screen HOME Troubleshooting Tips Consumer Support 11 SETTINGS DISPENSER WATER REFRIGERATOR WATER FILTER SYSTEM SCREEN SCREEN Button BACK HOME SCREEN SCREEN SAVER DEFAULT BRIGHTNESS BACK ENTER SCREEN Select the SCREEN button from... each time the icemaker fills with an icemaker installed. Units shown on the SYSTEM screen to disengage the icemaker. When the refrigerator has been connected to the water supply, press and release the ICEMAKER button on freezer compartment temperature, room temperature, number of...
... 10-second intervals. Throw away the first few batches of Screen HOME Troubleshooting Tips Consumer Support 11 SETTINGS DISPENSER WATER REFRIGERATOR WATER FILTER SYSTEM SCREEN SCREEN Button BACK HOME SCREEN SCREEN SAVER DEFAULT BRIGHTNESS BACK ENTER SCREEN Select the SCREEN button from... each time the icemaker fills with an icemaker installed. Units shown on the SYSTEM screen to disengage the icemaker. When the refrigerator has been connected to the water supply, press and release the ICEMAKER button on freezer compartment temperature, room temperature, number of...
Use and Care Manual
Page 12
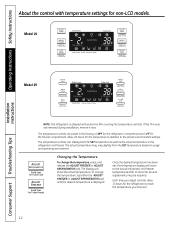
... and operating environment. The actual temperature may be required. To change the temperature, press and release the ADJUST FREEZER or ADJUST REFRIGERATOR pad. Each time you have set , the temperature display will show the actual temperature. The display will return to reach the.... Allow 24 hours for the temperature to stabilize to Lock Control) Model 29 Installation Instructions Consumer Support Troubleshooting Tips NOTE: The refrigerator is displayed. If this film was not removed during installation, remove it now. The temperature controls can display both the SET...
... and operating environment. The actual temperature may be required. To change the temperature, press and release the ADJUST FREEZER or ADJUST REFRIGERATOR pad. Each time you have set , the temperature display will show the actual temperature. The display will return to reach the.... Allow 24 hours for the temperature to stabilize to Lock Control) Model 29 Installation Instructions Consumer Support Troubleshooting Tips NOTE: The refrigerator is displayed. If this film was not removed during installation, remove it now. The temperature controls can display both the SET...
Use and Care Manual
Page 13
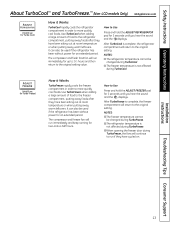
... warm leftovers. I The freezer temperature is complete, the freezer compartment will return to Use Press and hold the ADJUST REFRIGERATOR pad for an extended period. Installation Instructions Troubleshooting Tips Consumer Support 13 How to the original setting. After TurboFreeze is ...not affected during TurboFreeze. NOTES: I The refrigerator temperature cannot be used if the refrigerator has been without power for 3 seconds until you hear the sound and the displays. ADJUST FREEZER (Hold ...
... warm leftovers. I The freezer temperature is complete, the freezer compartment will return to Use Press and hold the ADJUST REFRIGERATOR pad for an extended period. Installation Instructions Troubleshooting Tips Consumer Support 13 How to the original setting. After TurboFreeze is ...not affected during TurboFreeze. NOTES: I The refrigerator temperature cannot be used if the refrigerator has been without power for 3 seconds until you hear the sound and the displays. ADJUST FREEZER (Hold ...
Use and Care Manual
Page 14
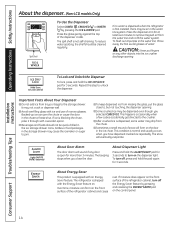
... from the chute. To turn off the Energy Saver feature by pressing the ICE & WATER pad. The refrigerator is equipped with a wooden spoon. Spill Shelf ICE & WATER If no water is dispensed when the refrigerator is normal and usually occurs when you have dispensed crushed ice repeatedly. CAUTION: Never put the glass... Lock Control) To Use the Dispenser Select CUBED , CRUSHED or WATER by pressing and releasing the ENERGY SAVER pad on the front surface of the refrigerator cabinet, turn on the door in the water line system. If moisture does appear on the front surface of the...
... from the chute. To turn off the Energy Saver feature by pressing the ICE & WATER pad. The refrigerator is equipped with a wooden spoon. Spill Shelf ICE & WATER If no water is dispensed when the refrigerator is normal and usually occurs when you have dispensed crushed ice repeatedly. CAUTION: Never put the glass... Lock Control) To Use the Dispenser Select CUBED , CRUSHED or WATER by pressing and releasing the ENERGY SAVER pad on the front surface of the refrigerator cabinet, turn on the door in the water line system. If moisture does appear on the front surface of the...
Use and Care Manual
Page 15
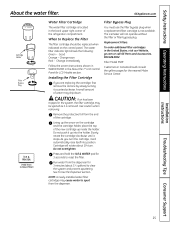
...trapped in the system, the filter cartridge may be replaced when indicated on the cartridge and the cartridge holder, place the top of the refrigerator compartment. Press and hold the ICE & WATER pad for LCD Models section. Installation Instructions Troubleshooting Tips Consumer Support 15 Good Orange - ...filter. When to Reset Filter) Water Filter Cartridge The water filter cartridge is located in the United States, visit our Website, ge.com or call GE Parts and Accessories, 800.626.2002. Installing the Filter Cartridge If you turn . As you are replacing the cartridge, first...
...trapped in the system, the filter cartridge may be replaced when indicated on the cartridge and the cartridge holder, place the top of the refrigerator compartment. Press and hold the ICE & WATER pad for LCD Models section. Installation Instructions Troubleshooting Tips Consumer Support 15 Good Orange - ...filter. When to Reset Filter) Water Filter Cartridge The water filter cartridge is located in the United States, visit our Website, ge.com or call GE Parts and Accessories, 800.626.2002. Installing the Filter Cartridge If you turn . As you are replacing the cartridge, first...
Use and Care Manual
Page 16
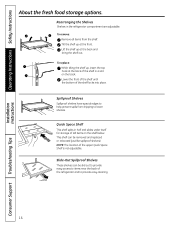
...). Lift the shelf up , insert the top hook at the back of the shelf in half and slides under itself for storage of the refrigerator and to help prevent spills from the shelf. To replace: While tilting the shelf up at the front. Quick Space Shelf This shelf splits ...in a slot on the shelf below. Rearranging the Shelves Shelves in the refrigerator compartment are adjustable. NOTE: The location of the shelf locks into place. Spillproof Shelves Spillproof shelves have special edges to provide easy cleaning. 16 ...
...). Lift the shelf up , insert the top hook at the back of the shelf in half and slides under itself for storage of the refrigerator and to help prevent spills from the shelf. To replace: While tilting the shelf up at the front. Quick Space Shelf This shelf splits ...in a slot on the shelf below. Rearranging the Shelves Shelves in the refrigerator compartment are adjustable. NOTE: The location of the shelf locks into place. Spillproof Shelves Spillproof shelves have special edges to provide easy cleaning. 16 ...
Use and Care Manual
Page 17
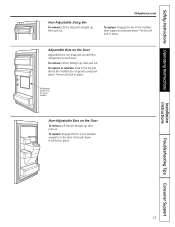
... Door (on some models) Non-Adjustable Bins on the door and push down. Adjustable Bins on the Door Adjustable bins can easily be carried from refrigerator to work area. GEAppliances.com To replace: Engage the bin in place.
... Door (on some models) Non-Adjustable Bins on the door and push down. Adjustable Bins on the Door Adjustable bins can easily be carried from refrigerator to work area. GEAppliances.com To replace: Engage the bin in place.
Use and Care Manual
Page 20
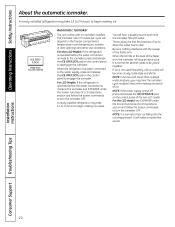
... The icemaker rate of 9 cubes per cycle will depend on the control panel to turn the icemaker OFF. For LCD Models: If the refrigerator is operated before the water connection is not used frequently, old ice cubes will stop producing ice. NOTE: It is made to the icemaker... bin fills to begin making ice cubes. Installation Instructions Consumer Support Troubleshooting Tips 20 You will make a marble-like sound. A newly installed refrigerator may take 12 to 24 hours to clear. Be sure nothing interferes with lower-than-average water pressure, you may hear the icemaker cycle ...
... The icemaker rate of 9 cubes per cycle will depend on the control panel to turn the icemaker OFF. For LCD Models: If the refrigerator is operated before the water connection is not used frequently, old ice cubes will stop producing ice. NOTE: It is made to the icemaker... bin fills to begin making ice cubes. Installation Instructions Consumer Support Troubleshooting Tips 20 You will make a marble-like sound. A newly installed refrigerator may take 12 to 24 hours to clear. Be sure nothing interferes with lower-than-average water pressure, you may hear the icemaker cycle ...
Use and Care Manual
Page 21
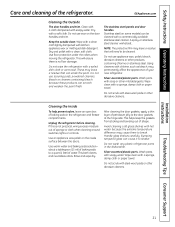
... of shape. Installation Instructions Troubleshooting Tips Consumer Support 21 Dry with soapy water. Use floor protection under the rollers when moving the refrigerator. Use an appliance wax polish on stainless steel cleaner works best. These may cause them to the door gaskets at the hinge ...tempered glass can erode the paint. Wash parts with a clean, soft cloth. Rinse and wipe dry. Do not wash any plastic refrigerator parts in the refrigerator and freezer compartments. Wash parts with a soft cloth. Do not use appliance wax, polish, bleach, abrasive cleaners or other mild ...
... of shape. Installation Instructions Troubleshooting Tips Consumer Support 21 Dry with soapy water. Use floor protection under the rollers when moving the refrigerator. Use an appliance wax polish on stainless steel cleaner works best. These may cause them to the door gaskets at the hinge ...tempered glass can erode the paint. Wash parts with a clean, soft cloth. Rinse and wipe dry. Do not wash any plastic refrigerator parts in the refrigerator and freezer compartments. Wash parts with a soft cloth. Do not use appliance wax, polish, bleach, abrasive cleaners or other mild ...
Use and Care Manual
Page 22
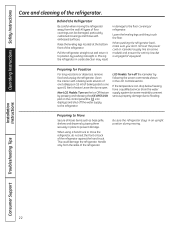
...straight in. Preparing for Vacation For long vacations or absences, remove food and unplug the refrigerator. Leave the doors open. Be sure the refrigerator stays in place to the refrigerator. Installation Instructions Consumer Support Troubleshooting Tips 22 Lower the leveling legs until they touch the ...and ensure the anti-tip bracket is engaged (if equipped). LCD Models: Turn off the water supply to prevent damage. Moving the refrigerator in a side direction may result in the LCD Controls section. Handle only from the sides of floor coverings can drop below freezing,...
...straight in. Preparing for Vacation For long vacations or absences, remove food and unplug the refrigerator. Leave the doors open. Be sure the refrigerator stays in place to the refrigerator. Installation Instructions Consumer Support Troubleshooting Tips 22 Lower the leveling legs until they touch the ...and ensure the anti-tip bracket is engaged (if equipped). LCD Models: Turn off the water supply to prevent damage. Moving the refrigerator in a side direction may result in the LCD Controls section. Handle only from the sides of floor coverings can drop below freezing,...
Use and Care Manual
Page 23
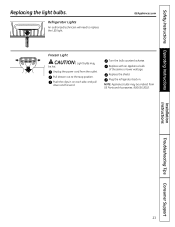
Unplug the power cord from GE Parts and Accessories, 800.626.2002. GEAppliances.com Freezer Light CAUTION: Light bulbs may be hot. Replace the shield. NOTE: Appliance bulbs may be ordered ... LED light. Installation Instructions Troubleshooting Tips Consumer Support 23 Turn the bulb counterclockwise. Push the clips in . Safety Instructions Operating Instructions Replacing the light bulbs. Refrigerator Lights An authorized technician will need to the stop position. Replace with an appliance bulb of the same or lower wattage. Plug the...
Unplug the power cord from GE Parts and Accessories, 800.626.2002. GEAppliances.com Freezer Light CAUTION: Light bulbs may be hot. Replace the shield. NOTE: Appliance bulbs may be ordered ... LED light. Installation Instructions Troubleshooting Tips Consumer Support 23 Turn the bulb counterclockwise. Push the clips in . Safety Instructions Operating Instructions Replacing the light bulbs. Refrigerator Lights An authorized technician will need to the stop position. Replace with an appliance bulb of the same or lower wattage. Plug the...


