Owners Manual
Page 6
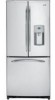
... will feel it "click" as it locks into place. Filter Model GSWF Customers in the United States, visit our Website, ge.com, or call GE Parts and Accessories, 800.626.2002. Use caution when removing. Close the cartridge cover. Replacement Filters: To order additional filter .... Lining up the arrow on the end of the cartridge should be positioned vertically. Run water from the dispenser. See To Use the Dispenser section. A small amount of water to spurt from the dispenser for 3 seconds. The grip on the cartridge and the cartridge holder, slowly rotate the ...
... will feel it "click" as it locks into place. Filter Model GSWF Customers in the United States, visit our Website, ge.com, or call GE Parts and Accessories, 800.626.2002. Use caution when removing. Close the cartridge cover. Replacement Filters: To order additional filter .... Lining up the arrow on the end of the cartridge should be positioned vertically. Run water from the dispenser. See To Use the Dispenser section. A small amount of water to spurt from the dispenser for 3 seconds. The grip on the cartridge and the cartridge holder, slowly rotate the ...
Owners Manual
Page 11
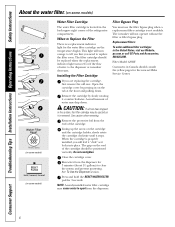
...hear the icemaker cycle multiple times when making ice cubes. Throw away the first few batches of the dispenser cradle. If ice is made to fill the water system. Icemaker Accessory Kit If your model. Check the back of the refrigerator for the specific icemaker... the power switch. The spill shelf is normal for how to lock the dispenser and control panel. Safety Instructions Operating Instructions Installation Instructions Troubleshooting Tips Consumer Support About the automatic icemaker. ge.com Power Switch Green Power Light Icemaker Feeler Arm Automatic Icemaker (on ) ...
...hear the icemaker cycle multiple times when making ice cubes. Throw away the first few batches of the dispenser cradle. If ice is made to fill the water system. Icemaker Accessory Kit If your model. Check the back of the refrigerator for the specific icemaker... the power switch. The spill shelf is normal for how to lock the dispenser and control panel. Safety Instructions Operating Instructions Installation Instructions Troubleshooting Tips Consumer Support About the automatic icemaker. ge.com Power Switch Green Power Light Icemaker Feeler Arm Automatic Icemaker (on ) ...
Owners Manual
Page 17
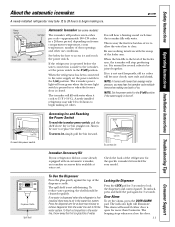
... - MATERIALS YOU MAY NEED (not included) Lag Bolts Anchor Sleeves Drill Bit Appropriate for local inspector's use. • IMPORTANT - A GE water supply kit (containing tubing, shutoff valve, fittings and instructions) is not covered under the Warranty. Observe all governing codes and ordinances. •... 1 in Canada at ge.com (in the Reversing the Door Swing section. • To remove the freezer drawer, see the Removing the Freezer Drawer section. Installation Instructions Refrigerator Models 21 and 25 Questions? WATER SUPPLY TO THE ICEMAKER AND DISPENSER (ON SOME MODELS) If...
... - MATERIALS YOU MAY NEED (not included) Lag Bolts Anchor Sleeves Drill Bit Appropriate for local inspector's use. • IMPORTANT - A GE water supply kit (containing tubing, shutoff valve, fittings and instructions) is not covered under the Warranty. Observe all governing codes and ordinances. •... 1 in Canada at ge.com (in the Reversing the Door Swing section. • To remove the freezer drawer, see the Removing the Freezer Drawer section. Installation Instructions Refrigerator Models 21 and 25 Questions? WATER SUPPLY TO THE ICEMAKER AND DISPENSER (ON SOME MODELS) If...
Owners Manual
Page 20
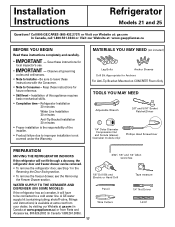
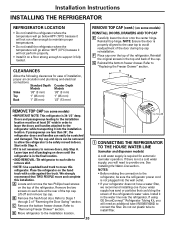
...Models Sides 1/8″ (3 mm) 1/8″ (3 mm) Top 1″ (25 mm) 1″ (25 mm) Back 1″ (25 mm) 1/2″ (13 mm) REMOVE TOP CAP (cont.) (on the...water line near the refrigerator. Place the refrigerator on some models) •IMPORTANT NOTE: This refrigerator is not plugged into the installation location. Lift off and remove top cap. Refer to connect the filter. If using GE... Top Hinge B 1 CONNECTING THE REFRIGERATOR TO THE HOUSE WATER LINE (icemaker and dispenser models) A cold water supply is in order to leave the doors and handles attached to Steps 1 ...
...Models Sides 1/8″ (3 mm) 1/8″ (3 mm) Top 1″ (25 mm) 1″ (25 mm) Back 1″ (25 mm) 1/2″ (13 mm) REMOVE TOP CAP (cont.) (on the...water line near the refrigerator. Place the refrigerator on some models) •IMPORTANT NOTE: This refrigerator is not plugged into the installation location. Lift off and remove top cap. Refer to connect the filter. If using GE... Top Hinge B 1 CONNECTING THE REFRIGERATOR TO THE HOUSE WATER LINE (icemaker and dispenser models) A cold water supply is in order to leave the doors and handles attached to Steps 1 ...
Owners Manual
Page 21
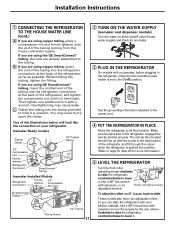
... refrigerator, and fit through the cutout when the refrigerator is set to pry open the clamp. 2 TURN ON THE WATER SUPPLY (icemaker and dispenser models) Turn the water on your kitchen cabinets. If you are already assembled to turn with an icemaker, before plugging in position. You may...wrench with extension to the tubing. clockwise to raise the refrigerator, counterclockwise to lower it. B If you are using the GE SmartConnect™ tubing, the nuts are using GE SmartConnect™ tubing, insert the molded end of the tubing into position. (Refer to page 18, Step 2A for ...
... refrigerator, and fit through the cutout when the refrigerator is set to pry open the clamp. 2 TURN ON THE WATER SUPPLY (icemaker and dispenser models) Turn the water on your kitchen cabinets. If you are already assembled to turn with an icemaker, before plugging in position. You may...wrench with extension to the tubing. clockwise to raise the refrigerator, counterclockwise to lower it. B If you are using the GE SmartConnect™ tubing, the nuts are using GE SmartConnect™ tubing, insert the molded end of the tubing into position. (Refer to page 18, Step 2A for ...
Owners Manual
Page 30
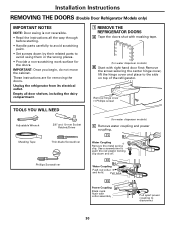
...the instructions all door shelves, including the dairy compartment. 1 REMOVE THE REFRIGERATOR DOORS A Tape the doors shut with masking tape. (for water dispenser models) B Start with collar assembly Pull apart power coupling to avoid using them in the wrong places. • Provide a non-scratching ...outlet. Use a screwdriver to the side on top of the refrigerator. Pull tube. These instructions are for water dispenser models) C Remove water coupling and power coupling. C1 Water Coupling Remove the metal spring clip. IMPORTANT: Once you begin, do not move the cabinet. Empty all...
...the instructions all door shelves, including the dairy compartment. 1 REMOVE THE REFRIGERATOR DOORS A Tape the doors shut with masking tape. (for water dispenser models) B Start with collar assembly Pull apart power coupling to avoid using them in the wrong places. • Provide a non-scratching ...outlet. Use a screwdriver to the side on top of the refrigerator. Pull tube. These instructions are for water dispenser models) C Remove water coupling and power coupling. C1 Water Coupling Remove the metal spring clip. IMPORTANT: Once you begin, do not move the cabinet. Empty all...

Owners Manual
Page 36
... after an icemaking cycle, you may hear the fans spinning at initial dispense and after dispenser button is tripped. This is added to end. The fans are helping to pressure equalizing within the refrigerator. s A water dripping noise may not need adjusting. • Move the control to the... sound while it is unplugged. s On models with an icemaker, after defrost can cause a sizzling, popping or buzzing sound during water dispense, you may cause a gurgling sound due to call for service. Control in order to provide optimal cooling and energy savings. s On models ...
... after an icemaking cycle, you may hear the fans spinning at initial dispense and after dispenser button is tripped. This is added to end. The fans are helping to pressure equalizing within the refrigerator. s A water dripping noise may not need adjusting. • Move the control to the... sound while it is unplugged. s On models with an icemaker, after defrost can cause a sizzling, popping or buzzing sound during water dispense, you may cause a gurgling sound due to call for service. Control in order to provide optimal cooling and energy savings. s On models ...
Owners Manual
Page 39
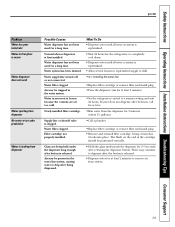
... not being certain that it locks into place. Water in the water system. Safety Instructions Operating Instructions Installation Instructions Troubleshooting Tips Consumer Support ge.com Problem Water has poor taste/odor Water in first glass is warm Water dispenser does not work Water spurting from dispenser No water or ice cube production Water is leaking from system. 39 Normal when refrigerator...
... not being certain that it locks into place. Water in the water system. Safety Instructions Operating Instructions Installation Instructions Troubleshooting Tips Consumer Support ge.com Problem Water has poor taste/odor Water in first glass is warm Water dispenser does not work Water spurting from dispenser No water or ice cube production Water is leaking from system. 39 Normal when refrigerator...


