
Owners Manual
Page 1
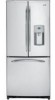
... side, near the top of California Water Treatment Device Certificate . . . . .48 Warranty for Canadian Customers 46 Warranty for U.S. ge.com Bottom Refr igeratoFreezerrs Safety Instructions 2, 3 Operating Instructions Additional Features 8 Automatic Icemaker 11 Care and Cleaning 12-13 Controls 4-5 Crispers ... Floor Bracket 18-19 Installing the Refrigerator . . . .20-24 Installing the Water Line . . . . .33-35 Preparing to Install the Refrigerator 17 Removing and Replacing the Freezer Drawer 25, 26 Reversing the Door Swing (Single Door Refrigerator Models only 27-29 Removing and ...
... side, near the top of California Water Treatment Device Certificate . . . . .48 Warranty for Canadian Customers 46 Warranty for U.S. ge.com Bottom Refr igeratoFreezerrs Safety Instructions 2, 3 Operating Instructions Additional Features 8 Automatic Icemaker 11 Care and Cleaning 12-13 Controls 4-5 Crispers ... Floor Bracket 18-19 Installing the Refrigerator . . . .20-24 Installing the Water Line . . . . .33-35 Preparing to Install the Refrigerator 17 Removing and Replacing the Freezer Drawer 25, 26 Reversing the Door Swing (Single Door Refrigerator Models only 27-29 Removing and ...

Owners Manual
Page 2
...a grounding 2 type plug and outlet and that children may stick to product disposal. WARNING! Skin may not easily climb inside. s Unplug the refrigerator before it be a UL-listed (in the United States) or a CSA certified (in place so that the electrical rating of the ejector mechanism...to help prevent accidents. s Do not touch the cold surfaces in the freezer compartment when hands are in the vicinity of an old refrigeration product, check with the heating element that any other appliance. s Do not refreeze frozen foods which under certain conditions, we strongly ...
...a grounding 2 type plug and outlet and that children may stick to product disposal. WARNING! Skin may not easily climb inside. s Unplug the refrigerator before it be a UL-listed (in the United States) or a CSA certified (in place so that the electrical rating of the ejector mechanism...to help prevent accidents. s Do not touch the cold surfaces in the freezer compartment when hands are in the vicinity of an old refrigeration product, check with the heating element that any other appliance. s Do not refreeze frozen foods which under certain conditions, we strongly ...
Owners Manual
Page 3
... damaged. Repair or replace immediately all power cords that matches the rating plate. When moving the refrigerator away from the outlet. SAVE THESE INSTRUCTIONS 3 Always grip plug firmly and pull straight out from...cut or remove the third (ground) prong from overheated wires. For personal safety, this appliance. The refrigerator should always be properly grounded. This provides the best performance and also prevents overloading house wiring circuits which ... Operating Instructions Installation Instructions Troubleshooting Tips Consumer Support ge.com WARNING!
... damaged. Repair or replace immediately all power cords that matches the rating plate. When moving the refrigerator away from the outlet. SAVE THESE INSTRUCTIONS 3 Always grip plug firmly and pull straight out from...cut or remove the third (ground) prong from overheated wires. For personal safety, this appliance. The refrigerator should always be properly grounded. This provides the best performance and also prevents overloading house wiring circuits which ... Operating Instructions Installation Instructions Troubleshooting Tips Consumer Support ge.com WARNING!

Owners Manual
Page 4
...actual temperature. Setting either or both controls to OFF stops cooling in both the freezer and refrigerator compartments, but does not shut off , tap the WARMER pad for either the refrigerator or freezer. To change the temperature, tap either the WARMER or COLDER touch pads until... in both the SET temperature as well as the actual temperature in the factory at 37°F for the refrigerator compartment and 0°F for the refrigerator to the actual refrigerator and freezer temperatures after 5 4 seconds. Allow 24 hours for the temperature to stabilize to the preset points ...
...actual temperature. Setting either or both controls to OFF stops cooling in both the freezer and refrigerator compartments, but does not shut off , tap the WARMER pad for either the refrigerator or freezer. To change the temperature, tap either the WARMER or COLDER touch pads until... in both the SET temperature as well as the actual temperature in the factory at 37°F for the refrigerator compartment and 0°F for the refrigerator to the actual refrigerator and freezer temperatures after 5 4 seconds. Allow 24 hours for the temperature to stabilize to the preset points ...
Owners Manual
Page 5
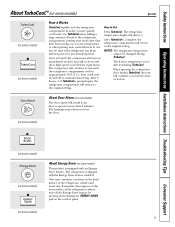
... Saver feature by pressing and releasing the ENERGY SAVER pad on the control panel. (on some models) This product is pressed again, the refrigerator compartment will return to Use Press TurboCool. The compressor will continue to run if they have cycled on. After TurboCool is shipped with an ...as needed for more quickly cool foods. Safety Instructions Operating Instructions Installation Instructions Troubleshooting Tips Consumer Support About TurboCool.™ (on some models) ge.com (on some models) (on some models) How it will cycle on and off to maintain this setting.
... Saver feature by pressing and releasing the ENERGY SAVER pad on the control panel. (on some models) This product is pressed again, the refrigerator compartment will return to Use Press TurboCool. The compressor will continue to run if they have cycled on. After TurboCool is shipped with an ...as needed for more quickly cool foods. Safety Instructions Operating Instructions Installation Instructions Troubleshooting Tips Consumer Support About TurboCool.™ (on some models) ge.com (on some models) (on some models) How it will cycle on and off to maintain this setting.
Owners Manual
Page 6
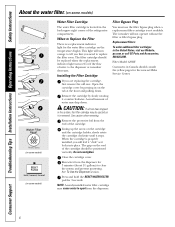
... Canada should consult the yellow pages for 3 seconds. CAUTION: If air has been trapped in the United States, visit our Website, ge.com, or call GE Parts and Accessories, 800.626.2002. Do not overtighten. Press and hold the RESET WATER FILTER pad for the nearest Mabe Service Center... to the dispenser or icemaker decreases. When the cartridge is a replacement indicator light for the water filter cartridge on the end of the refrigerator compartment. This light will turn orange to tell you that you are replacing the cartridge, first remove the old one. Remove the protective ...
... Canada should consult the yellow pages for 3 seconds. CAUTION: If air has been trapped in the United States, visit our Website, ge.com, or call GE Parts and Accessories, 800.626.2002. Do not overtighten. Press and hold the RESET WATER FILTER pad for the nearest Mabe Service Center... to the dispenser or icemaker decreases. When the cartridge is a replacement indicator light for the water filter cartridge on the end of the refrigerator compartment. This light will turn orange to tell you that you are replacing the cartridge, first remove the old one. Remove the protective ...

Owners Manual
Page 7
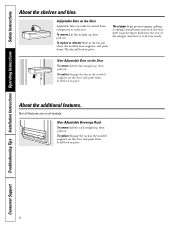
...the shelf forward until the central tabs are on some models) The slide-out spillproof shelf allows you close the door. 7 Refrigerator Compartment To remove: Remove all models. ge.com Spillproof Shelves (on all items from shelf. Make sure that can be adjusted in front of the shelf locks into ...Shelves in . The special edges are adjustable. Lower the front of the shelf until it is horizontal and slide the shelf in the refrigerator compartment are designed to help prevent spills from side to lower shelves. Slide-Out Spillproof Shelf (on the shelf frame.
...the shelf forward until the central tabs are on some models) The slide-out spillproof shelf allows you close the door. 7 Refrigerator Compartment To remove: Remove all models. ge.com Spillproof Shelves (on all items from shelf. Make sure that can be adjusted in front of the shelf locks into ...Shelves in . The special edges are adjustable. Lower the front of the shelf until it is horizontal and slide the shelf in the refrigerator compartment are designed to help prevent spills from side to lower shelves. Slide-Out Spillproof Shelf (on the shelf frame.
Owners Manual
Page 8
... rack straight up , then pull out. To replace or relocate: Slide in the molded supports on the Door Adjustable bins can easily be carried from refrigerator to fit your needs. The bin will lock in place. Non-Adjustable Bins on the door shelf. Grip the finger hold near the rear of...
... rack straight up , then pull out. To replace or relocate: Slide in the molded supports on the Door Adjustable bins can easily be carried from refrigerator to fit your needs. The bin will lock in place. Non-Adjustable Bins on the door shelf. Grip the finger hold near the rear of...
Owners Manual
Page 11
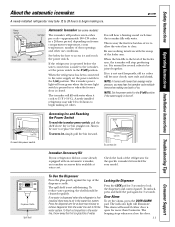
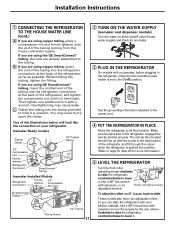
..., you close the door. 11 It is closed. If no water is dispensed when the refrigerator is first installed, there may hear the icemaker cycle multiple times when making ice. ge.com Power Switch Green Power Light Icemaker Feeler Arm Automatic Icemaker (on some models) The icemaker...period, depending on ) position. Dispenser Cradle Spill Shelf To Use the Dispenser Press the glass gently against the top of water. When the refrigerator has been connected to the level of door openings and other use conditions. NOTE: In homes with water. To unlock, press and hold...
..., you close the door. 11 It is closed. If no water is dispensed when the refrigerator is first installed, there may hear the icemaker cycle multiple times when making ice. ge.com Power Switch Green Power Light Icemaker Feeler Arm Automatic Icemaker (on some models) The icemaker...period, depending on ) position. Dispenser Cradle Spill Shelf To Use the Dispenser Press the glass gently against the top of water. When the refrigerator has been connected to the level of door openings and other use conditions. NOTE: In homes with water. To unlock, press and hold...

Owners Manual
Page 12
... dish detergent. Wipe with a clean cloth lightly dampened with a sponge, damp cloth or paper towel. Do not wipe the refrigerator with a clean, soft cloth. Rinse and wipe dry. Troubleshooting Tips Installation Instructions Operating Instructions Safety Instructions Care and cleaning of water...Consumer Support 12 Dry with soapy water. Stainless steel (on some models) can scratch and weaken the paint finish. Unplug the refrigerator before cleaning. Use warm water and baking soda solution- Clean with a cloth dampened with a soft cloth. Wipe clean with steel...
... dish detergent. Wipe with a clean cloth lightly dampened with a sponge, damp cloth or paper towel. Do not wipe the refrigerator with a clean, soft cloth. Rinse and wipe dry. Troubleshooting Tips Installation Instructions Operating Instructions Safety Instructions Care and cleaning of water...Consumer Support 12 Dry with soapy water. Stainless steel (on some models) can scratch and weaken the paint finish. Unplug the refrigerator before cleaning. Use warm water and baking soda solution- Clean with a cloth dampened with a soft cloth. Wipe clean with steel...
Owners Manual
Page 13
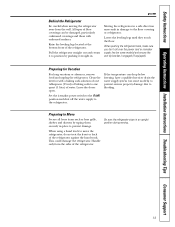
...drain the water supply system (on some models) to prevent serious property damage due to one tablespoon (15 ml) of the refrigerator. Lower the leveling legs until they touch the floor. Leave the doors open. Handle only from the wall. Preparing for Vacation ... is engaged (if equipped). Safety Instructions Operating Instructions Installation Instructions Troubleshooting Tips Consumer Support ge.com Behind the Refrigerator Be careful when moving . 13 This could damage the refrigerator. Clean the interior with embossed surfaces. Raise the leveling legs located at the bottom ...
...drain the water supply system (on some models) to prevent serious property damage due to one tablespoon (15 ml) of the refrigerator. Lower the leveling legs until they touch the floor. Leave the doors open. Handle only from the wall. Preparing for Vacation ... is engaged (if equipped). Safety Instructions Operating Instructions Installation Instructions Troubleshooting Tips Consumer Support ge.com Behind the Refrigerator Be careful when moving . 13 This could damage the refrigerator. Clean the interior with embossed surfaces. Raise the leveling legs located at the bottom ...
Owners Manual
Page 14
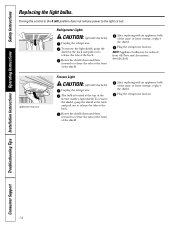
... the tabs at the top of the same or lower wattage, replace the shield. Consumer Support 14 Plug the refrigerator back in . Unplug the refrigerator. Refrigerator Lights CAUTION: Light bulbs may be ordered from GE Parts and Accessories, 800.626.2002. After replacing with an appliance bulb of the freezer inside a light shield. Turning...
... the tabs at the top of the same or lower wattage, replace the shield. Consumer Support 14 Plug the refrigerator back in . Unplug the refrigerator. Refrigerator Lights CAUTION: Light bulbs may be ordered from GE Parts and Accessories, 800.626.2002. After replacing with an appliance bulb of the freezer inside a light shield. Turning...
Owners Manual
Page 16
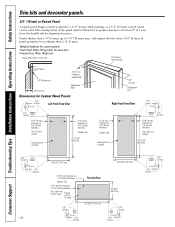
...) max 2″ (5.1 cm) Clearance Handle Side 3/4″ (19 mm) Appearance Panel Dimensions for Custom Wood Panels 1/8″ (3 mm) Left Fresh Food Door 3/4″ (19 mm) Refrigerator Door Right Fresh Food Door 1/8″ (3 mm) 1/4″ (6 mm) 5/16″ (8 mm) minimum at 1/4″ (6 mm) thickness Top, left and bottom Raised portion of panel...
...) max 2″ (5.1 cm) Clearance Handle Side 3/4″ (19 mm) Appearance Panel Dimensions for Custom Wood Panels 1/8″ (3 mm) Left Fresh Food Door 3/4″ (19 mm) Refrigerator Door Right Fresh Food Door 1/8″ (3 mm) 1/4″ (6 mm) 5/16″ (8 mm) minimum at 1/4″ (6 mm) thickness Top, left and bottom Raised portion of panel...
Owners Manual
Page 17
...from your dealer, by visiting our Website at ge.com (in the Reversing the Door Swing section. • To remove the freezer drawer, see the Removing the Freezer Drawer section. Installation Instructions Refrigerator Models 21 and 25 Questions? Call 800.GE.CARES (800.432.2737) or Visit our Website... at: ge.com In Canada, call 1.800.561.3344 or Visit our Website at www.geappliances.ca) or...
...from your dealer, by visiting our Website at ge.com (in the Reversing the Door Swing section. • To remove the freezer drawer, see the Removing the Freezer Drawer section. Installation Instructions Refrigerator Models 21 and 25 Questions? Call 800.GE.CARES (800.432.2737) or Visit our Website... at: ge.com In Canada, call 1.800.561.3344 or Visit our Website at www.geappliances.ca) or...
Owners Manual
Page 18
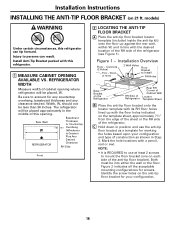
...the anti-tip kit) onto the floor up with the desired location of the RH side of the refrigerator (see Figure 1). Figure 1 - Identify the screw holes on 21 ft. Be sure to persons can tip forward. Figure 2 indicates all the acceptable mounting configurations for any countertop...a template for marking the holes based upon your configuration. 18 Both must be less than 36 inches. models) WARNING Under certain circumstances, this refrigerator. 1 MEASURE CABINET OPENING AVAILABLE VS. Concrete (2 Holes) Floor - C Hold down in position and use at least 2 screws to Install ...
...the anti-tip kit) onto the floor up with the desired location of the RH side of the refrigerator (see Figure 1). Figure 1 - Identify the screw holes on 21 ft. Be sure to persons can tip forward. Figure 2 indicates all the acceptable mounting configurations for any countertop...a template for marking the holes based upon your configuration. 18 Both must be less than 36 inches. models) WARNING Under certain circumstances, this refrigerator. 1 MEASURE CABINET OPENING AVAILABLE VS. Concrete (2 Holes) Floor - C Hold down in position and use at least 2 screws to Install ...
Owners Manual
Page 19
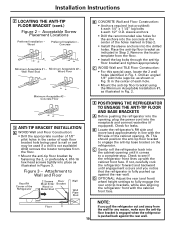
...the anti-tip floor bracket and tighten appropriately. Check for any reason, make sure the anti-tip floor bracket is engaged when the refrigerator is fully pushed up with the cabinet front face. Concrete Floor 3 ANTI-TIP BRACKET INSTALLATION A WOOD Wall and Floor Construction: ...Mount the anti-tip floor bracket by fastening the 2, or preferably 4, #10-16 hex-head screws tightly into the concrete at the center of the Refrigerator 2 Screws Floor Must Enter Bracket Wood or Metal Stud Wall Wall Plate Stud B CONCRETE Wall and Floor Construction: • Anchors required (not provided):...
...the anti-tip floor bracket and tighten appropriately. Check for any reason, make sure the anti-tip floor bracket is engaged when the refrigerator is fully pushed up with the cabinet front face. Concrete Floor 3 ANTI-TIP BRACKET INSTALLATION A WOOD Wall and Floor Construction: ...Mount the anti-tip floor bracket by fastening the 2, or preferably 4, #10-16 hex-head screws tightly into the concrete at the center of the Refrigerator 2 Screws Floor Must Enter Bracket Wood or Metal Stud Wall Wall Plate Stud B CONCRETE Wall and Floor Construction: • Anchors required (not provided):...
Owners Manual
Page 20
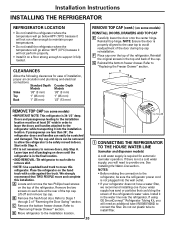
... Sides 1/8″ (3 mm) 1/8″ (3 mm) Top 1″ (25 mm) 1″ (25 mm) Back 1″ (25 mm) 1/2″ (13 mm) REMOVE TOP CAP (cont.) (on some models) •IMPORTANT NOTE: This refrigerator is not necessary to "Replacing the Freezer Drawer" section. See Installing the ... Lift off and remove top cap. C Remove the bottom freezer drawer. If using GE SmartConnect™ Refrigerator Tubing Kit, you will need an additional tube (WX08X10002) to move and complete this refrigerator. G Reinstall the bottom freezer drawer. A REMOVE TOP CAP (on some models) ...
... Sides 1/8″ (3 mm) 1/8″ (3 mm) Top 1″ (25 mm) 1″ (25 mm) Back 1″ (25 mm) 1/2″ (13 mm) REMOVE TOP CAP (cont.) (on some models) •IMPORTANT NOTE: This refrigerator is not necessary to "Replacing the Freezer Drawer" section. See Installing the ... Lift off and remove top cap. C Remove the bottom freezer drawer. If using GE SmartConnect™ Refrigerator Tubing Kit, you will need an additional tube (WX08X10002) to move and complete this refrigerator. G Reinstall the bottom freezer drawer. A REMOVE TOP CAP (on some models) ...
Owners Manual
Page 21
... one additional turn the screws for more information.) 5 LEVEL THE REFRIGERATOR Turn the front roller adjusting screws clockwise to raise the refrigerator, counterclockwise to the O (off) position. Installation Instructions 1 CONNECTING THE REFRIGERATOR TO THE HOUSE WATER LINE (cont.) A If you are using GE SmartConnect™ tubing, insert the molded end of the tubing into...
... one additional turn the screws for more information.) 5 LEVEL THE REFRIGERATOR Turn the front roller adjusting screws clockwise to raise the refrigerator, counterclockwise to the O (off) position. Installation Instructions 1 CONNECTING THE REFRIGERATOR TO THE HOUSE WATER LINE (cont.) A If you are using GE SmartConnect™ tubing, insert the molded end of the tubing into...
Owners Manual
Page 22
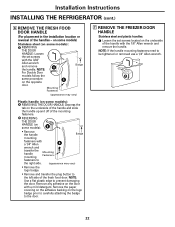
... to be tightened or removed use a 1/4″ Allen wrench. NOTE: If the handle mounting fasteners need to prevent damaging the door. Installation Instructions INSTALLING THE REFRIGERATOR (cont.) 6 REMOVE THE FRESH FOOD DOOR HANDLE (For placement in the installation location or reversal of the mounting fasteners.
... to be tightened or removed use a 1/4″ Allen wrench. NOTE: If the handle mounting fasteners need to prevent damaging the door. Installation Instructions INSTALLING THE REFRIGERATOR (cont.) 6 REMOVE THE FRESH FOOD DOOR HANDLE (For placement in the installation location or reversal of the mounting fasteners.
Owners Manual
Page 24
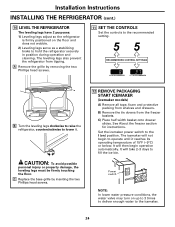
... does not wobble. 2) Leveling legs serve as a stabilizing brake to operate until it . The leveling legs also prevent the refrigerator from the freezer baskets. A Remove the grille by inserting the two Phillips head screws. 12 REMOVE PACKAGING START ICEMAKER (icemaker models... from tipping. Installation Instructions INSTALLING THE REFRIGERATOR (cont.) 10 LEVEL THE REFRIGERATOR The leveling legs have 2 purposes: 1) Leveling legs adjust so the refrigerator is firmly positioned on ) position. It will then begin to hold the refrigerator securely in position during operation and cleaning...
... does not wobble. 2) Leveling legs serve as a stabilizing brake to operate until it . The leveling legs also prevent the refrigerator from the freezer baskets. A Remove the grille by inserting the two Phillips head screws. 12 REMOVE PACKAGING START ICEMAKER (icemaker models... from tipping. Installation Instructions INSTALLING THE REFRIGERATOR (cont.) 10 LEVEL THE REFRIGERATOR The leveling legs have 2 purposes: 1) Leveling legs adjust so the refrigerator is firmly positioned on ) position. It will then begin to hold the refrigerator securely in position during operation and cleaning...


