
Installation Instructions
Page 1
Bottom Freezer Refrigerators ge.com Safety Instructions 2, 3 Operating Instructions Automatic Icemaker 11 Care and Cleaning 12, 13 Controls 4 Dispenser 5 Freezer 10 Replacing the Light Bulbs 14 Fresh Food Storage Options 7-9 Water Filter 6 Installation Instructions Installing the Refrigerator 16-23 Installing the Water Line 24-26 Preparing to Install the Refrigerator 15 Troubleshooting Tips . . . . . .27-30 Normal Operating Sounds 27...
Bottom Freezer Refrigerators ge.com Safety Instructions 2, 3 Operating Instructions Automatic Icemaker 11 Care and Cleaning 12, 13 Controls 4 Dispenser 5 Freezer 10 Replacing the Light Bulbs 14 Fresh Food Storage Options 7-9 Water Filter 6 Installation Instructions Installing the Refrigerator 16-23 Installing the Water Line 24-26 Preparing to Install the Refrigerator 15 Troubleshooting Tips . . . . . .27-30 Normal Operating Sounds 27...
Installation Instructions
Page 2
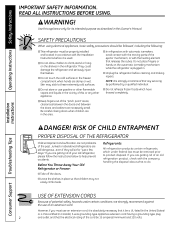
...will sit for its intended purpose as described in accordance with the Installation Instructions before cleaning and making repairs. Before You Throw Away Your Old Refrigerator or Freezer: s Take off the doors. Installation Instructions Consumer Support Troubleshooting Tips USE OF EXTENSION CORDS Because of ... are getting rid of the cord be properly installed and located in this or any servicing be removed prior to these extremely cold surfaces. s Do not store or use of this Owner's Manual. s In refrigerators with automatic icemakers, avoid contact with the moving...
...will sit for its intended purpose as described in accordance with the Installation Instructions before cleaning and making repairs. Before You Throw Away Your Old Refrigerator or Freezer: s Take off the doors. Installation Instructions Consumer Support Troubleshooting Tips USE OF EXTENSION CORDS Because of ... are getting rid of the cord be properly installed and located in this or any servicing be removed prior to these extremely cold surfaces. s Do not store or use of this Owner's Manual. s In refrigerators with automatic icemakers, avoid contact with the moving...
Installation Instructions
Page 3
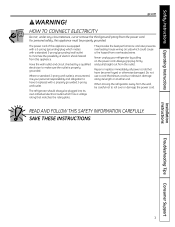
...Do not use a cord that matches the rating plate. Repair or replace immediately all power cords that have it is properly grounded. SAVE THESE INSTRUCTIONS Installation Instructions Troubleshooting Tips Consumer Support 3 HOW TO CONNECT ELECTRICITY Do not, under any circumstances, cut or remove the third (ground) prong from the ... appliance is encountered, it replaced with a properly grounded 3-prong wall outlet. READ AND FOLLOW THIS SAFETY INFORMATION CAREFULLY. Safety Instructions Operating Instructions ge.com WARNING! The refrigerator should always be properly grounded.
...Do not use a cord that matches the rating plate. Repair or replace immediately all power cords that have it is properly grounded. SAVE THESE INSTRUCTIONS Installation Instructions Troubleshooting Tips Consumer Support 3 HOW TO CONNECT ELECTRICITY Do not, under any circumstances, cut or remove the third (ground) prong from the ... appliance is encountered, it replaced with a properly grounded 3-prong wall outlet. READ AND FOLLOW THIS SAFETY INFORMATION CAREFULLY. Safety Instructions Operating Instructions ge.com WARNING! The refrigerator should always be properly grounded.
Installation Instructions
Page 4
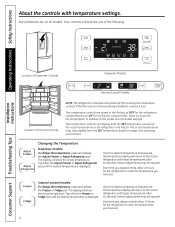
... SET temperature based on all features are preset in the refrigerator and freezer. The temperature controls are on usage and operating environment . If this film was not removed during installation, remove it now. Operating Instructions Safety Instructions About the... temperature display will look like one of the following: Installation Instructions Consumer Support Troubleshooting Tips Location of Dispenser Controls Dispenser Models Internal Control Models Location of Internal Controls NOTE: The refrigerator is shipped with temperature settings. Each time you adjust ...
... SET temperature based on all features are preset in the refrigerator and freezer. The temperature controls are on usage and operating environment . If this film was not removed during installation, remove it now. Operating Instructions Safety Instructions About the... temperature display will look like one of the following: Installation Instructions Consumer Support Troubleshooting Tips Location of Dispenser Controls Dispenser Models Internal Control Models Location of Internal Controls NOTE: The refrigerator is shipped with temperature settings. Each time you adjust ...
Installation Instructions
Page 5
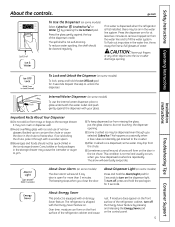
...icemaker or auger to , but not touching, the dispenser opening . About Energy Saver This product is first installed, there may be cleaned regularly. If no water is dispensed when the refrigerator is equipped with your glass. s Beverages and foods should be air in the ice storage drawer. This ...Saver pad on some water may be quick-chilled in the water line system. If moisture does appear on the front surface of narrow glasses. ge.com Spill Shelf To Use the Dispenser (on the control panel. 5 CAUTION: Never put the glass close the door. s Some crushed ...
...icemaker or auger to , but not touching, the dispenser opening . About Energy Saver This product is first installed, there may be cleaned regularly. If no water is dispensed when the refrigerator is equipped with your glass. s Beverages and foods should be air in the ice storage drawer. This ...Saver pad on some water may be quick-chilled in the water line system. If moisture does appear on the front surface of narrow glasses. ge.com Spill Shelf To Use the Dispenser (on the control panel. 5 CAUTION: Never put the glass close the door. s Some crushed ...
Installation Instructions
Page 6
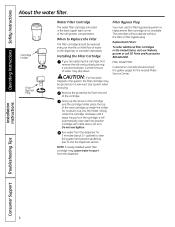
...filter bypass plug when a replacement filter cartridge is located in the United States, visit our Website, ge.com or call GE Parts and Accessories, 800.626.2002. Installation Instructions Consumer Support Troubleshooting Tips 6 Do not overtighten. Run water from the end of the new.... Operating Instructions Safety Instructions About the water filter. When to clear the system and prevent sputtering. A small amount of the refrigerator compartment. Do not push it counterclockwise. See To Use the Dispenser section. The icemaker will rotate about 11⁄ 2 gallons...
...filter bypass plug when a replacement filter cartridge is located in the United States, visit our Website, ge.com or call GE Parts and Accessories, 800.626.2002. Installation Instructions Consumer Support Troubleshooting Tips 6 Do not overtighten. Run water from the end of the new.... Operating Instructions Safety Instructions About the water filter. When to clear the system and prevent sputtering. A small amount of the refrigerator compartment. Do not push it counterclockwise. See To Use the Dispenser section. The icemaker will rotate about 11⁄ 2 gallons...
Installation Instructions
Page 7
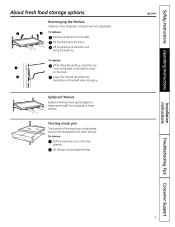
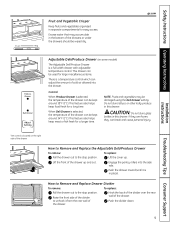
... of the shelf in the refrigerator compartment are adjustable. Floating snack pan The location of the shelf locks into place. To replace: While tilting the shelf up at the back and bring the shelf out. To remove: Pull the snack pan out to lower shelves. ge.com Installation Instructions Troubleshooting Tips Consumer Support...
... of the shelf in the refrigerator compartment are adjustable. Floating snack pan The location of the shelf locks into place. To replace: While tilting the shelf up at the back and bring the shelf out. To remove: Pull the snack pan out to lower shelves. ge.com Installation Instructions Troubleshooting Tips Consumer Support...
Installation Instructions
Page 8
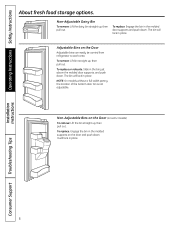
... in place. Non-Adjustable Bins on the Door (on the Door Adjustable bins can easily be carried from refrigerator to work area. The bin will lock in the molded door supports and push down . Installation Instructions Consumer Support Troubleshooting Tips 8 Operating Instructions Safety Instructions About fresh food storage options. To remove: Lift...
... in place. Non-Adjustable Bins on the Door (on the Door Adjustable bins can easily be carried from refrigerator to work area. The bin will lock in the molded door supports and push down . Installation Instructions Consumer Support Troubleshooting Tips 8 Operating Instructions Safety Instructions About fresh food storage options. To remove: Lift...
Installation Instructions
Page 9
...water that may be kept around 38°F (3°C). Do not store lettuce or other leafy produce in the bottom of the drawer. Installation Instructions Troubleshooting Tips Consumer Support The control is selected, the temperature of the drawer up . Push the drawer inward (until it from the ...the side rails. This feature also helps keep food fresh for a longer time. Engage the pantry rollers into the drawer. Fruit Veg ge.com Adjustable Deli/Produce Drawer (on the right side of the drawer can break and cause personal injury. When Deli Drawer is a ...
...water that may be kept around 38°F (3°C). Do not store lettuce or other leafy produce in the bottom of the drawer. Installation Instructions Troubleshooting Tips Consumer Support The control is selected, the temperature of the drawer up . Push the drawer inward (until it from the ...the side rails. This feature also helps keep food fresh for a longer time. Engage the pantry rollers into the drawer. Fruit Veg ge.com Adjustable Deli/Produce Drawer (on the right side of the drawer can break and cause personal injury. When Deli Drawer is a ...

Installation Instructions
Page 10
... a clicking sound and remove the bin. WARNING: Do not lose the side knobs during disassembly since they may present a choking hazard to the stop position. Installation Instructions Consumer Support Troubleshooting Tips Non-Adjustable Bin in the Freezer To remove: Pull the brackets upward until the bin locks into place. Drawer Removal...
... a clicking sound and remove the bin. WARNING: Do not lose the side knobs during disassembly since they may present a choking hazard to the stop position. Installation Instructions Consumer Support Troubleshooting Tips Non-Adjustable Bin in the Freezer To remove: Pull the brackets upward until the bin locks into place. Drawer Removal...
Installation Instructions
Page 11
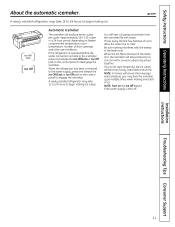
...-130 cubes in a 24-hour period, depending on the control panel to engage the icemaker. Installation Instructions Troubleshooting Tips Consumer Support 11 ge.com Automatic Icemaker The icemaker will become cloudy, taste stale and shrink. A newly installed refrigerator may take 12 to 24 hours to begin making ice. Safety Instructions Operating Instructions About the...
...-130 cubes in a 24-hour period, depending on the control panel to engage the icemaker. Installation Instructions Troubleshooting Tips Consumer Support 11 ge.com Automatic Icemaker The icemaker will become cloudy, taste stale and shrink. A newly installed refrigerator may take 12 to 24 hours to begin making ice. Safety Instructions Operating Instructions About the...
Installation Instructions
Page 12
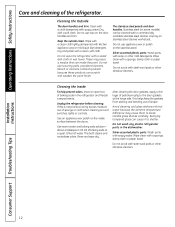
.... Use an appliance wax polish on stainless steel cleaner works best. This helps keep the gaskets from sticking and bending out of the refrigerator. Wash parts with a sponge, damp cloth or paper towel. Do not use wax on the stainless steel. Wipe with a clean ... with a soft cloth. These may cause them to a quart (1 liter) of baking soda in the dishwasher. Silver-accented plastic parts. Installation Instructions Consumer Support Troubleshooting Tips 12 Dry with kitchen appliance wax or mild liquid dish detergent. The stainless steel panels and door handles. Bumping...
.... Use an appliance wax polish on stainless steel cleaner works best. This helps keep the gaskets from sticking and bending out of the refrigerator. Wash parts with a sponge, damp cloth or paper towel. Do not use wax on the stainless steel. Wipe with a clean ... with a soft cloth. These may cause them to a quart (1 liter) of baking soda in the dishwasher. Silver-accented plastic parts. Installation Instructions Consumer Support Troubleshooting Tips 12 Dry with kitchen appliance wax or mild liquid dish detergent. The stainless steel panels and door handles. Bumping...
Installation Instructions
Page 13
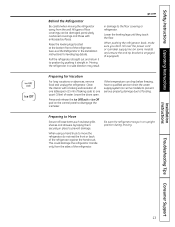
... taping them securely in damage to flooding. Lower the leveling legs until they touch the floor. When using a hand truck to disengage the icemaker. Installation Instructions Troubleshooting Tips Consumer Support 13 Handle only from the wall. This could damage the refrigerator. Safety Instructions Operating Instructions ge.com Behind the Refrigerator Be careful when moving .
... taping them securely in damage to flooding. Lower the leveling legs until they touch the floor. When using a hand truck to disengage the icemaker. Installation Instructions Troubleshooting Tips Consumer Support 13 Handle only from the wall. This could damage the refrigerator. Safety Instructions Operating Instructions ge.com Behind the Refrigerator Be careful when moving .

Installation Instructions
Page 14
...or lower wattage. Unplug the power cord from GE Parts and Accessories, 800.626.2002. Rotate the shield down while pushing it backwards to remove it . Plug the refrigerator back in . Replace the shield. Turn the bulb counterclockwise. Installation Instructions Consumer Support Troubleshooting Tips 14 Operating Instructions Safety...shield down while depressing the two tabs on the back side of the cover to the stop position. Plug the refrigerator back in . Pull drawer out to remove it . Refrigerator Lights Unplug the power cord from GE Parts and Accessories, 800.626.2002.
...or lower wattage. Unplug the power cord from GE Parts and Accessories, 800.626.2002. Rotate the shield down while pushing it backwards to remove it . Plug the refrigerator back in . Replace the shield. Turn the bulb counterclockwise. Installation Instructions Consumer Support Troubleshooting Tips 14 Operating Instructions Safety...shield down while depressing the two tabs on the back side of the cover to the stop position. Plug the refrigerator back in . Pull drawer out to remove it . Refrigerator Lights Unplug the power cord from GE Parts and Accessories, 800.626.2002.

Installation Instructions
Page 15
... Canada 1.888.261.3055). Installation of the installer. • Product failure due to Consumer - PREPARATION MOVING THE REFRIGERATOR INDOORS If the refrigerator will have to be removed. • To remove the refrigerator door, see the Installing the Refrigerator section. • To remove the freezer drawer, see the Removing the Freezer Drawer section. Installation Instructions Refrigerator GE Model 26 Questions? Save...
... Canada 1.888.261.3055). Installation of the installer. • Product failure due to Consumer - PREPARATION MOVING THE REFRIGERATOR INDOORS If the refrigerator will have to be removed. • To remove the refrigerator door, see the Installing the Refrigerator section. • To remove the freezer drawer, see the Removing the Freezer Drawer section. Installation Instructions Refrigerator GE Model 26 Questions? Save...
Installation Instructions
Page 16
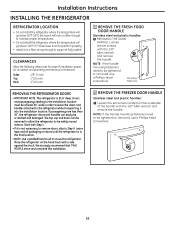
... handles attached to the refrigerator while transporting it into the installation location. A 16 Doors and passageways leading to the installation location must be safely moved indoors. NOTE: If the handle mounting fasteners need to be tightened or removed, use a Phillips-head screwdriver. Sides 1/8″ (3 mm) Top 1″ (25 mm) Back 1″ (25 mm) 1 REMOVE THE...
... handles attached to the refrigerator while transporting it into the installation location. A 16 Doors and passageways leading to the installation location must be safely moved indoors. NOTE: If the handle mounting fasteners need to be tightened or removed, use a Phillips-head screwdriver. Sides 1/8″ (3 mm) Top 1″ (25 mm) Back 1″ (25 mm) 1 REMOVE THE...

Installation Instructions
Page 17
.... Installation Instructions 3 ATTACH THE FRESH FOOD DOOR HANDLE Stainless steel and plastic handles: A Attach the handle to the handle A mounting fasteners and tighten the set screws on the bottom of the coupling and pull out the tubing. A 5 REMOVE THE REFRIGERATOR DOORS A Open the refrigerator doors... the handle firmly to the door itself. 17 G Remove three 10 mm hex-head bolts (right and left). Mounting Fasteners 5 REMOVE THE REFRIGERATOR DOORS (cont.) C Remove the three screws on the gray color of the handle with a 1/8″ Allen wrench. F Remove the two ...
.... Installation Instructions 3 ATTACH THE FRESH FOOD DOOR HANDLE Stainless steel and plastic handles: A Attach the handle to the handle A mounting fasteners and tighten the set screws on the bottom of the coupling and pull out the tubing. A 5 REMOVE THE REFRIGERATOR DOORS A Open the refrigerator doors... the handle firmly to the door itself. 17 G Remove three 10 mm hex-head bolts (right and left). Mounting Fasteners 5 REMOVE THE REFRIGERATOR DOORS (cont.) C Remove the three screws on the gray color of the handle with a 1/8″ Allen wrench. F Remove the two ...

Installation Instructions
Page 18
Ensure that the plastic hinge pin thimble is aligned with the cabinet and opposite door. E On left hinge. Installation Instructions INSTALLING THE REFRIGERATOR (cont.) 5 REMOVE THE REFRIGERATOR DOORS (cont.) H Lift the door straight up to the top of the cabinet. Do not tighten bolts completely. Set the... wire with masking tape or have a second person support the door. Then connect the water line and two connectors. 6 REPLACING THE REFRIGERATOR DOORS A Install the center hinge on each side of the top cap and reattach the three Phillips-head screws on top of the door. B Lower...
Ensure that the plastic hinge pin thimble is aligned with the cabinet and opposite door. E On left hinge. Installation Instructions INSTALLING THE REFRIGERATOR (cont.) 5 REMOVE THE REFRIGERATOR DOORS (cont.) H Lift the door straight up to the top of the cabinet. Do not tighten bolts completely. Set the... wire with masking tape or have a second person support the door. Then connect the water line and two connectors. 6 REPLACING THE REFRIGERATOR DOORS A Install the center hinge on each side of the top cap and reattach the three Phillips-head screws on top of the door. B Lower...
Installation Instructions
Page 19
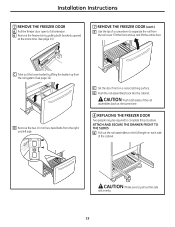
... door front on each side of a screwdriver to separate the rail from the right and left side. G Push the rail assemblies back into the cabinet. Installation Instructions 7 REMOVE THE FREEZER DOOR A Pull the freezer door open to pull out the side rails evenly. 19 Tilt the front end up from the...
... door front on each side of a screwdriver to separate the rail from the right and left side. G Push the rail assemblies back into the cabinet. Installation Instructions 7 REMOVE THE FREEZER DOOR A Pull the freezer door open to pull out the side rails evenly. 19 Tilt the front end up from the...

Installation Instructions
Page 20
... GE SmartConnect™ tubing, the nuts are four 10 mm hex-head bolts.) REPLACE THE FREEZER BASKET Replace the freezer basket by lowering it into the wall outlet. See Installing the Water Line section. If there is required for automatic icemaker operation. A If you will need to the tubing. 20 Installation Instructions INSTALLING THE REFRIGERATOR...
... GE SmartConnect™ tubing, the nuts are four 10 mm hex-head bolts.) REPLACE THE FREEZER BASKET Replace the freezer basket by lowering it into the wall outlet. See Installing the Water Line section. If there is required for automatic icemaker operation. A If you will need to the tubing. 20 Installation Instructions INSTALLING THE REFRIGERATOR...


