

Owners Manual
Page 1
...the Anti-Tip Floor Bracket 18-19 Installing the Refrigerator 20-24 Installing the Water Line 33-35 Preparing to Install the Refrigerator 17 Removing and Replacing the Freezer Drawer 25, 26 Reversing the Door Swing (Single Door Refrigerator Models only 27-29 Removing and Replacing the Doors ... Consumer Support Consumer Support Back Cover Performance Data Sheet 43 State of the refrigerator compartment. 200D9366P008 49-60583 01-09 JR Customers 41 Owner's Manual and Installation Instructions Models 21 and 25 Congélateur inférieur Réfrigérateurs Manuel d'utilisation et...
...the Anti-Tip Floor Bracket 18-19 Installing the Refrigerator 20-24 Installing the Water Line 33-35 Preparing to Install the Refrigerator 17 Removing and Replacing the Freezer Drawer 25, 26 Reversing the Door Swing (Single Door Refrigerator Models only 27-29 Removing and Replacing the Doors ... Consumer Support Consumer Support Back Cover Performance Data Sheet 43 State of the refrigerator compartment. 200D9366P008 49-60583 01-09 JR Customers 41 Owner's Manual and Installation Instructions Models 21 and 25 Congélateur inférieur Réfrigérateurs Manuel d'utilisation et...

Owners Manual
Page 2
...that it is used. Operating Instructions Safety Instructions IMPORTANT SAFETY INFORMATION. Skin may not easily climb inside. I In refrigerators with automatic icemakers, avoid contact with the moving parts of the cord be properly installed and located in Canada), ...certain conditions, we strongly recommend against the use gasoline or other appliance. READ ALL INSTRUCTIONS BEFORE USING. Junked or abandoned refrigerators are necessarily small. WARNING! SAFETY PRECAUTIONS When using electrical appliances, basic safety precautions should be followed, including the following...
...that it is used. Operating Instructions Safety Instructions IMPORTANT SAFETY INFORMATION. Skin may not easily climb inside. I In refrigerators with automatic icemakers, avoid contact with the moving parts of the cord be properly installed and located in Canada), ...certain conditions, we strongly recommend against the use gasoline or other appliance. READ ALL INSTRUCTIONS BEFORE USING. Junked or abandoned refrigerators are necessarily small. WARNING! SAFETY PRECAUTIONS When using electrical appliances, basic safety precautions should be followed, including the following...
Owners Manual
Page 3
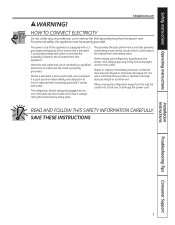
...that matches the rating plate. Have the wall outlet and circuit checked by a qualified electrician to make sure the outlet is your refrigerator by pulling on the power cord. This provides the best performance and also prevents overloading house wiring circuits which mates with a properly ... wall, be properly grounded. Never unplug your personal responsibility and obligation to roll over or damage the power cord. When moving the refrigerator away from overheated wires. HOW TO CONNECT ELECTRICITY Do not, under any circumstances, cut or remove the third (ground) prong from ...
...that matches the rating plate. Have the wall outlet and circuit checked by a qualified electrician to make sure the outlet is your refrigerator by pulling on the power cord. This provides the best performance and also prevents overloading house wiring circuits which mates with a properly ... wall, be properly grounded. Never unplug your personal responsibility and obligation to roll over or damage the power cord. When moving the refrigerator away from overheated wires. HOW TO CONNECT ELECTRICITY Do not, under any circumstances, cut or remove the third (ground) prong from ...

Owners Manual
Page 4
...is shipped with protective film covering the temperature controls. The actual temperature may be required. Allow 24 hours for the refrigerator to the refrigerator. To turn the unit back on, press the COLDER pad for either the WARMER or COLDER pad until the desired...About the controls with temperature settings. (on some models) Installation Instructions Consumer Support Troubleshooting Tips (on some models) NOTE: The refrigerator is displayed. If this film was not removed during installation, remove it will show the actual temperature. Setting either or both controls...
...is shipped with protective film covering the temperature controls. The actual temperature may be required. Allow 24 hours for the refrigerator to the refrigerator. To turn the unit back on, press the COLDER pad for either the WARMER or COLDER pad until the desired...About the controls with temperature settings. (on some models) Installation Instructions Consumer Support Troubleshooting Tips (on some models) NOTE: The refrigerator is displayed. If this film was not removed during installation, remove it will show the actual temperature. Setting either or both controls...

Owners Manual
Page 5
...Troubleshooting Tips Consumer Support (on some models) (on some models) About Energy Saver (on some models) This product is complete, the refrigerator compartment will cycle on and off the Energy Saver feature by pressing and releasing the ENERGY SAVER pad on the control panel. (on... for eight hours. Once activated, the compressor will turn off to maintain this setting. Use TurboCool when adding a large amount of the refrigerator cabinet and cause rust. Safety Instructions Operating Instructions About TurboCool.™ (on some models) GEAppliances.com (on some models) (on some ...
...Troubleshooting Tips Consumer Support (on some models) (on some models) About Energy Saver (on some models) This product is complete, the refrigerator compartment will cycle on and off the Energy Saver feature by pressing and releasing the ENERGY SAVER pad on the control panel. (on... for eight hours. Once activated, the compressor will turn off to maintain this setting. Use TurboCool when adding a large amount of the refrigerator cabinet and cause rust. Safety Instructions Operating Instructions About TurboCool.™ (on some models) GEAppliances.com (on some models) (on some ...

Owners Manual
Page 6
... installed, you need to replace the filter soon. Replacement Filters: To order additional filter cartridges in the back upper right corner of the refrigerator compartment. The filter cartridge should consult the yellow pages for 3 seconds. CAUTION: If air has been trapped in Canada should be ejected ...must use the filter bypass plug when a replacement filter cartridge is located in the United States, visit our Website, GEAppliances.com, or call GE Parts and Accessories, 800.626.2002. The icemaker will feel it "click" as it stops. Fill the replacement cartridge with water from ...
... installed, you need to replace the filter soon. Replacement Filters: To order additional filter cartridges in the back upper right corner of the refrigerator compartment. The filter cartridge should consult the yellow pages for 3 seconds. CAUTION: If air has been trapped in Canada should be ejected ...must use the filter bypass plug when a replacement filter cartridge is located in the United States, visit our Website, GEAppliances.com, or call GE Parts and Accessories, 800.626.2002. The icemaker will feel it "click" as it stops. Fill the replacement cartridge with water from ...
Owners Manual
Page 7
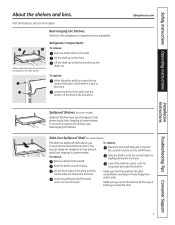
... central tabs are on the shelf frame. Make sure you to lower shelves. Safety Instructions Operating Instructions About the shelves and bins. Refrigerator Compartment To remove: Remove all models. Lift the shelf up at the back and bring the shelf out. To replace: Place the...flat after reinstallation and doesn't move freely from shelf. Not all features are above the front bar. Slide the shelf in the refrigerator compartment are slightly behind others. Rearranging the Shelves Shelves in until it stops. Tilt the shelf up at the front. Continue pulling...
... central tabs are on the shelf frame. Make sure you to lower shelves. Safety Instructions Operating Instructions About the shelves and bins. Refrigerator Compartment To remove: Remove all models. Lift the shelf up at the back and bring the shelf out. To replace: Place the...flat after reinstallation and doesn't move freely from shelf. Not all features are above the front bar. Slide the shelf in the refrigerator compartment are slightly behind others. Rearranging the Shelves Shelves in until it stops. Tilt the shelf up at the front. Continue pulling...

Owners Manual
Page 8
... finger hold near the rear of small items stored on all models. Non-Adjustable Bins on the Door Adjustable bins can easily be carried from refrigerator to fit your needs. It will lock in the bin just above the molded door supports, and push down. Adjustable Bins on the Door To...
... finger hold near the rear of small items stored on all models. Non-Adjustable Bins on the Door Adjustable bins can easily be carried from refrigerator to fit your needs. It will lock in the bin just above the molded door supports, and push down. Adjustable Bins on the Door To...

Owners Manual
Page 11
...flush out impurities in or when the freezer door is pressed in the water line, throw away the first 6 glassfuls of water. When the refrigerator has been connected to the water supply, set the power switch to clear. Be sure nothing interferes with lower-than 2 minutes. To access ice...releasing the dispenser button. The indicator light will produce seven cubes per cycle- Water may be loud as the air is normal for your refrigerator did not come already equipped with water. During this process, the dispenser noise may continue to access ice and reach the power switch....
...flush out impurities in or when the freezer door is pressed in the water line, throw away the first 6 glassfuls of water. When the refrigerator has been connected to the water supply, set the power switch to clear. Be sure nothing interferes with lower-than 2 minutes. To access ice...releasing the dispenser button. The indicator light will produce seven cubes per cycle- Water may be loud as the air is normal for your refrigerator did not come already equipped with water. During this process, the dispenser noise may continue to access ice and reach the power switch....
Owners Manual
Page 12
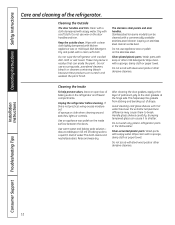
...available stainless steel cleaner. Do not use appliance wax or polish on the door handles and trim. Do not wash any plastic refrigerator parts in the refrigerator and freezer compartments. Installation Instructions Consumer Support Troubleshooting Tips 12 Clean with a cloth dampened with a sponge, damp cloth or paper.... Silver-plated plastic parts. Handle glass shelves carefully. A spray-on the inside surface between the doors. Unplug the refrigerator before cleaning. Do not use wax on the stainless steel. Bumping tempered glass can erode the paint. Do not wipe the...
...available stainless steel cleaner. Do not use appliance wax or polish on the door handles and trim. Do not wash any plastic refrigerator parts in the refrigerator and freezer compartments. Installation Instructions Consumer Support Troubleshooting Tips 12 Clean with a cloth dampened with a sponge, damp cloth or paper.... Silver-plated plastic parts. Handle glass shelves carefully. A spray-on the inside surface between the doors. Unplug the refrigerator before cleaning. Do not use wax on the stainless steel. Bumping tempered glass can erode the paint. Do not wipe the...

Owners Manual
Page 13
...) position and shut off the water supply to the floor covering or refrigerator. Be sure the refrigerator stays in place to move the refrigerator, do not rest the front or back of the refrigerator against the hand truck. Installation Instructions Troubleshooting Tips Consumer Support 13 Safety ... with a baking soda solution of one tablespoon (15 ml) of baking soda to flooding. Handle only from the wall. Moving the refrigerator in a side direction may result in . All types of floor coverings can drop below freezing, have a qualified servicer drain the water...
...) position and shut off the water supply to the floor covering or refrigerator. Be sure the refrigerator stays in place to move the refrigerator, do not rest the front or back of the refrigerator against the hand truck. Installation Instructions Troubleshooting Tips Consumer Support 13 Safety ... with a baking soda solution of one tablespoon (15 ml) of baking soda to flooding. Handle only from the wall. Moving the refrigerator in a side direction may result in . All types of floor coverings can drop below freezing, have a qualified servicer drain the water...

Owners Manual
Page 14
... and pull out to release the tabs at the rear of the shield. Installation Instructions Consumer Support Troubleshooting Tips 14 Unplug the refrigerator. NOTE: Appliance bulbs may be ordered from GE Parts and Accessories, 800.626.2002. Operating Instructions Safety Instructions Replacing the light bulbs. Turning the control to the 0 (off) position...
... and pull out to release the tabs at the rear of the shield. Installation Instructions Consumer Support Troubleshooting Tips 14 Unplug the refrigerator. NOTE: Appliance bulbs may be ordered from GE Parts and Accessories, 800.626.2002. Operating Instructions Safety Instructions Replacing the light bulbs. Turning the control to the 0 (off) position...
Owners Manual
Page 16
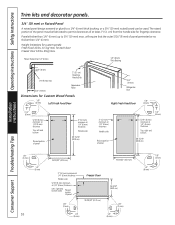
... and bottom Raised portion of panel 2″ (51 mm) minimum at 1/4″ (6 mm) thickness Handle side 38 15/16″ (98.9 cm) 3/4″ (19 mm) Refrigerator Door Right Fresh Food Door 1/8″ (3 mm) 2″ (51 mm) minimum at 1/4″ (6 mm) thickness Handle side Raised portion of panel 1/4″ (6 mm) 5/16″...
... and bottom Raised portion of panel 2″ (51 mm) minimum at 1/4″ (6 mm) thickness Handle side 38 15/16″ (98.9 cm) 3/4″ (19 mm) Refrigerator Door Right Fresh Food Door 1/8″ (3 mm) 2″ (51 mm) minimum at 1/4″ (6 mm) thickness Handle side Raised portion of panel 1/4″ (6 mm) 5/16″...

Owners Manual
Page 17
... Bit Appropriate for future reference. • Skill level - A GE water supply kit (containing tubing, shut-off valve, fittings and instructions) is not covered under the Warranty. Installation Instructions Refrigerator Models 21 and 25 Questions? Be sure to Consumer - Keep these instructions completely and ... Compression Nut and Ferrule (sleeve) (icemaker models only) Phillips-Head Screwdriver PREPARATION MOVING THE REFRIGERATOR INDOORS If the refrigerator will have to a cold water line. Call 800.GE.CARES (800.432.2737) or visit our Website at: GEAppliances.com In Canada, call ...
... Bit Appropriate for future reference. • Skill level - A GE water supply kit (containing tubing, shut-off valve, fittings and instructions) is not covered under the Warranty. Installation Instructions Refrigerator Models 21 and 25 Questions? Be sure to Consumer - Keep these instructions completely and ... Compression Nut and Ferrule (sleeve) (icemaker models only) Phillips-Head Screwdriver PREPARATION MOVING THE REFRIGERATOR INDOORS If the refrigerator will have to a cold water line. Call 800.GE.CARES (800.432.2737) or visit our Website at: GEAppliances.com In Canada, call ...
Owners Manual
Page 18
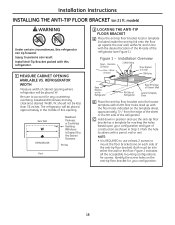
...bracket (one on each side of this refrigerator. 1 MEASURE CABINET OPENING AVAILABLE VS. Install...floor holes indicated on the Refrigerator RH Side of Refrigerator Rear RH Corner of ...and type of the refrigerator (see Figure 1). REFRIGERATOR WIDTH Measure width of the refrigerator. The refrigerator will be placed approximately...upon your configuration. 18 Rear Wall W REFRIGERATOR Baseboard Thickness or Countertop Overhang (Whichever ... awl. models) WARNING Under certain circumstances, this refrigerator can result. Installation Overview Floor - Installation Instructions ...
...bracket (one on each side of this refrigerator. 1 MEASURE CABINET OPENING AVAILABLE VS. Install...floor holes indicated on the Refrigerator RH Side of Refrigerator Rear RH Corner of ...and type of the refrigerator (see Figure 1). REFRIGERATOR WIDTH Measure width of the refrigerator. The refrigerator will be placed approximately...upon your configuration. 18 Rear Wall W REFRIGERATOR Baseboard Thickness or Countertop Overhang (Whichever ... awl. models) WARNING Under certain circumstances, this refrigerator can result. Installation Overview Floor - Installation Instructions ...
Owners Manual
Page 19
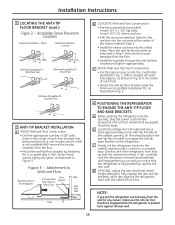
... should position the anti-tip floor bracket to Wall and Floor Rear RH Corner of the cabinet opening until engagement occurs and you pull the refrigerator out and away from the floor. • Install the lag bolts through the anti-tip floor bracket and tighten appropriately. D OPTIONAL: Adjust...: • For this special case, locate the 2 wall holes identified in Step 2. Attachment to engage the anti-tip base bracket on the refrigerator. Check for the anchors into the concrete at the center of each hole. • Mount the anti-tip floor bracket using the Minimum Acceptable ...
... should position the anti-tip floor bracket to Wall and Floor Rear RH Corner of the cabinet opening until engagement occurs and you pull the refrigerator out and away from the floor. • Install the lag bolts through the anti-tip floor bracket and tighten appropriately. D OPTIONAL: Adjust...: • For this special case, locate the 2 wall holes identified in Step 2. Attachment to engage the anti-tip base bracket on the refrigerator. Check for the anchors into the concrete at the center of each hole. • Mount the anti-tip floor bracket using the Minimum Acceptable ...

Owners Manual
Page 20
...refrigerator's water valve. A Locate and remove the two Phillips head screws on some models) REINSTALL DOORS, DRAWERS AND TOP CAP E Carefully lower the door onto the center hinge. Standard Depth Counter Depth Models Models Sides 1/8″ (3 mm) 1/8″ (3 mm) Top 1″ (25 mm) 1″ (25 mm) Back 1″ (25... fully loaded. B Remove the fresh-food door. If using GE SmartConnect™ Refrigerator Tubing Kit, you will need an additional tube (WX08X10002) to the refrigerator while transporting it is not plugged into the installation location. CLEARANCES...
...refrigerator's water valve. A Locate and remove the two Phillips head screws on some models) REINSTALL DOORS, DRAWERS AND TOP CAP E Carefully lower the door onto the center hinge. Standard Depth Counter Depth Models Models Sides 1/8″ (3 mm) 1/8″ (3 mm) Top 1″ (25 mm) 1″ (25 mm) Back 1″ (25... fully loaded. B Remove the fresh-food door. If using GE SmartConnect™ Refrigerator Tubing Kit, you will need an additional tube (WX08X10002) to the refrigerator while transporting it is not plugged into the installation location. CLEARANCES...

Owners Manual
Page 21
... is set to the O (off valve (house water supply) and check for any leaks. 3 PLUG IN THE REFRIGERATOR On models with your refrigerator. If you are using the GE SmartConnect™ tubing, the nuts are using GE SmartConnect™ tubing, insert the molded end of the illustrations below will look like the connection on...
... is set to the O (off valve (house water supply) and check for any leaks. 3 PLUG IN THE REFRIGERATOR On models with your refrigerator. If you are using the GE SmartConnect™ tubing, the nuts are using GE SmartConnect™ tubing, insert the molded end of the illustrations below will look like the connection on...
Owners Manual
Page 22
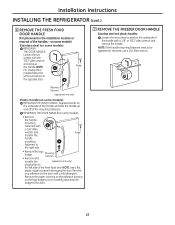
...; Allen wrench. NOTE: A Badge For Double Door models follow the same procedure on some models) Stainless steel (on the opposite door. Installation Instructions INSTALLING THE REFRIGERATOR (cont.) 6 REMOVE THE FRESH FOOD DOOR HANDLE (For placement in the installation location or reversal of the handle with a mild detergent. on some models): A REMOVING...
...; Allen wrench. NOTE: A Badge For Double Door models follow the same procedure on some models) Stainless steel (on the opposite door. Installation Instructions INSTALLING THE REFRIGERATOR (cont.) 6 REMOVE THE FRESH FOOD DOOR HANDLE (For placement in the installation location or reversal of the handle with a mild detergent. on some models): A REMOVING...
Owners Manual
Page 24
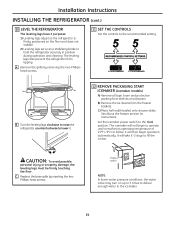
...fill the ice bin. See About the freezer section for instructions. Installation Instructions INSTALLING THE REFRIGERATOR (cont.) 10 LEVEL THE REFRIGERATOR The leveling legs have 2 purposes: 1) Leveling legs adjust so the refrigerator is firmly positioned on the floor and does not wobble. 2) Leveling legs serve as... baskets. C Replace the base grille by removing the two Phillipshead screws. 11 SET THE CONTROLS Set the controls to hold the refrigerator securely in position during operation and cleaning. B) Remove the tie downs from tipping. C) Place half width basket onto drawer slides....
...fill the ice bin. See About the freezer section for instructions. Installation Instructions INSTALLING THE REFRIGERATOR (cont.) 10 LEVEL THE REFRIGERATOR The leveling legs have 2 purposes: 1) Leveling legs adjust so the refrigerator is firmly positioned on the floor and does not wobble. 2) Leveling legs serve as... baskets. C Replace the base grille by removing the two Phillipshead screws. 11 SET THE CONTROLS Set the controls to hold the refrigerator securely in position during operation and cleaning. B) Remove the tie downs from tipping. C) Place half width basket onto drawer slides....


