
Owners Manual
Page 1
...Device Certificate . . . . .48 Warranty for Canadian Customers 46 Warranty for U.S. Owner's Manual and Installation Instructions Models 21 and 25 Congélateur inférieur Réfrigérateurs Manuel d'utilisation et d'installation La section française commence à la... español empieza en la página 93 200D9366P002 49-60530-2 01-08 JR Customers 41, 42 State of the refrigerator compartment. ge.com Bottom Refr igeratoFreezerrs Safety Instructions 2, 3 Operating Instructions Additional Features 8 Automatic Icemaker 11 Care and Cleaning 12-13 Controls 4-5...
...Device Certificate . . . . .48 Warranty for Canadian Customers 46 Warranty for U.S. Owner's Manual and Installation Instructions Models 21 and 25 Congélateur inférieur Réfrigérateurs Manuel d'utilisation et d'installation La section française commence à la... español empieza en la página 93 200D9366P002 49-60530-2 01-08 JR Customers 41, 42 State of the refrigerator compartment. ge.com Bottom Refr igeratoFreezerrs Safety Instructions 2, 3 Operating Instructions Additional Features 8 Automatic Icemaker 11 Care and Cleaning 12-13 Controls 4-5...

Owners Manual
Page 2
...what to help prevent accidents. s Leave the shelves in accordance with the Installation Instructions before cleaning and making repairs. Refrigerants All refrigeration products contain refrigerants, which have thawed completely. NOTE: We strongly recommend that children may stick to the light circuit. However, if ... of the cord be removed prior to climb, stand or hang on the automatic icemaking mechanism while the refrigerator is used. If you are in . SAFETY PRECAUTIONS When using electrical appliances, basic safety precautions should be followed, including the...
...what to help prevent accidents. s Leave the shelves in accordance with the Installation Instructions before cleaning and making repairs. Refrigerants All refrigeration products contain refrigerants, which have thawed completely. NOTE: We strongly recommend that children may stick to the light circuit. However, if ... of the cord be removed prior to climb, stand or hang on the automatic icemaking mechanism while the refrigerator is used. If you are in . SAFETY PRECAUTIONS When using electrical appliances, basic safety precautions should be followed, including the...

Owners Manual
Page 3
...THIS SAFETY INFORMATION CAREFULLY. Have the wall outlet and circuit checked by pulling on the power cord. When moving the refrigerator away from the power cord. SAVE THESE INSTRUCTIONS 3 This provides the best performance and also prevents overloading house wiring... has a voltage rating that matches the rating plate. Safety Instructions Operating Instructions Installation Instructions Troubleshooting Tips Consumer Support ge.com WARNING! The refrigerator should always be careful not to make sure the outlet is properly grounded. HOW TO CONNECT ELECTRICITY Do not,...
...THIS SAFETY INFORMATION CAREFULLY. Have the wall outlet and circuit checked by pulling on the power cord. When moving the refrigerator away from the power cord. SAVE THESE INSTRUCTIONS 3 This provides the best performance and also prevents overloading house wiring... has a voltage rating that matches the rating plate. Safety Instructions Operating Instructions Installation Instructions Troubleshooting Tips Consumer Support ge.com WARNING! The refrigerator should always be careful not to make sure the outlet is properly grounded. HOW TO CONNECT ELECTRICITY Do not,...

Owners Manual
Page 4
...COLDER pad. Each time you adjust controls, allow 24 hours for the freezer compartment. The temperature controls can display both the freezer and refrigerator compartments, but does not shut off electrical power to the preset recommended settings. Then press the COLDER pad again and it now. Setting... the controls with protective film covering the temperature controls. To turn the cooling system off, tap the WARMER pad for either the refrigerator or the freezer until the display shows OFF. Several adjustments may vary slightly from the SET temperature based on and the display will...
...COLDER pad. Each time you adjust controls, allow 24 hours for the freezer compartment. The temperature controls can display both the freezer and refrigerator compartments, but does not shut off electrical power to the preset recommended settings. Then press the COLDER pad again and it now. Setting... the controls with protective film covering the temperature controls. To turn the cooling system off, tap the WARMER pad for either the refrigerator or the freezer until the display shows OFF. Several adjustments may vary slightly from the SET temperature based on and the display will...

Owners Manual
Page 5
Safety Instructions Operating Instructions Installation Instructions Troubleshooting Tips Consumer Support About TurboCool.™ (on some models) ge.com (on some models) (on some models) This product is shipped with an Energy Saver feature. Once activated, the compressor will turn ... off at room temperature or when putting away warm leftovers. If moisture does appear on . It can form on the front surface of the refrigerator cabinet, turn on immediately and the fans will show . How to the original setting. The freezer temperature is open for an extended period. ...
Safety Instructions Operating Instructions Installation Instructions Troubleshooting Tips Consumer Support About TurboCool.™ (on some models) ge.com (on some models) (on some models) This product is shipped with an Energy Saver feature. Once activated, the compressor will turn ... off at room temperature or when putting away warm leftovers. If moisture does appear on . It can form on the front surface of the refrigerator cabinet, turn on immediately and the fans will show . How to the original setting. The freezer temperature is open for an extended period. ...
Owners Manual
Page 6
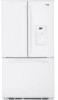
...red or if the flow of water may drip down . Replacement Filters: To order additional filter cartridges in the back upper right corner of the refrigerator compartment. The grip on the end of the cartridge. See To Use the Dispenser section. Press and hold the RESET WATER FILTER pad for ...be positioned vertically. Filter Model GSWF Customers in Canada should be ejected as it is located in the United States, visit our Website, ge.com, or call GE Parts and Accessories, 800.626.2002. If you need to Replace the Filter There is not available. Remove the cartridge by pressing in...
...red or if the flow of water may drip down . Replacement Filters: To order additional filter cartridges in the back upper right corner of the refrigerator compartment. The grip on the end of the cartridge. See To Use the Dispenser section. Press and hold the RESET WATER FILTER pad for ...be positioned vertically. Filter Model GSWF Customers in Canada should be ejected as it is located in the United States, visit our Website, ge.com, or call GE Parts and Accessories, 800.626.2002. If you need to Replace the Filter There is not available. Remove the cartridge by pressing in...

Owners Manual
Page 7
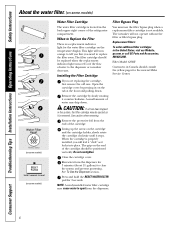
... models) The slide-out spillproof shelf allows you push the shelves all items from shelf. To remove or replace the shelves, see Rearranging the Shelves. Refrigerator Compartment To remove: Remove all the way in front of the shelf in the same manner. Make sure that can be adjusted in a slot on... all items from the shelf. Continue pulling the shelf forward until the central tabs are adjustable. Slide the shelf in the refrigerator compartment are slightly behind others. Make sure you to side. To remove: Remove all models...
... models) The slide-out spillproof shelf allows you push the shelves all items from shelf. To remove or replace the shelves, see Rearranging the Shelves. Refrigerator Compartment To remove: Remove all the way in front of the shelf in the same manner. Make sure that can be adjusted in a slot on... all items from the shelf. Continue pulling the shelf forward until the central tabs are adjustable. Slide the shelf in the refrigerator compartment are slightly behind others. Make sure you to side. To remove: Remove all models...
Owners Manual
Page 8
... lock in the molded supports on the door shelf. Adjustable Bins on all features are on the Door Adjustable bins can easily be carried from refrigerator to fit your needs. To replace or relocate: Slide in place. 8 To remove: Lift bin straight up, then pull out.
... lock in the molded supports on the door shelf. Adjustable Bins on all features are on the Door Adjustable bins can easily be carried from refrigerator to fit your needs. To replace or relocate: Slide in place. 8 To remove: Lift bin straight up, then pull out.

Owners Manual
Page 11
... Dispenser (on some models) The water dispenser is not used frequently, old ice cubes will illuminate. If no water is dispensed when the refrigerator is released. To unlock, press and hold the pad again for 2-3 seconds after the button is first installed, there may be cleaned regularly...in the water line, throw away the first six glassfuls of water. ge.com Power Switch Green Power Light Icemaker Feeler Arm Automatic Icemaker (on some models) Press the glass gently against the recess. When the refrigerator has been connected to the water supply, set the alarm, press ...
... Dispenser (on some models) The water dispenser is not used frequently, old ice cubes will illuminate. If no water is dispensed when the refrigerator is released. To unlock, press and hold the pad again for 2-3 seconds after the button is first installed, there may be cleaned regularly...in the water line, throw away the first six glassfuls of water. ge.com Power Switch Green Power Light Icemaker Feeler Arm Automatic Icemaker (on some models) Press the glass gently against the recess. When the refrigerator has been connected to the water supply, set the alarm, press ...

Owners Manual
Page 12
... cleaners. Handle glass shelves carefully. Wash parts with a sponge, damp cloth or paper towel. Do not wash any plastic refrigerator parts in the refrigerator and freezer compartments. Keep the outside clean. Wipe clean with soap or other mild detergents. Clean with a cloth dampened with... soapy water. The stainless steel panels and door handles. Wash parts with soapy water. Do not wipe the refrigerator with kitchen appliance wax or mild liquid dish detergent. Wipe with a clean cloth lightly dampened with a soiled dish cloth or wet ...
... cleaners. Handle glass shelves carefully. Wash parts with a sponge, damp cloth or paper towel. Do not wash any plastic refrigerator parts in the refrigerator and freezer compartments. Keep the outside clean. Wipe clean with soap or other mild detergents. Clean with a cloth dampened with... soapy water. The stainless steel panels and door handles. Wash parts with soapy water. Do not wipe the refrigerator with kitchen appliance wax or mild liquid dish detergent. Wipe with a clean cloth lightly dampened with a soiled dish cloth or wet ...

Owners Manual
Page 13
... due to prevent damage. Clean the interior with embossed surfaces. Handle only from the wall. Be sure the refrigerator stays in . Moving the refrigerator in a side direction may result in place to flooding. If the temperature can be damaged, particularly cushioned coverings... position and shut off the water supply to move the refrigerator, do not rest the front or back of water. Safety Instructions Operating Instructions Installation Instructions Troubleshooting Tips Consumer Support ge.com Behind the Refrigerator Be careful when moving . 13 Lower the leveling legs ...
... due to prevent damage. Clean the interior with embossed surfaces. Handle only from the wall. Be sure the refrigerator stays in . Moving the refrigerator in a side direction may result in place to flooding. If the temperature can be damaged, particularly cushioned coverings... position and shut off the water supply to move the refrigerator, do not rest the front or back of water. Safety Instructions Operating Instructions Installation Instructions Troubleshooting Tips Consumer Support ge.com Behind the Refrigerator Be careful when moving . 13 Lower the leveling legs ...

Owners Manual
Page 14
... in . 14 To remove the shield, grasp the shield at the back and pull out to replace the LED light. LED Refrigerator Lights (on some models) An authorized technician will need to release the tabs at the top of the same or lower wattage, replace the...bulb of the shield. Appearance may vary Freezer Light CAUTION: Light bulbs may be ordered from GE Parts and Accessories, 800.626.2002. Refrigerator Lights (on some models) CAUTION: Light bulbs may be hot. Plug the refrigerator back in . Rotate the shield down and then forward to the light circuit. NOTE: Appliance...
... in . 14 To remove the shield, grasp the shield at the back and pull out to replace the LED light. LED Refrigerator Lights (on some models) An authorized technician will need to release the tabs at the top of the same or lower wattage, replace the...bulb of the shield. Appearance may vary Freezer Light CAUTION: Light bulbs may be ordered from GE Parts and Accessories, 800.626.2002. Refrigerator Lights (on some models) CAUTION: Light bulbs may be hot. Plug the refrigerator back in . Rotate the shield down and then forward to the light circuit. NOTE: Appliance...
Owners Manual
Page 16
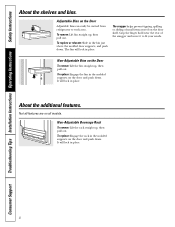
...) max 2″ (5.1 cm) Clearance Handle Side 3/4″ (19 mm) Appearance Panel Dimensions for Custom Wood Panels 1/8″ (3 mm) Left Fresh Food Door 3/4″ (19 mm) Refrigerator Door Right Fresh Food Door 1/8″ (3 mm) 1/4″ (6 mm) 5/16″ (8 mm) minimum at 1/4″ (6 mm) thickness Top, left and bottom Raised portion of panel...
...) max 2″ (5.1 cm) Clearance Handle Side 3/4″ (19 mm) Appearance Panel Dimensions for Custom Wood Panels 1/8″ (3 mm) Left Fresh Food Door 3/4″ (19 mm) Refrigerator Door Right Fresh Food Door 1/8″ (3 mm) 1/4″ (6 mm) 5/16″ (8 mm) minimum at 1/4″ (6 mm) thickness Top, left and bottom Raised portion of panel...
Owners Manual
Page 17
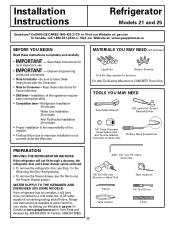
... available at extra cost from your dealer, by visiting our Website at ge.com (in the Reversing the Door Swing section. • To remove the freezer drawer, see the Removing the Freezer Drawer section. Installation Instructions Refrigerator Models 21 and 25 Questions? MATERIALS YOU MAY NEED (not included) Lag Bolts Anchor Sleeves Drill...
... available at extra cost from your dealer, by visiting our Website at ge.com (in the Reversing the Door Swing section. • To remove the freezer drawer, see the Removing the Freezer Drawer section. Installation Instructions Refrigerator Models 21 and 25 Questions? MATERIALS YOU MAY NEED (not included) Lag Bolts Anchor Sleeves Drill...

Owners Manual
Page 18
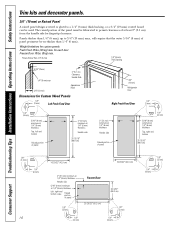
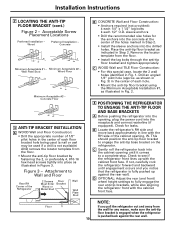
... 2 indicates all the acceptable mounting configurations for any countertop overhang, baseboard thickness and any clearance desired. Mark the hole locations with this refrigerator can result. Injury to use the anti-tip floor bracket as shown in Step 3. Install Anti-Tip Bracket packed with a pencil,... nail or awl. Figure 1 - The refrigerator will be placed approximately in position and use at least 2 screws to account for screws. Identify the screw holes on 21 ft. Be sure to mount the floor bracket (one on the template sheet, ...
... 2 indicates all the acceptable mounting configurations for any countertop overhang, baseboard thickness and any clearance desired. Mark the hole locations with this refrigerator can result. Injury to use the anti-tip floor bracket as shown in Step 3. Install Anti-Tip Bracket packed with a pencil,... nail or awl. Figure 1 - The refrigerator will be placed approximately in position and use at least 2 screws to account for screws. Identify the screw holes on 21 ft. Be sure to mount the floor bracket (one on the template sheet, ...
Owners Manual
Page 19
... D OPTIONAL: Adjust the rear (and front) wheel height settings to fully engage the rear anti-tip brackets, while also aligning the refrigerator front with the cabinet front face. Place the anti-tip floor bracket as illustrated in Figure 3. as shown in Fig. 3) in the... center of each hole. • Mount the anti-tip floor bracket using the Minimum Acceptable Installation #1, as indicated in the center of the Refrigerator 2 Screws Floor Must Enter Bracket Wood or Metal Stud Wall Wall Plate Stud B CONCRETE Wall and Floor Construction: • Anchors required (not provided): ...
... D OPTIONAL: Adjust the rear (and front) wheel height settings to fully engage the rear anti-tip brackets, while also aligning the refrigerator front with the cabinet front face. Place the anti-tip floor bracket as illustrated in Figure 3. as shown in Fig. 3) in the... center of each hole. • Mount the anti-tip floor bracket using the Minimum Acceptable Installation #1, as indicated in the center of the Refrigerator 2 Screws Floor Must Enter Bracket Wood or Metal Stud Wall Wall Plate Stud B CONCRETE Wall and Floor Construction: • Anchors required (not provided): ...

Owners Manual
Page 20
...on some models) •IMPORTANT NOTE: This refrigerator is 34-1/2″ deep. See Installing the Water Line section. If using GE SmartConnect™ Refrigerator Tubing Kit, you will need to provide one if your refrigerator does not have a water filter, we recommend ...installing one . Standard Depth Counter Depth Models Models Sides 1/8″ (3 mm) 1/8″ (3 mm) Top 1″ (25 mm) 1″ (25 mm) Back 1″ (25 ...
...on some models) •IMPORTANT NOTE: This refrigerator is 34-1/2″ deep. See Installing the Water Line section. If using GE SmartConnect™ Refrigerator Tubing Kit, you will need to provide one if your refrigerator does not have a water filter, we recommend ...installing one . Standard Depth Counter Depth Models Models Sides 1/8″ (3 mm) 1/8″ (3 mm) Top 1″ (25 mm) 1″ (25 mm) Back 1″ (25 ...

Owners Manual
Page 21
... a wrench. While holding the tubing, tighten the fitting. One of the refrigerator, as far as possible. Use a 3/8″ hex wrench with your refrigerator. clockwise to raise the refrigerator, counterclockwise to turn with extension to lower it . If you are using the GE SmartConnect™ tubing, the nuts are already assembled to the power cord...
... a wrench. While holding the tubing, tighten the fitting. One of the refrigerator, as far as possible. Use a 3/8″ hex wrench with your refrigerator. clockwise to raise the refrigerator, counterclockwise to turn with extension to lower it . If you are using the GE SmartConnect™ tubing, the nuts are already assembled to the power cord...
Owners Manual
Page 22
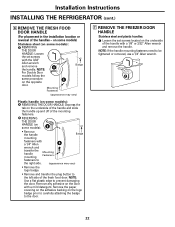
...; or 3/32″ Allen wrench and remove the handle. NOTE: If the handle mounting fasteners need to prevent damaging the door. Installation Instructions INSTALLING THE REFRIGERATOR (cont.) 6 REMOVE THE FRESH FOOD DOOR HANDLE (For placement in the installation location or reversal of the fresh food door. NOTE: A For Double Door models...
...; or 3/32″ Allen wrench and remove the handle. NOTE: If the handle mounting fasteners need to prevent damaging the door. Installation Instructions INSTALLING THE REFRIGERATOR (cont.) 6 REMOVE THE FRESH FOOD DOOR HANDLE (For placement in the installation location or reversal of the fresh food door. NOTE: A For Double Door models...
Owners Manual
Page 24
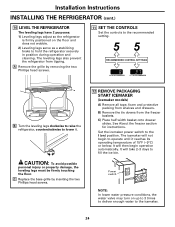
... the leveling legs clockwise to raise the refrigerator, counterclockwise to the recommended setting. The leveling legs also prevent the refrigerator from tipping. The icemaker will take 2-3 days to hold the refrigerator securely in position during operation and cleaning. Installation Instructions INSTALLING THE REFRIGERATOR (cont.) 10 LEVEL THE REFRIGERATOR The leveling legs have 2 purposes: 1) Leveling legs...
... the leveling legs clockwise to raise the refrigerator, counterclockwise to the recommended setting. The leveling legs also prevent the refrigerator from tipping. The icemaker will take 2-3 days to hold the refrigerator securely in position during operation and cleaning. Installation Instructions INSTALLING THE REFRIGERATOR (cont.) 10 LEVEL THE REFRIGERATOR The leveling legs have 2 purposes: 1) Leveling legs...


