
Owners Manual
Page 1
... y instalación La sección en español empieza en la página 93 200D9366P002 49-60530-2 01-08 JR ge.com Bottom Refr igeratoFreezerrs Safety Instructions 2, 3 Operating Instructions Additional Features 8 Automatic Icemaker 11 Care and Cleaning 12-13 Controls 4-5 Crispers ... Anti-Tip Floor Bracket 18-19 Installing the Refrigerator . . . .20-24 Installing the Water Line . . . . .33-35 Preparing to Install the Refrigerator 17 Removing and Replacing the Freezer Drawer 25, 26 Reversing the Door Swing (Single Door Refrigerator Models only 27-29 Removing and Replacing the ...
... y instalación La sección en español empieza en la página 93 200D9366P002 49-60530-2 01-08 JR ge.com Bottom Refr igeratoFreezerrs Safety Instructions 2, 3 Operating Instructions Additional Features 8 Automatic Icemaker 11 Care and Cleaning 12-13 Controls 4-5 Crispers ... Anti-Tip Floor Bracket 18-19 Installing the Refrigerator . . . .20-24 Installing the Water Line . . . . .33-35 Preparing to Install the Refrigerator 17 Removing and Replacing the Freezer Drawer 25, 26 Reversing the Door Swing (Single Door Refrigerator Models only 27-29 Removing and Replacing the ...

Owners Manual
Page 2
... doors and between the doors and cabinet are not problems of the cord be 15 amperes (minimum) and 120 volts. Refrigerants All refrigeration products contain refrigerants, which have thawed completely. WARNING! s Do not touch the cold surfaces in Canada), 3-wire grounding type appliance extension cord... with the company handling the disposal about what to climb, stand or hang on the automatic icemaking mechanism while the refrigerator is used. USE OF EXTENSION CORDS Because of the "pinch point" areas; Consumer Support Troubleshooting Tips Installation Instructions Operating...
... doors and between the doors and cabinet are not problems of the cord be 15 amperes (minimum) and 120 volts. Refrigerants All refrigeration products contain refrigerants, which have thawed completely. WARNING! s Do not touch the cold surfaces in Canada), 3-wire grounding type appliance extension cord... with the company handling the disposal about what to climb, stand or hang on the automatic icemaking mechanism while the refrigerator is used. USE OF EXTENSION CORDS Because of the "pinch point" areas; Consumer Support Troubleshooting Tips Installation Instructions Operating...

Owners Manual
Page 3
... or remove the third (ground) prong from the wall, be careful not to minimize the possibility of this appliance. The refrigerator should always be properly grounded. Do not use a cord that shows cracks or abrasion damage along its own individual electrical outlet... Instructions Installation Instructions Troubleshooting Tips Consumer Support ge.com WARNING! Where a standard 2-prong wall outlet is encountered, it is properly grounded. Never unplug your personal responsibility and obligation to make sure the outlet is your refrigerator by a qualified electrician to have become ...
... or remove the third (ground) prong from the wall, be careful not to minimize the possibility of this appliance. The refrigerator should always be properly grounded. Do not use a cord that shows cracks or abrasion damage along its own individual electrical outlet... Instructions Installation Instructions Troubleshooting Tips Consumer Support ge.com WARNING! Where a standard 2-prong wall outlet is encountered, it is properly grounded. Never unplug your personal responsibility and obligation to make sure the outlet is your refrigerator by a qualified electrician to have become ...

Owners Manual
Page 4
... press and release the WARMER or COLDER pad. Once the desired temperature has been set . The temperature controls are preset in the refrigerator and freezer. The actual temperature may be required. To change the temperature, tap either or both controls to OFF stops cooling in both... compartment. Setting either the WARMER or COLDER pad until the display shows OFF. The temperature controls can display both the freezer and refrigerator compartments, but does not shut off electrical power to reach the temperature you adjust controls, allow 24 hours for either or both controls...
... press and release the WARMER or COLDER pad. Once the desired temperature has been set . The temperature controls are preset in the refrigerator and freezer. The actual temperature may be required. To change the temperature, tap either or both controls to OFF stops cooling in both... compartment. Setting either the WARMER or COLDER pad until the display shows OFF. The temperature controls can display both the freezer and refrigerator compartments, but does not shut off electrical power to reach the temperature you adjust controls, allow 24 hours for either or both controls...

Owners Manual
Page 5
...be changed during TurboCool. The compressor will continue to more than 2 minutes. After 8 hours, or if TurboCool is pressed again, the refrigerator compartment will show . The beeping stops when you close the door. (on some models) (on some models) (on some models) ...front surface of the refrigerator cabinet, turn on immediately and the fans will sound if any door is open for more quickly cool foods. Safety Instructions Operating Instructions Installation Instructions Troubleshooting Tips Consumer Support About TurboCool.™ (on some models) ge.com (on some...
...be changed during TurboCool. The compressor will continue to more than 2 minutes. After 8 hours, or if TurboCool is pressed again, the refrigerator compartment will show . The beeping stops when you close the door. (on some models) (on some models) (on some models) ...front surface of the refrigerator cabinet, turn on immediately and the fans will sound if any door is open for more quickly cool foods. Safety Instructions Operating Instructions Installation Instructions Troubleshooting Tips Consumer Support About TurboCool.™ (on some models) ge.com (on some...
Owners Manual
Page 6
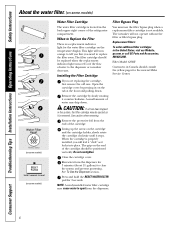
...on some models) Water Filter Cartridge Filter Bypass Plug The water filter cartridge is located in the United States, visit our Website, ge.com, or call GE Parts and Accessories, 800.626.2002. Use caution when removing. The grip on the cartridge and the cartridge holder, slowly rotate... should be replaced when the replacement indicator light turns red or if the flow of water to spurt from the end of the refrigerator compartment. When the cartridge is not available. Remove the cartridge by pressing in Canada should be positioned vertically. Do not overtighten. ...
...on some models) Water Filter Cartridge Filter Bypass Plug The water filter cartridge is located in the United States, visit our Website, ge.com, or call GE Parts and Accessories, 800.626.2002. Use caution when removing. The grip on the cartridge and the cartridge holder, slowly rotate... should be replaced when the replacement indicator light turns red or if the flow of water to spurt from the end of the refrigerator compartment. When the cartridge is not available. Remove the cartridge by pressing in Canada should be positioned vertically. Do not overtighten. ...

Owners Manual
Page 7
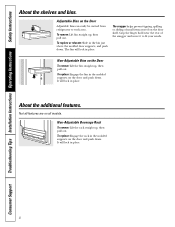
Rearranging the Shelves Shelves in before you close the door. 7 Refrigerator Compartment To remove: Remove all items from shelf. Lift the shelf up at the front. Lower the front of the shelf until the bottom of ...the central notches on some models) The slide-out spillproof shelf allows you push the shelves all the way in the refrigerator compartment are above the front bar. ge.com Spillproof Shelves (on the shelf frame. To remove: Remove all items from dripping to lower shelves. Slide the shelf out until...
Rearranging the Shelves Shelves in before you close the door. 7 Refrigerator Compartment To remove: Remove all items from shelf. Lift the shelf up at the front. Lower the front of the shelf until the bottom of ...the central notches on some models) The slide-out spillproof shelf allows you push the shelves all the way in the refrigerator compartment are above the front bar. ge.com Spillproof Shelves (on the shelf frame. To remove: Remove all items from dripping to lower shelves. Slide the shelf out until...
Owners Manual
Page 8
... door and push down . Non-Adjustable Bins on the door shelf. Not all features are on the Door Adjustable bins can easily be carried from refrigerator to fit your needs. Grip the finger hold near the rear of small items stored on the Door To remove: Lift the bin straight up...
... door and push down . Non-Adjustable Bins on the door shelf. Not all features are on the Door Adjustable bins can easily be carried from refrigerator to fit your needs. Grip the finger hold near the rear of small items stored on the Door To remove: Lift the bin straight up...

Owners Manual
Page 11
...frequently, old ice cubes will fill with an automatic icemaker, an icemaker accessory kit is made to dispense after releasing the dispenser button. When the refrigerator has been connected to 15°F (-10°C). Be sure nothing interferes with water. NOTE: In homes with a clean cloth or sponge....in the water line, throw away the first six glassfuls of ice to allow the water line to lock the dispenser and control panel. ge.com Power Switch Green Power Light Icemaker Feeler Arm Automatic Icemaker (on some models) The icemaker will illuminate. NOTE: Set the power ...
...frequently, old ice cubes will fill with an automatic icemaker, an icemaker accessory kit is made to dispense after releasing the dispenser button. When the refrigerator has been connected to 15°F (-10°C). Be sure nothing interferes with water. NOTE: In homes with a clean cloth or sponge....in the water line, throw away the first six glassfuls of ice to allow the water line to lock the dispenser and control panel. ge.com Power Switch Green Power Light Icemaker Feeler Arm Automatic Icemaker (on some models) The icemaker will illuminate. NOTE: Set the power ...

Owners Manual
Page 12
... cleaning cold glass shelves with steel-wool pads or other mild detergents. Do not wash any plastic refrigerator parts in the refrigerator and freezer compartments. Wash parts with kitchen appliance wax or mild liquid dish detergent. Consumer Support Troubleshooting Tips Installation ...wipe dry. Keep the outside clean. These may cause them to shatter. Silver-plated plastic parts. Wipe clean with a soft cloth. Unplug the refrigerator before cleaning. about a tablespoon (15 ml) of water. This helps keep the gaskets from sticking and bending out of baking soda in the...
... cleaning cold glass shelves with steel-wool pads or other mild detergents. Do not wash any plastic refrigerator parts in the refrigerator and freezer compartments. Wash parts with kitchen appliance wax or mild liquid dish detergent. Consumer Support Troubleshooting Tips Installation ...wipe dry. Keep the outside clean. These may cause them to shatter. Silver-plated plastic parts. Wipe clean with a soft cloth. Unplug the refrigerator before cleaning. about a tablespoon (15 ml) of water. This helps keep the gaskets from sticking and bending out of baking soda in the...

Owners Manual
Page 13
... the anti-tip bracket is engaged (if equipped). Preparing for Vacation For long vacations or absences, remove food and unplug the refrigerator. If the temperature can be damaged, particularly cushioned coverings and those with a baking soda solution of one tablespoon (15 ml)...base grille, shelves and drawers by pushing it to the refrigerator. Lower the leveling legs until they touch the floor. Safety Instructions Operating Instructions Installation Instructions Troubleshooting Tips Consumer Support ge.com Behind the Refrigerator Be careful when moving . 13 Raise the leveling legs ...
... the anti-tip bracket is engaged (if equipped). Preparing for Vacation For long vacations or absences, remove food and unplug the refrigerator. If the temperature can be damaged, particularly cushioned coverings and those with a baking soda solution of one tablespoon (15 ml)...base grille, shelves and drawers by pushing it to the refrigerator. Lower the leveling legs until they touch the floor. Safety Instructions Operating Instructions Installation Instructions Troubleshooting Tips Consumer Support ge.com Behind the Refrigerator Be careful when moving . 13 Raise the leveling legs ...

Owners Manual
Page 14
... some models) CAUTION: Light bulbs may be hot. NOTE: Appliance bulbs may be ordered from GE Parts and Accessories, 800.626.2002. Unplug the refrigerator. Appearance may vary Freezer Light CAUTION: Light bulbs may be hot. The bulb is located at the back. Turning the control to the...release the tabs at the back. After replacing with an appliance bulb of the same or lower wattage, replace the shield. Unplug the refrigerator. After replacing with an appliance bulb of the same or lower wattage, replace the shield. To remove the shield, grasp the shield at...
... some models) CAUTION: Light bulbs may be hot. NOTE: Appliance bulbs may be ordered from GE Parts and Accessories, 800.626.2002. Unplug the refrigerator. Appearance may vary Freezer Light CAUTION: Light bulbs may be hot. The bulb is located at the back. Turning the control to the...release the tabs at the back. After replacing with an appliance bulb of the same or lower wattage, replace the shield. Unplug the refrigerator. After replacing with an appliance bulb of the same or lower wattage, replace the shield. To remove the shield, grasp the shield at...
Owners Manual
Page 16
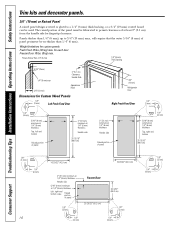
...) max 2″ (5.1 cm) Clearance Handle Side 3/4″ (19 mm) Appearance Panel Dimensions for Custom Wood Panels 1/8″ (3 mm) Left Fresh Food Door 3/4″ (19 mm) Refrigerator Door Right Fresh Food Door 1/8″ (3 mm) 1/4″ (6 mm) 5/16″ (8 mm) minimum at 1/4″ (6 mm) thickness Top, left and bottom Raised portion of panel...
...) max 2″ (5.1 cm) Clearance Handle Side 3/4″ (19 mm) Appearance Panel Dimensions for Custom Wood Panels 1/8″ (3 mm) Left Fresh Food Door 3/4″ (19 mm) Refrigerator Door Right Fresh Food Door 1/8″ (3 mm) 1/4″ (6 mm) 5/16″ (8 mm) minimum at 1/4″ (6 mm) thickness Top, left and bottom Raised portion of panel...
Owners Manual
Page 17
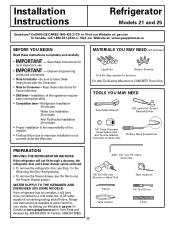
...from your dealer, by visiting our Website at ge.com (in the Reversing the Door Swing section. • To remove the freezer drawer, see the Removing the Freezer Drawer section. Installation Instructions Refrigerator Models 21 and 25 Questions? WATER SUPPLY TO THE ICEMAKER AND DISPENSER... (ON SOME MODELS) If the refrigerator has an icemaker, it will not fit through a doorway, the refrigerator door and freezer drawer can be connected to...
...from your dealer, by visiting our Website at ge.com (in the Reversing the Door Swing section. • To remove the freezer drawer, see the Removing the Freezer Drawer section. Installation Instructions Refrigerator Models 21 and 25 Questions? WATER SUPPLY TO THE ICEMAKER AND DISPENSER... (ON SOME MODELS) If the refrigerator has an icemaker, it will not fit through a doorway, the refrigerator door and freezer drawer can be connected to...

Owners Manual
Page 18
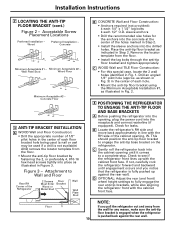
...REFRIGERATOR...RH Holes Base Bracket on the Refrigerator 71⁄4" RH Side of Refrigerator Rear RH Corner of Cabinet ... floor bracket as shown in the middle of the refrigerator. NOTE: • It is REQUIRED to mount.... models) WARNING Under certain circumstances, this refrigerator. 1 MEASURE CABINET OPENING AVAILABLE VS. Width, W, should ... Mark the hole locations with this refrigerator can result. Figure 2 indicates all ... Concrete (2 Holes) Floor - REFRIGERATOR WIDTH Measure width of cabinet opening where refrigerator will be placed, W. Installation...
...REFRIGERATOR...RH Holes Base Bracket on the Refrigerator 71⁄4" RH Side of Refrigerator Rear RH Corner of Cabinet ... floor bracket as shown in the middle of the refrigerator. NOTE: • It is REQUIRED to mount.... models) WARNING Under certain circumstances, this refrigerator. 1 MEASURE CABINET OPENING AVAILABLE VS. Width, W, should ... Mark the hole locations with this refrigerator can result. Figure 2 indicates all ... Concrete (2 Holes) Floor - REFRIGERATOR WIDTH Measure width of cabinet opening where refrigerator will be placed, W. Installation...
Owners Manual
Page 19
... Construction: • For this special case, locate the 2 wall holes identified in Step 2. Check to Wall and Floor Rear RH Corner of the Refrigerator 2 Screws Floor Must Enter Bracket Wood or Metal Stud Wall Wall Plate Stud B CONCRETE Wall and Floor Construction: • Anchors required (not provided):...the power cord into place as shown in Fig. 3) in the center of the cabinet opening until engagement occurs and you pull the refrigerator out and away from the floor. • Install the lag bolts through the anti-tip floor bracket and tighten appropriately. Concrete Minimum...
... Construction: • For this special case, locate the 2 wall holes identified in Step 2. Check to Wall and Floor Rear RH Corner of the Refrigerator 2 Screws Floor Must Enter Bracket Wood or Metal Stud Wall Wall Plate Stud B CONCRETE Wall and Floor Construction: • Anchors required (not provided):...the power cord into place as shown in Fig. 3) in the center of the cabinet opening until engagement occurs and you pull the refrigerator out and away from the floor. • Install the lag bolts through the anti-tip floor bracket and tighten appropriately. Concrete Minimum...

Owners Manual
Page 20
...8243; (3 mm) 1/8″ (3 mm) Top 1″ (25 mm) 1″ (25 mm) Back 1″ (25 mm) 1/2″ (13 mm) REMOVE TOP CAP (cont.) (on the hand truck with Step A. •If it is required for ease of the refrigerator. A REMOVE TOP CAP (on the top of installation, proper... the refrigerator. Reinstall the original screws in the water line near the refrigerator. A Locate and remove the two Phillips head screws on some models) REINSTALL DOORS, DRAWERS AND TOP CAP E Carefully lower the door onto the center hinge. If using GE SmartConnect™ Refrigerator Tubing Kit...
...8243; (3 mm) 1/8″ (3 mm) Top 1″ (25 mm) 1″ (25 mm) Back 1″ (25 mm) 1/2″ (13 mm) REMOVE TOP CAP (cont.) (on the hand truck with Step A. •If it is required for ease of the refrigerator. A REMOVE TOP CAP (on the top of installation, proper... the refrigerator. Reinstall the original screws in the water line near the refrigerator. A Locate and remove the two Phillips head screws on some models) REINSTALL DOORS, DRAWERS AND TOP CAP E Carefully lower the door onto the center hinge. If using GE SmartConnect™ Refrigerator Tubing Kit...

Owners Manual
Page 21
..., the nuts are using GE SmartConnect™ tubing, insert the molded end of the illustrations below will look like the connection on 21' Counter Depth models: These models also have rear adjustable rollers so you are already assembled to hold it in the back bottom of the refrigerator, and fit through the...
..., the nuts are using GE SmartConnect™ tubing, insert the molded end of the illustrations below will look like the connection on 21' Counter Depth models: These models also have rear adjustable rollers so you are already assembled to hold it in the back bottom of the refrigerator, and fit through the...
Owners Manual
Page 22
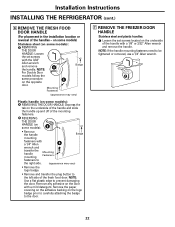
... some models): B • Remove the handle Badge mounting fasteners with a 1/8″ or 3/32″ Allen wrench and remove the handle. A 22 Installation Instructions INSTALLING THE REFRIGERATOR (cont.) 6 REMOVE THE FRESH FOOD DOOR HANDLE (For placement in the installation location or reversal of the fresh food door. REVERSING THE DOOR HANDLE (on...
... some models): B • Remove the handle Badge mounting fasteners with a 1/8″ or 3/32″ Allen wrench and remove the handle. A 22 Installation Instructions INSTALLING THE REFRIGERATOR (cont.) 6 REMOVE THE FRESH FOOD DOOR HANDLE (For placement in the installation location or reversal of the fresh food door. REVERSING THE DOOR HANDLE (on...
Owners Manual
Page 24
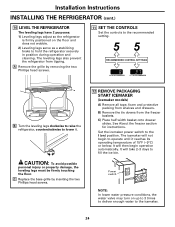
...(icemaker models) A) Remove all tape, foam and protective packing from the freezer baskets. B Turn the leveling legs clockwise to raise the refrigerator, counterclockwise to the recommended setting. See About the freezer section for instructions. Power switch NOTE: In lower water pressure conditions, the water ...valve may turn on up to 3 times to deliver enough water to hold the refrigerator securely in position during operation and cleaning. C Replace the base grille by removing the two Phillips head screws. 11 SET THE CONTROLS...
...(icemaker models) A) Remove all tape, foam and protective packing from the freezer baskets. B Turn the leveling legs clockwise to raise the refrigerator, counterclockwise to the recommended setting. See About the freezer section for instructions. Power switch NOTE: In lower water pressure conditions, the water ...valve may turn on up to 3 times to deliver enough water to hold the refrigerator securely in position during operation and cleaning. C Replace the base grille by removing the two Phillips head screws. 11 SET THE CONTROLS...


