Use and Care Manual
Page 1
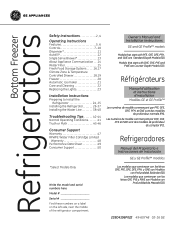
...Consumer Support 50 Owner's Manual and Installation Instructions GE and GE Profile™ models Models that start with PFE, GFE, DFE, PFH, and GNE are Standard Depth Models (SD) Models that start with DYE, GYE, PYE and PWE are Counter Depth Models (CD) Réfrigérateurs Manuel d'... modèles de profondeur normale (PN). Refrigeradores Manual del Propietario e Instrucciones de Instalación GE y GE Profile™ modelos *Select Models Only Write the model and serial numbers here: Model Serial Find these numbers on a label on the left side, near the middle of the refrigerator...
...Consumer Support 50 Owner's Manual and Installation Instructions GE and GE Profile™ models Models that start with PFE, GFE, DFE, PFH, and GNE are Standard Depth Models (SD) Models that start with DYE, GYE, PYE and PWE are Counter Depth Models (CD) Réfrigérateurs Manuel d'... modèles de profondeur normale (PN). Refrigeradores Manual del Propietario e Instrucciones de Instalación GE y GE Profile™ modelos *Select Models Only Write the model and serial numbers here: Model Serial Find these numbers on a label on the left side, near the middle of the refrigerator...
Use and Care Manual
Page 3
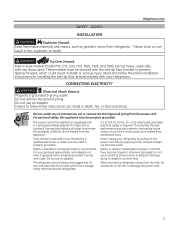
... over or damage the power cord. 3 GEAppliances.com SAFETY (CONT.) INSTALLATION WARNING Explosion Hazard. Read and follow these instructions can result in style models (model PYE, CYE, GYE, DYE, PWE, CWE, and ZWE) are top heavy, especially with any circumstances, cut or remove the third (ground)...prong wall outlet. CONNECTING ELECTRICITY WARNING Electrical Shock Hazard. Have the wall outlet and circuit checked by pulling on the power cord. These models must be careful not to make sure the outlet is required. Do not use an adapter. WARNING Tip Over Hazard. Plug into its...
... over or damage the power cord. 3 GEAppliances.com SAFETY (CONT.) INSTALLATION WARNING Explosion Hazard. Read and follow these instructions can result in style models (model PYE, CYE, GYE, DYE, PWE, CWE, and ZWE) are top heavy, especially with any circumstances, cut or remove the third (ground)...prong wall outlet. CONNECTING ELECTRICITY WARNING Electrical Shock Hazard. Have the wall outlet and circuit checked by pulling on the power cord. These models must be careful not to make sure the outlet is required. Do not use an adapter. WARNING Tip Over Hazard. Plug into its...
Use and Care Manual
Page 5
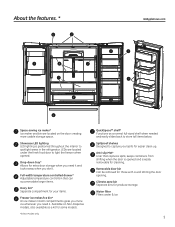
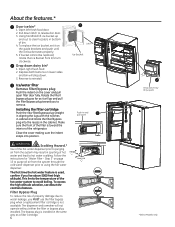
...when you need it. Removable door bin Can be removed for produce storage. Showcase LED lighting LED lighting is easily removable for some models. *Select Models Only QuickSpace™ shelf* Functions as a kit for cleaning. Water filter Filters water & Ice 5 Spillproof shelves Designed to capture ... a wall limiting the door opening. Available on the door creating more ice whenever you don't. LEDs are located on Non-Dispense models, also available as a normal full-sized shelf when needed and easily slides back to store tall items below. Full-width temperature ...
...when you need it. Removable door bin Can be removed for produce storage. Showcase LED lighting LED lighting is easily removable for some models. *Select Models Only QuickSpace™ shelf* Functions as a kit for cleaning. Water filter Filters water & Ice 5 Spillproof shelves Designed to capture ... a wall limiting the door opening. Available on the door creating more ice whenever you don't. LEDs are located on Non-Dispense models, also available as a normal full-sized shelf when needed and easily slides back to store tall items below. Full-width temperature ...
Use and Care Manual
Page 6
.../ bypass plug as far as a filter cartridge. 6 Push \ Pull 2 Drop down . 3. To replace the ice bucket, set it will drop down tray (tray open) *Select Models Only Step 3" on lower sides and bin will go and pull the filter/bypass plug toward the interior of the hot water dispenser prior to...
.../ bypass plug as far as a filter cartridge. 6 Push \ Pull 2 Drop down . 3. To replace the ice bucket, set it will drop down tray (tray open) *Select Models Only Step 3" on lower sides and bin will go and pull the filter/bypass plug toward the interior of the hot water dispenser prior to...

Use and Care Manual
Page 7
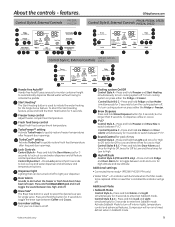
... recommended settings. The temperature controls are preset in the refrigerator and freezer. PFE28P, PYE22P Control Style A, Single Serve Models PFH28, PFE28K, DFE28, PYE22K, DYE22 Control Style B, AutoFill Models Ice GFE28, GFE26, GYE22 Control Style C, GE Models Error Complete Sensing Cubed Crushed GNE29, PWE23 Control Style D, Non-Dispense Control GEAppliances.com Refrigerator Recommended: 37 °...
... recommended settings. The temperature controls are preset in the refrigerator and freezer. PFE28P, PYE22P Control Style A, Single Serve Models PFH28, PFE28K, DFE28, PYE22K, DYE22 Control Style B, AutoFill Models Ice GFE28, GFE26, GYE22 Control Style C, GE Models Error Complete Sensing Cubed Crushed GNE29, PWE23 Control Style D, Non-Dispense Control GEAppliances.com Refrigerator Recommended: 37 °...
Use and Care Manual
Page 9
... replaced. Ice maker setting Turn your dispenser. Control Style B & C - Press and hold Brew Dispense button for 3 seconds to light your ice makers on /off . *Select Models Only Cooling system On/Off Control Style A - Additional settings: • Connected Home ready* (PFE28P, PYE22P, PFH only) • Water Filter* - Additional Mode: • Sabbath Mode...
... replaced. Ice maker setting Turn your dispenser. Control Style B & C - Press and hold Brew Dispense button for 3 seconds to light your ice makers on /off . *Select Models Only Cooling system On/Off Control Style A - Additional settings: • Connected Home ready* (PFE28P, PYE22P, PFH only) • Water Filter* - Additional Mode: • Sabbath Mode...
Use and Care Manual
Page 11
... in until it stops. „ Locate tab in the center on either side. „ Center Dispenser tray, and align with a clean cloth or sponge. *Select Models Only 11
... in until it stops. „ Locate tab in the center on either side. „ Center Dispenser tray, and align with a clean cloth or sponge. *Select Models Only 11

Use and Care Manual
Page 12
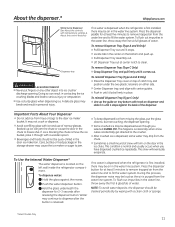
... cause scalds or burns. Important Facts about HOT WATER WARNING Scalding Hazard. • The water coming from the system prior to dispensing hot water. *Select Models Only 12 Sensors About the K-Cup Brewing System.* Important Facts about AUTOFILL • For optimum results, use a container that is suitable for about 5 minutes to...
... cause scalds or burns. Important Facts about HOT WATER WARNING Scalding Hazard. • The water coming from the system prior to dispensing hot water. *Select Models Only 12 Sensors About the K-Cup Brewing System.* Important Facts about AUTOFILL • For optimum results, use a container that is suitable for about 5 minutes to...
Use and Care Manual
Page 13
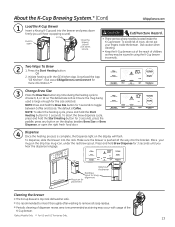
... usage of dispenser recess area is 8 oz. The default is pushed all soap residue. „ Periodic cleaning of the K-Cup brewer. *Select Models Only ** For US and US Territories Only. 13 Place your fingers inside the K-Cup brewer. The default size is recommended as they may occur with... To avoid risk of children, as staining may be injured in using the K-Cup brewer incorrectly. Two Ways To Brew 2 1. Download the App "GE Kitchen". Visit www.GEAppliances.com/connect for the size selected. NOTE: Press and hold the Start Heating button for 3 seconds, press the paddle, press...
... usage of dispenser recess area is 8 oz. The default is pushed all soap residue. „ Periodic cleaning of the K-Cup brewer. *Select Models Only ** For US and US Territories Only. 13 Place your fingers inside the K-Cup brewer. The default size is recommended as they may occur with... To avoid risk of children, as staining may be injured in using the K-Cup brewer incorrectly. Two Ways To Brew 2 1. Download the App "GE Kitchen". Visit www.GEAppliances.com/connect for the size selected. NOTE: Press and hold the Start Heating button for 3 seconds, press the paddle, press...
Use and Care Manual
Page 14
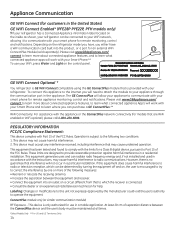
...the product, or a port for an external WiFi ConnectPlus Module (sold separately). Appliance Communication GE WiFi Connect (for customers in the United States) GE WiFi Connect Enabled* (PFE28P PYE22P, PFH models only) YIf your refrigerator has a Connected Appliance information label located on the inside as shown..., your refrigerator can be maintained at all times. *Select Models Only ** For US and US Territories Only. 14 The GE ConnectPlus will work with your smart phone for remote monitoring, control and notifications. This equipment generates uses...
...the product, or a port for an external WiFi ConnectPlus Module (sold separately). Appliance Communication GE WiFi Connect (for customers in the United States) GE WiFi Connect Enabled* (PFE28P PYE22P, PFH models only) YIf your refrigerator has a Connected Appliance information label located on the inside as shown..., your refrigerator can be maintained at all times. *Select Models Only ** For US and US Territories Only. 14 The GE ConnectPlus will work with your smart phone for remote monitoring, control and notifications. This equipment generates uses...
Use and Care Manual
Page 15
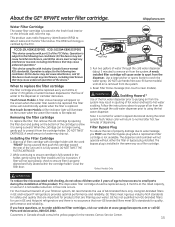
... leaks and monitor filter status. DO NOT use of dispensing. Reset Filter Status message (non-touch screen models). WARNING Scalding Hazard.* Use of hot water and lead to ensure cartridge is fully seated in GE and Hotpoint® refrigerators provides optimal performance and reliability. The dispenser and icemaker will cause water to...
... leaks and monitor filter status. DO NOT use of dispensing. Reset Filter Status message (non-touch screen models). WARNING Scalding Hazard.* Use of hot water and lead to ensure cartridge is fully seated in GE and Hotpoint® refrigerators provides optimal performance and reliability. The dispenser and icemaker will cause water to...
Use and Care Manual
Page 16
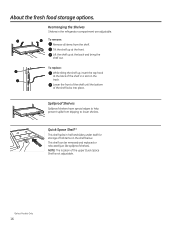
... of tall items on the track. Lower the front of the shelf until the bottom of the upper Quick Space Shelf is not adjustable. *Select Models Only 16 To replace: While tilting the shelf up at the back and bring the shelf out. To remove: Remove all items from dripping to...
... of tall items on the track. Lower the front of the shelf until the bottom of the upper Quick Space Shelf is not adjustable. *Select Models Only 16 To replace: While tilting the shelf up at the back and bring the shelf out. To remove: Remove all items from dripping to...

Use and Care Manual
Page 17
... See page 36. To replace or relocate: Slide in the bin just above the molded door supports, and push down tray * (tray open) 1. Non-Dispense Models (Left Hand Door) Non-Adjustable Bins on the Door Adjustable bins can easily be carried from refrigerator to reinstall. It will lock in place. To...: Engage the bin in the molded supports on lower sides of bin and bin will lock in its proper location. *Select Models Only 17 Adjustable Bins on the Door (Dispenser Models - See page 36. To replace: Engage the bin in the molded door supports and push down . The ice maker door...
... See page 36. To replace or relocate: Slide in the bin just above the molded door supports, and push down tray * (tray open) 1. Non-Dispense Models (Left Hand Door) Non-Adjustable Bins on the Door Adjustable bins can easily be carried from refrigerator to reinstall. It will lock in place. To...: Engage the bin in the molded supports on lower sides of bin and bin will lock in its proper location. *Select Models Only 17 Adjustable Bins on the Door (Dispenser Models - See page 36. To replace: Engage the bin in the molded door supports and push down . The ice maker door...

Use and Care Manual
Page 18
ClimateZone Keep fruits and vegetables organized in personal injury. *Select Models Only 18 Temperature Controlled Drawer* The Temperature Controlled Drawer is a full-width drawer with adjustable temperature control. About the climate zone and temperature controlled drawer. ...
ClimateZone Keep fruits and vegetables organized in personal injury. *Select Models Only 18 Temperature Controlled Drawer* The Temperature Controlled Drawer is a full-width drawer with adjustable temperature control. About the climate zone and temperature controlled drawer. ...

Use and Care Manual
Page 19
... slides until fully extended. How to Remove and Replace Drawer Divider* To remove: To replace: Pull the drawer out to the stop position. Divider *Select Models Only 19 Push the drawer in first and rotate drawer front down . Hook the back of the divider over the rear wall of the drawer...
... slides until fully extended. How to Remove and Replace Drawer Divider* To remove: To replace: Pull the drawer out to the stop position. Divider *Select Models Only 19 Push the drawer in first and rotate drawer front down . Hook the back of the divider over the rear wall of the drawer...

Use and Care Manual
Page 20
... doors. Lift it out to the stop position. Remove freezer door bin by pushing plastic tab on either left or right side to replace. *Select Models Only 20 Remove freezer basket by lifting up the rear of the basket and moving basket rearward until it locks into location until the front.... Lift it upward. Drawer Ice Bucket * (Available on either left or right side To replace: slide bin into place. Basket Removal To remove, standard depth models only: Open freezer door to remove. Freezer Basket and Drawer Basket. About the freezer. Available as a IM Kit on some...
... doors. Lift it out to the stop position. Remove freezer door bin by pushing plastic tab on either left or right side to replace. *Select Models Only 20 Remove freezer basket by lifting up the rear of the basket and moving basket rearward until it locks into location until the front.... Lift it upward. Drawer Ice Bucket * (Available on either left or right side To replace: slide bin into place. Basket Removal To remove, standard depth models only: Open freezer door to remove. Freezer Basket and Drawer Basket. About the freezer. Available as a IM Kit on some...

Use and Care Manual
Page 21
... replaced, rotate the ice bucket fork 1/4 turn the ice maker on the control. How to Turn the Ice Maker On/Off Display Type (See Page 7) Model # How to the refrigerator, the ice maker may hear a buzzing sound each time the ice maker fills with water. Control Style B, C PFH28,PFE28K,DFE28, Use... the first few batches of the upper basket. • Pull the upper basket forward to 15°F (-10°C). See the table below for some models) There is not used frequently, old ice cubes will produce seven cubes per cycle approximately 100-130 cubes in the left side of ice to...
... replaced, rotate the ice bucket fork 1/4 turn the ice maker on the control. How to Turn the Ice Maker On/Off Display Type (See Page 7) Model # How to the refrigerator, the ice maker may hear a buzzing sound each time the ice maker fills with water. Control Style B, C PFH28,PFE28K,DFE28, Use... the first few batches of the upper basket. • Pull the upper basket forward to 15°F (-10°C). See the table below for some models) There is not used frequently, old ice cubes will produce seven cubes per cycle approximately 100-130 cubes in the left side of ice to...
Use and Care Manual
Page 22
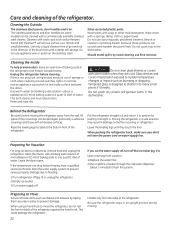
... both cleans and neutralizes odors. CAUTION Do not clean glass shelves or covers with embossed surfaces. Do not use appliance wax or polish on some models) can be cleaned with a sponge, damp cloth or paper towel. If this is designed to shatter into many small pieces if it breaks. Moving the...
... both cleans and neutralizes odors. CAUTION Do not clean glass shelves or covers with embossed surfaces. Do not use appliance wax or polish on some models) can be cleaned with a sponge, damp cloth or paper towel. If this is designed to shatter into many small pieces if it breaks. Moving the...
Use and Care Manual
Page 23
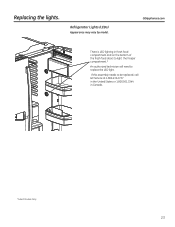
GEAppliances.com There is LED lighting in Canada. *Select Models Only 23 Refrigerator Lights (LEDs) Appearance may vary by model. If this assembly needs to be replaced, call GE Service at 1.800.432.2737 in the United States or 1.800.561.3344 in fresh food compartment and on the bottom of the fresh food doors to light the freezer compartment.* An authorized technician will need to replace the LED light. Replacing the lights.
GEAppliances.com There is LED lighting in Canada. *Select Models Only 23 Refrigerator Lights (LEDs) Appearance may vary by model. If this assembly needs to be replaced, call GE Service at 1.800.432.2737 in the United States or 1.800.561.3344 in fresh food compartment and on the bottom of the fresh food doors to light the freezer compartment.* An authorized technician will need to replace the LED light. Replacing the lights.

Use and Care Manual
Page 24
WARNING Tip Over Hazard. Built-in style models (model PYE, GYE, DYE, CWE, CYE, PWE, and ZWE) are top heavy, especially with the Consumer. • Note to Installer - Call 800.GE.CARES (800.432.2737) or visit our Website at: GEAppliances.com In ... Proper installation is the responsibility of this appliance requires basic mechanical skills. • Completion time - Installation Instructions Refrigerator GE and GE Profile™ models Questions? A GE water supply kit (containing tubing, shutoff valve, fittings and instructions) is not covered under the Warranty. Read and...
WARNING Tip Over Hazard. Built-in style models (model PYE, GYE, DYE, CWE, CYE, PWE, and ZWE) are top heavy, especially with the Consumer. • Note to Installer - Call 800.GE.CARES (800.432.2737) or visit our Website at: GEAppliances.com In ... Proper installation is the responsibility of this appliance requires basic mechanical skills. • Completion time - Installation Instructions Refrigerator GE and GE Profile™ models Questions? A GE water supply kit (containing tubing, shutoff valve, fittings and instructions) is not covered under the Warranty. Read and...

