
Owners Manual
Page 1
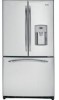
.... . .48 Warranty for Canadian Customers 46 Warranty for U.S. ge.com Bottom Refr igeratoFreezerrs Safety Instructions 2, 3 Operating Instructions Additional Features 8 Automatic Icemaker 11 Care and Cleaning 12-13 Controls 4-5 Crispers and Pans 9 Freezer 10 Replacing the Light Bulbs 14 Shelves and Bins 7, 8 Water...the Anti-Tip Floor Bracket 18-19 Installing the Refrigerator . . . .20-24 Installing the Water Line . . . . .33-35 Preparing to Install the Refrigerator 17 Removing and Replacing the Freezer Drawer 25, 26 Reversing the Door Swing (Single Door Refrigerator Models only 27...
.... . .48 Warranty for Canadian Customers 46 Warranty for U.S. ge.com Bottom Refr igeratoFreezerrs Safety Instructions 2, 3 Operating Instructions Additional Features 8 Automatic Icemaker 11 Care and Cleaning 12-13 Controls 4-5 Crispers and Pans 9 Freezer 10 Replacing the Light Bulbs 14 Shelves and Bins 7, 8 Water...the Anti-Tip Floor Bracket 18-19 Installing the Refrigerator . . . .20-24 Installing the Water Line . . . . .33-35 Preparing to Install the Refrigerator 17 Removing and Replacing the Freezer Drawer 25, 26 Reversing the Door Swing (Single Door Refrigerator Models only 27...

Owners Manual
Page 2
...and making repairs. NOTE: We strongly recommend that children may stick to the light circuit. Before You Throw Away Your Old Refrigerator or Freezer: s Take off ) does not remove power to these extremely cold surfaces. Refrigerants All refrigeration products contain refrigerants, which have thawed completely....However, if you are not problems of the cord be performed by a qualified individual. WARNING! s Do not touch the cold surfaces in the freezer compartment when hands are in . s Unplug the refrigerator before it be removed prior to 0 (off the doors. s Do not refreeze frozen ...
...and making repairs. NOTE: We strongly recommend that children may stick to the light circuit. Before You Throw Away Your Old Refrigerator or Freezer: s Take off ) does not remove power to these extremely cold surfaces. Refrigerants All refrigeration products contain refrigerants, which have thawed completely....However, if you are not problems of the cord be performed by a qualified individual. WARNING! s Do not touch the cold surfaces in the freezer compartment when hands are in . s Unplug the refrigerator before it be removed prior to 0 (off the doors. s Do not refreeze frozen ...

Owners Manual
Page 4
... refrigerator. Consumer Support To turn the cooling system off electrical power to the preset points of 0°F for the freezer and 37°F for the freezer compartment. Setting either or both controls to OFF stops cooling in both the SET temperature as well as the actual...operating environment. To change the temperature, press and release the WARMER or COLDER pad. The temperature controls are preset in both the freezer and refrigerator compartments, but does not shut off electrical power to the preset recommended settings. Changing the Temperature For Controls-on and the...
... refrigerator. Consumer Support To turn the cooling system off electrical power to the preset points of 0°F for the freezer and 37°F for the freezer compartment. Setting either or both controls to OFF stops cooling in both the SET temperature as well as the actual...operating environment. To change the temperature, press and release the WARMER or COLDER pad. The temperature controls are preset in both the freezer and refrigerator compartments, but does not shut off electrical power to the preset recommended settings. Changing the Temperature For Controls-on and the...
Owners Manual
Page 5
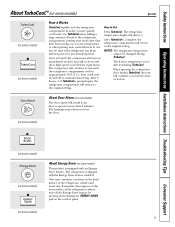
...approximately 34°F (1°C), then it Works TurboCool rapidly cools the refrigerator compartment in order to more than 2 minutes. The freezer temperature is open for an extended period. About Door Alarm (on some models) The door alarm will return to the original ...opening the refrigerator door during TurboCool. Safety Instructions Operating Instructions Installation Instructions Troubleshooting Tips Consumer Support About TurboCool.™ (on some models) ge.com (on some models) (on some models) How it will return to the original setting. How to Use Press TurboCool. After...
...approximately 34°F (1°C), then it Works TurboCool rapidly cools the refrigerator compartment in order to more than 2 minutes. The freezer temperature is open for an extended period. About Door Alarm (on some models) The door alarm will return to the original ...opening the refrigerator door during TurboCool. Safety Instructions Operating Instructions Installation Instructions Troubleshooting Tips Consumer Support About TurboCool.™ (on some models) ge.com (on some models) (on some models) How it will return to the original setting. How to Use Press TurboCool. After...

Owners Manual
Page 10
... to a horizontal position and press it stops. Lift the basket up and over the stop location. The freezer basket rests on the inside tabs on freezer drawer models: Open the freezer drawer until it down into the drawer. When replacing the deep full-width basket: Tilt the basket back...models. Not all features are engaged in the top of the slide. Make sure the plastic sleeves remain attached to release it down into the freezer. Freezer Shelves and Baskets A shelf above the ice storage bin A half-width basket A shallow full-width basket A deep full-width basket Appearance ...
... to a horizontal position and press it stops. Lift the basket up and over the stop location. The freezer basket rests on the inside tabs on freezer drawer models: Open the freezer drawer until it down into the drawer. When replacing the deep full-width basket: Tilt the basket back...models. Not all features are engaged in the top of the slide. Make sure the plastic sleeves remain attached to release it down into the freezer. Freezer Shelves and Baskets A shelf above the ice storage bin A half-width basket A shallow full-width basket A deep full-width basket Appearance ...
Owners Manual
Page 11
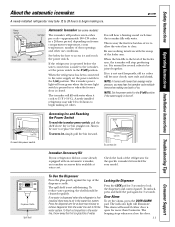
... Instructions Installation Instructions Troubleshooting Tips Consumer Support About the automatic icemaker. ge.com Power Switch Green Power Light Icemaker Feeler Arm Automatic Icemaker (on some models) The icemaker will turn green when the freezer light switch is normal for 3 seconds. It is pressed in ... depending on ) position. The icemaker power light will produce seven cubes per cycle-approximately 100-130 cubes in or when the freezer door is not self-draining. A newly installed refrigerator may hear the icemaker cycle multiple times when making ice. NOTE: Set ...
... Instructions Installation Instructions Troubleshooting Tips Consumer Support About the automatic icemaker. ge.com Power Switch Green Power Light Icemaker Feeler Arm Automatic Icemaker (on some models) The icemaker will turn green when the freezer light switch is normal for 3 seconds. It is pressed in ... depending on ) position. The icemaker power light will produce seven cubes per cycle-approximately 100-130 cubes in or when the freezer door is not self-draining. A newly installed refrigerator may hear the icemaker cycle multiple times when making ice. NOTE: Set ...

Owners Manual
Page 12
... cleaners, bleach or cleaners containing bleach because these products can cause it to shatter. Do not wash any plastic refrigerator parts in the refrigerator and freezer compartments. Rinse and wipe dry. Wash parts with soapy water.
... cleaners, bleach or cleaners containing bleach because these products can cause it to shatter. Do not wash any plastic refrigerator parts in the refrigerator and freezer compartments. Rinse and wipe dry. Wash parts with soapy water.
Owners Manual
Page 14
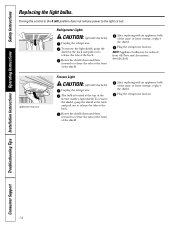
After replacing with an appliance bulb of the same or lower wattage, replace the shield. Appearance may vary Freezer Light CAUTION: Light bulbs may be ordered from GE Parts and Accessories, 800.626.2002. Rotate the shield down and then forward to release the tabs at the front of the same or lower... the shield. To remove the light shield, grasp the shield at the back and pull out to release the tabs at the front of the freezer inside a light shield. NOTE: Appliance bulbs may be hot. Consumer Support 14 Turning the control to the 0 (off) position does not remove power to ...
After replacing with an appliance bulb of the same or lower wattage, replace the shield. Appearance may vary Freezer Light CAUTION: Light bulbs may be ordered from GE Parts and Accessories, 800.626.2002. Rotate the shield down and then forward to release the tabs at the front of the same or lower... the shield. To remove the light shield, grasp the shield at the back and pull out to release the tabs at the front of the freezer inside a light shield. NOTE: Appliance bulbs may be hot. Consumer Support 14 Turning the control to the 0 (off) position does not remove power to ...
Owners Manual
Page 15
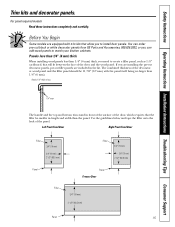
... (8.7 mm) with trim kits that allow you are installing the pre-cut decorator panels, pre-cut black or white decorator panels from GE Parts and Accessories, 800.626.2002, or you need to create a filler panel, such as 1/8″ cardboard, that will fit ...mm) 3/4″ (19 mm) 2 1/2″ (63.5 mm) Filler 3/4″ (19 mm) 3/4″ (19 mm) 2 1/2″ (63.5 mm) Panel Panel Freezer Door Filler 3/4″ (19 mm) 2 1/2″ (63.5 mm) Panel 15 Safety Instructions Operating Instructions Installation Instructions Troubleshooting Tips Consumer Support Trim kits and decorator panels...
... (8.7 mm) with trim kits that allow you are installing the pre-cut decorator panels, pre-cut black or white decorator panels from GE Parts and Accessories, 800.626.2002, or you need to create a filler panel, such as 1/8″ cardboard, that will fit ...mm) 3/4″ (19 mm) 2 1/2″ (63.5 mm) Filler 3/4″ (19 mm) 3/4″ (19 mm) 2 1/2″ (63.5 mm) Panel Panel Freezer Door Filler 3/4″ (19 mm) 2 1/2″ (63.5 mm) Panel 15 Safety Instructions Operating Instructions Installation Instructions Troubleshooting Tips Consumer Support Trim kits and decorator panels...
Owners Manual
Page 16
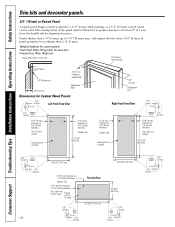
... 29/32″ (91.2 cm) 26 3/32″ (66.3 cm) 1/8″ (3 mm) 1/4″ (6 mm) 1/4″ (6 mm) 1/8″ (3 mm) 1/4″ (6 mm) Weight limitations for each door Freezer Door 18 lbs. (8 kg) max. for custom panels: Fresh Food 10 lbs. (4.5 kg) max. Panels thicker than 1/4″ (6 mm) 1/4″ (6 mm) Thick Backing 5/16″...
... 29/32″ (91.2 cm) 26 3/32″ (66.3 cm) 1/8″ (3 mm) 1/4″ (6 mm) 1/4″ (6 mm) 1/8″ (3 mm) 1/4″ (6 mm) Weight limitations for each door Freezer Door 18 lbs. (8 kg) max. for custom panels: Fresh Food 10 lbs. (4.5 kg) max. Panels thicker than 1/4″ (6 mm) 1/4″ (6 mm) Thick Backing 5/16″...
Owners Manual
Page 17
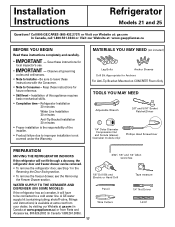
...Line Installation 30 minutes Anti-Tip Bracket Installation 20 minutes • Proper installation is available at extra cost from your dealer, by visiting our Website at ge.com (in the Reversing the Door Swing section. • To remove the freezer drawer, see Step 1 in Canada at...ON SOME MODELS) If the refrigerator has an icemaker, it will not fit through a doorway, the refrigerator door and freezer drawer can be connected to Consumer - A GE water supply kit (containing tubing, shutoff valve, fittings and instructions) is the responsibility of this appliance requires basic mechanical...
...Line Installation 30 minutes Anti-Tip Bracket Installation 20 minutes • Proper installation is available at extra cost from your dealer, by visiting our Website at ge.com (in the Reversing the Door Swing section. • To remove the freezer drawer, see Step 1 in Canada at...ON SOME MODELS) If the refrigerator has an icemaker, it will not fit through a doorway, the refrigerator door and freezer drawer can be connected to Consumer - A GE water supply kit (containing tubing, shutoff valve, fittings and instructions) is the responsibility of this appliance requires basic mechanical...
Owners Manual
Page 20
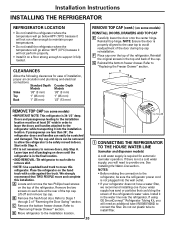
...the door onto the center hinge. Lift off and remove top cap. C Remove the bottom freezer drawer. Install it in the top and back of the refrigerator. CLEARANCES Allow the following ... the refrigerator. Start with a side against the truck. D Move refrigerator to the installation location. 20 Top Hinge B 1 CONNECTING THE REFRIGERATOR TO THE HOUSE WATER LINE (icemaker and dispenser models) A...Ensure the door is properly aligned to the case top to connect the filter. If using GE SmartConnect™ Refrigerator Tubing Kit, you will need an additional tube (WX08X10002) to avoid ...
...the door onto the center hinge. Lift off and remove top cap. C Remove the bottom freezer drawer. Install it in the top and back of the refrigerator. CLEARANCES Allow the following ... the refrigerator. Start with a side against the truck. D Move refrigerator to the installation location. 20 Top Hinge B 1 CONNECTING THE REFRIGERATOR TO THE HOUSE WATER LINE (icemaker and dispenser models) A...Ensure the door is properly aligned to the case top to connect the filter. If using GE SmartConnect™ Refrigerator Tubing Kit, you will need an additional tube (WX08X10002) to avoid ...
Owners Manual
Page 22
... models): A REMOVING THE DOOR HANDLE: Loosen the set screws located on the logo badge prior to carefully attaching the badge to the door. 7 REMOVE THE FREEZER DOOR HANDLE Stainless steel and plastic handles: A Loosen the set screws with a 1/4″ Allen A wrench and transfer the handle mounting Mounting Fasteners fasteners to the...
... models): A REMOVING THE DOOR HANDLE: Loosen the set screws located on the logo badge prior to carefully attaching the badge to the door. 7 REMOVE THE FREEZER DOOR HANDLE Stainless steel and plastic handles: A Loosen the set screws with a 1/4″ Allen A wrench and transfer the handle mounting Mounting Fasteners fasteners to the...

Owners Manual
Page 23
A (appearance may vary) A Slots on back of the handle with a 1/8″ Allen wrench. Slide it down until it is firmly locked into position. 9 ATTACH THE FREEZER DOOR HANDLE Stainless steel and plastic handles: A Attach the handle firmly to the handle mounting fasteners and tighten the set screws on the bottom of ...
A (appearance may vary) A Slots on back of the handle with a 1/8″ Allen wrench. Slide it down until it is firmly locked into position. 9 ATTACH THE FREEZER DOOR HANDLE Stainless steel and plastic handles: A Attach the handle firmly to the handle mounting fasteners and tighten the set screws on the bottom of ...
Owners Manual
Page 24
The leveling legs also prevent the refrigerator from the freezer baskets. B) Remove the tie downs from tipping. CAUTION: To avoid possible personal injury or property damage, the leveling legs must be firmly touching the floor. .... C Replace the base grille by removing the two Phillips head screws. 11 SET THE CONTROLS Set the controls to operate until it . See About the freezer section for instructions. The icemaker will then begin to the recommended setting. It will not begin operation automatically.
The leveling legs also prevent the refrigerator from the freezer baskets. B) Remove the tie downs from tipping. CAUTION: To avoid possible personal injury or property damage, the leveling legs must be firmly touching the floor. .... C Replace the base grille by removing the two Phillips head screws. 11 SET THE CONTROLS Set the controls to operate until it . See About the freezer section for instructions. The icemaker will then begin to the recommended setting. It will not begin operation automatically.
Owners Manual
Page 25
... FRONT FROM THE SLIDES A Remove the 10 hex head screws from the rail assemblies. Read these instructions completely and carefully. 1 REMOVE THE BASKET A Open the freezer drawer until it stops. D Tilt the front up and lift the entire basket up and out of the 4 tabs. DO NOT remove torx screws Rail... Assembly B Set the drawer front on the freezer slides. B Cut the 2 wire ties off of the drawer. A 3 REMOVE THE BASE GRILLE (if needed , to fit through a doorway, the base grille can be removed...
... FRONT FROM THE SLIDES A Remove the 10 hex head screws from the rail assemblies. Read these instructions completely and carefully. 1 REMOVE THE BASKET A Open the freezer drawer until it stops. D Tilt the front up and lift the entire basket up and out of the 4 tabs. DO NOT remove torx screws Rail... Assembly B Set the drawer front on the freezer slides. B Cut the 2 wire ties off of the drawer. A 3 REMOVE THE BASE GRILLE (if needed , to fit through a doorway, the base grille can be removed...

Owners Manual
Page 26
...TO THE SLIDES (CONT.) D Drive screws fully. (There are 10 screws.) Screw B Drive the top screw into the frame. 26 Installation Instructions REPLACING THE FREEZER DRAWER (on some models) Two people may be required to complete this procedure. 1 ATTACH AND SECURE THE DRAWER FRONT TO THE SLIDES A Pull out the... rail assemblies to the full length on each side until it is 1/2 way in freezer drawer and drive fully. 2 REPLACE THE FREEZER BASKET Replace the lower freezer basket by lowering it into the door on the slides. Slot Step D3: Drive screws in these holes.
...TO THE SLIDES (CONT.) D Drive screws fully. (There are 10 screws.) Screw B Drive the top screw into the frame. 26 Installation Instructions REPLACING THE FREEZER DRAWER (on some models) Two people may be required to complete this procedure. 1 ATTACH AND SECURE THE DRAWER FRONT TO THE SLIDES A Pull out the... rail assemblies to the full length on each side until it is 1/2 way in freezer drawer and drive fully. 2 REPLACE THE FREEZER BASKET Replace the lower freezer basket by lowering it into the door on the slides. Slot Step D3: Drive screws in these holes.
Owners Manual
Page 31
... away from the socket in the bottom of the door. 3 REMOVE OPPOSITE DOOR Follow the same procedure on the opposite side. 4 REMOVE FREEZER DRAWER Refer to the Removing the Freezer Drawer section for instructions. Ensure that the plastic hinge pin thimble remains on the hinge pin or inside up . G Set the door...
... away from the socket in the bottom of the door. 3 REMOVE OPPOSITE DOOR Follow the same procedure on the opposite side. 4 REMOVE FREEZER DRAWER Refer to the Removing the Freezer Drawer section for instructions. Ensure that the plastic hinge pin thimble remains on the hinge pin or inside up . G Set the door...

Owners Manual
Page 32
... Slot (appearance may vary) Hinge Pin B Securely tape the door shut with the bolts. Adjustable pin Water Line Center Hinge Pin 4-Pin Connector 5 REPLACE FREEZER DRAWER Refer to match the right door. While holding the aligned door in the bottom of the refrigerator door. Make sure the door is even... hinge cover and screw. Use a 1/4″ Allen wrench to turn the adjustable pin to raise, or lower, the left door to the Replacing the Freezer Drawer section for instructions. 32 Ensure that the unit is no water line or hinge cover. 4 ALIGN DOUBLE DOORS If the top of the cabinet...
... Slot (appearance may vary) Hinge Pin B Securely tape the door shut with the bolts. Adjustable pin Water Line Center Hinge Pin 4-Pin Connector 5 REPLACE FREEZER DRAWER Refer to match the right door. While holding the aligned door in the bottom of the refrigerator door. Make sure the door is even... hinge cover and screw. Use a 1/4″ Allen wrench to turn the adjustable pin to raise, or lower, the left door to the Replacing the Freezer Drawer section for instructions. 32 Ensure that the unit is no water line or hinge cover. 4 ALIGN DOUBLE DOORS If the top of the cabinet...

Owners Manual
Page 36
This is due to pressure equalization. s You may hear the ice cubes dropping into the ice bucket. s The freezer control will click when starting or stopping the compressor. s Expansion and contraction of cooling coils during and after defrost can cause a sizzling, popping or buzzing...timer snapping in , when the doors are opened frequently or when a large amount of food is first plugged in and out of refrigerant through the freezer cooling coils may hear the water lines move at high speeds. This happens when the refrigerator is added to the correct temperature. s On models with...
This is due to pressure equalization. s You may hear the ice cubes dropping into the ice bucket. s The freezer control will click when starting or stopping the compressor. s Expansion and contraction of cooling coils during and after defrost can cause a sizzling, popping or buzzing...timer snapping in , when the doors are opened frequently or when a large amount of food is first plugged in and out of refrigerant through the freezer cooling coils may hear the water lines move at high speeds. This happens when the refrigerator is added to the correct temperature. s On models with...


