
Owners Manual
Page 1
... serial numbers here: Model Serial Find these numbers on a label on the right side, near the top of California Water Treatment Device Certificate . . . . .48 Warranty for Canadian Customers 46 Warranty for U.S. ge.com Bottom Refr igeratoFreezerrs Safety Instructions 2, 3 Operating Instructions Additional Features ...19 Installing the Refrigerator . . . .20-24 Installing the Water Line . . . . .33-35 Preparing to Install the Refrigerator 17 Removing and Replacing the Freezer Drawer 25, 26 Reversing the Door Swing (Single Door Refrigerator Models only 27-29 Removing and Replacing the ...
... serial numbers here: Model Serial Find these numbers on a label on the right side, near the top of California Water Treatment Device Certificate . . . . .48 Warranty for Canadian Customers 46 Warranty for U.S. ge.com Bottom Refr igeratoFreezerrs Safety Instructions 2, 3 Operating Instructions Additional Features ...19 Installing the Refrigerator . . . .20-24 Installing the Water Line . . . . .33-35 Preparing to Install the Refrigerator 17 Removing and Replacing the Freezer Drawer 25, 26 Reversing the Door Swing (Single Door Refrigerator Models only 27-29 Removing and Replacing the ...

Owners Manual
Page 4
Once the desired temperature has been set . Changing the Temperature For Controls-on-the-Door Models: To change the temperature, tap either the refrigerator or freezer. Each time you adjust controls, allow 24 hours ... the WARMER or COLDER pad. Troubleshooting Tips Installation Instructions Operating Instructions Safety Instructions About the controls with temperature settings. (on some models) (on some models) NOTE: The refrigerator is displayed. Several adjustments may vary slightly from the SET temperature based on usage and operating environment. Allow...
Once the desired temperature has been set . Changing the Temperature For Controls-on-the-Door Models: To change the temperature, tap either the refrigerator or freezer. Each time you adjust controls, allow 24 hours ... the WARMER or COLDER pad. Troubleshooting Tips Installation Instructions Operating Instructions Safety Instructions About the controls with temperature settings. (on some models) (on some models) NOTE: The refrigerator is displayed. Several adjustments may vary slightly from the SET temperature based on usage and operating environment. Allow...
Owners Manual
Page 5
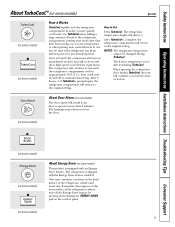
...needed for eight hours. Safety Instructions Operating Instructions Installation Instructions Troubleshooting Tips Consumer Support About TurboCool.™ (on some models) ge.com (on some models) (on some models) 5 Use TurboCool when adding a large amount of food to approximately 34°F (1°C), then it Works TurboCool... feature. When opening the refrigerator door during TurboCool. The beeping stops when you close the door. (on some models) (on some models) (on some models) About Energy Saver (on and off the Energy Saver feature by pressing and releasing the ENERGY SAVER pad on...
...needed for eight hours. Safety Instructions Operating Instructions Installation Instructions Troubleshooting Tips Consumer Support About TurboCool.™ (on some models) ge.com (on some models) (on some models) 5 Use TurboCool when adding a large amount of food to approximately 34°F (1°C), then it Works TurboCool... feature. When opening the refrigerator door during TurboCool. The beeping stops when you close the door. (on some models) (on some models) (on some models) About Energy Saver (on and off the Energy Saver feature by pressing and releasing the ENERGY SAVER pad on...
Owners Manual
Page 6
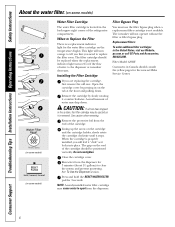
... 11⁄2 gallons) to Replace the Filter There is properly installed, you will not operate without the filter or filter bypass plug. Filter Model GSWF Customers in the back upper right corner of the cartridge. Do not overtighten. CAUTION: If air has been trapped in the United States..., visit our Website, ge.com, or call GE Parts and Accessories, 800.626.2002. See To Use the Dispenser section. Replacement Filters: To order additional filter cartridges in the ...
... 11⁄2 gallons) to Replace the Filter There is properly installed, you will not operate without the filter or filter bypass plug. Filter Model GSWF Customers in the back upper right corner of the cartridge. Do not overtighten. CAUTION: If air has been trapped in the United States..., visit our Website, ge.com, or call GE Parts and Accessories, 800.626.2002. See To Use the Dispenser section. Replacement Filters: To order additional filter cartridges in the ...

Owners Manual
Page 7
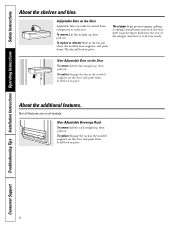
... The special edges are designed to help prevent spills from side to lower shelves. Lower the shelf into place. ge.com Spillproof Shelves (on some models) The slide-out spillproof shelf allows you to lower shelves. Make sure that can be adjusted in until it can...Instructions Installation Instructions Troubleshooting Tips Consumer Support About the shelves and bins. Lift the front edge of the central notches on some models) Spillproof shelves have wire shelves that the shelf sits flat after reinstallation and doesn't move freely from dripping to reach items ...
... The special edges are designed to help prevent spills from side to lower shelves. Lower the shelf into place. ge.com Spillproof Shelves (on some models) The slide-out spillproof shelf allows you to lower shelves. Make sure that can be adjusted in until it can...Instructions Installation Instructions Troubleshooting Tips Consumer Support About the shelves and bins. Lift the front edge of the central notches on some models) Spillproof shelves have wire shelves that the shelf sits flat after reinstallation and doesn't move freely from dripping to reach items ...
Owners Manual
Page 8
... out. To replace or relocate: Slide in place. The bin will lock in the molded supports on the door shelf. Non-Adjustable Bins on all models. To replace: Engage the rack in place. To remove: Lift bin straight up , then pull out. Adjustable Bins on the door and push down. It...
... out. To replace or relocate: Slide in place. The bin will lock in the molded supports on the door shelf. Non-Adjustable Bins on all models. To replace: Engage the rack in place. To remove: Lift bin straight up , then pull out. Adjustable Bins on the door and push down. It...

Owners Manual
Page 9
... access the 4 swing locks. Lift the front of the drawer into the drawer supports, making sure the swing locks fit on some models) Slide the control all the way to the HIGH setting to the stop position. Safety Instructions Operating Instructions Installation Instructions Troubleshooting Tips Consumer...of the drawer up and out. Make sure all four swing locks are on some models) Slide the control all models. Pull the drawer out to provide high humidity recommended for most fruits. ge.com Adjustable Humidity Crisper (on all the way to provide lower humidity levels recommended ...
... access the 4 swing locks. Lift the front of the drawer into the drawer supports, making sure the swing locks fit on some models) Slide the control all the way to the HIGH setting to the stop position. Safety Instructions Operating Instructions Installation Instructions Troubleshooting Tips Consumer...of the drawer up and out. Make sure all four swing locks are on some models) Slide the control all models. Pull the drawer out to provide high humidity recommended for most fruits. ge.com Adjustable Humidity Crisper (on all the way to provide lower humidity levels recommended ...

Owners Manual
Page 10
Not all features are out of the slide bracket. The freezer basket rests on the inside tabs on freezer drawer models: Open the freezer drawer until it from the slides. When replacing the basket, make sure that the wire tabs and wire hooks on the ...sides of the upper basket slides. Troubleshooting Tips Installation Instructions Operating Instructions Safety Instructions About the freezer. Lift the basket so that all models. To remove the half-width basket: Pull the basket out to release it stops. Consumer Support 10 Freezer Shelves and Baskets A shelf above the...
Not all features are out of the slide bracket. The freezer basket rests on the inside tabs on freezer drawer models: Open the freezer drawer until it from the slides. When replacing the basket, make sure that the wire tabs and wire hooks on the ...sides of the upper basket slides. Troubleshooting Tips Installation Instructions Operating Instructions Safety Instructions About the freezer. Lift the basket so that all models. To remove the half-width basket: Pull the basket out to release it stops. Consumer Support 10 Freezer Shelves and Baskets A shelf above the...
Owners Manual
Page 11
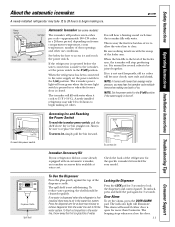
ge.com Power Switch Green Power Light Icemaker Feeler Arm Automatic Icemaker (on some models) The icemaker will stop producing ice. When the bin fills to the level of the dispenser cradle. Dispenser Cradle Spill Shelf To Use the Dispenser ... automatic icemaker. If the refrigerator is operated before the water connection is normal for 3 seconds to fill the water system. Icemaker Accessory Kit If your model. To flush out impurities in or when the freezer door is not used frequently, old ice cubes will hear a buzzing sound each time the icemaker...
ge.com Power Switch Green Power Light Icemaker Feeler Arm Automatic Icemaker (on some models) The icemaker will stop producing ice. When the bin fills to the level of the dispenser cradle. Dispenser Cradle Spill Shelf To Use the Dispenser ... automatic icemaker. If the refrigerator is operated before the water connection is normal for 3 seconds to fill the water system. Icemaker Accessory Kit If your model. To flush out impurities in or when the freezer door is not used frequently, old ice cubes will hear a buzzing sound each time the icemaker...

Owners Manual
Page 12
Dry with a commercially available stainless steel cleaner. The stainless steel panels and door handles. Stainless steel (on some models) can erode the paint. Wipe clean with hot water because the extreme temperature difference may leave a residue that can be cleaned with a soft cloth. about a ...
Dry with a commercially available stainless steel cleaner. The stainless steel panels and door handles. Stainless steel (on some models) can erode the paint. Wipe clean with hot water because the extreme temperature difference may leave a residue that can be cleaned with a soft cloth. about a ...
Owners Manual
Page 13
...the refrigerator back, make sure you don't roll over the power cord or icemaker supply line (on some models) and ensure the anti-tip bracket is engaged (if equipped). Safety Instructions Operating Instructions Installation Instructions Troubleshooting Tips Consumer Support... ge.com Behind the Refrigerator Be careful when moving . 13 All types of floor coverings can drop below freezing, have a qualified servicer drain the water supply system (on some models) to prevent serious property damage due to ...
...the refrigerator back, make sure you don't roll over the power cord or icemaker supply line (on some models) and ensure the anti-tip bracket is engaged (if equipped). Safety Instructions Operating Instructions Installation Instructions Troubleshooting Tips Consumer Support... ge.com Behind the Refrigerator Be careful when moving . 13 All types of floor coverings can drop below freezing, have a qualified servicer drain the water supply system (on some models) to prevent serious property damage due to ...
Owners Manual
Page 15
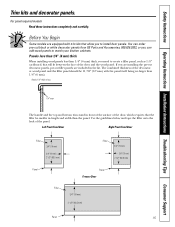
...add wood panels to install door panels. If you are installing the pre-cut decorator panels, pre-cut black or white decorator panels from GE Parts and Accessories, 800.626.2002, or you to match your kitchen cabinets. Left Fresh Food Door Right Fresh Food Door Filler 3/4″...) 3/4″ (19 mm) 2 1/2″ (63.5 mm) Panel Panel Freezer Door Filler 3/4″ (19 mm) 2 1/2″ (63.5 mm) Panel 15 For panel required models Read these instructions completely and carefully. Panels 1/4″ thick or less 1/4″ max The handle and the top and bottom trim stand in front of...
...add wood panels to install door panels. If you are installing the pre-cut decorator panels, pre-cut black or white decorator panels from GE Parts and Accessories, 800.626.2002, or you to match your kitchen cabinets. Left Fresh Food Door Right Fresh Food Door Filler 3/4″...) 3/4″ (19 mm) 2 1/2″ (63.5 mm) Panel Panel Freezer Door Filler 3/4″ (19 mm) 2 1/2″ (63.5 mm) Panel 15 For panel required models Read these instructions completely and carefully. Panels 1/4″ thick or less 1/4″ max The handle and the top and bottom trim stand in front of...
Owners Manual
Page 17
...• Note to a cold water line. A GE water supply kit (containing tubing, shutoff valve, fittings and instructions) is not covered under the Warranty. WATER SUPPLY TO THE ICEMAKER AND DISPENSER (ON SOME MODELS) If the refrigerator has an icemaker, it will...use. • IMPORTANT - Save these instructions completely and carefully. • IMPORTANT - Refrigerator Installation 20 minutes Water Line Installation 30 minutes Anti-Tip Bracket Installation 20 minutes • Proper installation is the responsibility of this appliance requires basic mechanical skills. • ...
...• Note to a cold water line. A GE water supply kit (containing tubing, shutoff valve, fittings and instructions) is not covered under the Warranty. WATER SUPPLY TO THE ICEMAKER AND DISPENSER (ON SOME MODELS) If the refrigerator has an icemaker, it will...use. • IMPORTANT - Save these instructions completely and carefully. • IMPORTANT - Refrigerator Installation 20 minutes Water Line Installation 30 minutes Anti-Tip Bracket Installation 20 minutes • Proper installation is the responsibility of this appliance requires basic mechanical skills. • ...
Owners Manual
Page 18
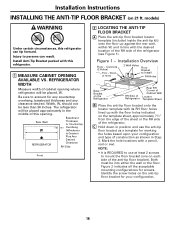
...mounting configurations for any countertop overhang, baseboard thickness and any clearance desired. Be sure to account for screws. Figure 1 - models) WARNING Under certain circumstances, this refrigerator. 1 MEASURE CABINET OPENING AVAILABLE VS. Mark the hole locations with this refrigerator can result.... Identify the screw holes on 21 ft. Installation Overview Floor - Installation Instructions INSTALLING THE ANTI-TIP FLOOR BRACKET (on the anti-tip floor bracket for ...
...mounting configurations for any countertop overhang, baseboard thickness and any clearance desired. Be sure to account for screws. Figure 1 - models) WARNING Under certain circumstances, this refrigerator. 1 MEASURE CABINET OPENING AVAILABLE VS. Mark the hole locations with this refrigerator can result.... Identify the screw holes on 21 ft. Installation Overview Floor - Installation Instructions INSTALLING THE ANTI-TIP FLOOR BRACKET (on the anti-tip floor bracket for ...
Owners Manual
Page 20
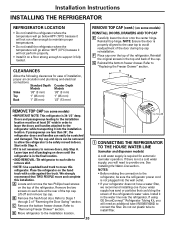
...if your refrigerator does not have a water filter, we recommend installing one . D Move refrigerator to the installation location. 20 Top Hinge B 1 CONNECTING THE REFRIGERATOR TO THE HOUSE WATER LINE (icemaker and dispenser models) A cold water supply is not a cold water supply, you will need an additional tube (WX08X10002) to connect ...freezer drawer. If there is required for ease of the door during top cap reinstallation. Install it is 34-1/2″ deep. If using GE SmartConnect™ Refrigerator Tubing Kit, you will need to move and complete this refrigerator.
...if your refrigerator does not have a water filter, we recommend installing one . D Move refrigerator to the installation location. 20 Top Hinge B 1 CONNECTING THE REFRIGERATOR TO THE HOUSE WATER LINE (icemaker and dispenser models) A cold water supply is not a cold water supply, you will need an additional tube (WX08X10002) to connect ...freezer drawer. If there is required for ease of the door during top cap reinstallation. Install it is 34-1/2″ deep. If using GE SmartConnect™ Refrigerator Tubing Kit, you will need to move and complete this refrigerator.
Owners Manual
Page 21
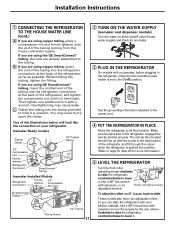
... rollers on 21' Counter Depth models: These models also have rear adjustable rollers so you can align the refrigerator with an icemaker, before plugging in the refrigerator, make sure the icemaker power switch is hand tight. B If you are using the GE SmartConnect™ tubing, the nuts... refrigerator, counterclockwise to lower it. Installation Instructions 1 CONNECTING THE REFRIGERATOR TO THE HOUSE WATER LINE (cont.) A If you are using GE SmartConnect™ tubing, insert the molded end of the tubing into the refrigerator connection, at the back of the refrigerator, and tighten ...
... rollers on 21' Counter Depth models: These models also have rear adjustable rollers so you can align the refrigerator with an icemaker, before plugging in the refrigerator, make sure the icemaker power switch is hand tight. B If you are using the GE SmartConnect™ tubing, the nuts... refrigerator, counterclockwise to lower it. Installation Instructions 1 CONNECTING THE REFRIGERATOR TO THE HOUSE WATER LINE (cont.) A If you are using GE SmartConnect™ tubing, insert the molded end of the tubing into the refrigerator connection, at the back of the refrigerator, and tighten ...
Owners Manual
Page 22
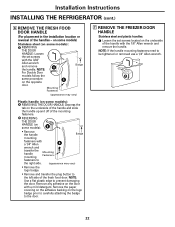
...installation location or reversal of the mounting fasteners. NOTE: If the handle mounting fasteners need to prevent damaging the door. on some models) Stainless steel (on some models): A REMOVING THE DOOR HANDLE: Depress the tab on the logo badge prior to carefully attaching the badge to the left side of... the handle with the 3/32″ Allen wrench and remove the handle. NOTE: A For Double Door models follow the same procedure B on the underside of the fresh food door. Remove the paper covering on the adhesive backing on the underside of ...
...installation location or reversal of the mounting fasteners. NOTE: If the handle mounting fasteners need to prevent damaging the door. on some models) Stainless steel (on some models): A REMOVING THE DOOR HANDLE: Depress the tab on the logo badge prior to carefully attaching the badge to the left side of... the handle with the 3/32″ Allen wrench and remove the handle. NOTE: A For Double Door models follow the same procedure B on the underside of the fresh food door. Remove the paper covering on the adhesive backing on the underside of ...

Owners Manual
Page 23
NOTE: For Double Door models follow the same procedure on back of the handle with a 1/8″ Allen wrench. A Mounting Fasteners (appearance may vary) A Slots on the opposite door. Slide it ...
NOTE: For Double Door models follow the same procedure on back of the handle with a 1/8″ Allen wrench. A Mounting Fasteners (appearance may vary) A Slots on the opposite door. Slide it ...
Owners Manual
Page 24
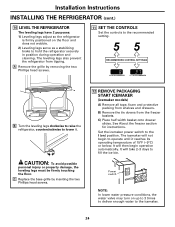
.... 24 B) Remove the tie downs from shelves and drawers. A Remove the grille by inserting the two Phillips head screws. 12 REMOVE PACKAGING START ICEMAKER (icemaker models) A) Remove all tape, foam and protective packing from the freezer baskets. C Replace the base grille by removing the two Phillips head screws. 11 SET THE...
.... 24 B) Remove the tie downs from shelves and drawers. A Remove the grille by inserting the two Phillips head screws. 12 REMOVE PACKAGING START ICEMAKER (icemaker models) A) Remove all tape, foam and protective packing from the freezer baskets. C Replace the base grille by removing the two Phillips head screws. 11 SET THE...
Owners Manual
Page 25
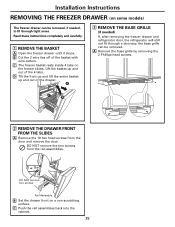
... the front up and lift the entire basket up and out of the basket with wire cutters. Installation Instructions REMOVING THE FREEZER DRAWER (on some models) The freezer drawer can be removed, if needed, to fit through tight areas. C Push the rail assemblies back into the cabinet. 25 C The freezer basket...
... the front up and lift the entire basket up and out of the basket with wire cutters. Installation Instructions REMOVING THE FREEZER DRAWER (on some models) The freezer drawer can be removed, if needed, to fit through tight areas. C Push the rail assemblies back into the cabinet. 25 C The freezer basket...

