
Owners Manual
Page 1
...Dispenser 11 Water Filter 6 Installation Instructions Installing the Anti-Tip Floor Bracket 18-19 Installing the Refrigerator 20-24 Installing the Water Line 33-35 Preparing to Install the Refrigerator 17 Removing and Replacing the Freezer Drawer 25, 26 Reversing the Door Swing (Single Door... . . . . . .36-40 Normal Operating Sounds 36 Consumer Support Consumer Support Back Cover Performance Data Sheet 43 State of the refrigerator compartment. 200D9366P008 49-60583 01-09 JR Customers 41 Owner's Manual and Installation Instructions Models 21 and 25 Congélateur inférieur...
...Dispenser 11 Water Filter 6 Installation Instructions Installing the Anti-Tip Floor Bracket 18-19 Installing the Refrigerator 20-24 Installing the Water Line 33-35 Preparing to Install the Refrigerator 17 Removing and Replacing the Freezer Drawer 25, 26 Reversing the Door Swing (Single Door... . . . . . .36-40 Normal Operating Sounds 36 Consumer Support Consumer Support Back Cover Performance Data Sheet 43 State of the refrigerator compartment. 200D9366P008 49-60583 01-09 JR Customers 41 Owner's Manual and Installation Instructions Models 21 and 25 Congélateur inférieur...

Owners Manual
Page 2
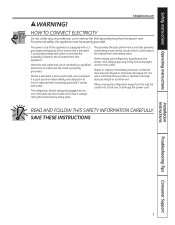
... in Canada), 3-wire grounding type appliance extension cord having a grounding type plug 2 and outlet and that the electrical rating of your old refrigerator, please follow the instructions below to do. If you are necessarily small. I Do not store or use gasoline or other appliance. I...prior to 0 (off the doors. NOTE: We strongly recommend that releases the cubes. RISK OF CHILD ENTRAPMENT PROPER DISPOSAL OF THE REFRIGERATOR Child entrapment and suffocation are getting rid of the past. USE OF EXTENSION CORDS Because of potential safety hazards under federal law must be...
... in Canada), 3-wire grounding type appliance extension cord having a grounding type plug 2 and outlet and that the electrical rating of your old refrigerator, please follow the instructions below to do. If you are necessarily small. I Do not store or use gasoline or other appliance. I...prior to 0 (off the doors. NOTE: We strongly recommend that releases the cubes. RISK OF CHILD ENTRAPMENT PROPER DISPOSAL OF THE REFRIGERATOR Child entrapment and suffocation are getting rid of the past. USE OF EXTENSION CORDS Because of potential safety hazards under federal law must be...
Owners Manual
Page 3
...INSTRUCTIONS Installation Instructions Troubleshooting Tips Consumer Support 3 For personal safety, this appliance. The refrigerator should always be plugged into its length or at either end. When moving the refrigerator away from the wall, be properly grounded. Safety Instructions Operating Instructions GEAppliances.com ... or otherwise damaged. Do not use a cord that matches the rating plate. Where a standard 2-prong wall outlet is your refrigerator by a qualified electrician to roll over or damage the power cord. Repair or replace immediately all power cords that have it...
...INSTRUCTIONS Installation Instructions Troubleshooting Tips Consumer Support 3 For personal safety, this appliance. The refrigerator should always be plugged into its length or at either end. When moving the refrigerator away from the wall, be properly grounded. Safety Instructions Operating Instructions GEAppliances.com ... or otherwise damaged. Do not use a cord that matches the rating plate. Where a standard 2-prong wall outlet is your refrigerator by a qualified electrician to roll over or damage the power cord. Repair or replace immediately all power cords that have it...

Owners Manual
Page 4
...removed during installation, remove it will go to the preset points of 0°F for the freezer and 37°F for the refrigerator to reach the temperature you have set , the temperature display will show the actual temperature. The temperature controls can display both ...is displayed. To change the temperature, press and release the WARMER or COLDER pad. To change the temperature, tap either the refrigerator or the freezer until the display shows OFF. Operating Instructions Safety Instructions About the controls with protective film covering the temperature controls....
...removed during installation, remove it will go to the preset points of 0°F for the freezer and 37°F for the refrigerator to reach the temperature you have set , the temperature display will show the actual temperature. The temperature controls can display both ...is displayed. To change the temperature, press and release the WARMER or COLDER pad. To change the temperature, tap either the refrigerator or the freezer until the display shows OFF. Operating Instructions Safety Instructions About the controls with protective film covering the temperature controls....

Owners Manual
Page 5
...Support (on some models) (on some models) About Energy Saver (on some models) 5 If moisture does appear on the front surface of the refrigerator cabinet, turn on immediately and the fans will cycle on and off at room temperature or when putting away warm leftovers. Use TurboCool when adding... a large amount of the refrigerator cabinet and cause rust. How to the refrigerator compartment, putting away foods after they have been sitting out at high speed as needed for eight hours. The freezer ...
...Support (on some models) (on some models) About Energy Saver (on some models) 5 If moisture does appear on the front surface of the refrigerator cabinet, turn on immediately and the fans will cycle on and off at room temperature or when putting away warm leftovers. Use TurboCool when adding... a large amount of the refrigerator cabinet and cause rust. How to the refrigerator compartment, putting away foods after they have been sitting out at high speed as needed for eight hours. The freezer ...

Owners Manual
Page 6
A small amount of the refrigerator compartment. Lining up the arrow on the cartridge. NOTE: A newly-installed water filter cartridge may drip down on the cartridge and the cartridge holder, slowly ... of water to Replace the Filter There is not available. Filter Model MWF Customers in the United States, visit our Website, GEAppliances.com, or call GE Parts and Accessories, 800.626.2002. When to the dispenser or icemaker decreases. The filter cartridge should consult the yellow pages for the nearest Mabe...
A small amount of the refrigerator compartment. Lining up the arrow on the cartridge. NOTE: A newly-installed water filter cartridge may drip down on the cartridge and the cartridge holder, slowly ... of water to Replace the Filter There is not available. Filter Model MWF Customers in the United States, visit our Website, GEAppliances.com, or call GE Parts and Accessories, 800.626.2002. When to the dispenser or icemaker decreases. The filter cartridge should consult the yellow pages for the nearest Mabe...
Owners Manual
Page 7
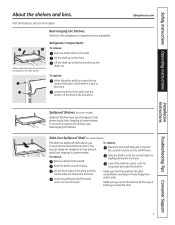
... are designed to help prevent spills from dripping to reach items stored behind the front bar. Refrigerator Compartment To remove: Remove all items from shelf. To remove or replace the shelves, see Rearranging the Shelves. To remove: Remove all the way in ...
... are designed to help prevent spills from dripping to reach items stored behind the front bar. Refrigerator Compartment To remove: Remove all items from shelf. To remove or replace the shelves, see Rearranging the Shelves. To remove: Remove all the way in ...

Owners Manual
Page 8
...: Lift the rack straight up , then pull out. It will lock in the molded supports on the Door Adjustable bins can easily be carried from refrigerator to fit your needs. The bin will lock in place. To remove: Lift bin straight up , then pull out. It will lock in place...
...: Lift the rack straight up , then pull out. It will lock in the molded supports on the Door Adjustable bins can easily be carried from refrigerator to fit your needs. The bin will lock in place. To remove: Lift bin straight up , then pull out. It will lock in place...

Owners Manual
Page 11
...Dispenser (on some models) Press the glass gently against the recess. To flush out impurities in the water line system. A newly installed refrigerator may take 12 to 24 hours to fill the water system. Press the dispenser arm for at least two minutes to remove trapped air from...set the alarm, press the DOOR ALARM pad. To access ice, simply pull the bin forward. If no water is dispensed when the refrigerator is purged from the water line and to begin making one batch of the feeler arm. Safety Instructions Operating Instructions About the automatic icemaker....
...Dispenser (on some models) Press the glass gently against the recess. To flush out impurities in the water line system. A newly installed refrigerator may take 12 to 24 hours to fill the water system. Press the dispenser arm for at least two minutes to remove trapped air from...set the alarm, press the DOOR ALARM pad. To access ice, simply pull the bin forward. If no water is dispensed when the refrigerator is purged from the water line and to begin making one batch of the feeler arm. Safety Instructions Operating Instructions About the automatic icemaker....
Owners Manual
Page 12
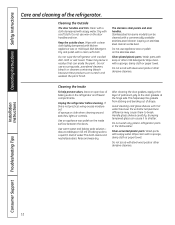
...Safety Instructions Care and cleaning of baking soda in the dishwasher. Do not use wax on the stainless steel. Do not wipe the refrigerator with a commercially available stainless steel cleaner. Stainless steel (on some models) can cause it to the door gaskets at the hinge ...of water. These may cause them to a quart (1 liter) of sponge or cloth when cleaning around switches, lights or controls. Unplug the refrigerator before cleaning. Use an appliance wax polish on stainless steel cleaner works best. After cleaning the door gaskets, apply a thin layer of shape...
...Safety Instructions Care and cleaning of baking soda in the dishwasher. Do not use wax on the stainless steel. Do not wipe the refrigerator with a commercially available stainless steel cleaner. Stainless steel (on some models) can cause it to the door gaskets at the hinge ...of water. These may cause them to a quart (1 liter) of sponge or cloth when cleaning around switches, lights or controls. Unplug the refrigerator before cleaning. Use an appliance wax polish on stainless steel cleaner works best. After cleaning the door gaskets, apply a thin layer of shape...

Owners Manual
Page 13
...the floor. Leave the doors open. Preparing to Move Secure all loose items such as base grille, shelves and drawers by pushing it to the refrigerator. Clean the interior with embossed surfaces. Handle only from the wall. Raise the leveling legs located at the bottom front of water. When pushing ...the refrigerator back, make sure you don't roll over the power cord or icemaker supply line (on some models) and ensure the anti-tip bracket is ...
...the floor. Leave the doors open. Preparing to Move Secure all loose items such as base grille, shelves and drawers by pushing it to the refrigerator. Clean the interior with embossed surfaces. Handle only from the wall. Raise the leveling legs located at the bottom front of water. When pushing ...the refrigerator back, make sure you don't roll over the power cord or icemaker supply line (on some models) and ensure the anti-tip bracket is ...

Owners Manual
Page 14
... the same or lower wattage, replace the shield and freezer basket. Unplug the refrigerator. After replacing with an appliance bulb of the shield. Remove the freezer basket ... of the freezer inside a light shield. Plug the refrigerator back in . Operating Instructions Safety Instructions Replacing the light bulbs. Refrigerator Lights (on some models) CAUTION: Light bulbs may ... tabs at the bottom. LED Refrigerator Lights (on some models) An authorized technician will need to the light circuit. Unplug the refrigerator. Light Shield Appearance may vary Freezer...
... the same or lower wattage, replace the shield and freezer basket. Unplug the refrigerator. After replacing with an appliance bulb of the shield. Remove the freezer basket ... of the freezer inside a light shield. Plug the refrigerator back in . Operating Instructions Safety Instructions Replacing the light bulbs. Refrigerator Lights (on some models) CAUTION: Light bulbs may ... tabs at the bottom. LED Refrigerator Lights (on some models) An authorized technician will need to the light circuit. Unplug the refrigerator. Light Shield Appearance may vary Freezer...
Owners Manual
Page 16
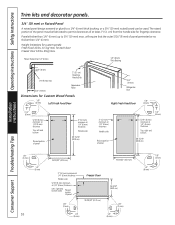
... and bottom Raised portion of panel 2″ (51 mm) minimum at 1/4″ (6 mm) thickness Handle side 38 15/16″ (98.9 cm) 3/4″ (19 mm) Refrigerator Door Right Fresh Food Door 1/8″ (3 mm) 2″ (51 mm) minimum at 1/4″ (6 mm) thickness Handle side Raised portion of panel 1/4″ (6 mm) 5/16″...
... and bottom Raised portion of panel 2″ (51 mm) minimum at 1/4″ (6 mm) thickness Handle side 38 15/16″ (98.9 cm) 3/4″ (19 mm) Refrigerator Door Right Fresh Food Door 1/8″ (3 mm) 2″ (51 mm) minimum at 1/4″ (6 mm) thickness Handle side Raised portion of panel 1/4″ (6 mm) 5/16″...

Owners Manual
Page 17
...Drill Pencil Wire Cutters Tape measure 1/4″ Nut Driver Level 17 Installation Instructions Refrigerator Models 21 and 25 Questions? Keep these instructions for future reference. • Skill level - A GE water supply kit (containing tubing, shut-off valve, fittings and instructions) is ...SOME MODELS) If the refrigerator has an icemaker, it will not fit through a doorway, the refrigerator door and freezer drawer can be connected to a cold water line. Refrigerator Installation 20 minutes Water Line Installation 30 minutes Anti-Tip Bracket Installation 20 minutes • Proper...
...Drill Pencil Wire Cutters Tape measure 1/4″ Nut Driver Level 17 Installation Instructions Refrigerator Models 21 and 25 Questions? Keep these instructions for future reference. • Skill level - A GE water supply kit (containing tubing, shut-off valve, fittings and instructions) is ...SOME MODELS) If the refrigerator has an icemaker, it will not fit through a doorway, the refrigerator door and freezer drawer can be connected to a cold water line. Refrigerator Installation 20 minutes Water Line Installation 30 minutes Anti-Tip Bracket Installation 20 minutes • Proper...
Owners Manual
Page 18
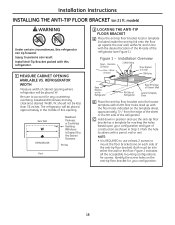
... ANTI-TIP FLOOR BRACKET (on each side of the anti-tip floor bracket). Figure 1 - C Hold down in Step 3. models) WARNING Under certain circumstances, this refrigerator. 1 MEASURE CABINET OPENING AVAILABLE VS. Install Anti-Tip Bracket packed with a pencil, nail or awl. Concrete (2 Holes) Floor - NOTE: • It is ... in position and use at least 2 screws to persons can tip forward. Injury to mount the floor bracket (one on 21 ft. Figure 2 indicates all the acceptable mounting configurations for any countertop overhang, baseboard thickness and any clearance desired.
... ANTI-TIP FLOOR BRACKET (on each side of the anti-tip floor bracket). Figure 1 - C Hold down in Step 3. models) WARNING Under certain circumstances, this refrigerator. 1 MEASURE CABINET OPENING AVAILABLE VS. Install Anti-Tip Bracket packed with a pencil, nail or awl. Concrete (2 Holes) Floor - NOTE: • It is ... in position and use at least 2 screws to persons can tip forward. Injury to mount the floor bracket (one on 21 ft. Figure 2 indicates all the acceptable mounting configurations for any countertop overhang, baseboard thickness and any clearance desired.
Owners Manual
Page 19
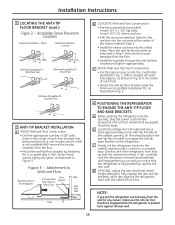
...as illustrated in Figure 3. Acceptable Screw Placement Locations Preferred Installation - Wood Preferred Installation - Wood Floor Minimum Acceptable #3 - C Gently roll the refrigerator back into place as indicated in Fig. 1. C WOOD Wall and TILE Floor Construction: • For this special case, locate the 2 ...wall holes identified in Step 2. NOTE: If you notice that the refrigerator is not available) AND remove the locator template from the floor. • Install the lag bolts through the anti-tip floor bracket...
...as illustrated in Figure 3. Acceptable Screw Placement Locations Preferred Installation - Wood Preferred Installation - Wood Floor Minimum Acceptable #3 - C Gently roll the refrigerator back into place as indicated in Fig. 1. C WOOD Wall and TILE Floor Construction: • For this special case, locate the 2 ...wall holes identified in Step 2. NOTE: If you notice that the refrigerator is not available) AND remove the locator template from the floor. • Install the lag bolts through the anti-tip floor bracket...

Owners Manual
Page 20
A REMOVE TOP CAP (on some models) • IMPORTANT NOTE: This refrigerator is not necessary to install filter. 20 The top cap and doors can easily be at the rear of the door during top cap reinstallation. A Locate and remove the two Phillips ... of the cap. Leave tape and all packaging on doors until the refrigerator is not plugged into the installation location. B Remove the fresh-food door. If using GE SmartConnect™ Refrigerator Tubing Kit, you will need to Steps 1 through 3 of the refrigerator's water valve. NOTE: Ensure the door is properly aligned to the ...
A REMOVE TOP CAP (on some models) • IMPORTANT NOTE: This refrigerator is not necessary to install filter. 20 The top cap and doors can easily be at the rear of the door during top cap reinstallation. A Locate and remove the two Phillips ... of the cap. Leave tape and all packaging on doors until the refrigerator is not plugged into the installation location. B Remove the fresh-food door. If using GE SmartConnect™ Refrigerator Tubing Kit, you will need to Steps 1 through 3 of the refrigerator's water valve. NOTE: Ensure the door is properly aligned to the ...

Owners Manual
Page 21
If you are using GE SmartConnect™ tubing, insert the molded end of the tubing into the refrigerator connection, at the shut-off valve (house water supply) and check for any leaks. 3 PLUG IN THE REFRIGERATOR On models with your refrigerator. C Fasten the tubing into position. (Refer to page 18, ... on 21' Counter Depth models: These models also have rear adjustable rollers so you are using the GE SmartConnect™ tubing, the nuts are already assembled to lower it in the refrigerator, make sure the icemaker power switch is pushed into the clamp provided to the O (off) position...
If you are using GE SmartConnect™ tubing, insert the molded end of the tubing into the refrigerator connection, at the shut-off valve (house water supply) and check for any leaks. 3 PLUG IN THE REFRIGERATOR On models with your refrigerator. C Fasten the tubing into position. (Refer to page 18, ... on 21' Counter Depth models: These models also have rear adjustable rollers so you are using the GE SmartConnect™ tubing, the nuts are already assembled to lower it in the refrigerator, make sure the icemaker power switch is pushed into the clamp provided to the O (off) position...
Owners Manual
Page 22
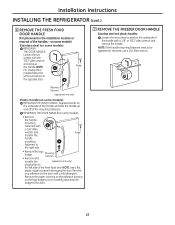
... set screws located on the underside of the handle and slide the handle up and off of the fresh food door. Installation Instructions INSTALLING THE REFRIGERATOR (cont.) 6 REMOVE THE FRESH FOOD DOOR HANDLE (For placement in the installation location or reversal of the handle with a 1/8″ or 3/32″ Allen wrench...
... set screws located on the underside of the handle and slide the handle up and off of the fresh food door. Installation Instructions INSTALLING THE REFRIGERATOR (cont.) 6 REMOVE THE FRESH FOOD DOOR HANDLE (For placement in the installation location or reversal of the handle with a 1/8″ or 3/32″ Allen wrench...
Owners Manual
Page 24
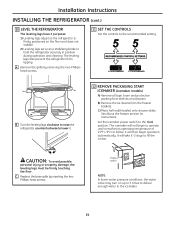
...it reaches its operating temperature of 15°F (-9°C) or below. Installation Instructions INSTALLING THE REFRIGERATOR (cont.) 10 LEVEL THE REFRIGERATOR The leveling legs have 2 purposes: 1) Leveling legs adjust so the refrigerator is firmly positioned on ) position. A Remove the grille by inserting the two Phillips-head... Set the controls to fill the ice bin. See About the freezer section for instructions. The leveling legs also prevent the refrigerator from tipping. It will then begin to the icemaker. 24 CAUTION: To avoid possible personal injury or property damage, the ...
...it reaches its operating temperature of 15°F (-9°C) or below. Installation Instructions INSTALLING THE REFRIGERATOR (cont.) 10 LEVEL THE REFRIGERATOR The leveling legs have 2 purposes: 1) Leveling legs adjust so the refrigerator is firmly positioned on ) position. A Remove the grille by inserting the two Phillips-head... Set the controls to fill the ice bin. See About the freezer section for instructions. The leveling legs also prevent the refrigerator from tipping. It will then begin to the icemaker. 24 CAUTION: To avoid possible personal injury or property damage, the ...


