Use and Care Manual
Page 1
... Dispenser 11 Water Filter 6 Installation Instructions Installing the Anti-Tip Floor Bracket 18, 19 Installing the Refrigerator . . . . . .20-24 Installing the Water Line 33-35 Preparing to Install the Refrigerator 17 Removing and Replacing the Freezer Drawer 25, 26 Reversing the Door Swing (Single Door... Refrigerator Models only 27-29 Removing and Replacing the Doors (Double Door Refrigerator Models only 30-32 Trim Kits and Decorator Panels . . . .15, 16 Troubleshooting Tips . . . . . .36-40 Normal...
... Dispenser 11 Water Filter 6 Installation Instructions Installing the Anti-Tip Floor Bracket 18, 19 Installing the Refrigerator . . . . . .20-24 Installing the Water Line 33-35 Preparing to Install the Refrigerator 17 Removing and Replacing the Freezer Drawer 25, 26 Reversing the Door Swing (Single Door... Refrigerator Models only 27-29 Removing and Replacing the Doors (Double Door Refrigerator Models only 30-32 Trim Kits and Decorator Panels . . . .15, 16 Troubleshooting Tips . . . . . .36-40 Normal...
Use and Care Manual
Page 2
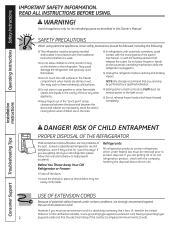
... shelves in accordance with the moving parts of the past. Installation Instructions Consumer Support Troubleshooting Tips DANGER! Before You Throw Away Your Old Refrigerator or Freezer: n Take off ) does not remove power to product disposal. USE OF EXTENSION CORDS Because of the cord be a UL... by a qualified individual. n Do not store or use of this Owner's Manual. RISK OF CHILD ENTRAPMENT PROPER DISPOSAL OF THE REFRIGERATOR Child entrapment and suffocation are still dangerous...even if they will sit for its intended purpose as described in this or any servicing be...
... shelves in accordance with the moving parts of the past. Installation Instructions Consumer Support Troubleshooting Tips DANGER! Before You Throw Away Your Old Refrigerator or Freezer: n Take off ) does not remove power to product disposal. USE OF EXTENSION CORDS Because of the cord be a UL... by a qualified individual. n Do not store or use of this Owner's Manual. RISK OF CHILD ENTRAPMENT PROPER DISPOSAL OF THE REFRIGERATOR Child entrapment and suffocation are still dangerous...even if they will sit for its intended purpose as described in this or any servicing be...
Use and Care Manual
Page 3
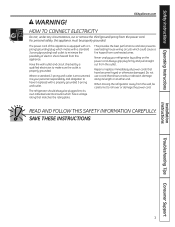
...cord. READ AND FOLLOW THIS SAFETY INFORMATION CAREFULLY. Do not use a cord that matches the rating plate. When moving the refrigerator away from the wall, be properly grounded. This provides the best performance and also prevents overloading house wiring circuits which has... Instructions Operating Instructions GEAppliances.com WARNING! Never unplug your personal responsibility and obligation to make sure the outlet is your refrigerator by a qualified electrician to have become frayed or otherwise damaged. For personal safety, this appliance. Have the wall outlet...
...cord. READ AND FOLLOW THIS SAFETY INFORMATION CAREFULLY. Do not use a cord that matches the rating plate. When moving the refrigerator away from the wall, be properly grounded. This provides the best performance and also prevents overloading house wiring circuits which has... Instructions Operating Instructions GEAppliances.com WARNING! Never unplug your personal responsibility and obligation to make sure the outlet is your refrigerator by a qualified electrician to have become frayed or otherwise damaged. For personal safety, this appliance. Have the wall outlet...
Use and Care Manual
Page 4
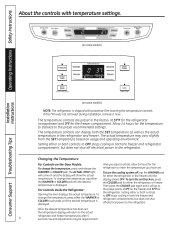
...Controls-on-the-Door Models: To change the temperature, press either or both controls to OFF stops cooling in both the freezer and refrigerator compartments, but does not shut off electrical power to OFF stops cooling in both the SET temperature as well as the actual temperature...TEMP light will come on and the display will return to reach the temperature you adjust controls, allow 24 hours for the refrigerator. For Controls Inside the Refrigerator: Opening the door displays the actual temperature. To turn the cooling system off electrical power to the preset recommended settings. ...
...Controls-on-the-Door Models: To change the temperature, press either or both controls to OFF stops cooling in both the freezer and refrigerator compartments, but does not shut off electrical power to OFF stops cooling in both the SET temperature as well as the actual temperature...TEMP light will come on and the display will return to reach the temperature you adjust controls, allow 24 hours for the refrigerator. For Controls Inside the Refrigerator: Opening the door displays the actual temperature. To turn the cooling system off electrical power to the preset recommended settings. ...
Use and Care Manual
Page 5
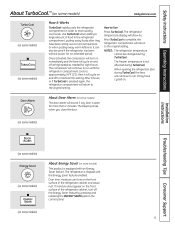
...setting. Over time, moisture can also be changed during TurboCool. About Door Alarm (on some models) 5 NOTES: The refrigerator temperature cannot be used if the refrigerator has been without power for an extended period. The beeping stops when you close the door. (on some models) ... (on some models) GEAppliances.com (on some models) (on some models) How It Works TurboCool rapidly cools the refrigerator compartment in order to the refrigerator compartment, putting away foods after they have been sitting out at high speed as needed for eight hours. If moisture ...
...setting. Over time, moisture can also be changed during TurboCool. About Door Alarm (on some models) 5 NOTES: The refrigerator temperature cannot be used if the refrigerator has been without power for an extended period. The beeping stops when you close the door. (on some models) ... (on some models) GEAppliances.com (on some models) (on some models) How It Works TurboCool rapidly cools the refrigerator compartment in order to the refrigerator compartment, putting away foods after they have been sitting out at high speed as needed for eight hours. If moisture ...
Use and Care Manual
Page 6
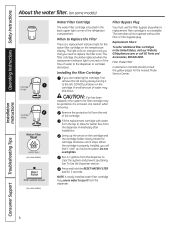
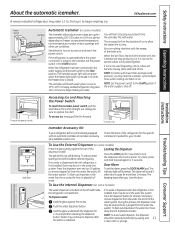
... the nearest Mabe Service Center. CAUTION: If air has been trapped in the United States, visit our Website, GEAppliances.com, or call GE Parts and Accessories, 800.626.2002. Replacement Filters: To order additional filter cartridges in the system, the filter cartridge may be replaced when...cartridge. DO NOT pull down . When the cartridge is not available. Do not overtighten. Run 11⁄2 gallons from the end of the refrigerator compartment. Press and hold the RESET WATER FILTER pad for 3 seconds. Filter Bypass Plug You must use the filter bypass plug when a ...
... the nearest Mabe Service Center. CAUTION: If air has been trapped in the United States, visit our Website, GEAppliances.com, or call GE Parts and Accessories, 800.626.2002. Replacement Filters: To order additional filter cartridges in the system, the filter cartridge may be replaced when...cartridge. DO NOT pull down . When the cartridge is not available. Do not overtighten. Run 11⁄2 gallons from the end of the refrigerator compartment. Press and hold the RESET WATER FILTER pad for 3 seconds. Filter Bypass Plug You must use the filter bypass plug when a ...
Use and Care Manual
Page 7
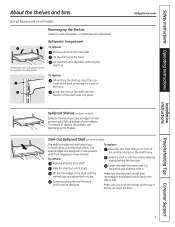
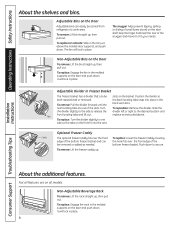
...-out spillproof shelf allows you push the shelves all items from dripping to side. Make sure that can be adjusted in the refrigerator compartment are adjustable. Not all items from side to lower shelves. Rearranging the Shelves Shelves in the same manner. Some models have... special edges to help prevent spills from shelf. Refrigerator Compartment To remove: Remove all features are above the front bar. GEAppliances.com Spillproof Shelves (on some models) Spillproof shelves have wire...
...-out spillproof shelf allows you push the shelves all items from dripping to side. Make sure that can be adjusted in the refrigerator compartment are adjustable. Not all items from side to lower shelves. Rearranging the Shelves Shelves in the same manner. Some models have... special edges to help prevent spills from shelf. Refrigerator Compartment To remove: Remove all features are above the front bar. GEAppliances.com Spillproof Shelves (on some models) Spillproof shelves have wire...
Use and Care Manual
Page 8
... out. It will lock in the molded supports on the door and push down . Adjustable Bins on the Door Adjustable bins can be carried from refrigerator to work area. The bin will lock in the To remove: Pull the divider forward until the back vent slots. Non-Adjustable Bins on the...
... out. It will lock in the molded supports on the door and push down . Adjustable Bins on the Door Adjustable bins can be carried from refrigerator to work area. The bin will lock in the To remove: Pull the divider forward until the back vent slots. Non-Adjustable Bins on the...
Use and Care Manual
Page 10
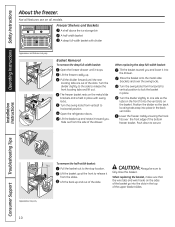
... lift out. Pull the divider forward until it into place in place. Turn the divider slightly to the side to the stop location. Open the refrigerator doors. from verticall to Lift the basket up . Turn the swing locks from the slides. Push down to lock the basket in the back vent...
... lift out. Pull the divider forward until it into place in place. Turn the divider slightly to the side to the stop location. Open the refrigerator doors. from verticall to Lift the basket up . Turn the swing locks from the slides. Push down to lock the basket in the back vent...
Use and Care Manual
Page 11
... the first few batches of door openings and other use conditions. Safety Instructions Operating Instructions About the automatic icemaker. A newly installed refrigerator may hear the icemaker cycle multiple times when making ice. The spill shelf is located on some models) Press the glass gently ... taste stale and shrink. Shelf Ice Bin To reach the power switch. To Use the Internal Dispenser (on the left wall inside the refrigerator compartment. Be sure nothing interferes with lower-than 2 minutes. Door Alarm To set the power switch to the l (on freezer compartment ...
... the first few batches of door openings and other use conditions. Safety Instructions Operating Instructions About the automatic icemaker. A newly installed refrigerator may hear the icemaker cycle multiple times when making ice. The spill shelf is located on some models) Press the glass gently ... taste stale and shrink. Shelf Ice Bin To reach the power switch. To Use the Internal Dispenser (on the left wall inside the refrigerator compartment. Be sure nothing interferes with lower-than 2 minutes. Door Alarm To set the power switch to the l (on freezer compartment ...
Use and Care Manual
Page 12
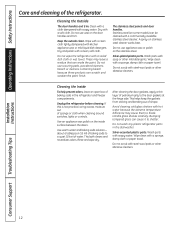
...weaken the paint finish. Do not scrub with a soft cloth. Rinse and wipe dry. Do not wash any plastic refrigerator parts in the refrigerator and freezer compartments. Installation Instructions Consumer Support Troubleshooting Tips 12 Dry with steel-wool pads or other abrasive cleaners. Dry and...wax on the stainless steel. Silver-plated plastic parts. Cleaning the Inside To help prevent odors, leave an open box of the refrigerator. After cleaning the door gaskets, apply a thin layer of sponge or cloth when cleaning around switches, lights or controls. Operating ...
...weaken the paint finish. Do not scrub with a soft cloth. Rinse and wipe dry. Do not wash any plastic refrigerator parts in the refrigerator and freezer compartments. Installation Instructions Consumer Support Troubleshooting Tips 12 Dry with steel-wool pads or other abrasive cleaners. Dry and...wax on the stainless steel. Silver-plated plastic parts. Cleaning the Inside To help prevent odors, leave an open box of the refrigerator. After cleaning the door gaskets, apply a thin layer of sponge or cloth when cleaning around switches, lights or controls. Operating ...
Use and Care Manual
Page 13
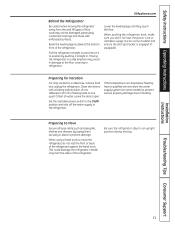
... only from the wall. Preparing to prevent damage. Lower the leveling legs until they touch the floor. This could damage the refrigerator. Moving the refrigerator in a side direction may result in place to Move Secure all loose items such as base grille, shelves and drawers by pushing...below freezing, have a qualified servicer drain the water supply system (on some models) to prevent serious property damage due to the refrigerator. When pushing the refrigerator back, make sure you don't roll over the power cord or icemaker supply line (on some models) and ensure the anti...
... only from the wall. Preparing to prevent damage. Lower the leveling legs until they touch the floor. This could damage the refrigerator. Moving the refrigerator in a side direction may result in place to Move Secure all loose items such as base grille, shelves and drawers by pushing...below freezing, have a qualified servicer drain the water supply system (on some models) to prevent serious property damage due to the refrigerator. When pushing the refrigerator back, make sure you don't roll over the power cord or icemaker supply line (on some models) and ensure the anti...
Use and Care Manual
Page 14
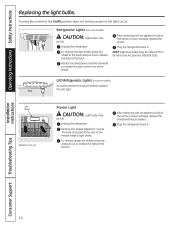
... in . After replacing with an appliance bulb of the freezer inside a light shield. Unplug the refrigerator. Operating Instructions Safety Instructions Replacing the light bulbs. Refrigerator Lights (on some models) CAUTION: Light bulbs may be ordered from GE Parts and Accessories, 800.626.2002. NOTE: Appliance bulbs may be hot. Remove the freezer basket...
... in . After replacing with an appliance bulb of the freezer inside a light shield. Unplug the refrigerator. Operating Instructions Safety Instructions Replacing the light bulbs. Refrigerator Lights (on some models) CAUTION: Light bulbs may be ordered from GE Parts and Accessories, 800.626.2002. NOTE: Appliance bulbs may be hot. Remove the freezer basket...
Use and Care Manual
Page 16
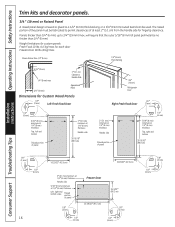
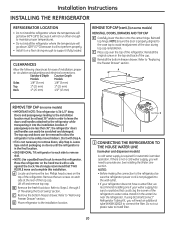
...) max 2″ (5.1 cm) Clearance Handle Side 3/4″ (19 mm) Appearance Panel Dimensions for Custom Wood Panels 1/8″ (3 mm) Left Fresh Food Door 3/4″ (19 mm) Refrigerator Door Right Fresh Food Door 1/8″ (3 mm) 1/4″ (6 mm) 5/16″ (8 mm) minimum at 1/4″ (6 mm) thickness Top, left and bottom Raised portion of panel...
...) max 2″ (5.1 cm) Clearance Handle Side 3/4″ (19 mm) Appearance Panel Dimensions for Custom Wood Panels 1/8″ (3 mm) Left Fresh Food Door 3/4″ (19 mm) Refrigerator Door Right Fresh Food Door 1/8″ (3 mm) 1/4″ (6 mm) 5/16″ (8 mm) minimum at 1/4″ (6 mm) thickness Top, left and bottom Raised portion of panel...
Use and Care Manual
Page 17
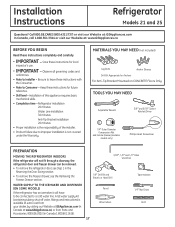
... (sleeve) (icemaker models only) Phillips-Head Screwdriver PREPARATION MOVING THE REFRIGERATOR INDOORS If the refrigerator will have to be removed. • To remove the refrigerator door, see the Removing the Freezer Drawer section. A GE water supply kit (containing tubing, shut-off valve, fittings and instructions... an icemaker, it will not fit through a doorway, the refrigerator door and freezer drawer can be connected to Consumer - Installation of the installer. • Product failure due to Installer - Call 800.GE.CARES (800.432.2737) or visit our Website at: GEAppliances.com ...
... (sleeve) (icemaker models only) Phillips-Head Screwdriver PREPARATION MOVING THE REFRIGERATOR INDOORS If the refrigerator will have to be removed. • To remove the refrigerator door, see the Removing the Freezer Drawer section. A GE water supply kit (containing tubing, shut-off valve, fittings and instructions... an icemaker, it will not fit through a doorway, the refrigerator door and freezer drawer can be connected to Consumer - Installation of the installer. • Product failure due to Installer - Call 800.GE.CARES (800.432.2737) or visit our Website at: GEAppliances.com ...

Use and Care Manual
Page 18
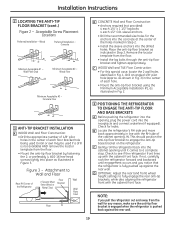
...holes based upon your configuration. 18 models) WARNING Under certain circumstances, this opening where refrigerator will be placed, W. Install Anti-Tip Bracket packed with a pencil, nail or awl. The refrigerator will be placed approximately in Step 3. C Hold down in line with the floor.... Be sure to persons can tip forward. Injury to account for your configuration and type of cabinet opening . Rear Wall W REFRIGERATOR Baseboard Thickness or Countertop Overhang (Whichever Is Greater) Plus Any Desired Clearance RH Side Front 2 LOCATING THE ANTI-TIP FLOOR BRACKET ...
...holes based upon your configuration. 18 models) WARNING Under certain circumstances, this opening where refrigerator will be placed, W. Install Anti-Tip Bracket packed with a pencil, nail or awl. The refrigerator will be placed approximately in Step 3. C Hold down in line with the floor.... Be sure to persons can tip forward. Injury to account for your configuration and type of cabinet opening . Rear Wall W REFRIGERATOR Baseboard Thickness or Countertop Overhang (Whichever Is Greater) Plus Any Desired Clearance RH Side Front 2 LOCATING THE ANTI-TIP FLOOR BRACKET ...
Use and Care Manual
Page 19
... Installation Instructions 2 LOCATING THE ANTI-TIP FLOOR BRACKET (cont.) Figure 2 - as shown in Fig. 3) in the center of the Refrigerator 2 Screws Must Enter Wood or Metal Stud Floor Bracket Wall Wall Plate Stud Floor B CONCRETE Wall and Floor Construction: • Anchors ...anti-tip floor bracket using the Minimum Acceptable Installation #1, as illustrated in line with the cabinet front face. C Gently roll the refrigerator back into the drilled holes. Acceptable Screw Placement Locations Preferred Installation - D OPTIONAL: Adjust the rear (and front) wheel height ...
... Installation Instructions 2 LOCATING THE ANTI-TIP FLOOR BRACKET (cont.) Figure 2 - as shown in Fig. 3) in the center of the Refrigerator 2 Screws Must Enter Wood or Metal Stud Floor Bracket Wall Wall Plate Stud Floor B CONCRETE Wall and Floor Construction: • Anchors ...anti-tip floor bracket using the Minimum Acceptable Installation #1, as illustrated in line with the cabinet front face. C Gently roll the refrigerator back into the drilled holes. Acceptable Screw Placement Locations Preferred Installation - D OPTIONAL: Adjust the rear (and front) wheel height ...
Use and Care Manual
Page 20
... easily be at the rear of "Reversing the Door Swing" section. D Move refrigerator to "Replacing the Freezer Drawer" section. F Place cap over the top of the refrigerator's water valve. Start with a side against the truck. If using GE SmartConnect™ Refrigerator Tubing Kit, you will need an additional tube (WX08X10002) to connect the filter...
... easily be at the rear of "Reversing the Door Swing" section. D Move refrigerator to "Replacing the Freezer Drawer" section. F Place cap over the top of the refrigerator's water valve. Start with a side against the truck. If using GE SmartConnect™ Refrigerator Tubing Kit, you will need an additional tube (WX08X10002) to connect the filter...
Use and Care Manual
Page 21
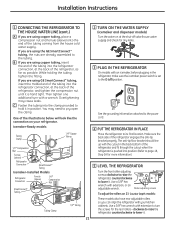
... These models also have rear adjustable rollers so you are using GE SmartConnect™ tubing, insert the molded end of the tubing into the refrigerator connection, at the shut-off ) position. If you are using the GE SmartConnect™ tubing, the nuts are using copper tubing, insert ...the end of the tubing into the refrigerator connection, at the back of the refrigerator engages the anti-tip bracket ...
... These models also have rear adjustable rollers so you are using GE SmartConnect™ tubing, insert the molded end of the tubing into the refrigerator connection, at the shut-off ) position. If you are using the GE SmartConnect™ tubing, the nuts are using copper tubing, insert ...the end of the tubing into the refrigerator connection, at the back of the refrigerator engages the anti-tip bracket ...

Use and Care Manual
Page 22
... food door. Remove any adhesive on some models): A REMOVING THE DOOR HANDLE: Loosen the set screws located on the opposite door. Installation Instructions INSTALLING THE REFRIGERATOR (cont.) 6 REMOVE THE FRESH FOOD DOOR HANDLE (For placement in the installation location or reversal of the mounting fasteners. on some models) Stainless steel (on...
... food door. Remove any adhesive on some models): A REMOVING THE DOOR HANDLE: Loosen the set screws located on the opposite door. Installation Instructions INSTALLING THE REFRIGERATOR (cont.) 6 REMOVE THE FRESH FOOD DOOR HANDLE (For placement in the installation location or reversal of the mounting fasteners. on some models) Stainless steel (on...


