Use and Care Manual
Page 1
Customers 41 Owner's Manual and Installation Instructions Models 21 and 25 Congélateur inférieur Réfrig&#...243;n La sección en español empieza en la página 89 Write the model and serial numbers here: Model Serial Find these numbers on a label on the right side, near the top of California Water...17 Removing and Replacing the Freezer Drawer 25, 26 Reversing the Door Swing (Single Door Refrigerator Models only 27-29 Removing and Replacing the Doors (Double Door Refrigerator Models only 30-32 Trim Kits and Decorator Panels . . . .15, 16 Troubleshooting Tips . ...
Customers 41 Owner's Manual and Installation Instructions Models 21 and 25 Congélateur inférieur Réfrig&#...243;n La sección en español empieza en la página 89 Write the model and serial numbers here: Model Serial Find these numbers on a label on the right side, near the top of California Water...17 Removing and Replacing the Freezer Drawer 25, 26 Reversing the Door Swing (Single Door Refrigerator Models only 27-29 Removing and Replacing the Doors (Double Door Refrigerator Models only 30-32 Trim Kits and Decorator Panels . . . .15, 16 Troubleshooting Tips . ...
Use and Care Manual
Page 4
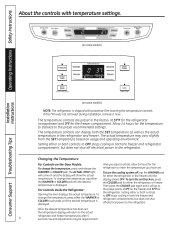
... the temperature display will return to the refrigerator. Several adjustments may vary slightly from the SET temperature based on -the-Door Models: To change the temperature, press and release the WARMER or COLDER pad. The temperature controls can display both the freezer and...either the refrigerator or the freezer until the desired temperature is shipped with temperature settings. (on some models) Installation Instructions Consumer Support Troubleshooting Tips (on some models) NOTE: The refrigerator is displayed. Setting either the WARMER or COLDER touch pads until the display ...
... the temperature display will return to the refrigerator. Several adjustments may vary slightly from the SET temperature based on -the-Door Models: To change the temperature, press and release the WARMER or COLDER pad. The temperature controls can display both the freezer and...either the refrigerator or the freezer until the desired temperature is shipped with temperature settings. (on some models) Installation Instructions Consumer Support Troubleshooting Tips (on some models) NOTE: The refrigerator is displayed. Setting either the WARMER or COLDER touch pads until the display ...
Use and Care Manual
Page 5
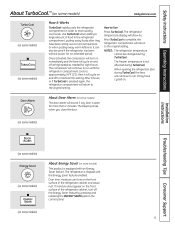
...putting away warm leftovers. Over time, moisture can also be changed during TurboCool. Once activated, the compressor will cycle on some models) The door alarm will show . The refrigerator temperature display will sound if any door is not affected during TurboCool. The ...The compressor will continue to the original setting. If moisture does appear on the front surface of the refrigerator cabinet, turn on some models) 5 After 8 hours, or if TurboCool is complete, the refrigerator compartment will continue to run until the refrigerator compartment cools to approximately...
...putting away warm leftovers. Over time, moisture can also be changed during TurboCool. Once activated, the compressor will cycle on some models) The door alarm will show . The refrigerator temperature display will sound if any door is not affected during TurboCool. The ...The compressor will continue to the original setting. If moisture does appear on the front surface of the refrigerator cabinet, turn on some models) 5 After 8 hours, or if TurboCool is complete, the refrigerator compartment will continue to run until the refrigerator compartment cools to approximately...
Use and Care Manual
Page 6
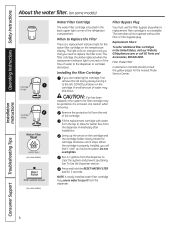
... to the left. The filter cartridge should consult the yellow pages for the water filter cartridge on some models) (on the temperature display. Installing the Filter Cartridge If you will not operate without the filter or ... be ejected as it stops. Operating Instructions Safety Instructions About the water filter. (on some models) Cartridge Holder Cartridge Holder (on some models) Water Filter Cartridge The water filter cartridge is located in the back upper right corner of... in the United States, visit our Website, GEAppliances.com, or call GE Parts and Accessories, 800.626.2002.
... to the left. The filter cartridge should consult the yellow pages for the water filter cartridge on some models) (on the temperature display. Installing the Filter Cartridge If you will not operate without the filter or ... be ejected as it stops. Operating Instructions Safety Instructions About the water filter. (on some models) Cartridge Holder Cartridge Holder (on some models) Water Filter Cartridge The water filter cartridge is located in the back upper right corner of... in the United States, visit our Website, GEAppliances.com, or call GE Parts and Accessories, 800.626.2002.
Use and Care Manual
Page 7
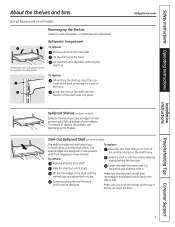
...help prevent spills from dripping to reach items stored behind the front bar. Lift the front edge of the central notches on some models) The slide-out spillproof shelf allows you close the door. Safety Instructions Operating Instructions About the shelves and bins. Lift the ...lower shelves. Installation Instructions Troubleshooting Tips Consumer Support 7 Make sure you push the shelves all features are above the front bar. Some models have special edges to help prevent spills from dripping to side. Slide the shelf out until it stops. Continue pulling the shelf ...
...help prevent spills from dripping to reach items stored behind the front bar. Lift the front edge of the central notches on some models) The slide-out spillproof shelf allows you close the door. Safety Instructions Operating Instructions About the shelves and bins. Lift the ...lower shelves. Installation Instructions Troubleshooting Tips Consumer Support 7 Make sure you push the shelves all features are above the front bar. Some models have special edges to help prevent spills from dripping to side. Slide the shelf out until it stops. Continue pulling the shelf ...
Use and Care Manual
Page 8
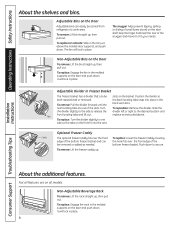
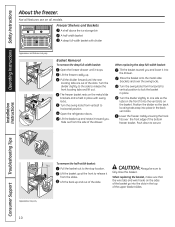
... the door and push down . To replace or relocate: Slide in Freezer Basket The freezer basket has a divider that can easily be slots on all models. It will lock in place. Position the divider so both repositioned or removed. Slide the the divider slightly to the side to release the divider...
... the door and push down . To replace or relocate: Slide in Freezer Basket The freezer basket has a divider that can easily be slots on all models. It will lock in place. Position the divider so both repositioned or removed. Slide the the divider slightly to the side to release the divider...
Use and Care Manual
Page 9
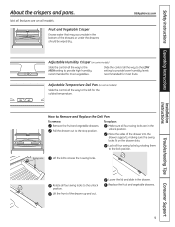
... Lower the lid and slide in the bottom of the drawer into the drawer supports, making sure the swing locks fit on some models) Slide the control all models. Replace the fruit and vegetable drawers. Slide the control all the way to the LOW setting to the lock position. How to ...the crispers and pans. Pull the drawer out to the left for most vegetables. To replace: Make sure all four swing locks are on some models) Slide the control all features are in the unlock position. Adjustable Temperature Deli Pan (on all the way to the stop position. Fruit and Vegetable...
... Lower the lid and slide in the bottom of the drawer into the drawer supports, making sure the swing locks fit on some models) Slide the control all models. Replace the fruit and vegetable drawers. Slide the control all the way to the LOW setting to the lock position. How to ...the crispers and pans. Pull the drawer out to the left for most vegetables. To replace: Make sure all four swing locks are on some models) Slide the control all features are in the unlock position. Adjustable Temperature Deli Pan (on all the way to the stop position. Fruit and Vegetable...
Use and Care Manual
Page 10
... is held in place. Push down to the stop location. from the side of the slots. Turn the divider slightly to horizontal position. Not all models. Installation Instructions Consumer Support Troubleshooting Tips Tabs To remove the half-width basket: Tabs Pull the basket out to secure. Lift the freezer caddy up...
... is held in place. Push down to the stop location. from the side of the slots. Turn the divider slightly to horizontal position. Not all models. Installation Instructions Consumer Support Troubleshooting Tips Tabs To remove the half-width basket: Tabs Pull the basket out to secure. Lift the freezer caddy up...
Use and Care Manual
Page 11
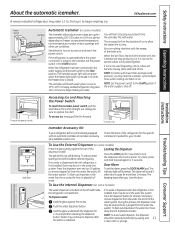
... pad again for at extra cost. GEAppliances.com Installation Instructions Power Switch Green Power Light Icemaker Feeler Arm Automatic Icemaker (on some models) The icemaker will turn green when the freezer light switch is available at least 2 minutes to remove trapped air from the water...buzzing sound each time the icemaker fills with lower-than 2 minutes. If no water is dispensed when the refrigerator is located on some models) Press the glass gently against the recess. To flush out impurities in the water line system. The indicator light will stop producing ice...
... pad again for at extra cost. GEAppliances.com Installation Instructions Power Switch Green Power Light Icemaker Feeler Arm Automatic Icemaker (on some models) The icemaker will turn green when the freezer light switch is available at least 2 minutes to remove trapped air from the water...buzzing sound each time the icemaker fills with lower-than 2 minutes. If no water is dispensed when the refrigerator is located on some models) Press the glass gently against the recess. To flush out impurities in the water line system. The indicator light will stop producing ice...
Use and Care Manual
Page 12
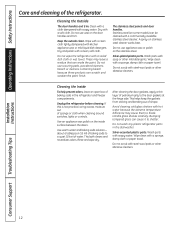
Cleaning the Outside The door handles and trim. Dry and polish with a commercially available stainless steel cleaner. Stainless steel (on some models) can scratch and weaken the paint finish. Wash parts with soapy water. Cleaning the Inside To help prevent odors, leave an open box of water. ...
Cleaning the Outside The door handles and trim. Dry and polish with a commercially available stainless steel cleaner. Stainless steel (on some models) can scratch and weaken the paint finish. Wash parts with soapy water. Cleaning the Inside To help prevent odors, leave an open box of water. ...
Use and Care Manual
Page 13
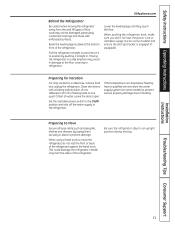
All types of floor coverings can drop below freezing, have a qualified servicer drain the water supply system (on some models) to prevent serious property damage due to flooding. Lower the leveling legs until they touch the floor. Clean the interior with embossed surfaces. Preparing to ... refrigerator against the hand truck. When pushing the refrigerator back, make sure you don't roll over the power cord or icemaker supply line (on some models) and ensure the anti-tip bracket is engaged (if equipped). Installation Instructions Troubleshooting Tips Consumer Support 13
All types of floor coverings can drop below freezing, have a qualified servicer drain the water supply system (on some models) to prevent serious property damage due to flooding. Lower the leveling legs until they touch the floor. Clean the interior with embossed surfaces. Preparing to ... refrigerator against the hand truck. When pushing the refrigerator back, make sure you don't roll over the power cord or icemaker supply line (on some models) and ensure the anti-tip bracket is engaged (if equipped). Installation Instructions Troubleshooting Tips Consumer Support 13
Use and Care Manual
Page 14
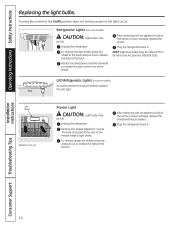
... the 0 (off) position does not remove power to release the tabs at the back. Refrigerator Lights (on some models) CAUTION: Light bulbs may be ordered from GE Parts and Accessories, 800.626.2002. Rotate the shield down and then forward to the light circuit. Unplug the refrigerator.... Plug the refrigerator back in . Unplug the refrigerator. NOTE: Appliance bulbs may be hot. LED Refrigerator Lights (on some models) An authorized ...
... the 0 (off) position does not remove power to release the tabs at the back. Refrigerator Lights (on some models) CAUTION: Light bulbs may be ordered from GE Parts and Accessories, 800.626.2002. Rotate the shield down and then forward to the light circuit. Unplug the refrigerator.... Plug the refrigerator back in . Unplug the refrigerator. NOTE: Appliance bulbs may be hot. LED Refrigerator Lights (on some models) An authorized ...
Use and Care Manual
Page 15
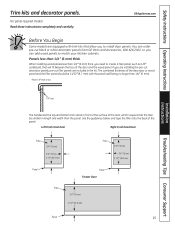
...mm) 2 1/2″ (63.5 mm) Panel 15 If you are installing the pre-cut decorator panels, pre-cut black or white decorator panels from GE Parts and Accessories, 800.626.2002, or you need to create a filler panel, such as 1/8″ cardboard, that allow you to match your ... the face of the decorator or wood panel and the filler panel should be smaller in the kit. GEAppliances.com Before You Begin Some models are included in length and width than 1/4″ (6 mm). Panels 1/4″ thick or less Installation Instructions Troubleshooting Tips Consumer Support 1/4″...
...mm) 2 1/2″ (63.5 mm) Panel 15 If you are installing the pre-cut decorator panels, pre-cut black or white decorator panels from GE Parts and Accessories, 800.626.2002, or you need to create a filler panel, such as 1/8″ cardboard, that allow you to match your ... the face of the decorator or wood panel and the filler panel should be smaller in the kit. GEAppliances.com Before You Begin Some models are included in length and width than 1/4″ (6 mm). Panels 1/4″ thick or less Installation Instructions Troubleshooting Tips Consumer Support 1/4″...
Use and Care Manual
Page 17
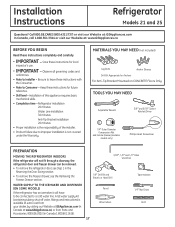
...NEED Adjustable Wrench 3/8″ and 5/16″ Socket Ratchet/Driver 1/4″ Outer Diameter Compression Nut and Ferrule (sleeve) (icemaker models only) Phillips-Head Screwdriver PREPARATION MOVING THE REFRIGERATOR INDOORS If the refrigerator will have to be removed. • To remove the ... installation is the responsibility of this appliance requires basic mechanical skills. • Completion time - Installation Instructions Refrigerator Models 21 and 25 Questions? Call 800.GE.CARES (800.432.2737) or visit our Website at: GEAppliances.com In Canada, call 1.800.561.3344...
...NEED Adjustable Wrench 3/8″ and 5/16″ Socket Ratchet/Driver 1/4″ Outer Diameter Compression Nut and Ferrule (sleeve) (icemaker models only) Phillips-Head Screwdriver PREPARATION MOVING THE REFRIGERATOR INDOORS If the refrigerator will have to be removed. • To remove the ... installation is the responsibility of this appliance requires basic mechanical skills. • Completion time - Installation Instructions Refrigerator Models 21 and 25 Questions? Call 800.GE.CARES (800.432.2737) or visit our Website at: GEAppliances.com In Canada, call 1.800.561.3344...

Use and Care Manual
Page 18
... (included inside the anti-tip kit) onto the floor up with this opening where refrigerator will be placed, W. Both must be less than 36 inches. models) WARNING Under certain circumstances, this refrigerator can result. Be sure to persons can tip forward. Mark the hole locations with the desired location of the...
... (included inside the anti-tip kit) onto the floor up with this opening where refrigerator will be placed, W. Both must be less than 36 inches. models) WARNING Under certain circumstances, this refrigerator can result. Be sure to persons can tip forward. Mark the hole locations with the desired location of the...
Use and Care Manual
Page 20
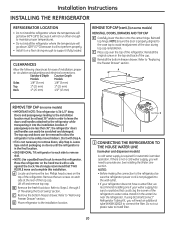
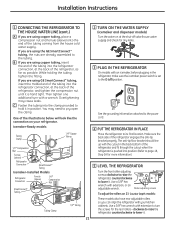
...to "Removing Freezer Drawer" section. Refer to Steps 1 through 3 of installation, proper air circulation and plumbing and electrical connections. If using GE SmartConnect™ Refrigerator Tubing Kit, you will need an additional tube (WX08X10002) to be safely moved indoors. F Place cap over the top ...the case top to remove doors, skip Step A. Top Hinge B 1 CONNECTING THE REFRIGERATOR TO THE HOUSE WATER LINE (icemaker and dispenser models) A cold water supply is not necessary to avoid readjustment of the refrigerator. Install it in order to leave the doors and handles ...
...to "Removing Freezer Drawer" section. Refer to Steps 1 through 3 of installation, proper air circulation and plumbing and electrical connections. If using GE SmartConnect™ Refrigerator Tubing Kit, you will need an additional tube (WX08X10002) to be safely moved indoors. F Place cap over the top ...the case top to remove doors, skip Step A. Top Hinge B 1 CONNECTING THE REFRIGERATOR TO THE HOUSE WATER LINE (icemaker and dispenser models) A cold water supply is not necessary to avoid readjustment of the refrigerator. Install it in order to leave the doors and handles ...
Use and Care Manual
Page 21
... the nuts are already assembled to lower it. 21 If you are using GE SmartConnect™ tubing, insert the molded end of the tubing into the clamp ... O (off valve (house water supply) and check for any leaks. 3 PLUG IN THE REFRIGERATOR On models with extension to turn with your refrigerator. Roller adjusting screws To adjust the rollers on your kitchen cabinets. ... at the back of the illustrations below will look like the connection on 21' Counter Depth models: These models also have rear adjustable rollers so you are using copper tubing, insert the end of the refrigerator...
... the nuts are already assembled to lower it. 21 If you are using GE SmartConnect™ tubing, insert the molded end of the tubing into the clamp ... O (off valve (house water supply) and check for any leaks. 3 PLUG IN THE REFRIGERATOR On models with extension to turn with your refrigerator. Roller adjusting screws To adjust the rollers on your kitchen cabinets. ... at the back of the illustrations below will look like the connection on 21' Counter Depth models: These models also have rear adjustable rollers so you are using copper tubing, insert the end of the refrigerator...

Use and Care Manual
Page 22
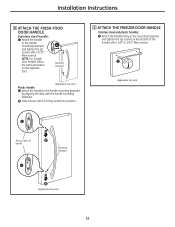
... a 1/4″ Allen wrench. Remove any adhesive on the underside of the fresh food door. Remove the paper covering on the adhesive backing on some models): • Remove the handle mounting fasteners with a 1/8″ or 3/32″ Allen wrench and remove the handle. Mounting Fasteners • Remove...the right side. • Remove the logo badge. REVERSING THE DOOR HANDLE (on some models): A REMOVING THE DOOR HANDLE: Depress the tab on the opposite door. NOTE: For Double Door models A Badge follow the same procedure on the underside of the handle and slide the handle up...
... a 1/4″ Allen wrench. Remove any adhesive on the underside of the fresh food door. Remove the paper covering on the adhesive backing on some models): • Remove the handle mounting fasteners with a 1/8″ or 3/32″ Allen wrench and remove the handle. Mounting Fasteners • Remove...the right side. • Remove the logo badge. REVERSING THE DOOR HANDLE (on some models): A REMOVING THE DOOR HANDLE: Depress the tab on the opposite door. NOTE: For Double Door models A Badge follow the same procedure on the underside of the handle and slide the handle up...
Use and Care Manual
Page 23
... the mounting fasteners and tighten the set screws with a 3/32″ Allen wrench. A (appearance may vary) A Slots on the opposite door. NOTE: For Double Door models follow the same procedure on back of the handle with a 1/8″ or 3/32″ Allen wrench. A Mounting Fasteners (appearance may vary) Plastic handle: A Attach the...
... the mounting fasteners and tighten the set screws with a 3/32″ Allen wrench. A (appearance may vary) A Slots on the opposite door. NOTE: For Double Door models follow the same procedure on back of the handle with a 1/8″ or 3/32″ Allen wrench. A Mounting Fasteners (appearance may vary) Plastic handle: A Attach the...
Use and Care Manual
Page 24
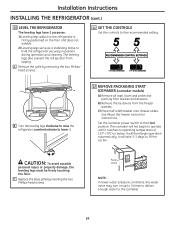
... to fill the ice bin. B Turn the leveling legs clockwise to raise the refrigerator, counterclockwise to operate until it . 12 REMOVE PACKAGING START ICEMAKER (icemaker models) A) Remove all tape, foam and protective packing from tipping. It will not begin operation automatically. A Remove the grille by inserting the two Phillips-head screws...
... to fill the ice bin. B Turn the leveling legs clockwise to raise the refrigerator, counterclockwise to operate until it . 12 REMOVE PACKAGING START ICEMAKER (icemaker models) A) Remove all tape, foam and protective packing from tipping. It will not begin operation automatically. A Remove the grille by inserting the two Phillips-head screws...

