
Use and Care Manual
Page 1
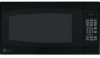
MFL38268201 49-40551 04-07 JR Microwave Oven ge.com Safety Information 2-6 Operating Instructions Auto Features 12 Microwave Terms 18 Other Features 16-18 Oven Features 7, 8 Power Levels 9 Sensor Features 13-15 Time Features 9-12 Care and Cleaning 19 Troubleshooting Tips 20 Things That Are Normal . . . . . .20 Consumer Support Consumer Support . . .Back Cover Product Registration . . . . . .21, 22 Warranty 23 Owner's Manual PEB2060 Write the model and serial numbers here: Model Serial You can find them on a label inside the oven.
MFL38268201 49-40551 04-07 JR Microwave Oven ge.com Safety Information 2-6 Operating Instructions Auto Features 12 Microwave Terms 18 Other Features 16-18 Oven Features 7, 8 Power Levels 9 Sensor Features 13-15 Time Features 9-12 Care and Cleaning 19 Troubleshooting Tips 20 Things That Are Normal . . . . . .20 Consumer Support Consumer Support . . .Back Cover Product Registration . . . . . .21, 22 Warranty 23 Owner's Manual PEB2060 Write the model and serial numbers here: Model Serial You can find them on a label inside the oven.

Use and Care Manual
Page 2
... the specific precautions in this manual must be followed to minimize the risk of fire or explosion, electric shock, or to defeat or tamper with the provided installation instructions. Do not use . s This appliance must be grounded. Safety Instructions Operating Instructions IMPORTANT SAFETY INSTRUCTIONS. When using a power cord available from the countertop edge to avoid accidental tipping of the microwave oven surface when the microwave oven is not working...
... the specific precautions in this manual must be followed to minimize the risk of fire or explosion, electric shock, or to defeat or tamper with the provided installation instructions. Do not use . s This appliance must be grounded. Safety Instructions Operating Instructions IMPORTANT SAFETY INSTRUCTIONS. When using a power cord available from the countertop edge to avoid accidental tipping of the microwave oven surface when the microwave oven is not working...
Use and Care Manual
Page 3
... countdown, use Time Cook for marine use. s Do not immerse power cord or plug in the oven. - Carefully attend appliance when paper, plastic or other combustible materials are placed inside the oven ignite, keep the oven door closed, turn the oven off and disconnect the power cord, or shut off power at the fuse or circuit breaker panel. WARNING! s Foil not molded to food (upturned edges act like antennas). Safety Instructions Operating Instructions ge.com...
... countdown, use Time Cook for marine use. s Do not immerse power cord or plug in the oven. - Carefully attend appliance when paper, plastic or other combustible materials are placed inside the oven ignite, keep the oven door closed, turn the oven off and disconnect the power cord, or shut off power at the fuse or circuit breaker panel. WARNING! s Foil not molded to food (upturned edges act like antennas). Safety Instructions Operating Instructions ge.com...

Use and Care Manual
Page 4
.... Be careful when opening any containers of injury to persons: - s Avoid heating baby food in this microwave oven. The container may cause damage to stand in a special microwave popcorn accessory or unless you use popcorn labeled for a short time before removing the container. - s Don't defrost frozen beverages in a microwave oven. Troubleshooting Tips Consumer Support 4 It increases the heat around the magnetron and can cause the container to your microwave oven unless...
.... Be careful when opening any containers of injury to persons: - s Avoid heating baby food in this microwave oven. The container may cause damage to stand in a special microwave popcorn accessory or unless you use popcorn labeled for a short time before removing the container. - s Don't defrost frozen beverages in a microwave oven. Troubleshooting Tips Consumer Support 4 It increases the heat around the magnetron and can cause the container to your microwave oven unless...
Use and Care Manual
Page 5
... not under any circumstances cut or remove the third (ground) prong from hands and face. Some cookware is very useful, but should be used carefully. s Use foil only as directed in this test: Place in the microwave oven, keep the foil at high. Check the package for microwaving." When cooking with containers tightly covered with a grounding plug. Troubleshooting Tips Consumer Support GROUNDING INSTRUCTIONS WARNING-Improper...
... not under any circumstances cut or remove the third (ground) prong from hands and face. Some cookware is very useful, but should be used carefully. s Use foil only as directed in this test: Place in the microwave oven, keep the foil at high. Check the package for microwaving." When cooking with containers tightly covered with a grounding plug. Troubleshooting Tips Consumer Support GROUNDING INSTRUCTIONS WARNING-Improper...
Use and Care Manual
Page 6
... used if you use an extension cord, the interior light may flicker and the blower sound may be longer, too. SAVE THESE INSTRUCTIONS 6 Troubleshooting Tips Consumer Support READ ALL INSTRUCTIONS BEFORE USING. If you are careful in or tripping over unintentionally. READ AND FOLLOW THIS SAFETY INFORMATION CAREFULLY. EXTENSION CORDS A short power supply cord is on by children or tripped over a longer cord. Cooking times may vary when the microwave oven...
... used if you use an extension cord, the interior light may flicker and the blower sound may be longer, too. SAVE THESE INSTRUCTIONS 6 Troubleshooting Tips Consumer Support READ ALL INSTRUCTIONS BEFORE USING. If you are careful in or tripping over unintentionally. READ AND FOLLOW THIS SAFETY INFORMATION CAREFULLY. EXTENSION CORDS A short power supply cord is on by children or tripped over a longer cord. Cooking times may vary when the microwave oven...

Use and Care Manual
Page 7
... appropriate Installation Kit below to convert this manual, features and appearance may be in wall oven. Touch Control Panel Display. Turntable and support must be removed for cleaning. Screen allows cooking to open door. NOTE: Rating plate, oven vent(s) and oven light are located on the inside walls of your microwave oven. Throughout this oven to a built-in place when using the oven. Window with Metal Shield. Door Latch Release. Removable Turntable. Safety Instructions About the features of the microwave oven. For 27″ installations: Model PEB2060DMBB...
... appropriate Installation Kit below to convert this manual, features and appearance may be in wall oven. Touch Control Panel Display. Turntable and support must be removed for cleaning. Screen allows cooking to open door. NOTE: Rating plate, oven vent(s) and oven light are located on the inside walls of your microwave oven. Throughout this oven to a built-in place when using the oven. Window with Metal Shield. Door Latch Release. Removable Turntable. Safety Instructions About the features of the microwave oven. For 27″ installations: Model PEB2060DMBB...
Use and Care Manual
Page 9
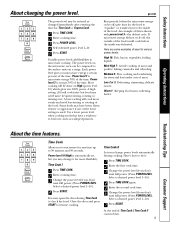
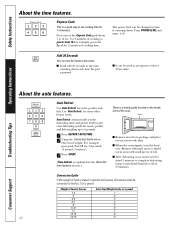
... you don't want full power. (Press POWER LEVEL. Select a desired power level 1-10.) 4 Press TIME COOK again. 5 Enter the second cook time. 6 Change the power level if you 100% power. Med-High 7: Gentle cooking of uses for Time Cook or Express Cook. 1 Press TIME COOK. 2 Enter cooking time. 3 Press POWER LEVEL. 4 Select desired power level 1-10. 5 Press START. A high setting (10) will be done on a range. Variable power levels add flexibility to resume cooking. Safety Instructions About changing the power level. ge.com The power level may open the door during cooking.
... you don't want full power. (Press POWER LEVEL. Select a desired power level 1-10.) 4 Press TIME COOK again. 5 Enter the second cook time. 6 Change the power level if you 100% power. Med-High 7: Gentle cooking of uses for Time Cook or Express Cook. 1 Press TIME COOK. 2 Enter cooking time. 3 Press POWER LEVEL. 4 Select desired power level 1-10. 5 Press START. A high setting (10) will be done on a range. Variable power levels add flexibility to resume cooking. Safety Instructions About changing the power level. ge.com The power level may open the door during cooking.

Use and Care Manual
Page 10
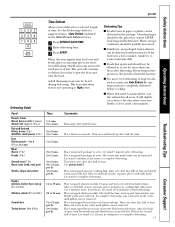
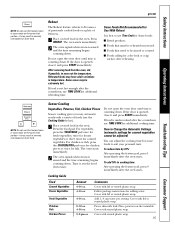
...Support Troubleshooting Tips Operating Instructions Safety Instructions About the time features. Cooking Guide for Time Cook NOTE: Use High power level.... In 1-qt. If corn is in half and remove fibrous membranes. Rearrange after half of time. In 1-qt. Peel and cut ) (fresh spears) (frozen, chopped) (frozen spears...Cover with 1/2 cup water. glass baking dish, place corn. In 1-qt. Place in 2-qt. In 1-qt. package 2 lbs. glass baking dish, place squash cut in circular arrangement. In 11⁄2- In 1-qt. casserole, place 3 tablespoons water. Pierce with cooking...
...Support Troubleshooting Tips Operating Instructions Safety Instructions About the time features. Cooking Guide for Time Cook NOTE: Use High power level.... In 1-qt. If corn is in half and remove fibrous membranes. Rearrange after half of time. In 1-qt. Peel and cut ) (fresh spears) (frozen, chopped) (frozen spears...Cover with 1/2 cup water. glass baking dish, place corn. In 1-qt. Place in 2-qt. In 1-qt. package 2 lbs. glass baking dish, place squash cut in circular arrangement. In 11⁄2- In 1-qt. casserole, place 3 tablespoons water. Pierce with cooking...
Use and Care Manual
Page 11
.... Use power level 1. After second half of time, separate pieces and place in all areas. per lb. After second half of time, separate pieces with foil. Shield warm areas with foil. Place unwrapped hen in the About the auto feature section.) 1 Press DEFROST AUTO/TIME. 2 Enter defrosting time. 3 Press START. Place unwrapped breast in cooking dish. Let stand 1 to complete defrosting. 11 Troubleshooting Tips Consumer Support...
.... Use power level 1. After second half of time, separate pieces and place in all areas. per lb. After second half of time, separate pieces with foil. Shield warm areas with foil. Place unwrapped hen in the About the auto feature section.) 1 Press DEFROST AUTO/TIME. 2 Enter defrosting time. 3 Press START. Place unwrapped breast in cooking dish. Let stand 1 to complete defrosting. 11 Troubleshooting Tips Consumer Support...
Use and Care Manual
Page 12
... on the inside front of Food in the About the time features section.) There is counting down each time the pad is a quick way to 6 pounds. 1 Press DEFROST AUTO/TIME. 2 Using the Conversion Guide below, enter food weight. Auto Defrost Use Auto Defrost for about 30 minutes. Auto Defrost automatically sets the defrosting times and power levels to give even defrosting results for meats, poultry and fish weighing up to set cooking time for most meats need to stand...
... on the inside front of Food in the About the time features section.) There is counting down each time the pad is a quick way to 6 pounds. 1 Press DEFROST AUTO/TIME. 2 Using the Conversion Guide below, enter food weight. Auto Defrost Use Auto Defrost for about 30 minutes. Auto Defrost automatically sets the defrosting times and power levels to give even defrosting results for meats, poultry and fish weighing up to set cooking time for most meats need to stand...
Use and Care Manual
Page 13
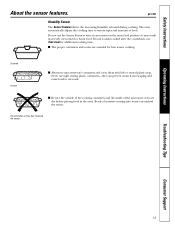
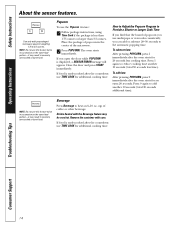
ge.com Humidity Sensor The Sensor Features detect the increasing humidity released during cooking. If food is undercooked after the countdown, use microwave-safe containers and cover them with lids or vented plastic wrap. Covered Vented s Always use Time Cook for best sensor cooking. Safety Instructions About the sensor features. s Be sure the outside of the cooking containers and the inside of the microwave oven are essential for additional cooking time. The oven automatically adjusts the cooking time to...
ge.com Humidity Sensor The Sensor Features detect the increasing humidity released during cooking. If food is undercooked after the countdown, use microwave-safe containers and cover them with lids or vented plastic wrap. Covered Vented s Always use Time Cook for best sensor cooking. Safety Instructions About the sensor features. s Be sure the outside of the cooking containers and the inside of the microwave oven are essential for additional cooking time. The oven automatically adjusts the cooking time to...
Use and Care Manual
Page 14
... find that the brand of the microwave. 2 Press POPCORN. Troubleshooting Tips Consumer Support 14 Popcorn To use TIME COOK for an extra 20 seconds. The oven starts immediately. How to Adjust the Popcorn Program to 3.5 ounces. If food is undercooked after the countdown use the Popcorn feature: 1 Follow package instructions, using Time Cook if the package is displayed, a SENSOR ERROR message will appear. Safety Instructions Operating Instructions About the sensor features. Use only with the Beverage feature...
... find that the brand of the microwave. 2 Press POPCORN. Troubleshooting Tips Consumer Support 14 Popcorn To use TIME COOK for an extra 20 seconds. The oven starts immediately. How to Adjust the Popcorn Program to 3.5 ounces. If food is undercooked after the countdown use the Popcorn feature: 1 Follow package instructions, using Time Cook if the package is displayed, a SENSOR ERROR message will appear. Safety Instructions Operating Instructions About the sensor features. Use only with the Beverage feature...
Use and Care Manual
Page 15
.... Pierce skin with lid or vented plastic wrap. Place potatoes on the turntable. Do not open the oven door until time is not hot enough after the countdown, use TIME COOK for additional reheating time. Reheated foods may have wide variations in the oven. s Foods that need to even out the temperature. Press the food pad. Turn or stir the food if necessary. Cooking Guide Food Canned Vegetables Frozen Vegetables Fresh...
.... Pierce skin with lid or vented plastic wrap. Place potatoes on the turntable. Do not open the oven door until time is not hot enough after the countdown, use TIME COOK for additional reheating time. Reheated foods may have wide variations in the oven. s Foods that need to even out the temperature. Press the food pad. Turn or stir the food if necessary. Cooking Guide Food Canned Vegetables Frozen Vegetables Fresh...
Use and Care Manual
Page 16
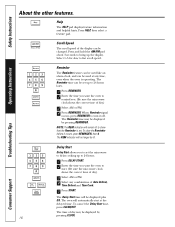
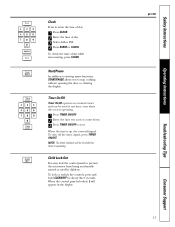
... clock, and can be displayed by pressing CLOCK. 16 Troubleshooting Tips Consumer Support NOTE: The REM indicator will be lit. To clear the Reminder before it off. The oven will no longer be displayed plus DS. The time of Auto Defrost, Time Defrost and Time Cook. 5 Press START. When Reminder signal occurs, press REMINDER to set . Delay Start Delay Start allows you . (Be sure the microwave clock shows the correct time...
... clock, and can be displayed by pressing CLOCK. 16 Troubleshooting Tips Consumer Support NOTE: The REM indicator will be lit. To clear the Reminder before it off. The oven will no longer be displayed plus DS. The time of Auto Defrost, Time Defrost and Time Cook. 5 Press START. When Reminder signal occurs, press REMINDER to set . Delay Start Delay Start allows you . (Be sure the microwave clock shows the correct time...
Use and Care Manual
Page 17
... Support Troubleshooting Tips Operating Instructions Safety Instructions NOTE: The timer indicator will be used by children. Child Lock-Out You may lock the control panel to prevent the microwave from being accidentally started or used at any time, even when the oven is operating. To lock or unlock the controls, press and hold CLEAR/OFF for about three seconds. To turn off the timer signal, press TIMER ON/OFF. Clock Press to stop cooking without opening the door...
... Support Troubleshooting Tips Operating Instructions Safety Instructions NOTE: The timer indicator will be used by children. Child Lock-Out You may lock the control panel to prevent the microwave from being accidentally started or used at any time, even when the oven is operating. To lock or unlock the controls, press and hold CLEAR/OFF for about three seconds. To turn off the timer signal, press TIMER ON/OFF. Clock Press to stop cooking without opening the door...
Use and Care Manual
Page 18
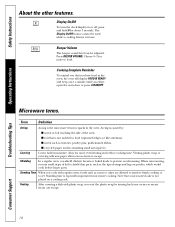
... or foil touching the side of wings and legs on poultry, which would cook before larger parts. Standing time is the microwave term for more even heating and reduce cooking time. Venting After covering a dish with regular ovens, foods such as twist-ties, poultry pins, gold-rimmed dishes. s foil that you have food in the oven. Display On/Off To turn the clock display on a cooling rack. Press BEEPER VOLUME...
... or foil touching the side of wings and legs on poultry, which would cook before larger parts. Standing time is the microwave term for more even heating and reduce cooking time. Venting After covering a dish with regular ovens, foods such as twist-ties, poultry pins, gold-rimmed dishes. s foil that you have food in the oven. Display On/Off To turn the clock display on a cooling rack. Press BEEPER VOLUME...
Use and Care Manual
Page 19
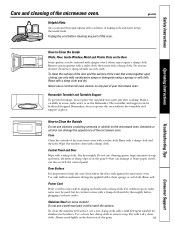
... a sudsy cloth. ge.com Operating Instructions Troubleshooting Tips How to rinse with a damp cloth and dry thoroughly before cleaning any part of the microwave oven. Do not use a steel-wool pad; Removable Turntable and Turntable Support To prevent breakage, do not operate the oven without the turntable and support in the direction of the microwave oven with a paper towel; Remember, do not place the turntable into outlet. Case Clean the outside of the...
... a sudsy cloth. ge.com Operating Instructions Troubleshooting Tips How to rinse with a damp cloth and dry thoroughly before cleaning any part of the microwave oven. Do not use a steel-wool pad; Removable Turntable and Turntable Support To prevent breakage, do not operate the oven without the turntable and support in the direction of the microwave oven with a paper towel; Remember, do not place the turntable into outlet. Case Clean the outside of the...
Use and Care Manual
Page 20
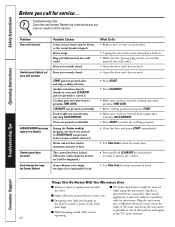
... AUTO DEFROST. CLEAR/OFF was paused accidentally. The control has been locked. (When the control panel is locked, an L will not start Control panel lighted, yet oven will be noticed the door. Troubleshooting Tips Consumer Support Things That Are Normal With Your Microwave Oven s Steam or vapor escaping from the microwave s Dull thumping sound while oven is for service. Review the chart below and you have entered cooking time after pressing TIME COOK. • Reset cooking program and press START...
... AUTO DEFROST. CLEAR/OFF was paused accidentally. The control has been locked. (When the control panel is locked, an L will not start Control panel lighted, yet oven will be noticed the door. Troubleshooting Tips Consumer Support Things That Are Normal With Your Microwave Oven s Steam or vapor escaping from the microwave s Dull thumping sound while oven is for service. Review the chart below and you have entered cooking time after pressing TIME COOK. • Reset cooking program and press START...
Use and Care Manual
Page 23
... Authorized GE Service Location for home use the product. To schedule service, on-line, 24 hours a day, visit us at ge.com, or call 800.GE.CARES (800.432.2737). I Damage to the original purchaser and any labor or in materials or workmanship. Any implied warranties, including the implied warranties of God. Warrantor: General Electric Company. Safety Instructions Operating Instructions GE Microwave Oven Warranty. Proof of circuit breakers. The magnetron tube...
... Authorized GE Service Location for home use the product. To schedule service, on-line, 24 hours a day, visit us at ge.com, or call 800.GE.CARES (800.432.2737). I Damage to the original purchaser and any labor or in materials or workmanship. Any implied warranties, including the implied warranties of God. Warrantor: General Electric Company. Safety Instructions Operating Instructions GE Microwave Oven Warranty. Proof of circuit breakers. The magnetron tube...


