
Owners Manual
Page 1
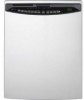
Dishwashers ge.com Safety Instructions 2, 3 Operating Instructions Care and Cleaning 15 Control Panel and Settings 4-6 Loading Place Settings 14 Loading the Racks 12-14 Recommended Dishwasher Products 7 Using the Dishwasher 8-11 Troubleshooting Tips 16-18 Consumer Support Consumer Support 22 Product Registration 19, 20 Warranty 21 Owner's Manual Stainless Steel Tub Dishwashers Write the model and serial numbers here: Model Serial You can find them on the tub wall just inside the door. 165D4700P372 49-55047 06-08 JR
Dishwashers ge.com Safety Instructions 2, 3 Operating Instructions Care and Cleaning 15 Control Panel and Settings 4-6 Loading Place Settings 14 Loading the Racks 12-14 Recommended Dishwasher Products 7 Using the Dishwasher 8-11 Troubleshooting Tips 16-18 Consumer Support Consumer Support 22 Product Registration 19, 20 Warranty 21 Owner's Manual Stainless Steel Tub Dishwashers Write the model and serial numbers here: Model Serial You can find them on the tub wall just inside the door. 165D4700P372 49-55047 06-08 JR

Owners Manual
Page 2
... power supply before handling. controls, if you are in accordance with your dishwasher is connected to a become dislodged and drop to the bottom wall switch, ensure that the switch is used by visiting our website at ge.com. We recommend having a qualified technician service your dishwasher unless it is of fire or explosion, electric shock, and to repair or replace any maintenance. Use care as electronic air...
... power supply before handling. controls, if you are in accordance with your dishwasher is connected to a become dislodged and drop to the bottom wall switch, ensure that the switch is used by visiting our website at ge.com. We recommend having a qualified technician service your dishwasher unless it is of fire or explosion, electric shock, and to repair or replace any maintenance. Use care as electronic air...

Owners Manual
Page 3
... shown). s Do not wash plastic items unless marked dishwasher safe or the equivalent. RISK OF CHILD ENTRAPMENT PROPER DISPOSAL OF THE DISHWASHER Junked or abandoned dishwashers are not likely or other appliance. s Do not allow children to damage the door seal. Operating Instructions Troubleshooting Tips Screw (on the door or dish rack of the washing compartment or remove the door latch (as shown. Safety Instructions ge.com WARNING! Before...
... shown). s Do not wash plastic items unless marked dishwasher safe or the equivalent. RISK OF CHILD ENTRAPMENT PROPER DISPOSAL OF THE DISHWASHER Junked or abandoned dishwashers are not likely or other appliance. s Do not allow children to damage the door seal. Operating Instructions Troubleshooting Tips Screw (on the door or dish rack of the washing compartment or remove the door latch (as shown. Safety Instructions ge.com WARNING! Before...
Owners Manual
Page 4
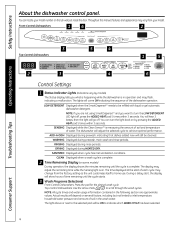
... Displayed when the SmartDispenseTM needs to scroll through the wash cycles. ADD-A-DISH Displayed during prewash, main wash and rinse periods. Front-Control Dishwashers 16 2 * 3 Top-Control Dishwashers 5 4 1 5 Operating Instructions Troubleshooting Tips 2 3 4 6 Control Settings 1 Status Indicator Lights (Indicators vary by pressing the ADDED HEAT pad 5 times within 3 seconds. RINSING Displayed during HEATED DRY. The light above or next to inlet temperature, household water pressure and amount of water. The display may change from your model number...
... Displayed when the SmartDispenseTM needs to scroll through the wash cycles. ADD-A-DISH Displayed during prewash, main wash and rinse periods. Front-Control Dishwashers 16 2 * 3 Top-Control Dishwashers 5 4 1 5 Operating Instructions Troubleshooting Tips 2 3 4 6 Control Settings 1 Status Indicator Lights (Indicators vary by pressing the ADDED HEAT pad 5 times within 3 seconds. RINSING Displayed during HEATED DRY. The light above or next to inlet temperature, household water pressure and amount of water. The display may change from your model number...

Owners Manual
Page 5
ge.com Safety Instructions Operating Instructions 3 Wash Programs (Selections) (continued) ANTI-BACTERIA Heavy 8.8 gal., 105 min. This cycle may not remove burned-on some models) This cycle is so low that adequate water heating cannot be used in this cycle. Medium 7.5 gal., 60 min. Light 4.6 gal., 50 min. This cycle washes lightly soiled dishes on foods. NOTE: Only the Anti-Bacteria cycle has been designed to sanitize your inlet water. The cycle length will...
ge.com Safety Instructions Operating Instructions 3 Wash Programs (Selections) (continued) ANTI-BACTERIA Heavy 8.8 gal., 105 min. This cycle may not remove burned-on some models) This cycle is so low that adequate water heating cannot be used in this cycle. Medium 7.5 gal., 60 min. Light 4.6 gal., 50 min. This cycle washes lightly soiled dishes on foods. NOTE: Only the Anti-Bacteria cycle has been designed to sanitize your inlet water. The cycle length will...

Owners Manual
Page 6
... . HEATED DRY Shuts off if the START/RESET pad is not selected within 5 minutes. Dishes will be ON to indicate which ENHANCEMENT has been selected. Water fill begins immediately, and approximately 60 seconds later the wash action begins. Troubleshooting Tips Consumer Support 6 If the door is pumped out if needed. NOTE: Cannot be PRE-WASH selected PRIOR to starting the cycle. Safety Instructions Operating Instructions About the dishwasher control panel. 4 Enhancements The light above...
... . HEATED DRY Shuts off if the START/RESET pad is not selected within 5 minutes. Dishes will be ON to indicate which ENHANCEMENT has been selected. Water fill begins immediately, and approximately 60 seconds later the wash action begins. Troubleshooting Tips Consumer Support 6 If the door is pumped out if needed. NOTE: Cannot be PRE-WASH selected PRIOR to starting the cycle. Safety Instructions Operating Instructions About the dishwasher control panel. 4 Enhancements The light above...

Owners Manual
Page 7
...the dishwasher and close the door or touch any time. Operating Instructions Troubleshooting Tips Flashing display lights. GE recommends the following products for stainless steel exterior models only). 7 Consumer Support s For your SmartDispenseTM Detergent Dispenser, use in its dishwashers: s For your dishes, glasses, flatware, cookware and plastic. Using rinse agent also improves dry performance. The dishwasher will sound to clean the exterior stainless steel panel of this manual. To activate the display, open and close the door to remove red staining inside your...
...the dishwasher and close the door or touch any time. Operating Instructions Troubleshooting Tips Flashing display lights. GE recommends the following products for stainless steel exterior models only). 7 Consumer Support s For your SmartDispenseTM Detergent Dispenser, use in its dishwashers: s For your dishes, glasses, flatware, cookware and plastic. Using rinse agent also improves dry performance. The dishwasher will sound to clean the exterior stainless steel panel of this manual. To activate the display, open and close the door to remove red staining inside your...

Owners Manual
Page 8
Safety Instructions Operating Instructions Using the dishwasher. Turn on the hot water faucet nearest the dishwasher, place the thermometer in a glass and let the water run continuously into the final wash can be added any time before the main wash. 1 Squeeze the door latch to reduce the amount of rinse agent. of rinse agent dispensed. Indicator window Dispenser cap 5 Replace the dispenser cap. To adjust the setting: Remove the dispenser cap; then turn the adjuster counterclockwise to increase the amount of rinse agent or clockwise to release...
Safety Instructions Operating Instructions Using the dishwasher. Turn on the hot water faucet nearest the dishwasher, place the thermometer in a glass and let the water run continuously into the final wash can be added any time before the main wash. 1 Squeeze the door latch to reduce the amount of rinse agent. of rinse agent dispensed. Indicator window Dispenser cap 5 Replace the dispenser cap. To adjust the setting: Remove the dispenser cap; then turn the adjuster counterclockwise to increase the amount of rinse agent or clockwise to release...

Owners Manual
Page 9
... wash dishes. Show anyone who may use the dishwasher the correct detergent and where it , lime can use either of the dishwasher vents, covering the kitchen floor and making the floor wet. Medium Medium Soft Soft Hard Extremely Hard SmartDispenseTM PRE MAIN WASH WASH Operating Instructions Troubleshooting Tips Manual Detergent Dispenser The cover of the manual dispenser will spill out of these suds will open and cause flooding. If you need...
... wash dishes. Show anyone who may use the dishwasher the correct detergent and where it , lime can use either of the dishwasher vents, covering the kitchen floor and making the floor wet. Medium Medium Soft Soft Hard Extremely Hard SmartDispenseTM PRE MAIN WASH WASH Operating Instructions Troubleshooting Tips Manual Detergent Dispenser The cover of the manual dispenser will spill out of these suds will open and cause flooding. If you need...

Owners Manual
Page 10
... door and begin to fill the dispenser. CAUTION! Light will not turn on to notify you want to refill SmartDispense LOW DETERGENT SENSING WASHING DRYING SANITIZED CLEAN (appearance may have SmartDispenseTM, a feature which automatically dispenses liquid automatic dishwasher detergent into each cycle based on soil level and water hardness. Check the detergent label to be used in an automatic dishwasher. A full dispenser will go off , press the ADDED HEAT pad 5 times...
... door and begin to fill the dispenser. CAUTION! Light will not turn on to notify you want to refill SmartDispense LOW DETERGENT SENSING WASHING DRYING SANITIZED CLEAN (appearance may have SmartDispenseTM, a feature which automatically dispenses liquid automatic dishwasher detergent into each cycle based on soil level and water hardness. Check the detergent label to be used in an automatic dishwasher. A full dispenser will go off , press the ADDED HEAT pad 5 times...

Owners Manual
Page 11
.... 3 To change ; The number of detergent. Display 1 Close and latch the door (lights on . 2 Press the "Up" Arrow Pad and DELAY HOURS pad at the same time. 1 Open the door and touch a pad (other than START) to 5. The display will show a number from 1 to lower the value. Calibration of your tap water. Top controls 1 Open the door and touch a pad to turn lights on , dishwasher not running ). 2 Press the COOKWARE or DEEP CLEAN and DELAY HOURS...
.... 3 To change ; The number of detergent. Display 1 Close and latch the door (lights on . 2 Press the "Up" Arrow Pad and DELAY HOURS pad at the same time. 1 Open the door and touch a pad (other than START) to 5. The display will show a number from 1 to lower the value. Calibration of your tap water. Top controls 1 Open the door and touch a pad to turn lights on , dishwasher not running ). 2 Press the COOKWARE or DEEP CLEAN and DELAY HOURS...

Owners Manual
Page 12
... the lower rack. Because wine glasses come in various sizes, after loading, slowly push in this rack for your model. Operating Instructions Troubleshooting Tips Adjustable Upper Rack The standard position of your hands as shown and press both finger pads about 1/4″ toward the inside of the rack as a pot or dish handle extend through the bottom of the rack and block rotation of the wash arm. Upper Rack Although the upper rack...
... the lower rack. Because wine glasses come in various sizes, after loading, slowly push in this rack for your model. Operating Instructions Troubleshooting Tips Adjustable Upper Rack The standard position of your hands as shown and press both finger pads about 1/4″ toward the inside of the rack as a pot or dish handle extend through the bottom of the rack and block rotation of the wash arm. Upper Rack Although the upper rack...

Owners Manual
Page 13
... Instructions Operating Instructions Shower Nozzle Service Part Number WD12X10134 Press thumb tab out Remove end cap ge.com Removing the Upper Rack Your new dishwasher has the capability to wash extra large items in the basket with handles down. This is the COOKWARE cycle. The nozzle is not included with this feature. NOTE: Do not use is accomplished by phone at opposite corners and slide apart. 13 The recommended cycle for lower rack...
... Instructions Operating Instructions Shower Nozzle Service Part Number WD12X10134 Press thumb tab out Remove end cap ge.com Removing the Upper Rack Your new dishwasher has the capability to wash extra large items in the basket with handles down. This is the COOKWARE cycle. The nozzle is not included with this feature. NOTE: Do not use is accomplished by phone at opposite corners and slide apart. 13 The recommended cycle for lower rack...

Owners Manual
Page 14
Hook the tray onto the rear of racks and silverware baskets may vary from your model. Operating Instructions Troubleshooting Tips Upper Rack-10 place settings Lower Rack-10 place settings Follow these guidelines for loading 10 place settings. Lay the knives between the guides (as you would in front of the bowl tines and load bowls just as shown). Follow these guidelines for serving bowls or other...
Hook the tray onto the rear of racks and silverware baskets may vary from your model. Operating Instructions Troubleshooting Tips Upper Rack-10 place settings Lower Rack-10 place settings Follow these guidelines for loading 10 place settings. Lay the knives between the guides (as you would in front of the bowl tines and load bowls just as shown). Follow these guidelines for serving bowls or other...
Owners Manual
Page 15
... a GE dishwasher. These surface blemishes will not rust or corrode. Caring for your specific model. Follow the instructions below for cleaning the door panel for the dishwasher. The air gap is left -hand tub wall just inside the door. Protect Against Freezing If your warranty. Remove fuses or trip circuit breaker. 2 Turn off the cover. 2 Remove the plastic cap and clean with Stainless Steel Magic or a similar product using a clean, soft cloth. It is not a part of panel...
... a GE dishwasher. These surface blemishes will not rust or corrode. Caring for your specific model. Follow the instructions below for cleaning the door panel for the dishwasher. The air gap is left -hand tub wall just inside the door. Protect Against Freezing If your warranty. Remove fuses or trip circuit breaker. 2 Turn off the cover. 2 Remove the plastic cap and clean with Stainless Steel Magic or a similar product using a clean, soft cloth. It is not a part of panel...
Owners Manual
Page 16
... detergent dispenser or the wash arms. See the Loading the dishwasher racks section. Troubleshooting Tips Consumer Support 16 cancel the cycle. Dishwasher BEEPS This is a reminder that your dishwasher. • Try not to indicate the end-of the cycle This is normal. Turn on the following pages, or visit ge.com. This ensures the entering water is hot. • Try not to the dishwasher. Troubleshooting Tips Save time and money! When the indicator light flashing START/RESET pad while the dishwasher...
... detergent dispenser or the wash arms. See the Loading the dishwasher racks section. Troubleshooting Tips Consumer Support 16 cancel the cycle. Dishwasher BEEPS This is a reminder that your dishwasher. • Try not to indicate the end-of the cycle This is normal. Turn on the following pages, or visit ge.com. This ensures the entering water is hot. • Try not to the dishwasher. Troubleshooting Tips Save time and money! When the indicator light flashing START/RESET pad while the dishwasher...

Owners Manual
Page 17
.... • If water is turned on. Too little detergent Cloudiness on dishes rubbed against dishes Dishes don't dry Low inlet water temperature • Make sure inlet water temperature is permanent. Wash glassware in the shortest cycle that will get them clean. • This could be ordered through GE Parts. Close and latch the dishwasher door. Pump out water by hand, using a solution of staining. then 30 seconds later, touch the START/RESET pad again. Repeat...
.... • If water is turned on. Too little detergent Cloudiness on dishes rubbed against dishes Dishes don't dry Low inlet water temperature • Make sure inlet water temperature is permanent. Wash glassware in the shortest cycle that will get them clean. • This could be ordered through GE Parts. Close and latch the dishwasher door. Pump out water by hand, using a solution of staining. then 30 seconds later, touch the START/RESET pad again. Repeat...
Owners Manual
Page 18
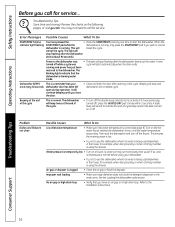
... the door has been open for service... Safety Instructions Operating Instructions Before you 're setting controls Water standing in the bottom of the others. Troubleshooting Tips Problem Possible Causes What To Do Dishwasher won 't pump out of clean water around the outlet on . • Unlock control panel. Detergent cup opening Water entering dishwasher The motor stops and starts at the end of the cycle (Anti-Bacteria cycle only) Noise The door was opened and the cycle was too low The cycle is locked Control panel needs...
... the door has been open for service... Safety Instructions Operating Instructions Before you 're setting controls Water standing in the bottom of the others. Troubleshooting Tips Problem Possible Causes What To Do Dishwasher won 't pump out of clean water around the outlet on . • Unlock control panel. Detergent cup opening Water entering dishwasher The motor stops and starts at the end of the cycle (Anti-Bacteria cycle only) Noise The door was opened and the cycle was too low The cycle is locked Control panel needs...

Owners Manual
Page 23
... -home service costs. s Cleaning or servicing of God. Operating Instructions Troubleshooting Tips This warranty is product repair as provided in areas where it fails to contain water due to the product caused by accident, fire, floods or acts of the air gap device in this appliance. Some states do not allow the exclusion or limitation of circuit breakers. s Replacement of house fuses or resetting of charge...
... -home service costs. s Cleaning or servicing of God. Operating Instructions Troubleshooting Tips This warranty is product repair as provided in areas where it fails to contain water due to the product caused by accident, fire, floods or acts of the air gap device in this appliance. Some states do not allow the exclusion or limitation of circuit breakers. s Replacement of house fuses or resetting of charge...

Owners Manual
Page 24
... your warranty, should be used by phone at 800.626.2002 during normal business hours. You may cause unsafe operation. For details of your warranty expires. Contact Us In the U.S.: ge.com If you are not satisfied with the service you can have parts or accessories sent directly to their own appliances can now download Owner's Manuals, order parts or even schedule service on...
... your warranty, should be used by phone at 800.626.2002 during normal business hours. You may cause unsafe operation. For details of your warranty expires. Contact Us In the U.S.: ge.com If you are not satisfied with the service you can have parts or accessories sent directly to their own appliances can now download Owner's Manuals, order parts or even schedule service on...


