
Installation Instructions
Page 2
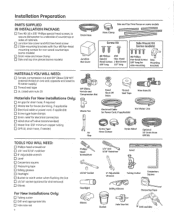
... 10' Drain Hose GPFZ0L TOOLS YOU WILL NEED: [] Phillips head screwdriver [] 114" and 5/16" nutdriver [] 6" Adjustable wrench [] Level [] Carpenters square [] Heasuring tope [] Safetg gtasses [] Flashlight [] Bucket to underside of countertop or sides of cabinets, [] Junction box cover... °,3 "_r-- 15116"Socket 5116"Nutdriver i) 6" Adjustable Wrench Level Tubing Cutter ! j Carpenters Square Flashlight Safety Glasses MeasuringTape Gloves Bucket Hole Saw Set n Drill and Bits Installation Preparation PARTS SUPPLIED IN INSTALLATION PACKAGE: [] Two #8-18 × 5/8" Phillips ...
... 10' Drain Hose GPFZ0L TOOLS YOU WILL NEED: [] Phillips head screwdriver [] 114" and 5/16" nutdriver [] 6" Adjustable wrench [] Level [] Carpenters square [] Heasuring tope [] Safetg gtasses [] Flashlight [] Bucket to underside of countertop or sides of cabinets, [] Junction box cover... °,3 "_r-- 15116"Socket 5116"Nutdriver i) 6" Adjustable Wrench Level Tubing Cutter ! j Carpenters Square Flashlight Safety Glasses MeasuringTape Gloves Bucket Hole Saw Set n Drill and Bits Installation Preparation PARTS SUPPLIED IN INSTALLATION PACKAGE: [] Two #8-18 × 5/8" Phillips ...
Installation Instructions
Page 3
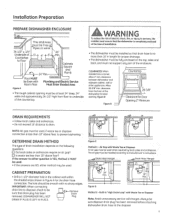
...persons, the installer must ensure that the dishwasher is less than 18" above floor? DETERMINE DRAIN METHOD The type of tile dishwasher for door opening must be used. either question is no sharp edges. CABINET PREPARATION • Drill a t-112" diameter hole in the cabinet ...siphoning. .... o If the answers are NO. clearance from floor to the disposer, Remove L__.Z--U_ Drain removed. The dishwasher must not support and part of the enclosure. Do not exceed 10' distance to manufacturer's instructions. _ _ Drain Has? Alwags be sure that drain hose is YES, ...
...persons, the installer must ensure that the dishwasher is less than 18" above floor? DETERMINE DRAIN METHOD The type of tile dishwasher for door opening must be used. either question is no sharp edges. CABINET PREPARATION • Drill a t-112" diameter hole in the cabinet ...siphoning. .... o If the answers are NO. clearance from floor to the disposer, Remove L__.Z--U_ Drain removed. The dishwasher must not support and part of the enclosure. Do not exceed 10' distance to manufacturer's instructions. _ _ Drain Has? Alwags be sure that drain hose is YES, ...
Installation Instructions
Page 6
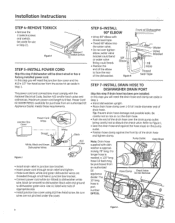
... green wire. o Seat the drain hose end against the front lip of the drain hose Pump Outlet \ Hose Stops " supplied with dishwasher is part number _} GPFIOL Figure L 6 Junction Box Cover Wires Power Cord 0 Dishwasher Wires Figure J • Install strain relief in junction box bracket. °...DISHWASHER DRAIN PORT Skip this step gou will need the junction box cover and the #10 × 1/2" he× head screw from an authorized GE Appliance Dealer, meets these requirements. o Theod 90 ° elbow into the water valve. o Do not over Z-3/16" inside diameter end of ...
... green wire. o Seat the drain hose end against the front lip of the drain hose Pump Outlet \ Hose Stops " supplied with dishwasher is part number _} GPFIOL Figure L 6 Junction Box Cover Wires Power Cord 0 Dishwasher Wires Figure J • Install strain relief in junction box bracket. °...DISHWASHER DRAIN PORT Skip this step gou will need the junction box cover and the #10 × 1/2" he× head screw from an authorized GE Appliance Dealer, meets these requirements. o Theod 90 ° elbow into the water valve. o Do not over Z-3/16" inside diameter end of ...
Installation Instructions
Page 8
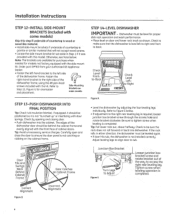
...to Step 15, Figure U for models not factory equipped with the kit. Check by opening and closing door. Check to tighten screw when leveling is completed. Order part GPF65 from gour authorized GE Appliance Dealer. • Fasten the left side of the dishwasher frame. o Push dishwasher into dishwasher. ... is not catching or rubbing on the cabinet frame. STEP 14-LEVEL DISHWASHER IMPORTANT- I if it is not "bunched up" or interfering with the front face of cabinet doors. Installation Instructions h_¸ STEP 12-INSTALL SIDE-MOUNT BRACKETS (included with this step if underside of ...
...to Step 15, Figure U for models not factory equipped with the kit. Check by opening and closing door. Check to tighten screw when leveling is completed. Order part GPF65 from gour authorized GE Appliance Dealer. • Fasten the left side of the dishwasher frame. o Push dishwasher into dishwasher. ... is not catching or rubbing on the cabinet frame. STEP 14-LEVEL DISHWASHER IMPORTANT- I if it is not "bunched up" or interfering with the front face of cabinet doors. Installation Instructions h_¸ STEP 12-INSTALL SIDE-MOUNT BRACKETS (included with this step if underside of ...

