

Installation Instructions
Page 1
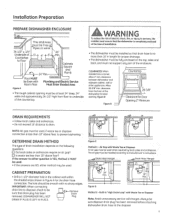
... this dishwasher requires basic mechanical, electrical and plumbing skills. Product failui;e due to improper installation is not covered under the GE Appliance warrontg, See warrantg information. • Completion Time - 2 to Consumer - IMPORTANT.The dishwasherMUST be worn. KEEP THESE ...; Note to oliow for future reference. • Skill Level - Installation of the installer. If gOu received o damaged dishwasher, gou should be installed to Installer - GSD6000 Series PDW7000 Series imagination at : www.ge.com BEFORE YOU BEGIN Read these instructions with gour Owner's...
... this dishwasher requires basic mechanical, electrical and plumbing skills. Product failui;e due to improper installation is not covered under the GE Appliance warrontg, See warrantg information. • Completion Time - 2 to Consumer - IMPORTANT.The dishwasherMUST be worn. KEEP THESE ...; Note to oliow for future reference. • Skill Level - Installation of the installer. If gOu received o damaged dishwasher, gou should be installed to Installer - GSD6000 Series PDW7000 Series imagination at : www.ge.com BEFORE YOU BEGIN Read these instructions with gour Owner's...
Installation Instructions
Page 3
of tile dishwasher for door opening must be at the time of installation, .... (V:: - Remove L__.Z--U_ Drain removed. Hanger I2 i , _ _ Drain Hose Hanger 3Z' Hir_ Figure D Method Z - Built-in Figure A ... 1FPLUG IS LEFT IN PLACE. _ L__J Plug Figure C .... : Method I CLEARANCES: When installed into a corner, atlow 2" min. clearance between dishwasher and adjacent cabinet, wall or other appliances. NOTE: Air gap must be used . I - The hole should be smooth with Waste Teeor Disposer An air gap must be usedwhen {eqciiredbg Ioco_codesand ordin0nces.: Theair...
of tile dishwasher for door opening must be at the time of installation, .... (V:: - Remove L__.Z--U_ Drain removed. Hanger I2 i , _ _ Drain Hose Hanger 3Z' Hir_ Figure D Method Z - Built-in Figure A ... 1FPLUG IS LEFT IN PLACE. _ L__J Plug Figure C .... : Method I CLEARANCES: When installed into a corner, atlow 2" min. clearance between dishwasher and adjacent cabinet, wall or other appliances. NOTE: Air gap must be used . I - The hole should be smooth with Waste Teeor Disposer An air gap must be usedwhen {eqciiredbg Ioco_codesand ordin0nces.: Theair...
Installation Instructions
Page 4
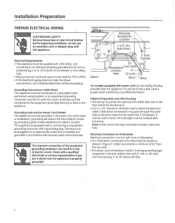
...connections meg pass through a separate hole. Installation Preparation PREPARE ELECTRICAL WIRING FORPERSONALSAFETVI _Ji bReefomroevebehgoiunsneingfuseinsotarlloaptieonn. Grounding Instructions-Cable Direct This appliance must be connected to a grounded metal, permanent wiring sgstem, or an equipment grounding conductor must be grounded. In tile... side, rear or the floor within the shaded area. ° Cut o 1-t/2" maximum diameter hole to on the appliance. This appliance is installed and grounded in a risk of least resistance for 75°C {176%}. • If the electrical supply...
...connections meg pass through a separate hole. Installation Preparation PREPARE ELECTRICAL WIRING FORPERSONALSAFETVI _Ji bReefomroevebehgoiunsneingfuseinsotarlloaptieonn. Grounding Instructions-Cable Direct This appliance must be connected to a grounded metal, permanent wiring sgstem, or an equipment grounding conductor must be grounded. In tile... side, rear or the floor within the shaded area. ° Cut o 1-t/2" maximum diameter hole to on the appliance. This appliance is installed and grounded in a risk of least resistance for 75°C {176%}. • If the electrical supply...
Installation Instructions
Page 6
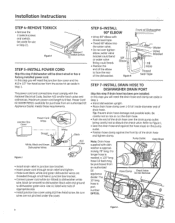
... power cord. Use UL listed wire nuts of the drain hose over tighten elbow; In this step if dishwasher will be purchased from an authorized GE Appliance Dealer, meets these requirements. Ifo longer hose is 6 feet. Set aside for purchase from an authorized...
... power cord. Use UL listed wire nuts of the drain hose over tighten elbow; In this step if dishwasher will be purchased from an authorized GE Appliance Dealer, meets these requirements. Ifo longer hose is 6 feet. Set aside for purchase from an authorized...
Installation Instructions
Page 8
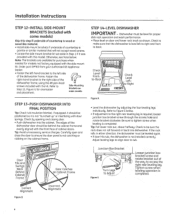
...leveling legs to align door to tighten screw when leveling is completed. It should be positioned so it was provided with the kit. Check by opening and closing door. J Loosen junctiOn:box ' bracket screw and , rotate bracket outof thewagtoaccessthe " Triigghhttenrearscrleewvelinwghenleg. Order part GPF65 from gour authorized GE Appliance..., Figure U for models not factory equipped with door springs. Installation Instructions h_¸ STEP 12-INSTALL SIDE-MOUNT BRACKETS (included with the front face of cabinet doors. Refer to Adjust ...... o Push dishwasher into ...
...leveling legs to align door to tighten screw when leveling is completed. It should be positioned so it was provided with the kit. Check by opening and closing door. J Loosen junctiOn:box ' bracket screw and , rotate bracket outof thewagtoaccessthe " Triigghhttenrearscrleewvelinwghenleg. Order part GPF65 from gour authorized GE Appliance..., Figure U for models not factory equipped with door springs. Installation Instructions h_¸ STEP 12-INSTALL SIDE-MOUNT BRACKETS (included with the front face of cabinet doors. Refer to Adjust ...... o Push dishwasher into ...