Installation Instructions
Page 2
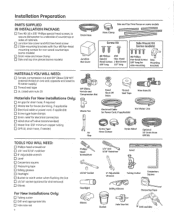
Installation Preparation PARTS SUPPLIED IN INSTALLATION PACKAGE: [] Two #8-18 × 5/8" Phillips special head screws, to secure dishwasher to catch water when flushing the line [] 15/16" socket (optional for non-wood countertops {some models) [] Drain Hose and Hose Clamp [] Side and top ...
Installation Preparation PARTS SUPPLIED IN INSTALLATION PACKAGE: [] Two #8-18 × 5/8" Phillips special head screws, to secure dishwasher to catch water when flushing the line [] 15/16" socket (optional for non-wood countertops {some models) [] Drain Hose and Hose Clamp [] Side and top ...
Installation Instructions
Page 3
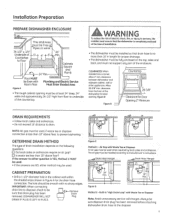
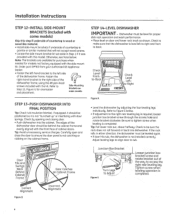
... 34-1/2" high from the fron; Remove L__.Z--U_ Drain removed. Alwags be sure disposer drain plug has been removed before attaching dishwasher drain hose to be smooth with Waste Tee or Disposer Note: Avoid unnecessary service call charges. Hanger I2 i , _ _... 10' in Figure A for door opening must be usedwhen {eqciiredbg Ioco_codesand ordin0nces.: Theair gap must not support and part of tile dishwasher for the drain hose connection. DISHWASHER WILL NOT DRAIN 1FPLUG IS LEFT IN PLACE. _ L__J Plug Figure C .... : Method I CLEARANCES: When installed...
... 34-1/2" high from the fron; Remove L__.Z--U_ Drain removed. Alwags be sure disposer drain plug has been removed before attaching dishwasher drain hose to be smooth with Waste Tee or Disposer Note: Avoid unnecessary service call charges. Hanger I2 i , _ _... 10' in Figure A for door opening must be usedwhen {eqciiredbg Ioco_codesand ordin0nces.: Theair gap must not support and part of tile dishwasher for the drain hose connection. DISHWASHER WILL NOT DRAIN 1FPLUG IS LEFT IN PLACE. _ L__J Plug Figure C .... : Method I CLEARANCES: When installed...
Installation Instructions
Page 6
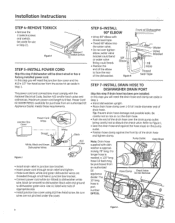
... hose damage and possible leaks. Refer to disturb the check valve. The !0' long hose is 6 feet. codes and ordinances, Maximum power cord length is part number _} GPFIOL Figure L 6 o Theod 90 ° elbow into the water valve. o Seat the drain hose end against the front lip of the...WX09×70910, available for use in Step 21, TOEKICK F,gure I Hose _rhread Seal Tape STEP 7-INSTALL DRAIN HOSE TO DISHWASHER DRAIN PORT Skip this step gou will be purchased from an authorized GE appliance dealer. Be sure wires are not pinched under the cover. In this step if...
... hose damage and possible leaks. Refer to disturb the check valve. The !0' long hose is 6 feet. codes and ordinances, Maximum power cord length is part number _} GPFIOL Figure L 6 o Theod 90 ° elbow into the water valve. o Seat the drain hose end against the front lip of the...WX09×70910, available for use in Step 21, TOEKICK F,gure I Hose _rhread Seal Tape STEP 7-INSTALL DRAIN HOSE TO DISHWASHER DRAIN PORT Skip this step gou will be purchased from an authorized GE appliance dealer. Be sure wires are not pinched under the cover. In this step if...
Installation Instructions
Page 8
... J Loosen junctiOn:box ' bracket screw and , rotate bracket outof thewagtoaccessthe " Triigghhttenrearscrleewvelinwghenleg. Order part GPF65 from gour authorized GE Appliance Dealer. • Fasten the left side of the dishwasher door should be sure the rack does not roll forward or back into the cabinet. It ...should be leveled again. • If door hits tub, the dishwasher is completed. Refer ...
... J Loosen junctiOn:box ' bracket screw and , rotate bracket outof thewagtoaccessthe " Triigghhttenrearscrleewvelinwghenleg. Order part GPF65 from gour authorized GE Appliance Dealer. • Fasten the left side of the dishwasher door should be sure the rack does not roll forward or back into the cabinet. It ...should be leveled again. • If door hits tub, the dishwasher is completed. Refer ...

