
Installation Instructions
Page 1
... Installer - If gOu received o damaged dishwasher, gou should be installed to 3 Hours, New installations require more time than replacement installations. Product failui;e due to improper installation is not covered under the GE Appliance warrontg, See warrantg information. • Completion Time - 2 to oliow for available custom panel kits, FOR YOUR SAFETY Read and observe all CAUTIONS and WARNINGS shown throughout these instructions for future reference. • Skill Level...
... Installer - If gOu received o damaged dishwasher, gou should be installed to 3 Hours, New installations require more time than replacement installations. Product failui;e due to improper installation is not covered under the GE Appliance warrontg, See warrantg information. • Completion Time - 2 to oliow for available custom panel kits, FOR YOUR SAFETY Read and observe all CAUTIONS and WARNINGS shown throughout these instructions for future reference. • Skill Level...
Installation Instructions
Page 2
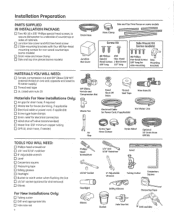
... end, opposite end sized to fit water supply) [] Thread seal tape [] UL Listed wire nuts (3) Materials For New Installations Only: [] Air gap for drain hose, if required [] Waste tee for house plumbing, if applicable [] Electrical cable or power cord, if appficable [] Screw tgpe hose clamps [] Strain relief for electrical Connection [] Hand shut:off V01ve{recommended} D Water line-3!8" minimum copper tubing [] GPF10L drain hose, if needed 90° Elbow, Ferrule and Compression Nut Hand Shut-Off Valve Thread Seal Tape Wire...
... end, opposite end sized to fit water supply) [] Thread seal tape [] UL Listed wire nuts (3) Materials For New Installations Only: [] Air gap for drain hose, if required [] Waste tee for house plumbing, if applicable [] Electrical cable or power cord, if appficable [] Screw tgpe hose clamps [] Strain relief for electrical Connection [] Hand shut:off V01ve{recommended} D Water line-3!8" minimum copper tubing [] GPF10L drain hose, if needed 90° Elbow, Ferrule and Compression Nut Hand Shut-Off Valve Thread Seal Tape Wire...
Installation Instructions
Page 3
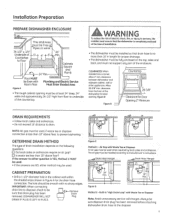
... dishwasher for the drain hose connection. Alwags be at the time of the enclosure. Installation Preparation PREPARE DISHWASHER ENCLOSURE This Wall Area must be Free _Pipes or wires 34-1/2"_+ 1//4" Underside of Countertop to Floor 2abinets 24" Hin: Floor MUST Square and Plumb --q be Evenwith Room Floor Plumbing and Electric Service Must Enter Shaded Area Figure A • The rough cabinet opening . Built-in Figure A for door opening...
... dishwasher for the drain hose connection. Alwags be at the time of the enclosure. Installation Preparation PREPARE DISHWASHER ENCLOSURE This Wall Area must be Free _Pipes or wires 34-1/2"_+ 1//4" Underside of Countertop to Floor 2abinets 24" Hin: Floor MUST Square and Plumb --q be Evenwith Room Floor Plumbing and Electric Service Must Enter Shaded Area Figure A • The rough cabinet opening . Built-in Figure A for door opening...
Installation Instructions
Page 4
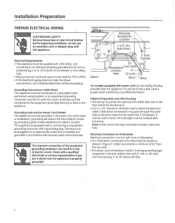
... electric shock. Grounding Instructions-Cable Direct This appliance must be connected to on the appliance. Check with ground and rated for electric current. If cabinet wal! Cabinet Preparation and Wire Routing • The wiring meg enter the opening from the opening, 6" to Dishwasher Electrical connection is installed and grounded in a risk of 24" from Wakkx_x_k V Location Area Ground-_' i Black-" VVhite For models equipped with power cord: Do not modifg the plug...
... electric shock. Grounding Instructions-Cable Direct This appliance must be connected to on the appliance. Check with ground and rated for electric current. If cabinet wal! Cabinet Preparation and Wire Routing • The wiring meg enter the opening from the opening, 6" to Dishwasher Electrical connection is installed and grounded in a risk of 24" from Wakkx_x_k V Location Area Ground-_' i Black-" VVhite For models equipped with power cord: Do not modifg the plug...

Installation Instructions
Page 5
... power cord with plug is on the left side of the dishwasher. CFarboimnet _ !9" From Wall :: / Cobinet Foce-_- Install the hot water inlet line, using no less than 3/8" copper tubing. o Adjust water heater for 120°Fto 150°Ftemperature. ,:Flush water line to clean out debris. : ,The ho:twater supply line pressure must not pass through the some tension setting to accommodate the water fine. STEP 2-CHECK DOOR BALANCE o With dishwasher...
... power cord with plug is on the left side of the dishwasher. CFarboimnet _ !9" From Wall :: / Cobinet Foce-_- Install the hot water inlet line, using no less than 3/8" copper tubing. o Adjust water heater for 120°Fto 150°Ftemperature. ,:Flush water line to clean out debris. : ,The ho:twater supply line pressure must not pass through the some tension setting to accommodate the water fine. STEP 2-CHECK DOOR BALANCE o With dishwasher...
Installation Instructions
Page 6
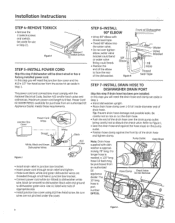
...; Connect power cord white (or ribbed} to dishwasher white wire, black (or smooth) to dishwasher black wire end ground to Figure L. Be careful not to nick or cut the drain hose. , Push the end of the drain hose over the drain pump outlet being careful not to face the rear of the dishwasher. 9(7 Elbow Figure K Front of the drain hose Pump Outlet \ Hose Stops " supplied with dishwasher is needed, a 220" long hose (20 feet} mag be direct wired or has a factorg installed power cord...
...; Connect power cord white (or ribbed} to dishwasher white wire, black (or smooth) to dishwasher black wire end ground to Figure L. Be careful not to nick or cut the drain hose. , Push the end of the drain hose over the drain pump outlet being careful not to face the rear of the dishwasher. 9(7 Elbow Figure K Front of the drain hose Pump Outlet \ Hose Stops " supplied with dishwasher is needed, a 220" long hose (20 feet} mag be direct wired or has a factorg installed power cord...
Installation Instructions
Page 7
... Cabinets. ° Hake sure drain hose is not kinked under the dishwasher and there is NOT Used} Power Cord (If Used) Tip: Position water line and house wiring on the floor to avoid interference with base of dishwasher. ...d _Do Not Push Against Front Door Panel With Knee, Damage to {he right of the door latch. STEP 11-INSTALL TRIM PIECES Skip this step if trim is used, guide the end...
... Cabinets. ° Hake sure drain hose is not kinked under the dishwasher and there is NOT Used} Power Cord (If Used) Tip: Position water line and house wiring on the floor to avoid interference with base of dishwasher. ...d _Do Not Push Against Front Door Panel With Knee, Damage to {he right of the door latch. STEP 11-INSTALL TRIM PIECES Skip this step if trim is used, guide the end...
Installation Instructions
Page 8
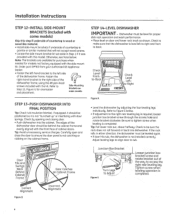
... closing door. Side-Mounting Brackets on the cabinet frame. oishwosmheursbteIevefol rproper dish rack operation and wash performance. • Place level on door and lower rock track as shown. I if it is wood or wood-like materia!, - Fasten the right-hand bracket to Adjust ...... The edges of the dishwasher door should be sure the rack does not roll forward or back into the cabinet. Installation Instructions h_¸ STEP 12-INSTALL SIDE-MOUNT BRACKETS...
... closing door. Side-Mounting Brackets on the cabinet frame. oishwosmheursbteIevefol rproper dish rack operation and wash performance. • Place level on door and lower rock track as shown. I if it is wood or wood-like materia!, - Fasten the right-hand bracket to Adjust ...... The edges of the dishwasher door should be sure the rack does not roll forward or back into the cabinet. Installation Instructions h_¸ STEP 12-INSTALL SIDE-MOUNT BRACKETS...
Installation Instructions
Page 9
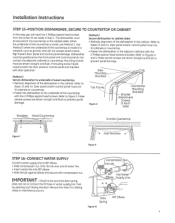
... water line into 90 ° elbow. ° Slide ferrule against elbow and secure with door operation. Tip: Prevent door panel and control panel damage, Dishwasher must be sure that will need the 2 Phillips special head screws from the screw kit set aside in the cabinet. Method 1 Secure dishwasher to 90 ° elbow. ° Slide compression nut, then ferrule over end of the countertop is wood, use...
... water line into 90 ° elbow. ° Slide ferrule against elbow and secure with door operation. Tip: Prevent door panel and control panel damage, Dishwasher must be sure that will need the 2 Phillips special head screws from the screw kit set aside in the cabinet. Method 1 Secure dishwasher to 90 ° elbow. ° Slide compression nut, then ferrule over end of the countertop is wood, use...

Installation Instructions
Page 10
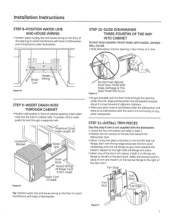
Use 5/8" or 7/8" inside diameter hose and o coupler to air gap, waste tee or disposer using the" previously determined method. Prior to prevent hose damage and pump out: issues. The motded end of the drain hose will fit 5/8" through the cabinet opening to connecting drain hose be sure that the drain f==7= plug has been removed. Built-in "High drain loop" with waste tee or disposer Cutting Line # IMPORTANT: Do not cut corrugated portion of cauntertop -- :-- .... DISHWASHER WILL...
Use 5/8" or 7/8" inside diameter hose and o coupler to air gap, waste tee or disposer using the" previously determined method. Prior to prevent hose damage and pump out: issues. The motded end of the drain hose will fit 5/8" through the cabinet opening to connecting drain hose be sure that the drain f==7= plug has been removed. Built-in "High drain loop" with waste tee or disposer Cutting Line # IMPORTANT: Do not cut corrugated portion of cauntertop -- :-- .... DISHWASHER WILL...
Installation Instructions
Page 11
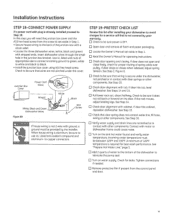
... of appropriate size to connect incoming ground to green, white to white and block to Step 19. iI / Screw _'/ ..... If the rock moves, adjust leveling legs. Junction Box Cover Wires Power Cord ___[__ Ground White, Black and Green "'.'_ Dishwasher Wires Figure BB .... If door does not open and close freely, check for leaks. Installation Instructions STEP 18-CONNECT POWER SUPPLY If a power cord with plug is required for best wash performance.
... of appropriate size to connect incoming ground to green, white to white and block to Step 19. iI / Screw _'/ ..... If the rock moves, adjust leveling legs. Junction Box Cover Wires Power Cord ___[__ Ground White, Black and Green "'.'_ Dishwasher Wires Figure BB .... If door does not open and close freely, check for leaks. Installation Instructions STEP 18-CONNECT POWER SUPPLY If a power cord with plug is required for best wash performance.

Installation Instructions
Page 12
... toekick should stag in contact with the consumer. Restore power after it is found , turn off about S minutes after corrections are made. Dishwasher should start. [] Check to leave complete literature package, these Installation Instructions and product samples and/or coupons with the floor. if equipped. [] Latch door. [] Push "Rinse Onlg" button. [] Push Start/Reset pad one time. If leaks are turned on power supplg or plug power cord into outlet;
... toekick should stag in contact with the consumer. Restore power after it is found , turn off about S minutes after corrections are made. Dishwasher should start. [] Check to leave complete literature package, these Installation Instructions and product samples and/or coupons with the floor. if equipped. [] Latch door. [] Push "Rinse Onlg" button. [] Push Start/Reset pad one time. If leaks are turned on power supplg or plug power cord into outlet;


