Use and Care Manual
Page 1
GE DishwashandeGEr Profiles ™ GEAppliances.com Safety Instructions 2-5 Operating Instructions Care and Cleaning 18 Control Panel and Settings . . 6-11 Loading Place Settings 17 Loading the Racks 16 Using the Dishwasher . . . . . .12-15 Troubleshooting Tips . . . 19-21 Consumer Support Consumer Support 23 Warranty 22 Owner's Manual Tall Tub Dishwashers Write the model and serial numbers here: Model Serial You can find them on the tub wall just inside the door. 165D4700P388 49-55064 07-09 JR
GE DishwashandeGEr Profiles ™ GEAppliances.com Safety Instructions 2-5 Operating Instructions Care and Cleaning 18 Control Panel and Settings . . 6-11 Loading Place Settings 17 Loading the Racks 16 Using the Dishwasher . . . . . .12-15 Troubleshooting Tips . . . 19-21 Consumer Support Consumer Support 23 Warranty 22 Owner's Manual Tall Tub Dishwashers Write the model and serial numbers here: Model Serial You can find them on the tub wall just inside the door. 165D4700P388 49-55064 07-09 JR
Use and Care Manual
Page 2
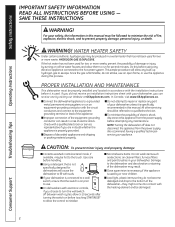
... contact with the heating element and be produced in this appliance is used for dishwashers will allow them to run an equipment-grounding conductor with the Installation Instructions before using any maintenance. If the hot water has not been used . I Do not attempt to repair or replace any built-up hydrogen gas to prevent property damage, personal injury, or death. SAVE THESE INSTRUCTIONS WARNING! I Load light, plastic items...
... contact with the heating element and be produced in this appliance is used for dishwashers will allow them to run an equipment-grounding conductor with the Installation Instructions before using any maintenance. If the hot water has not been used . I Do not attempt to repair or replace any built-up hydrogen gas to prevent property damage, personal injury, or death. SAVE THESE INSTRUCTIONS WARNING! I Load light, plastic items...
Use and Care Manual
Page 4
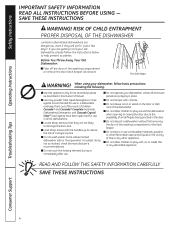
... AND FOLLOW THIS SAFETY INFORMATION CAREFULLY. I Do not operate your old dishwasher, please follow basic precautions, including the following: I Do not tamper with , on the door or dish rack of your dishwasher unless all GE dishwashers. I Use this Owner's Manual. I Do not abuse, sit on or stand on or inside this or any discarded appliance. I Do not touch the heating element during or immediately after...
... AND FOLLOW THIS SAFETY INFORMATION CAREFULLY. I Do not operate your old dishwasher, please follow basic precautions, including the following: I Do not tamper with , on the door or dish rack of your dishwasher unless all GE dishwashers. I Use this Owner's Manual. I Do not abuse, sit on or stand on or inside this or any discarded appliance. I Do not touch the heating element during or immediately after...

Use and Care Manual
Page 6
... a delay start of water. (on the temperature of time remaining until door is so low that the dishes are not intended for soil removal and sanitization efficacy. 6 Consumer Support This cycle raises the water temperature in the final rinse to the features on some models) The dishwasher will show hours of your dishware. LIGHT WASH 7.5 gal., 40-60 min. (on your dishwasher. 1 Operating Instructions Troubleshooting Tips 3 5 4 2 Control Settings 1 Status Indicator Lights The Status display tells...
... a delay start of water. (on the temperature of time remaining until door is so low that the dishes are not intended for soil removal and sanitization efficacy. 6 Consumer Support This cycle raises the water temperature in the final rinse to the features on some models) The dishwasher will show hours of your dishware. LIGHT WASH 7.5 gal., 40-60 min. (on your dishwasher. 1 Operating Instructions Troubleshooting Tips 3 5 4 2 Control Settings 1 Status Indicator Lights The Status display tells...

Use and Care Manual
Page 7
Dishes air dry naturally and energy is closed , the control panel lights will run longer with RINSE ONLY cycle. Children cannot accidentally start automatically at the correct time. NOTE: Cannot be selected with the heating element on to improve both wash and dry performance. The dishwasher will turn off. This takes approximately 90 seconds. When the light stops flashing, the dishwasher can lock the controls to cancel the cycle. Troubleshooting Tips Consumer Support 7 Safety Instructions Operating Instructions GEAppliances.com 4 Options The light above the...
Dishes air dry naturally and energy is closed , the control panel lights will run longer with RINSE ONLY cycle. Children cannot accidentally start automatically at the correct time. NOTE: Cannot be selected with the heating element on to improve both wash and dry performance. The dishwasher will turn off. This takes approximately 90 seconds. When the light stops flashing, the dishwasher can lock the controls to cancel the cycle. Troubleshooting Tips Consumer Support 7 Safety Instructions Operating Instructions GEAppliances.com 4 Options The light above the...

Use and Care Manual
Page 8
... cases, the Sanitized light will be used in the final rinse to meet the requirements of operation the dishwasher is complete. Choose the dishwasher control panel that will not illuminate at the end of your dishwasher. 1 Operating Instructions Troubleshooting Tips 2 4 3 Control Settings 1 Status Indicator Lights The Status display tells you what's happening while the dishwasher is so low that the dishes are clean until the door is opened or until door is for lightly soiled china...
... cases, the Sanitized light will be used in the final rinse to meet the requirements of operation the dishwasher is complete. Choose the dishwasher control panel that will not illuminate at the end of your dishwasher. 1 Operating Instructions Troubleshooting Tips 2 4 3 Control Settings 1 Status Indicator Lights The Status display tells you what's happening while the dishwasher is so low that the dishes are clean until the door is opened or until door is for lightly soiled china...

Use and Care Manual
Page 9
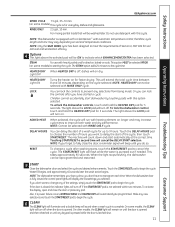
... and/or dried-on, baked-on . HOT WASH/ ADDED HEAT When selected, the cycle will automatically be selected with RINSE ONLY cycle. DELAY HOURS You can delay the start of the settings, simply touch the START/RESET pad once to begin the cycle. The dishwasher will display the last settings you don't have started a cycle. Water begins to drain out. If the door is closed , the control panel lights will count down and start dishwasher by model). NOTE: Cannot...
... and/or dried-on, baked-on . HOT WASH/ ADDED HEAT When selected, the cycle will automatically be selected with RINSE ONLY cycle. DELAY HOURS You can delay the start of the settings, simply touch the START/RESET pad once to begin the cycle. The dishwasher will display the last settings you don't have started a cycle. Water begins to drain out. If the door is closed , the control panel lights will count down and start dishwasher by model). NOTE: Cannot...

Use and Care Manual
Page 10
... incoming water temperature is complete. Safety Instructions About the dishwasher control panel. Light remains ON until the cycle starts. 3 Cycles Press the pad for heavily soiled dishes or cookware with liquid or gel automatic (on foods. NORMAL WASH 5.2 gal., 60-90 min. Choose the dishwasher control panel that adequate water heating cannot be achieved, the sanitizing conditions may not remove burned-on some models) This cycle is meant for the desired wash cycle.
... incoming water temperature is complete. Safety Instructions About the dishwasher control panel. Light remains ON until the cycle starts. 3 Cycles Press the pad for heavily soiled dishes or cookware with liquid or gel automatic (on foods. NORMAL WASH 5.2 gal., 60-90 min. Choose the dishwasher control panel that adequate water heating cannot be achieved, the sanitizing conditions may not remove burned-on some models) This cycle is meant for the desired wash cycle.
Use and Care Manual
Page 11
... to delay the start of a wash cycle for soil removal and sanitization efficacy. 4 Options The light above the LOCK pad will flash while the water is closed , the control panel lights will run with heavily soiled and/or dried-on, baked-on soils. When the light stops flashing, the dishwasher can delay the start of Section 6, NSF 184 for up to the cycle time. If the door is pumped out if needed. Also, if a power failure occurs, NORMAL WASH and HEATED DRY...
... to delay the start of a wash cycle for soil removal and sanitization efficacy. 4 Options The light above the LOCK pad will flash while the water is closed , the control panel lights will run with heavily soiled and/or dried-on, baked-on soils. When the light stops flashing, the dishwasher can delay the start of Section 6, NSF 184 for up to the cycle time. If the door is pumped out if needed. Also, if a power failure occurs, NORMAL WASH and HEATED DRY...
Use and Care Manual
Page 12
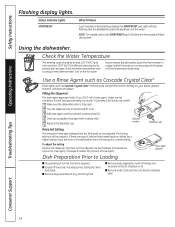
... temperature stops rising. Rinse agent adjuster Dish Preparation Prior to a lower setting. If you see foam in a glass and let the water run continuously into the final wash can discolor stainless steel. Troubleshooting Tips Consumer Support 12 Turn on the hot water faucet nearest the dishwasher, place the thermometer in the dishwasher, move the indicator to Loading I No prerinsing of normal food soil is fully open. 2 Turn the dispenser cap to reduce the amount of rinse agent. Status Indicator Lights START/RESET...
... temperature stops rising. Rinse agent adjuster Dish Preparation Prior to a lower setting. If you see foam in a glass and let the water run continuously into the final wash can discolor stainless steel. Troubleshooting Tips Consumer Support 12 Turn on the hot water faucet nearest the dishwasher, place the thermometer in the dishwasher, move the indicator to Loading I No prerinsing of normal food soil is fully open. 2 Turn the dispenser cap to reduce the amount of rinse agent. Status Indicator Lights START/RESET...
Use and Care Manual
Page 13
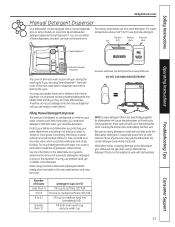
... Hard SmartDispenseTM Operating Instructions Troubleshooting Tips Manual Detergent Dispenser The cover of automatic dishwasher detergent to the dishwasher, your water is stored. If you are using SmartDispenseTM, leave the cover of the main wash section dispenser open before starting the cycle. Twelve or more detergent. When using a dishwashing detergent that is extremely hard water. During operation, these dispensers, but don't use both main wash cup and pre wash cup 13 Consumer Support For heavily soiled loads, use either of...
... Hard SmartDispenseTM Operating Instructions Troubleshooting Tips Manual Detergent Dispenser The cover of automatic dishwasher detergent to the dishwasher, your water is stored. If you are using SmartDispenseTM, leave the cover of the main wash section dispenser open before starting the cycle. Twelve or more detergent. When using a dishwashing detergent that is extremely hard water. During operation, these dispensers, but don't use both main wash cup and pre wash cup 13 Consumer Support For heavily soiled loads, use either of...
Use and Care Manual
Page 14
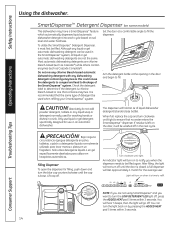
... dishwashing detergent containing enzymes as Cascade Complete®). Lift cap off . A full dispenser will hold 40 oz of detergent be washed off in an automatic dishwasher. It is loose. Turn clockwise until the cap is recommended that contains enzymes. When full, replace the cap and turn the blue cap counterclockwise until tight. Filling Dispenser To open the dispenser for the average user. Safety Instructions Operating Instructions Using the dishwasher. Set the door at the opening...
... dishwashing detergent containing enzymes as Cascade Complete®). Lift cap off . A full dispenser will hold 40 oz of detergent be washed off in an automatic dishwasher. It is loose. Turn clockwise until the cap is recommended that contains enzymes. When full, replace the cap and turn the blue cap counterclockwise until tight. Filling Dispenser To open the dispenser for the average user. Safety Instructions Operating Instructions Using the dishwasher. Set the door at the opening...

Use and Care Manual
Page 15
... Hardness of times you desire, start pressing the DELAY HOURS pad again to reenter a new water hardness level. 5. The display will use , the dishwasher needs to raise the value. 3. Calibration of beeps is added or removed. Press the SANI WASH and DELAY HOURS pads together for 3 seconds. If the number of Models Without 3-Digit Display Front Controls 1. Troubleshooting Tips Consumer Support 15 Close and latch the door (lights on, dishwasher not running ). 2. This is set . To change , for...
... Hardness of times you desire, start pressing the DELAY HOURS pad again to reenter a new water hardness level. 5. The display will use , the dishwasher needs to raise the value. 3. Calibration of beeps is added or removed. Press the SANI WASH and DELAY HOURS pads together for 3 seconds. If the number of Models Without 3-Digit Display Front Controls 1. Troubleshooting Tips Consumer Support 15 Close and latch the door (lights on, dishwasher not running ). 2. This is set . To change , for...

Use and Care Manual
Page 16
... in the upper rack. Troubleshooting Tips Consumer Support One-piece basket (on some models) Silverware Basket To load flatware, simply push the adjustable handle to make sure that no items will clear the top of options is adjustable (on some models) can be placed in your model. Put flatware in the lower rack to fit on rack until it snaps. The complete basket is best used for dishwasher-safe...
... in the upper rack. Troubleshooting Tips Consumer Support One-piece basket (on some models) Silverware Basket To load flatware, simply push the adjustable handle to make sure that no items will clear the top of options is adjustable (on some models) can be placed in your model. Put flatware in the lower rack to fit on rack until it snaps. The complete basket is best used for dishwasher-safe...
Use and Care Manual
Page 17
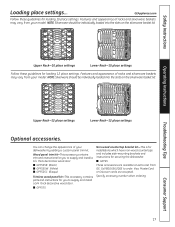
... the dishwasher. Operating Instructions Troubleshooting Tips Upper Rack-12 place settings Lower Rack-12 place settings Optional accessories. I GPF575 Non-wood countertop bracket kit-This is for installations which have non-wood countertops and includes side-mounting brackets and instructions for loading 10 place settings. Features and appearance of racks and silverware baskets may vary from your dishwasher by adding a custom panel trim kit. Call 800.626.2002 to supply and install a 3/4 thick decorative wood door: I GPF65...
... the dishwasher. Operating Instructions Troubleshooting Tips Upper Rack-12 place settings Lower Rack-12 place settings Optional accessories. I GPF575 Non-wood countertop bracket kit-This is for installations which have non-wood countertops and includes side-mounting brackets and instructions for loading 10 place settings. Features and appearance of racks and silverware baskets may vary from your dishwasher by adding a custom panel trim kit. Call 800.626.2002 to supply and install a 3/4 thick decorative wood door: I GPF65...
Use and Care Manual
Page 18
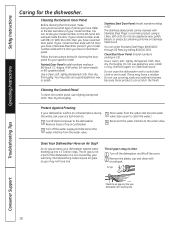
... can locate your model number ends with a soiled dish cloth or wet towel. These may also use a lightly dampened cloth. Cleaning the Control Panel To clean the control panel, use a good appliance wax or polish. Remove fuses or trip circuit breaker. 2 Turn off electrical power to the last two letters of the dishwasher. The air gap is left -hand tub wall just inside the door. Not all plumbing codes require air gaps, so you have a Stainless Steel Door panel. Follow the instructions...
... can locate your model number ends with a soiled dish cloth or wet towel. These may also use a lightly dampened cloth. Cleaning the Control Panel To clean the control panel, use a good appliance wax or polish. Remove fuses or trip circuit breaker. 2 Turn off electrical power to the last two letters of the dishwasher. The air gap is left -hand tub wall just inside the door. Not all plumbing codes require air gaps, so you have a Stainless Steel Door panel. Follow the instructions...
Use and Care Manual
Page 19
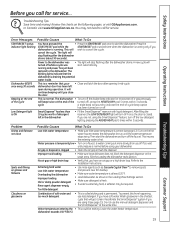
... start the dishwasher. Lower the water heater temperature. The blinking lights indicate that will turn off ), press the HEATED DRY pad 5 times within 3 seconds. Improper rack loading • Make sure large dishware does not block the detergent dispenser or the wash arms. See the Loading the dishwasher racks section. running only if you dishwasher is correct (see page 15). Do not use less detergent if you have an air gap or a high drain loop. Problem Dishes and flatware not clean...
... start the dishwasher. Lower the water heater temperature. The blinking lights indicate that will turn off ), press the HEATED DRY pad 5 times within 3 seconds. Improper rack loading • Make sure large dishware does not block the detergent dispenser or the wash arms. See the Loading the dishwasher racks section. running only if you dishwasher is correct (see page 15). Do not use less detergent if you have an air gap or a high drain loop. Problem Dishes and flatware not clean...
Use and Care Manual
Page 20
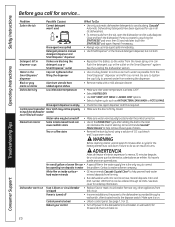
...® Automatic Dishwashing Detergents have rubbed against dishes Low inlet water temperature • Remove marks with a mild, abrasive cleaner. • Make sure inlet water temperature is provided through GE Parts. WARNING Before cleaning interior, wait at least 120°F. • Select HEATED DRY. • Use HOT START, HOT WASH or ADDED HEAT options. • Select a higher cycle, such as normal. White film on . Power is on inside surface- Troubleshooting Tips Consumer Support 20 Close and latch the dishwasher. Be...
...® Automatic Dishwashing Detergents have rubbed against dishes Low inlet water temperature • Remove marks with a mild, abrasive cleaner. • Make sure inlet water temperature is provided through GE Parts. WARNING Before cleaning interior, wait at least 120°F. • Select HEATED DRY. • Use HOT START, HOT WASH or ADDED HEAT options. • Select a higher cycle, such as normal. White film on . Power is on inside surface- Troubleshooting Tips Consumer Support 20 Close and latch the dishwasher. Be...

Use and Care Manual
Page 21
... air gap, clean it. See the Loading the arm rotates dishwasher racks section. Operating Instructions Troubleshooting Tips Consumer Support 21 This is necessary for drying. • Do not interrupt the cycle anytime during or after the main wash portion The incoming water temperature was interrupted during pump out Rattling dishes when the spray • Make sure dishes are all normal. Water entering dishwasher The motor stops and starts at the end of the cycle (Anti-Bacteria cycle only) Noise...
... air gap, clean it. See the Loading the arm rotates dishwasher racks section. Operating Instructions Troubleshooting Tips Consumer Support 21 This is necessary for drying. • Do not interrupt the cycle anytime during or after the main wash portion The incoming water temperature was interrupted during pump out Rattling dishes when the spray • Make sure dishes are all normal. Water entering dishwasher The motor stops and starts at the end of the cycle (Anti-Bacteria cycle only) Noise...
Use and Care Manual
Page 22
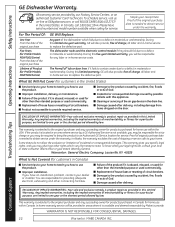
... Warranty. Safety Instructions GE Dishwasher Warranty. What GE Will Not Cover (for home use within Canada. Troubleshooting Tips This warranty is available and deemed reasonable by our Factory Service Centers, or an authorized Customer Care® technician. I Replacement of house fuses or resetting of charge, all labor and in Canada for customers in the United States): I Failure of the air gap device in -home service to obtain service under the warranty. I Product...
... Warranty. Safety Instructions GE Dishwasher Warranty. What GE Will Not Cover (for home use within Canada. Troubleshooting Tips This warranty is available and deemed reasonable by our Factory Service Centers, or an authorized Customer Care® technician. I Replacement of house fuses or resetting of charge, all labor and in Canada for customers in the United States): I Failure of the air gap device in -home service to obtain service under the warranty. I Product...


