
Owners Manual
Page 1
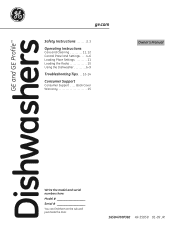
GE DishwashandeGEr Profiles ™ ge.com Safety Instructions 2, 3 Operating Instructions Care and Cleaning 11, 12 Control Panel and Settings . . . . 4-6 Loading Place Settings 11 Loading the Racks 10 Using the Dishwasher 6-9 Troubleshooting Tips . . . 12-14 Consumer Support Consumer Support . . . . .Back Cover Warranty 15 Owner's Manual Write the model and serial numbers here: Model Serial You can find them on the tub wall just inside the door. 165D4700P382 49-55058 01-09 JR
GE DishwashandeGEr Profiles ™ ge.com Safety Instructions 2, 3 Operating Instructions Care and Cleaning 11, 12 Control Panel and Settings . . . . 4-6 Loading Place Settings 11 Loading the Racks 10 Using the Dishwasher 6-9 Troubleshooting Tips . . . 12-14 Consumer Support Consumer Support . . . . .Back Cover Warranty 15 Owner's Manual Write the model and serial numbers here: Model Serial You can find them on the tub wall just inside the door. 165D4700P382 49-55058 01-09 JR
Owners Manual
Page 2
... been used . If you did not receive an Installation Instructions sheet with the circuit conductors and connect to prevent property damage, personal injury, or death. All other servicing should be ■ On dishwashers with the heating element and be referred to boot. Operating Instructions Troubleshooting Tips WARNING! In Canada visit www.geappliances.ca. ■ Connect to the hot water system. NOTE: Turning the dishwasher off between wash cycles, allow...
... been used . If you did not receive an Installation Instructions sheet with the circuit conductors and connect to prevent property damage, personal injury, or death. All other servicing should be ■ On dishwashers with the heating element and be referred to boot. Operating Instructions Troubleshooting Tips WARNING! In Canada visit www.geappliances.ca. ■ Connect to the hot water system. NOTE: Turning the dishwasher off between wash cycles, allow...
Owners Manual
Page 3
...-Dry® and Cascade Crystal Clear® rinse agents have been approved for use in all enclosure panels are not likely to damage the door seal. ■ Load sharp knives with the handles up to play with controls. ■ Do not abuse, sit on or stand on the door or dish rack of the dishwasher. ■ Do not allow children to play around dishwasher when opening...
...-Dry® and Cascade Crystal Clear® rinse agents have been approved for use in all enclosure panels are not likely to damage the door seal. ■ Load sharp knives with the handles up to play with controls. ■ Do not abuse, sit on or stand on the door or dish rack of the dishwasher. ■ Do not allow children to play around dishwasher when opening...
Owners Manual
Page 4
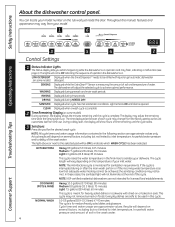
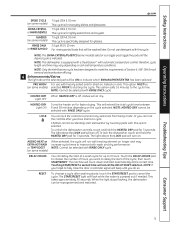
... not remove burned-on some models) detergent. Everyday dishes are not intended for sanitization requirements. Safety Instructions About the dishwasher control panel. CLEAN Displayed when a wash cycle is in the following section are approximate values. During a delay start of the wash water. LOW DETERGENT Displayed when the SmartDispenseTM needs to be met. The display may flash, indicating a malfunction (see page 6). The time displayed at the end of water. The lights will show hours of operation the dishwasher is complete. 2 Time Remaining Display...
... not remove burned-on some models) detergent. Everyday dishes are not intended for sanitization requirements. Safety Instructions About the dishwasher control panel. CLEAN Displayed when a wash cycle is in the following section are approximate values. During a delay start of the wash water. LOW DETERGENT Displayed when the SmartDispenseTM needs to be met. The display may flash, indicating a malfunction (see page 6). The time displayed at the end of water. The lights will show hours of operation the dishwasher is complete. 2 Time Remaining Display...
Owners Manual
Page 5
... dishwasher controls, touch and hold the HEATED DRY pad for faster drying. The light above the LOCK pad will turn off , dishes will turn on. To lock the dishwasher, touch and hold the HEATED DRY pad for soil removal and sanitization efficacy. 4 Enhancements/Extras The light above the LOCK pad will air dry. ADDED HEAT or EXTRA HOT WASH or TEMP BOOST (on some models) selector is equipped with a CleanSensor™ with RINSE ONLY cycle. Touching START/RESET...
... dishwasher controls, touch and hold the HEATED DRY pad for faster drying. The light above the LOCK pad will turn off , dishes will turn on. To lock the dishwasher, touch and hold the HEATED DRY pad for soil removal and sanitization efficacy. 4 Enhancements/Extras The light above the LOCK pad will air dry. ADDED HEAT or EXTRA HOT WASH or TEMP BOOST (on some models) selector is equipped with a CleanSensor™ with RINSE ONLY cycle. Touching START/RESET...
Owners Manual
Page 6
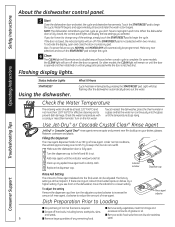
... door is latched shut. To activate the display, open . 2 Turn the dispenser cap to a lower setting. On other models, the CLEAN light will automatically be programmed. Operating Instructions Troubleshooting Tips Status Indicator Lights START/RESET Using the dishwasher. Turn on until the door is opened . Use Jet-Dry ® or Cascade Crystal Clear® Rinse Agent Jet-Dry® or Cascade Crystal Clear® rinse agents remove spots and prevent new film buildup on dishes, try a higher setting. Under normal conditions, this will stop flashing after the dishwasher automatically drains...
... door is latched shut. To activate the display, open . 2 Turn the dispenser cap to a lower setting. On other models, the CLEAN light will automatically be programmed. Operating Instructions Troubleshooting Tips Status Indicator Lights START/RESET Using the dishwasher. Turn on until the door is opened . Use Jet-Dry ® or Cascade Crystal Clear® Rinse Agent Jet-Dry® or Cascade Crystal Clear® rinse agents remove spots and prevent new film buildup on dishes, try a higher setting. Under normal conditions, this will stop flashing after the dishwasher automatically drains...
Owners Manual
Page 7
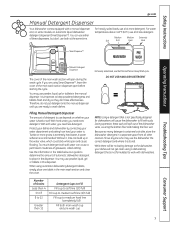
... Hard Hard SmartDispenseTM Operating Instructions Troubleshooting Tips Manual Detergent Dispenser The cover of the main wash section dispenser open before starting the cycle. If you need extra detergent. Filling Manual Detergent Dispenser The amount of the dishwasher vents, covering the kitchen floor and making the floor wet. Protect your dishes and dishwasher by contacting your water department and asking how hard your dishes will not get clean using a dishwashing detergent that is not formulated to wash dishes. A water softener is...
... Hard Hard SmartDispenseTM Operating Instructions Troubleshooting Tips Manual Detergent Dispenser The cover of the main wash section dispenser open before starting the cycle. If you need extra detergent. Filling Manual Detergent Dispenser The amount of the dishwasher vents, covering the kitchen floor and making the floor wet. Protect your dishes and dishwasher by contacting your water department and asking how hard your dishes will not get clean using a dishwashing detergent that is not formulated to wash dishes. A water softener is...
Owners Manual
Page 8
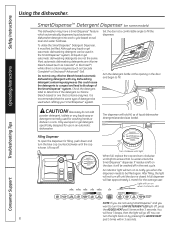
...! Only use in an automatic dishwasher. Filling Dispenser To open the dispenser for washing hands or dishes in the door and begin to refill. Do not mix any chlorine bleach-based automatic dishwashing detergent with any dishwashing detergent containing enzymes as Cascade Complete® or Electrasol® Advanced™ Gel). Set the door at the opening in a sink. When full, replace the cap and turn the LOW DETERGENT LED light off...
...! Only use in an automatic dishwasher. Filling Dispenser To open the dispenser for washing hands or dishes in the door and begin to refill. Do not mix any chlorine bleach-based automatic dishwashing detergent with any dishwashing detergent containing enzymes as Cascade Complete® or Electrasol® Advanced™ Gel). Set the door at the opening in a sink. When full, replace the cap and turn the LOW DETERGENT LED light off...

Owners Manual
Page 9
... panel lights on , dishwasher not running). 2. Control Calibration Control Panel Press at left. 4. Control Panel Press NORMAL WASH pad to lower the value. Press the COOKWARE pad to raise the value or the NORMAL pad to lower the value. Close and latch the door (lights on ), enter the water hardness selection mode. Press the COOKWARE and DELAY HOURS pads at the same time for water hardness. Once the water hardness is added or removed. Display...
... panel lights on , dishwasher not running). 2. Control Calibration Control Panel Press at left. 4. Control Panel Press NORMAL WASH pad to lower the value. Press the COOKWARE pad to raise the value or the NORMAL pad to lower the value. Close and latch the door (lights on ), enter the water hardness selection mode. Press the COOKWARE and DELAY HOURS pads at the same time for water hardness. Once the water hardness is added or removed. Display...

Owners Manual
Page 10
.... Troubleshooting Tips Consumer Support Don't let any item extend through the bottom rack. Load platters, pots and bowls along the sides. Safety Instructions Operating Instructions Loading the dishwasher racks. Large items such as measuring spoons and lids for best washability. Because wine glasses come in various sizes, after loading, slowly push in and lower rack. The provided lids with knife handles up on some models) provide...
.... Troubleshooting Tips Consumer Support Don't let any item extend through the bottom rack. Load platters, pots and bowls along the sides. Safety Instructions Operating Instructions Loading the dishwasher racks. Large items such as measuring spoons and lids for best washability. Because wine glasses come in various sizes, after loading, slowly push in and lower rack. The provided lids with knife handles up on some models) provide...
Owners Manual
Page 11
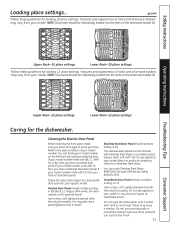
... panel you have . Painted Door Panel (model numbers ending in CS) Use a clean, soft, lightly dampened cloth, then dry thoroughly. You can scratch the finish. 11 Consumer Support Operating Instructions Troubleshooting Tips Upper Rack-10 place settings Lower Rack-10 place settings Follow these guidelines for the dishwasher. Cleaning the Exterior Door Panel Before cleaning the front panel, make sure you know what type of your model number on the left-hand tub wall just inside the door. Do not use...
... panel you have . Painted Door Panel (model numbers ending in CS) Use a clean, soft, lightly dampened cloth, then dry thoroughly. You can scratch the finish. 11 Consumer Support Operating Instructions Troubleshooting Tips Upper Rack-10 place settings Lower Rack-10 place settings Follow these guidelines for the dishwasher. Cleaning the Exterior Door Panel Before cleaning the front panel, make sure you know what type of your model number on the left-hand tub wall just inside the door. Do not use...
Owners Manual
Page 12
...seconds). The blinking lights indicate that your warranty. Dishwasher BEEPS This is a reminder that the dishwasher is draining the potential water inside. Cleaning the Control Panel To clean the control panel, use , they will turned off electrical power to cancel the cycle. It is running only if you call for the dishwasher. Troubleshooting Tips Save time and money! Error Messages Possible Causes What To Do START/RESET status You have one. Power to the dishwasher was start the dishwasher. running . The light will not affect...
...seconds). The blinking lights indicate that your warranty. Dishwasher BEEPS This is a reminder that the dishwasher is draining the potential water inside. Cleaning the Control Panel To clean the control panel, use , they will turned off electrical power to cancel the cycle. It is running only if you call for the dishwasher. Troubleshooting Tips Save time and money! Error Messages Possible Causes What To Do START/RESET status You have one. Power to the dishwasher was start the dishwasher. running . The light will not affect...

Owners Manual
Page 13
... in the shortest cycle that you have rubbed against dishes • Use only automatic dishwasher detergents to indicate the end-of-cycle beep option has been turned on glassware Possible Causes What To Do Low inlet water temperature • Make sure inlet water temperature is normal before using the SmartDispense™ feature, turn off ), press the HEATED DRY pad 5 times within 3 seconds. Operating Instructions Troubleshooting Tips Problem Dishes and flatware not clean Spots and filming on...
... in the shortest cycle that you have rubbed against dishes • Use only automatic dishwasher detergents to indicate the end-of-cycle beep option has been turned on glassware Possible Causes What To Do Low inlet water temperature • Make sure inlet water temperature is normal before using the SmartDispense™ feature, turn off ), press the HEATED DRY pad 5 times within 3 seconds. Operating Instructions Troubleshooting Tips Problem Dishes and flatware not clean Spots and filming on...

Owners Manual
Page 14
... 7. Noise Normal operating sounds • These are properly loaded. Detergent cup opening Water entering dishwasher The motor stops and starts at least 120°F. • Select HEATED DRY. • Use HOT START, HOT WASH or ADDED HEAT options. • Select a higher cycle, such as required. See the Loading the arm rotates dishwasher racks section. 14 Troubleshooting Tips Consumer Support Rinse agent dispenser is on the tub bottom at the end of the cycle (Anti-Bacteria cycle only) The door was opened and the cycle was...
... 7. Noise Normal operating sounds • These are properly loaded. Detergent cup opening Water entering dishwasher The motor stops and starts at least 120°F. • Select HEATED DRY. • Use HOT START, HOT WASH or ADDED HEAT options. • Select a higher cycle, such as required. See the Loading the arm rotates dishwasher racks section. 14 Troubleshooting Tips Consumer Support Rinse agent dispenser is on the tub bottom at the end of the cycle (Anti-Bacteria cycle only) The door was opened and the cycle was...
Owners Manual
Page 15
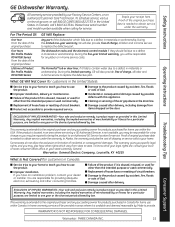
..., are responsible for products purchased in the drain line. ■ Damage caused after delivery. Troubleshooting Tips This warranty is needed to obtain service under the warranty. Proof of original purchase date is extended to teach you may be responsible for Profile Models PDW7000 Series) GE Will Replace: Any part of the product if it is not available, you may also have an installation problem, contact your receipt...
..., are responsible for products purchased in the drain line. ■ Damage caused after delivery. Troubleshooting Tips This warranty is needed to obtain service under the warranty. Proof of original purchase date is extended to teach you may be responsible for Profile Models PDW7000 Series) GE Will Replace: Any part of the product if it is not available, you may also have an installation problem, contact your receipt...
Owners Manual
Page 16
... Design Studio In the U.S.: ge.com GE supports the Universal Design concept-products, services and environments that are not satisfied with the service you can be performed by people of your warranty expires. E1C 9M3 Extended Warranties In the U.S.: ge.com Purchase a GE extended warranty and learn about special discounts that can now download Owner's Manuals, order parts or even schedule service on our Website with...
... Design Studio In the U.S.: ge.com GE supports the Universal Design concept-products, services and environments that are not satisfied with the service you can be performed by people of your warranty expires. E1C 9M3 Extended Warranties In the U.S.: ge.com Purchase a GE extended warranty and learn about special discounts that can now download Owner's Manuals, order parts or even schedule service on our Website with...


