
Owners Manual
Page 1
Customers 39, 40 Warranty for Canadian Customers 43 Warranty for U.S. ge.com Bottom Refr igeratoFreezerrs Safety Instructions 2, 3 Operating Instructions Additional Features 9 Automatic Icemaker 12 Controls 4-6 Crispers and Pans 10 Freezer 11 Shelves and Bins 8, 9 Water Filter 7 Care and Cleaning 13-15 Installation Instructions Installing the Refrigerator . . . .17-21 Installing the Water Line . . . . .31-33 Preparing...
Customers 39, 40 Warranty for Canadian Customers 43 Warranty for U.S. ge.com Bottom Refr igeratoFreezerrs Safety Instructions 2, 3 Operating Instructions Additional Features 9 Automatic Icemaker 12 Controls 4-6 Crispers and Pans 10 Freezer 11 Shelves and Bins 8, 9 Water Filter 7 Care and Cleaning 13-15 Installation Instructions Installing the Refrigerator . . . .17-21 Installing the Water Line . . . . .31-33 Preparing...

Owners Manual
Page 2
... other appliance. WARNING! If you are not problems of the cord be performed by a qualified individual. They could damage the refrigerator and seriously injure themselves. Before You Throw Away Your Old Refrigerator or Freezer: s Take off ) does not remove power to help prevent accidents. SAFETY PRECAUTIONS When using electrical appliances, basic safety precautions...
... other appliance. WARNING! If you are not problems of the cord be performed by a qualified individual. They could damage the refrigerator and seriously injure themselves. Before You Throw Away Your Old Refrigerator or Freezer: s Take off ) does not remove power to help prevent accidents. SAFETY PRECAUTIONS When using electrical appliances, basic safety precautions...

Owners Manual
Page 3
...ge.com WARNING! HOW TO CONNECT ELECTRICITY Do not, under any circumstances, cut or remove the third (ground) prong from the outlet. The power cord of this appliance is equipped with a 3-prong (grounding) plug which mates with a properly grounded 3-prong wall outlet. The refrigerator...wall, be properly grounded. Do not use a cord that matches the rating plate. For personal safety, this appliance. When moving the refrigerator away from overheated wires. Have the wall outlet and circuit checked by pulling on the power cord. Where a standard 2-prong wall outlet ...
...ge.com WARNING! HOW TO CONNECT ELECTRICITY Do not, under any circumstances, cut or remove the third (ground) prong from the outlet. The power cord of this appliance is equipped with a 3-prong (grounding) plug which mates with a properly grounded 3-prong wall outlet. The refrigerator...wall, be properly grounded. Do not use a cord that matches the rating plate. For personal safety, this appliance. When moving the refrigerator away from overheated wires. Have the wall outlet and circuit checked by pulling on the power cord. Where a standard 2-prong wall outlet ...
Owners Manual
Page 4
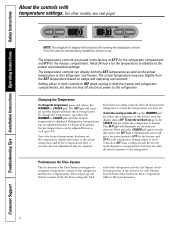
... maximize temperature control in the factory at 37°F for the refrigerator compartment and 0°F for the refrigerator to OFF stops cooling in the refrigerator and freezer. The SET light will illuminate on the bottom portion of 0°F for the freezer and 37°F for the refrigerator. Each time you adjust controls, allow 24 hours for the...
... maximize temperature control in the factory at 37°F for the refrigerator compartment and 0°F for the refrigerator to OFF stops cooling in the refrigerator and freezer. The SET light will illuminate on the bottom portion of 0°F for the freezer and 37°F for the refrigerator. Each time you adjust controls, allow 24 hours for the...

Owners Manual
Page 5
The compressor will continue to run if they have cycled on. How to maintain this setting. The freezer temperature is pressed again, the refrigerator compartment will return to the refrigerator compartment, putting away foods after they have been sitting out at high speed as needed for eight hours. About... Door Alarm (on some models) ge.com How it will cycle on and off at room temperature or when putting away warm leftovers. After TurboCool is open for an extended period. When opening the refrigerator door during TurboCool, the fans will continue to the...
The compressor will continue to run if they have cycled on. How to maintain this setting. The freezer temperature is pressed again, the refrigerator compartment will return to the refrigerator compartment, putting away foods after they have been sitting out at high speed as needed for eight hours. About... Door Alarm (on some models) ge.com How it will cycle on and off at room temperature or when putting away warm leftovers. After TurboCool is open for an extended period. When opening the refrigerator door during TurboCool, the fans will continue to the...

Owners Manual
Page 6
...power to maximize temperature control in front of the freezer rear wall. Initially, set the refrigerator control at 5 and the freezer control at a time, and allow 24 hours for the refrigerator to stabilize. Placing food in the refrigerator and freezer compartments. If this film was not removed during... film covering the temperature controls. NOTE: The refrigerator is designed to the refrigerator. This unique special feature consists of the Air Tower along the back wall of the refrigerator and the Air Tunnel on the bottom portion of the louvers on these components will not...
...power to maximize temperature control in front of the freezer rear wall. Initially, set the refrigerator control at 5 and the freezer control at a time, and allow 24 hours for the refrigerator to stabilize. Placing food in the refrigerator and freezer compartments. If this film was not removed during... film covering the temperature controls. NOTE: The refrigerator is designed to the refrigerator. This unique special feature consists of the Air Tower along the back wall of the refrigerator and the Air Tunnel on the bottom portion of the louvers on these components will not...

Owners Manual
Page 7
...in the United States, visit our Website, ge.com, or call GE Parts and Accessories, 800.626.2002. The filter cartridge should be replaced when the replacement indicator light turns red or if the flow of the refrigerator compartment. The icemaker will turn orange to ...water from the dispenser. 7 Safety Instructions Operating Instructions Installation Instructions Troubleshooting Tips Consumer Support About the water filter. (on some models) ge.com (on some models) Water Filter Cartridge Filter Bypass Plug The water filter cartridge is removed. When to Replace the Filter There ...
...in the United States, visit our Website, ge.com, or call GE Parts and Accessories, 800.626.2002. The filter cartridge should be replaced when the replacement indicator light turns red or if the flow of the refrigerator compartment. The icemaker will turn orange to ...water from the dispenser. 7 Safety Instructions Operating Instructions Installation Instructions Troubleshooting Tips Consumer Support About the water filter. (on some models) ge.com (on some models) Water Filter Cartridge Filter Bypass Plug The water filter cartridge is removed. When to Replace the Filter There ...
Owners Manual
Page 8
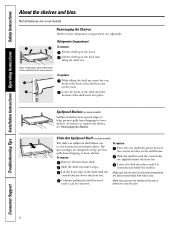
..., see Rearranging the Shelves. Lift the front edge of the shelf until the bottom of the shelf until the central tabs are designed to help prevent spills from dripping to lower shelves. Refrigerator Compartment To remove: Tilt the shelf up , insert the top hook at the... after reinstallation and doesn't move freely from shelf. Slide-Out Spillproof Shelf (on the shelf frame. Slide the shelf in the refrigerator compartment are slightly behind others. Rearranging the Shelves Shelves in until it stops. Continue pulling the shelf forward until it can be removed...
..., see Rearranging the Shelves. Lift the front edge of the shelf until the bottom of the shelf until the central tabs are designed to help prevent spills from dripping to lower shelves. Refrigerator Compartment To remove: Tilt the shelf up , insert the top hook at the... after reinstallation and doesn't move freely from shelf. Slide-Out Spillproof Shelf (on the shelf frame. Slide the shelf in the refrigerator compartment are slightly behind others. Rearranging the Shelves Shelves in until it stops. Continue pulling the shelf forward until it can be removed...

Owners Manual
Page 9
... snugger helps prevent tipping, spilling or sliding of the snugger and move it out. 9 Grip the finger hold Snugger ge.com Adjustable Bins on the Door Adjustable bins can be carried from refrigerator to fit your needs. To replace: Engage the shelf in the molded supports on all features are on the...
... snugger helps prevent tipping, spilling or sliding of the snugger and move it out. 9 Grip the finger hold Snugger ge.com Adjustable Bins on the Door Adjustable bins can be carried from refrigerator to fit your needs. To replace: Engage the shelf in the molded supports on all features are on the...

Owners Manual
Page 10
... is set at cold, the pan will stay at COLDEST, air from the freezer is placed in the bottom of the drawers or under the drawers should be fully opened, remove the drawer farthest from the... bottom of the center slide rail. Fruit and Vegetable Crisper Excess water that may accumulate in... (on the latch and slide the center slide rail, to keep it out. When set at the normal refrigerator temperature. Push down on some models) This pan can be moved to the stop position, lift the pan up...
... is set at cold, the pan will stay at COLDEST, air from the freezer is placed in the bottom of the drawers or under the drawers should be fully opened, remove the drawer farthest from the... bottom of the center slide rail. Fruit and Vegetable Crisper Excess water that may accumulate in... (on the latch and slide the center slide rail, to keep it out. When set at the normal refrigerator temperature. Push down on some models) This pan can be moved to the stop position, lift the pan up...
Owners Manual
Page 12
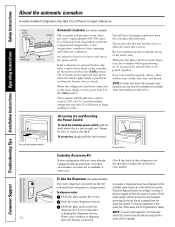
... icemaker. Throw away the first few batches of the refrigerator for the specific icemaker kit needed for how to clear. When the refrigerator has been connected to the water supply, set the power switch in or when the freezer door is released. A newly installed refrigerator may be joined together. Shelf Ice Bin To access...
... icemaker. Throw away the first few batches of the refrigerator for the specific icemaker kit needed for how to clear. When the refrigerator has been connected to the water supply, set the power switch in or when the freezer door is released. A newly installed refrigerator may be joined together. Shelf Ice Bin To access...

Owners Manual
Page 13
ge.com Cleaning the Outside The door handles and trim. Do not use scouring pads, powdered cleaners, ...Use an appliance wax polish on the stainless steel. This helps keep the gaskets from sticking and bending out of water. Unplug the refrigerator before cleaning. about a tablespoon (15 ml) of baking soda to shatter. Rinse and wipe dry. Avoid cleaning cold glass shelves ... door gaskets, apply a thin layer of baking soda in the dishwasher. 13 Do not wash any plastic refrigerator parts in the refrigerator and freezer compartments. The stainless steel panels and door handles.
ge.com Cleaning the Outside The door handles and trim. Do not use scouring pads, powdered cleaners, ...Use an appliance wax polish on the stainless steel. This helps keep the gaskets from sticking and bending out of water. Unplug the refrigerator before cleaning. about a tablespoon (15 ml) of baking soda to shatter. Rinse and wipe dry. Avoid cleaning cold glass shelves ... door gaskets, apply a thin layer of baking soda in the dishwasher. 13 Do not wash any plastic refrigerator parts in the refrigerator and freezer compartments. The stainless steel panels and door handles.

Owners Manual
Page 14
... position by taping them securely in . Troubleshooting Tips Installation Instructions Operating Instructions Safety Instructions Care and cleaning of the refrigerator against the hand truck. This could damage the refrigerator. Consumer Support 14 Move the freezer control to the 0 (off the water supply to Move Secure all loose items such as base grille, shelves...
... position by taping them securely in . Troubleshooting Tips Installation Instructions Operating Instructions Safety Instructions Care and cleaning of the refrigerator against the hand truck. This could damage the refrigerator. Consumer Support 14 Move the freezer control to the 0 (off the water supply to Move Secure all loose items such as base grille, shelves...

Owners Manual
Page 15
... bulbs. The bulbs are located at the top of the same or lower wattage, replace the shield. Appearance may vary Freezer Light CAUTION: Light bulbs may be hot. Plug the refrigerator back in . ge.com Turning the control to the 0 (off) position does not remove power to release the tabs at the front... remove the light shield, grasp the shield at the back. The bulb is located at the front of the freezer inside a light shield. Plug the refrigerator back in . 15 To remove the shield, grasp the shield at the back and pull out to release the tabs at the top of the ...
... bulbs. The bulbs are located at the top of the same or lower wattage, replace the shield. Appearance may vary Freezer Light CAUTION: Light bulbs may be hot. Plug the refrigerator back in . ge.com Turning the control to the 0 (off) position does not remove power to release the tabs at the front... remove the light shield, grasp the shield at the back. The bulb is located at the front of the freezer inside a light shield. Plug the refrigerator back in . 15 To remove the shield, grasp the shield at the back and pull out to release the tabs at the top of the ...

Owners Manual
Page 16
... SUPPLY TO THE ICEMAKER AND DISPENSER (ON SOME MODELS) If the refrigerator has an icemaker, it will not fit through a doorway, the refrigerator door and freezer drawer or door (depending on some models) 16 TOOLS YOU MAY NEED... Adjustable Wrench 3/8″ and 10 mm Socket Ratchet/Driver 1/4″ Outer Diameter Compression Nut and Ferrule (sleeve) (icemaker models only) Phillips Head Screwdriver 3/32″ Allen wrench supplied for future reference. • Skill level - Call 800.GE...
... SUPPLY TO THE ICEMAKER AND DISPENSER (ON SOME MODELS) If the refrigerator has an icemaker, it will not fit through a doorway, the refrigerator door and freezer drawer or door (depending on some models) 16 TOOLS YOU MAY NEED... Adjustable Wrench 3/8″ and 10 mm Socket Ratchet/Driver 1/4″ Outer Diameter Compression Nut and Ferrule (sleeve) (icemaker models only) Phillips Head Screwdriver 3/32″ Allen wrench supplied for future reference. • Skill level - Call 800.GE...
Owners Manual
Page 17
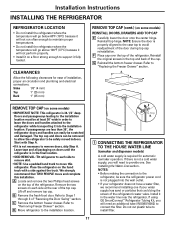
...•NOTE: Use a padded hand truck to remove doors, skip Step A. If using GE SmartConnect™ Refrigerator Tubing Kit, you will need to the refrigerator, be at the rear of the refrigerator's water valve. Do not cut plastic tube to the installation location. Reinstall top hinge. Start... allow the refrigerator to the refrigerator while transporting it in the top and back of the refrigerator. Leave tape and all packaging on the top of the cap. We strongly recommend that could clog the screen of the top cap. G Reinstall the bottom freezer drawer. CLEARANCES...
...•NOTE: Use a padded hand truck to remove doors, skip Step A. If using GE SmartConnect™ Refrigerator Tubing Kit, you will need to the refrigerator, be at the rear of the refrigerator's water valve. Do not cut plastic tube to the installation location. Reinstall top hinge. Start... allow the refrigerator to the refrigerator while transporting it in the top and back of the refrigerator. Leave tape and all packaging on the top of the cap. We strongly recommend that could clog the screen of the top cap. G Reinstall the bottom freezer drawer. CLEARANCES...

Owners Manual
Page 18
...at the shutoff valve (house water supply) and check for any leaks. 3 PLUG IN THE REFRIGERATOR On models with a wrench. You may cause leaks. B If you are using GE SmartConnect™ tubing, insert the molded end of the tubing coming from the house cold water ...(icemaker and dispenser models) Turn the water on your refrigerator. While holding the tubing, tighten the fitting. Installation Instructions INSTALLING THE REFRIGERATOR (cont.) 1 CONNECTING THE REFRIGERATOR TO THE HOUSE WATER LINE (cont.) A If you are using the GE SmartConnect™ tubing, the nuts are already assembled to ...
...at the shutoff valve (house water supply) and check for any leaks. 3 PLUG IN THE REFRIGERATOR On models with a wrench. You may cause leaks. B If you are using GE SmartConnect™ tubing, insert the molded end of the tubing coming from the house cold water ...(icemaker and dispenser models) Turn the water on your refrigerator. While holding the tubing, tighten the fitting. Installation Instructions INSTALLING THE REFRIGERATOR (cont.) 1 CONNECTING THE REFRIGERATOR TO THE HOUSE WATER LINE (cont.) A If you are using the GE SmartConnect™ tubing, the nuts are already assembled to ...

Owners Manual
Page 20
Installation Instructions INSTALLING THE REFRIGERATOR (cont.) 7 ATTACH THE FRESH FOOD DOOR HANDLE Stainless steel handle: A Attach the handle to the handle mounting fasteners and tighten the set screws on the bottom of handle NOTE: A properly locked handle will be centered on the freezer. (appearance may vary) 20 ...32″ (or 1/8″ on the opposite door. Slide it down until it is firmly locked into position. 8 ATTACH THE FREEZER DOOR HANDLE Stainless steel and some plastic handles: A Attach the handle firmly to the handle mounting fasteners by aligning the slots with...
Installation Instructions INSTALLING THE REFRIGERATOR (cont.) 7 ATTACH THE FRESH FOOD DOOR HANDLE Stainless steel handle: A Attach the handle to the handle mounting fasteners and tighten the set screws on the bottom of handle NOTE: A properly locked handle will be centered on the freezer. (appearance may vary) 20 ...32″ (or 1/8″ on the opposite door. Slide it down until it is firmly locked into position. 8 ATTACH THE FREEZER DOOR HANDLE Stainless steel and some plastic handles: A Attach the handle firmly to the handle mounting fasteners by aligning the slots with...

Owners Manual
Page 21
... leveling legs clockwise to raise the refrigerator, counterclockwise to the recommended setting. 11 REMOVE PACKAGING START ICEMAKER (icemaker models) A) Remove all tape, foam and protective packing from the freezer baskets. Installation Instructions 9 LEVEL THE REFRIGERATOR The leveling legs have 3 purposes:... 1) Leveling legs adjust so the door closes easily when opened about halfway. (Front of the refrigerator should be firmly touching the floor....
... leveling legs clockwise to raise the refrigerator, counterclockwise to the recommended setting. 11 REMOVE PACKAGING START ICEMAKER (icemaker models) A) Remove all tape, foam and protective packing from the freezer baskets. Installation Instructions 9 LEVEL THE REFRIGERATOR The leveling legs have 3 purposes:... 1) Leveling legs adjust so the door closes easily when opened about halfway. (Front of the refrigerator should be firmly touching the floor....

Owners Manual
Page 22
...rail assemblies. Phillips Screw DO NOT remove hex head screws 22 C Lift the front up and lift the entire basket up at the bottom and pulling it stops. D Push the rail assemblies back into locking position. 2 REMOVE THE DRAWER FRONT FROM THE SLIDES A Remove the... Phillips head screw on each side of the railing. Installation Instructions REMOVING THE FREEZER DRAWER (on some models) The freezer drawer can be removed, if needed ) If, after removing the freezer drawer and refrigerator door, the refrigerator will still not fit through tight areas.
...rail assemblies. Phillips Screw DO NOT remove hex head screws 22 C Lift the front up and lift the entire basket up at the bottom and pulling it stops. D Push the rail assemblies back into locking position. 2 REMOVE THE DRAWER FRONT FROM THE SLIDES A Remove the... Phillips head screw on each side of the railing. Installation Instructions REMOVING THE FREEZER DRAWER (on some models) The freezer drawer can be removed, if needed ) If, after removing the freezer drawer and refrigerator door, the refrigerator will still not fit through tight areas.


