

Owners Manual
Page 1
Customers 41 Owner's Manual and Installation Instructions Models 21 and 25 Congélateur inférieur Réfrigérateurs Manuel d'utilisation et d'installation La section française commence à la page ... Light Bulbs 14 Shelves and Bins 7, 8 Water Dispenser 11 Water Filter 6 Installation Instructions Installing the Anti-Tip Floor Bracket 18-19 Installing the Refrigerator 20-24 Installing the Water Line 33-35 Preparing to Install the Refrigerator 17 Removing and Replacing the Freezer Drawer 25, 26 Reversing the Door Swing (Single Door...
Customers 41 Owner's Manual and Installation Instructions Models 21 and 25 Congélateur inférieur Réfrigérateurs Manuel d'utilisation et d'installation La section française commence à la page ... Light Bulbs 14 Shelves and Bins 7, 8 Water Dispenser 11 Water Filter 6 Installation Instructions Installing the Anti-Tip Floor Bracket 18-19 Installing the Refrigerator 20-24 Installing the Water Line 33-35 Preparing to Install the Refrigerator 17 Removing and Replacing the Freezer Drawer 25, 26 Reversing the Door Swing (Single Door...

Owners Manual
Page 2
...a UL-listed (in the United States) or a CSA certified (in place so that the electrical rating of an old refrigeration product, check with the Installation Instructions before cleaning and making repairs. Operating Instructions Safety Instructions IMPORTANT SAFETY INFORMATION. WARNING! I Leave... Do not refreeze frozen foods which under certain conditions, we strongly recommend against the use gasoline or other appliance. I Unplug the refrigerator before it be removed prior to help prevent accidents. Use this appliance only for "just a few days." I Setting either or...
...a UL-listed (in the United States) or a CSA certified (in place so that the electrical rating of an old refrigeration product, check with the Installation Instructions before cleaning and making repairs. Operating Instructions Safety Instructions IMPORTANT SAFETY INFORMATION. WARNING! I Leave... Do not refreeze frozen foods which under certain conditions, we strongly recommend against the use gasoline or other appliance. I Unplug the refrigerator before it be removed prior to help prevent accidents. Use this appliance only for "just a few days." I Setting either or...
Owners Manual
Page 3
... a 3prong (grounding) plug which mates with a properly grounded 3-prong wall outlet. READ AND FOLLOW THIS SAFETY INFORMATION CAREFULLY. The refrigerator should always be plugged into its own individual electrical outlet which could cause a fire hazard from the power cord. For personal safety,...the wall, be properly grounded. Repair or replace immediately all power cords that have it is properly grounded. When moving the refrigerator away from the outlet. Do not use a cord that matches the rating plate. SAVE THESE INSTRUCTIONS Installation Instructions Troubleshooting Tips ...
... a 3prong (grounding) plug which mates with a properly grounded 3-prong wall outlet. READ AND FOLLOW THIS SAFETY INFORMATION CAREFULLY. The refrigerator should always be plugged into its own individual electrical outlet which could cause a fire hazard from the power cord. For personal safety,...the wall, be properly grounded. Repair or replace immediately all power cords that have it is properly grounded. When moving the refrigerator away from the outlet. Do not use a cord that matches the rating plate. SAVE THESE INSTRUCTIONS Installation Instructions Troubleshooting Tips ...

Owners Manual
Page 4
...slightly from the SET temperature based on and the display will come on usage and operating environment. For Controls Inside the Refrigerator: Opening the door displays the actual temperature. To turn the cooling system off electrical power to OFF stops cooling in... The temperature controls can display both the SET temperature as well as the actual temperature in both controls to the actual 4 refrigerator and freezer temperatures after 5 seconds. Operating Instructions Safety Instructions About the controls with temperature settings. (on some models) Installation ...
...slightly from the SET temperature based on and the display will come on usage and operating environment. For Controls Inside the Refrigerator: Opening the door displays the actual temperature. To turn the cooling system off electrical power to OFF stops cooling in... The temperature controls can display both the SET temperature as well as the actual temperature in both controls to the actual 4 refrigerator and freezer temperatures after 5 seconds. Operating Instructions Safety Instructions About the controls with temperature settings. (on some models) Installation ...

Owners Manual
Page 5
...Instructions About TurboCool.™ (on some models) GEAppliances.com (on some models) (on some models) How It Works TurboCool rapidly cools the refrigerator compartment in order to more than 2 minutes. The compressor will continue to the original setting. How to approximately 34°F (1°C), then...will cycle on and off at room temperature or when putting away warm leftovers. After 8 hours, or if TurboCool is complete, the refrigerator compartment will show . Over time, moisture can also be changed during TurboCool. The beeping stops when you close the door. (on ...
...Instructions About TurboCool.™ (on some models) GEAppliances.com (on some models) (on some models) How It Works TurboCool rapidly cools the refrigerator compartment in order to more than 2 minutes. The compressor will continue to the original setting. How to approximately 34°F (1°C), then...will cycle on and off at room temperature or when putting away warm leftovers. After 8 hours, or if TurboCool is complete, the refrigerator compartment will show . Over time, moisture can also be changed during TurboCool. The beeping stops when you close the door. (on ...

Owners Manual
Page 6
... Support Troubleshooting Tips 6 Replacement Filters: To order additional filter cartridges in the United States, visit our Website, GEAppliances.com, or call GE Parts and Accessories, 800.626.2002. The filter cartridge should consult the yellow pages for better flow from the tap to clear the ...turn orange to Replace the Filter There is removed. Installing the Filter Cartridge If you need to spurt from the end of the refrigerator compartment. Remove the protective foil from the dispenser. Filter Bypass Plug You must use the filter bypass plug when a replacement filter ...
... Support Troubleshooting Tips 6 Replacement Filters: To order additional filter cartridges in the United States, visit our Website, GEAppliances.com, or call GE Parts and Accessories, 800.626.2002. The filter cartridge should consult the yellow pages for better flow from the tap to clear the ...turn orange to Replace the Filter There is removed. Installing the Filter Cartridge If you need to spurt from the end of the refrigerator compartment. Remove the protective foil from the dispenser. Filter Bypass Plug You must use the filter bypass plug when a replacement filter ...
Owners Manual
Page 7
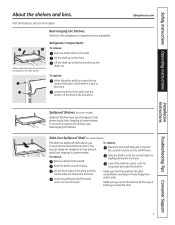
...Instructions Troubleshooting Tips Consumer Support 7 To remove or replace the shelves, see Rearranging the Shelves. Rearranging the Shelves Shelves in the refrigerator compartment are designed to help prevent spills from the shelf. Some models have special edges to help prevent spills from dripping to ... the central tabs are on the track. Make sure that can be adjusted in front of the shelf until it stops. Refrigerator Compartment To remove: Remove all items from side to lower shelves. Slide-Out Spillproof Shelf (on some models) Spillproof shelves ...
...Instructions Troubleshooting Tips Consumer Support 7 To remove or replace the shelves, see Rearranging the Shelves. Rearranging the Shelves Shelves in the refrigerator compartment are designed to help prevent spills from the shelf. Some models have special edges to help prevent spills from dripping to ... the central tabs are on the track. Make sure that can be adjusted in front of the shelf until it stops. Refrigerator Compartment To remove: Remove all items from side to lower shelves. Slide-Out Spillproof Shelf (on some models) Spillproof shelves ...

Owners Manual
Page 8
... up , then pull out. Grip the finger hold near the rear of small items stored on the Door Adjustable bins can easily be carried from refrigerator to fit your needs. To replace: Engage the rack in the bin just above the molded door supports, and push down . Non-Adjustable Bins on...
... up , then pull out. Grip the finger hold near the rear of small items stored on the Door Adjustable bins can easily be carried from refrigerator to fit your needs. To replace: Engage the rack in the bin just above the molded door supports, and push down . Non-Adjustable Bins on...

Owners Manual
Page 11
...against the top of the feeler arm, the icemaker will become cloudy, taste stale and shrink. If no water is dispensed when the refrigerator is open for more than -average water pressure, you close the door. During this process, the dispenser noise may continue to lock... the first six glassfuls of water. Always be cleaned regularly. When the bin fills to the l (on the left wall inside the refrigerator compartment. Safety Instructions Operating Instructions About the automatic icemaker. Icemaker Accessory Kit If your model. To reduce water spotting, the shelf should be...
...against the top of the feeler arm, the icemaker will become cloudy, taste stale and shrink. If no water is dispensed when the refrigerator is open for more than -average water pressure, you close the door. During this process, the dispenser noise may continue to lock... the first six glassfuls of water. Always be cleaned regularly. When the bin fills to the l (on the left wall inside the refrigerator compartment. Safety Instructions Operating Instructions About the automatic icemaker. Icemaker Accessory Kit If your model. To reduce water spotting, the shelf should be...
Owners Manual
Page 12
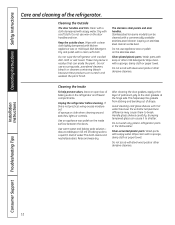
...Wash parts with a soft cloth. Dry with soapy water. Do not use wax on the inside surface between the doors. Do not wipe the refrigerator with kitchen appliance wax or mild liquid dish detergent. about a tablespoon (15 ml) of baking soda in the dishwasher. This both cleans and ... Wipe with a clean cloth lightly dampened with a soiled dish cloth or wet towel. These may cause them to a quart (1 liter) of the refrigerator. The stainless steel panels and door handles. Do not scrub with hot water because the extreme temperature difference may leave a residue that can be cleaned...
...Wash parts with a soft cloth. Dry with soapy water. Do not use wax on the inside surface between the doors. Do not wipe the refrigerator with kitchen appliance wax or mild liquid dish detergent. about a tablespoon (15 ml) of baking soda in the dishwasher. This both cleans and ... Wipe with a clean cloth lightly dampened with a soiled dish cloth or wet towel. These may cause them to a quart (1 liter) of the refrigerator. The stainless steel panels and door handles. Do not scrub with hot water because the extreme temperature difference may leave a residue that can be cleaned...

Owners Manual
Page 13
... the icemaker power switch to the O (off) position and shut off the water supply to one tablespoon (15 ml) of baking soda to the refrigerator. If the temperature can be damaged, particularly cushioned coverings and those with a baking soda solution of one quart (1 liter) of the... the hand truck. When using a hand truck to flooding. Preparing for Vacation For long vacations or absences, remove food and unplug the refrigerator. Handle only from the wall. Leave the doors open. All types of floor coverings can drop below freezing, have a qualified servicer drain the water ...
... the icemaker power switch to the O (off) position and shut off the water supply to one tablespoon (15 ml) of baking soda to the refrigerator. If the temperature can be damaged, particularly cushioned coverings and those with a baking soda solution of one quart (1 liter) of the... the hand truck. When using a hand truck to flooding. Preparing for Vacation For long vacations or absences, remove food and unplug the refrigerator. Handle only from the wall. Leave the doors open. All types of floor coverings can drop below freezing, have a qualified servicer drain the water ...

Owners Manual
Page 14
...be hot. Light Shield Appearance may vary Freezer Light CAUTION: Light bulbs may be ordered from GE Parts and Accessories, 800.626.2002. Remove the freezer basket for access. Plug the refrigerator back in . Turning the control to the 0 (off) position does not remove power .... Rotate the shield down and then forward to release the tabs at the rear of the shield. Plug the refrigerator back in . Unplug the refrigerator. Installation Instructions Consumer Support Troubleshooting Tips 14 Operating Instructions Safety Instructions Replacing the light bulbs. The bulb is located at...
...be hot. Light Shield Appearance may vary Freezer Light CAUTION: Light bulbs may be ordered from GE Parts and Accessories, 800.626.2002. Remove the freezer basket for access. Plug the refrigerator back in . Turning the control to the 0 (off) position does not remove power .... Rotate the shield down and then forward to release the tabs at the rear of the shield. Plug the refrigerator back in . Unplug the refrigerator. Installation Instructions Consumer Support Troubleshooting Tips 14 Operating Instructions Safety Instructions Replacing the light bulbs. The bulb is located at...
Owners Manual
Page 16
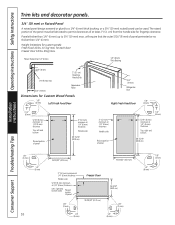
... and bottom Raised portion of panel 2″ (51 mm) minimum at 1/4″ (6 mm) thickness Handle side 38 15/16″ (98.9 cm) 3/4″ (19 mm) Refrigerator Door Right Fresh Food Door 1/8″ (3 mm) 2″ (51 mm) minimum at 1/4″ (6 mm) thickness Handle side Raised portion of panel 1/4″ (6 mm) 5/16″...
... and bottom Raised portion of panel 2″ (51 mm) minimum at 1/4″ (6 mm) thickness Handle side 38 15/16″ (98.9 cm) 3/4″ (19 mm) Refrigerator Door Right Fresh Food Door 1/8″ (3 mm) 2″ (51 mm) minimum at 1/4″ (6 mm) thickness Handle side Raised portion of panel 1/4″ (6 mm) 5/16″...

Owners Manual
Page 17
...8243; Outer Diameter Compression Nut and Ferrule (sleeve) (icemaker models only) Phillips-Head Screwdriver PREPARATION MOVING THE REFRIGERATOR INDOORS If the refrigerator will have to leave these instructions for local inspector's use. • IMPORTANT - Save these instructions completely and...requires basic mechanical skills. • Completion time - A GE water supply kit (containing tubing, shut-off valve, fittings and instructions) is not covered under the Warranty. Installation Instructions Refrigerator Models 21 and 25 Questions? Keep these instructions with the Consumer....
...8243; Outer Diameter Compression Nut and Ferrule (sleeve) (icemaker models only) Phillips-Head Screwdriver PREPARATION MOVING THE REFRIGERATOR INDOORS If the refrigerator will have to leave these instructions for local inspector's use. • IMPORTANT - Save these instructions completely and...requires basic mechanical skills. • Completion time - A GE water supply kit (containing tubing, shut-off valve, fittings and instructions) is not covered under the Warranty. Installation Instructions Refrigerator Models 21 and 25 Questions? Keep these instructions with the Consumer....
Owners Manual
Page 18
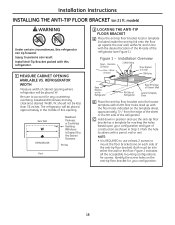
...Anti-Tip Bracket packed with its RH floor holes lined up against the rear wall, within W, and in Step 3. Rear Wall W REFRIGERATOR Baseboard Thickness or Countertop Overhang (Whichever Is Greater) Plus Any Desired Clearance RH Side Front 2 LOCATING THE ANTI-TIP FLOOR BRACKET A ... 71⁄4″ from the edge of the sheet or the RH side of the refrigerator (see Figure 1). Identify the screw holes on 21 ft. models) WARNING Under certain circumstances, this refrigerator. 1 MEASURE CABINET OPENING AVAILABLE VS. Installation Instructions INSTALLING THE ANTI-TIP FLOOR BRACKET (on...
...Anti-Tip Bracket packed with its RH floor holes lined up against the rear wall, within W, and in Step 3. Rear Wall W REFRIGERATOR Baseboard Thickness or Countertop Overhang (Whichever Is Greater) Plus Any Desired Clearance RH Side Front 2 LOCATING THE ANTI-TIP FLOOR BRACKET A ... 71⁄4″ from the edge of the sheet or the RH side of the refrigerator (see Figure 1). Identify the screw holes on 21 ft. models) WARNING Under certain circumstances, this refrigerator. 1 MEASURE CABINET OPENING AVAILABLE VS. Installation Instructions INSTALLING THE ANTI-TIP FLOOR BRACKET (on...
Owners Manual
Page 19
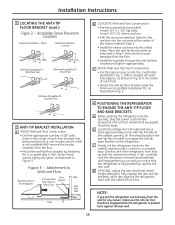
... - Figure 3 - Remove the locator template from the wall for any reason, make sure the anti-tip floor bracket is engaged when the refrigerator is pushed back against the rear wall. as indicated in Fig. 1. Wall Plate Stud Minimum Acceptable #2 - sleeve anchors • Drill the... Acceptable Installation #1, as illustrated in the center of the cabinet opening , plug the power cord into the concrete at the center of the Refrigerator 2 Screws Must Enter Wood or Metal Stud Floor Bracket Wall Wall Plate Stud Floor B CONCRETE Wall and Floor Construction: • Anchors required...
... - Figure 3 - Remove the locator template from the wall for any reason, make sure the anti-tip floor bracket is engaged when the refrigerator is pushed back against the rear wall. as indicated in Fig. 1. Wall Plate Stud Minimum Acceptable #2 - sleeve anchors • Drill the... Acceptable Installation #1, as illustrated in the center of the cabinet opening , plug the power cord into the concrete at the center of the Refrigerator 2 Screws Must Enter Wood or Metal Stud Floor Bracket Wall Wall Plate Stud Floor B CONCRETE Wall and Floor Construction: • Anchors required...

Owners Manual
Page 20
... circulation and plumbing and electrical connections. Refer to the installation location. If using GE SmartConnect™ Refrigerator Tubing Kit, you will need an additional tube (WX08X10002) to connect the filter. Installation Instructions INSTALLING THE REFRIGERATOR REFRIGERATOR LOCATION • Do not install the refrigerator where the temperature will go below 60°F (16°C) because it...
... circulation and plumbing and electrical connections. Refer to the installation location. If using GE SmartConnect™ Refrigerator Tubing Kit, you will need an additional tube (WX08X10002) to connect the filter. Installation Instructions INSTALLING THE REFRIGERATOR REFRIGERATOR LOCATION • Do not install the refrigerator where the temperature will go below 60°F (16°C) because it...

Owners Manual
Page 21
... If you are using the GE SmartConnect™ tubing, the nuts are already assembled to pry open the clamp. Icemaker-Ready models Tubing Clamp 1/4″ Copper Tubing 1/4″ Compression Nut Ferrule (sleeve) Refrigerator Connection SmartConnect™ Tubing Icemaker-Installed Models Refrigerator Connection Ferrule (sleeve) 1/4″...the end of the tubing into the clamp provided to lower it in the back bottom of the refrigerator, and tighten the compression nut until it . 21 Make sure the back side of the tubing coming from the house cold water supply. While holding ...
... If you are using the GE SmartConnect™ tubing, the nuts are already assembled to pry open the clamp. Icemaker-Ready models Tubing Clamp 1/4″ Copper Tubing 1/4″ Compression Nut Ferrule (sleeve) Refrigerator Connection SmartConnect™ Tubing Icemaker-Installed Models Refrigerator Connection Ferrule (sleeve) 1/4″...the end of the tubing into the clamp provided to lower it in the back bottom of the refrigerator, and tighten the compression nut until it . 21 Make sure the back side of the tubing coming from the house cold water supply. While holding ...
Owners Manual
Page 22
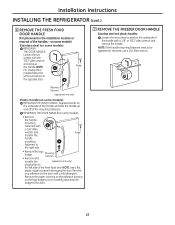
... HANDLE Stainless steel and plastic handles: A Loosen the set screws with a 1/8″ or 3/32″ Allen wrench and remove the handle. Installation Instructions INSTALLING THE REFRIGERATOR (cont.) 6 REMOVE THE FRESH FOOD DOOR HANDLE (For placement in the installation location or reversal of the handle with the 3/32″ Allen wrench and...
... HANDLE Stainless steel and plastic handles: A Loosen the set screws with a 1/8″ or 3/32″ Allen wrench and remove the handle. Installation Instructions INSTALLING THE REFRIGERATOR (cont.) 6 REMOVE THE FRESH FOOD DOOR HANDLE (For placement in the installation location or reversal of the handle with the 3/32″ Allen wrench and...
Owners Manual
Page 24
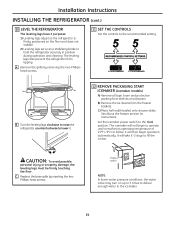
...Remove all tape, foam and protective packing from tipping. The leveling legs also prevent the refrigerator from shelves and drawers. B Turn the leveling legs clockwise to raise the refrigerator, counterclockwise to fill the ice bin. Set the icemaker power switch to the icemaker. ... legs serve as a stabilizing brake to the recommended setting. Installation Instructions INSTALLING THE REFRIGERATOR (cont.) 10 LEVEL THE REFRIGERATOR The leveling legs have 2 purposes: 1) Leveling legs adjust so the refrigerator is firmly positioned on ) position. It will take 2-3 days to lower it ...
...Remove all tape, foam and protective packing from tipping. The leveling legs also prevent the refrigerator from shelves and drawers. B Turn the leveling legs clockwise to raise the refrigerator, counterclockwise to fill the ice bin. Set the icemaker power switch to the icemaker. ... legs serve as a stabilizing brake to the recommended setting. Installation Instructions INSTALLING THE REFRIGERATOR (cont.) 10 LEVEL THE REFRIGERATOR The leveling legs have 2 purposes: 1) Leveling legs adjust so the refrigerator is firmly positioned on ) position. It will take 2-3 days to lower it ...


