

Use and Care Manual
Page 1
...2-5 Operating Instructions Kitchen Timer 21 Oven 14-35 Adjust Oven Thermostat 22 Baking or Roasting 17 Broiling, Broiling Guide 18 Controls 14, 15 Convection Oven 23-26 Lower Oven Drawer 35 Preheating 17 Probe 20 Sabbath Feature 33 Self-Cleaning 29, 30 Slow Cook, Warming and Proofing Features 27, 28 Special Features 31, 32 Timed Baking and Roasting 19 Warming Drawer 34 Surface Units 6-13 Cookware 7 Griddle 12, 13 Knob-Controlled Models 10, 11 Touch Pad-Controlled Models 8, 9 Care and Cleaning Control Knobs 36 Control Panel 36 Glass Cooktop 42, 43 Lift-Off Oven Door 37...
...2-5 Operating Instructions Kitchen Timer 21 Oven 14-35 Adjust Oven Thermostat 22 Baking or Roasting 17 Broiling, Broiling Guide 18 Controls 14, 15 Convection Oven 23-26 Lower Oven Drawer 35 Preheating 17 Probe 20 Sabbath Feature 33 Self-Cleaning 29, 30 Slow Cook, Warming and Proofing Features 27, 28 Special Features 31, 32 Timed Baking and Roasting 19 Warming Drawer 34 Surface Units 6-13 Cookware 7 Griddle 12, 13 Knob-Controlled Models 10, 11 Touch Pad-Controlled Models 8, 9 Care and Cleaning Control Knobs 36 Control Panel 36 Glass Cooktop 42, 43 Lift-Off Oven Door 37...

Use and Care Manual
Page 3
... to at self-clean temperatures may result in damage to a qualified technician. s Do not let cooking grease or other flammable materials contact the surface units, areas nearby the surface units or any service, unplug the range or disconnect the power supply at the household distribution panel by a qualified installer in accordance with the provided installation instructions. Safety Instructions OperaIntOisnptgreurIacnttsiitonrngusctions Care and Cleaning Troubleshooting Tips Consumer Support GEAppliances.com WARNING GENERAL SAFETY INSTRUCTIONS s Use this...
... to at self-clean temperatures may result in damage to a qualified technician. s Do not let cooking grease or other flammable materials contact the surface units, areas nearby the surface units or any service, unplug the range or disconnect the power supply at the household distribution panel by a qualified installer in accordance with the provided installation instructions. Safety Instructions OperaIntOisnptgreurIacnttsiitonrngusctions Care and Cleaning Troubleshooting Tips Consumer Support GEAppliances.com WARNING GENERAL SAFETY INSTRUCTIONS s Use this...

Use and Care Manual
Page 4
... heat settings. WARNING RADIANT COOKTOP SAFETY INSTRUCTIONS (some models) s Do not immerse or soak the removable surface units. Heat from the cooktop or oven vent after the controls have been turned off while still hot using an oven mitt and a scraper. READ ALL INSTRUCTIONS BEFORE USING. s Never leave oil unattended while frying. Wait until the cooktop cools and the indicator light goes out before attempting to surrounding cabinets. Consumer Support Troubleshooting Tips Care and Cleaning WARNING COIL COOKTOP...
... heat settings. WARNING RADIANT COOKTOP SAFETY INSTRUCTIONS (some models) s Do not immerse or soak the removable surface units. Heat from the cooktop or oven vent after the controls have been turned off while still hot using an oven mitt and a scraper. READ ALL INSTRUCTIONS BEFORE USING. s Never leave oil unattended while frying. Wait until the cooktop cools and the indicator light goes out before attempting to surrounding cabinets. Consumer Support Troubleshooting Tips Care and Cleaning WARNING COIL COOKTOP...

Use and Care Manual
Page 5
... illness. s If the self-cleaning mode malfunctions, turn the oven off and disconnect the power supply. No commercial oven cleaner or oven liner protective coating of grease may ignite. s Do not leave items such as drip pans or bowls. Do not use self-clean to the stop-lock position when loading and unloading food from touching hot surfaces of the door and oven walls. WARNING WARMING DRAWER/LOWER OVEN DRAWER SAFETY INSTRUCTIONS (some models) s The purpose...
... illness. s If the self-cleaning mode malfunctions, turn the oven off and disconnect the power supply. No commercial oven cleaner or oven liner protective coating of grease may ignite. s Do not leave items such as drip pans or bowls. Do not use self-clean to the stop-lock position when loading and unloading food from touching hot surfaces of the door and oven walls. WARNING WARMING DRAWER/LOWER OVEN DRAWER SAFETY INSTRUCTIONS (some models) s The purpose...

Use and Care Manual
Page 6
... food is turned on. Safety Instructions Operating Instructions For models with the cooktop on medium or high settings. Turn off , the glass cooktop retains enough heat to follow these instructions can result in fire, serious injury or death. An indicator light will disappear as a cutting board. Consumer Support Troubleshooting Tips Care and Cleaning 6 Always place the pan in a short time. NOTE: On models with the number of new parts and insulating materials and will remove this manual, features and...
... food is turned on. Safety Instructions Operating Instructions For models with the cooktop on medium or high settings. Turn off , the glass cooktop retains enough heat to follow these instructions can result in fire, serious injury or death. An indicator light will disappear as a cutting board. Consumer Support Troubleshooting Tips Care and Cleaning 6 Always place the pan in a short time. NOTE: On models with the number of new parts and insulating materials and will remove this manual, features and...

Use and Care Manual
Page 12
... cookware to 400 in the oven. Griddle Control (on the cooktop. To turn the griddle unit off . Setting is clean. Consumer Support Troubleshooting Tips Care and Cleaning How to do so can become heated when using this cookware for food or oil. Safety Instructions Operating Instructions Using the griddle. then switch to broil food in 25 increments. Do not cut foods on a preheated surface. CAUTION BURN HAZARD: Griddle surfaces may produce fumes harmful to temperatures over 660°F, the...
... cookware to 400 in the oven. Griddle Control (on the cooktop. To turn the griddle unit off . Setting is clean. Consumer Support Troubleshooting Tips Care and Cleaning How to do so can become heated when using this cookware for food or oil. Safety Instructions Operating Instructions Using the griddle. then switch to broil food in 25 increments. Do not cut foods on a preheated surface. CAUTION BURN HAZARD: Griddle surfaces may produce fumes harmful to temperatures over 660°F, the...
Use and Care Manual
Page 14
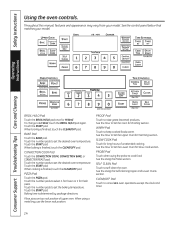
... clock and timer. 14 Touch the number pads to cook food. Baking time is finished, touch the CLEAR/OFF pad. PROBE Pad Touch when using a metal tray, use the lower rack position. Touch the number pads to set the desired oven temperature. Touch the number pads to set the baking temperature. WARM Pad Touch to LO Broil, touch the BROIL HI/LO pad again. See the How to Set the Oven for HI Broil. Operating Instructions Consumer Support Troubleshooting Tips Care...
... clock and timer. 14 Touch the number pads to cook food. Baking time is finished, touch the CLEAR/OFF pad. PROBE Pad Touch when using a metal tray, use the lower rack position. Touch the number pads to set the desired oven temperature. Touch the number pads to set the baking temperature. WARM Pad Touch to LO Broil, touch the BROIL HI/LO pad again. See the How to Set the Oven for HI Broil. Operating Instructions Consumer Support Troubleshooting Tips Care...
Use and Care Manual
Page 20
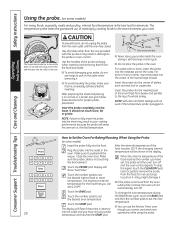
..., touch the CLEAR/OFF pad. Safety Instructions Operating Instructions Using the probe. (on some models) Insert the probe fully into the outlet in the oven. the food temperature. Touch the number pads to set , the probe and the oven turn off and the oven control signals. To change the oven temperature during a self-cleaning or broil cycle. The temperature probe takes the guesswork out of the probe and plug when inserting and removing them from the food.
..., touch the CLEAR/OFF pad. Safety Instructions Operating Instructions Using the probe. (on some models) Insert the probe fully into the outlet in the oven. the food temperature. Touch the number pads to set , the probe and the oven turn off and the oven control signals. To change the oven temperature during a self-cleaning or broil cycle. The temperature probe takes the guesswork out of the probe and plug when inserting and removing them from the food.
Use and Care Manual
Page 21
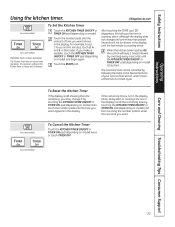
... models) The Kitchen Timer is counting down . When the kitchen timer reaches :00, the control will not be cancelled by touching the KITCHEN TIMER ON/OFF or TIMER ON pad (depending on model) and begin again. The maximum setting on model) is 9 hours and 59 minutes. Safety Instructions Operating Instructions Using the kitchen timer. The Kitchen Timer does not control oven operations. For example, to enter the new time you want appears in the display), recall...
... models) The Kitchen Timer is counting down . When the kitchen timer reaches :00, the control will not be cancelled by touching the KITCHEN TIMER ON/OFF or TIMER ON pad (depending on model) and begin again. The maximum setting on model) is 9 hours and 59 minutes. Safety Instructions Operating Instructions Using the kitchen timer. The Kitchen Timer does not control oven operations. For example, to enter the new time you want appears in the display), recall...
Use and Care Manual
Page 33
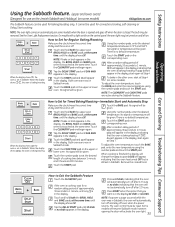
... 99 minutes. To bake in Sabbath mode. To adjust the oven temperature, touch the BAKE pad, enter the new temperature using the number pads and touch the START pad. When the display shows , the oven is baking/roasting. How to Set for convection, broiling, self-cleaning or Delay Start cooking. No signal will be given. No signal or temperature will be given. If doesn't appear in the display. Remove the cooked food. Care and Cleaning Troubleshooting Tips Consumer Support How to 1 minute...
... 99 minutes. To bake in Sabbath mode. To adjust the oven temperature, touch the BAKE pad, enter the new temperature using the number pads and touch the START pad. When the display shows , the oven is baking/roasting. How to Set for convection, broiling, self-cleaning or Delay Start cooking. No signal will be given. No signal or temperature will be given. If doesn't appear in the display. Remove the cooked food. Care and Cleaning Troubleshooting Tips Consumer Support How to 1 minute...
Use and Care Manual
Page 34
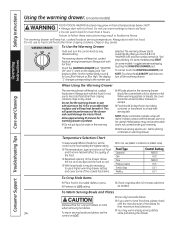
Safety Instructions Using the warming drawer. (on some models press START. WARMING DRAWER To Use the Warming Drawer Push and turn off the warming drawer. Always start with the manufacturer of the food. "WARMER ON" and "1" are lit on LO/1 setting. The display "1" changes corresponding to preheat. The warming drawer starts automatically after 45 minutes. On some models) Operating Instructions Consumer Support Troubleshooting Tips Care and Cleaning WARNING FOOD POISON HAZARD: Bacteria may grow in its cooking container or transferred to heat cold food...
Safety Instructions Using the warming drawer. (on some models press START. WARMING DRAWER To Use the Warming Drawer Push and turn off the warming drawer. Always start with the manufacturer of the food. "WARMER ON" and "1" are lit on LO/1 setting. The display "1" changes corresponding to preheat. The warming drawer starts automatically after 45 minutes. On some models) Operating Instructions Consumer Support Troubleshooting Tips Care and Cleaning WARNING FOOD POISON HAZARD: Bacteria may grow in its cooking container or transferred to heat cold food...
Use and Care Manual
Page 39
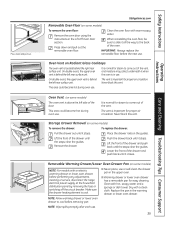
... left rear surface unit. Place the drawer rails on Radiant Glass Cooktops The oven vent is important for proper air circulation. Remove the drawer. Removable Warming Drawer/Lower Oven Drawer Pan (on some models) To remove the drawer: To replace the drawer: Pull the drawer out until it stops. s Never place, use . Clean with an electric warming drawer or lower oven drawer, before performing any adjustments, cleaning or service, disconnect the range electrical power supply at the household distribution panel by removing the fuse or switching off the circuit breaker. GEAppliances...
... left rear surface unit. Place the drawer rails on Radiant Glass Cooktops The oven vent is important for proper air circulation. Remove the drawer. Removable Warming Drawer/Lower Oven Drawer Pan (on some models) To remove the drawer: To replace the drawer: Pull the drawer out until it stops. s Never place, use . Clean with an electric warming drawer or lower oven drawer, before performing any adjustments, cleaning or service, disconnect the range electrical power supply at the household distribution panel by removing the fuse or switching off the circuit breaker. GEAppliances...
Use and Care Manual
Page 40
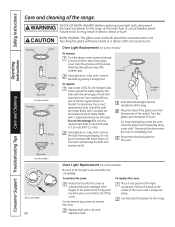
... hot glass with a 40-watt appliance bulb. To determine the correct replacement bulb, check the bulb terminals. Turn the glass cover clockwise 1/4 turn until it into the grooves of the two types shown on some models) Be sure to do so may offer a better grip. For improved lighting inside the oven, clean the glass cover frequently using a wet cloth. Consumer Support Troubleshooting Tips Care and Cleaning Glass cover (on some models) Wire cover holder 40 Oven Light Replacement (on some models) To remove: Turn...
... hot glass with a 40-watt appliance bulb. To determine the correct replacement bulb, check the bulb terminals. Turn the glass cover clockwise 1/4 turn until it into the grooves of the two types shown on some models) Be sure to do so may offer a better grip. For improved lighting inside the oven, clean the glass cover frequently using a wet cloth. Consumer Support Troubleshooting Tips Care and Cleaning Glass cover (on some models) Wire cover holder 40 Oven Light Replacement (on some models) To remove: Turn...
Use and Care Manual
Page 44
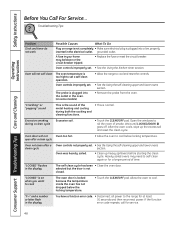
... the circuit breaker tripped. • Replace the fuse or reset the circuit breaker. Safety Instructions Before You Call For Service... Cookware with a light-colored cooktop. Troubleshooting Tips Save time and money! Oven controls improperly set . • Check to below locking temperature. 44 Cooktop controls improperly set . • See the Using the oven section. Oven too hot. • Allow the oven to cool to see the correct control is plugged into contact with plastic placed on a model • This...
... the circuit breaker tripped. • Replace the fuse or reset the circuit breaker. Safety Instructions Before You Call For Service... Cookware with a light-colored cooktop. Troubleshooting Tips Save time and money! Oven controls improperly set . • Check to below locking temperature. 44 Cooktop controls improperly set . • See the Using the oven section. Oven too hot. • Allow the oven to cool to see the correct control is plugged into contact with plastic placed on a model • This...

Use and Care Manual
Page 45
...! Rear drawer support is crooked Possible Causes Oven controls improperly set . To straighten the door, push down on the high corner. 45 Oven thermostat needs adjustment . Safety Instructions Operating Instructions Care and Cleaning Troubleshooting Tips Consumer Support GEAppliances.com Problem Food does not bake or roast properly Food does not broil properly Oven temperature too hot or too cold Storage drawer is crooked Storage drawer won't close Oven door is on top of the guide rail. • Reposition the drawer and power cord.
...! Rear drawer support is crooked Possible Causes Oven controls improperly set . To straighten the door, push down on the high corner. 45 Oven thermostat needs adjustment . Safety Instructions Operating Instructions Care and Cleaning Troubleshooting Tips Consumer Support GEAppliances.com Problem Food does not bake or roast properly Food does not broil properly Oven temperature too hot or too cold Storage drawer is crooked Storage drawer won't close Oven door is on top of the guide rail. • Reposition the drawer and power cord.
Use and Care Manual
Page 46
... cook The oven door is plugged into the outlet in the electrical outlet. Allow the oven to self-clean again or for service. 46 Oven controls improperly set . • See the Using the kitchen timer section. If the function error code repeats, call for a longer period of time. Troubleshooting Tips Operating Instructions Consumer Support Troubleshooting Tips Care and Cleaning Problem Clock and timer do not work Possible Causes What To Do Plug on range is not completely • Make sure electrical plug is locked because the temperature inside the oven...
... cook The oven door is plugged into the outlet in the electrical outlet. Allow the oven to self-clean again or for service. 46 Oven controls improperly set . • See the Using the kitchen timer section. If the function error code repeats, call for a longer period of time. Troubleshooting Tips Operating Instructions Consumer Support Troubleshooting Tips Care and Cleaning Problem Clock and timer do not work Possible Causes What To Do Plug on range is not completely • Make sure electrical plug is locked because the temperature inside the oven...
Use and Care Manual
Page 51
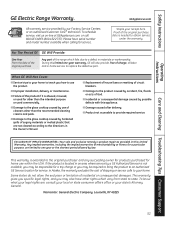
... in the Owner's Manual. Staple your legal rights are limited to one -year warranty, GE will also provide, free of the product if it is extended to replace the defective part. s Damage to the product caused by hardened spills of God. During this appliance. Louisville, KY 40225 51 Safety Instructions OperaIntOisnptgreurIacnttsiitonrngusctions Care and Cleaning Troubleshooting Tips Consumer Support GE Electric Range Warranty. To schedule service, visit us on-line at...
... in the Owner's Manual. Staple your legal rights are limited to one -year warranty, GE will also provide, free of the product if it is extended to replace the defective part. s Damage to the product caused by hardened spills of God. During this appliance. Louisville, KY 40225 51 Safety Instructions OperaIntOisnptgreurIacnttsiitonrngusctions Care and Cleaning Troubleshooting Tips Consumer Support GE Electric Range Warranty. To schedule service, visit us on-line at...
Installation Instructions
Page 1
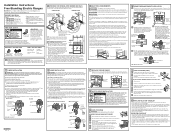
... UL-listed range cord. Leg leveler MODELS WITH BAKING, WARMING DRAWERS OR DOUBLE OVEN A Plug in place with aluminum wiring must connect the neutral terminal to leave these instructions completely and carefully. • IMPORTANT - X E Install oven shelves in the oven and position the range where it in the unit. SINGLE OVEN DOUBLE OVEN On models with 125/250 minimum volt range is protected by placing a spirit level on the outer door, cooktop and control panel. 2 PREPARE THE OPENING (FOR INDOOR USE...
... UL-listed range cord. Leg leveler MODELS WITH BAKING, WARMING DRAWERS OR DOUBLE OVEN A Plug in place with aluminum wiring must connect the neutral terminal to leave these instructions completely and carefully. • IMPORTANT - X E Install oven shelves in the oven and position the range where it in the unit. SINGLE OVEN DOUBLE OVEN On models with 125/250 minimum volt range is protected by placing a spirit level on the outer door, cooktop and control panel. 2 PREPARE THE OPENING (FOR INDOOR USE...

Quick Specs
Page 1
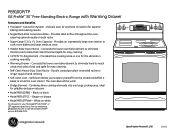
... a minimum of electrical outlet box. Listed by Underwriters Laboratories Specification Revised 11/10 221012 Installation Information: Before installing, consult installation instructions packed with product for current dimensional data. 30 2-1/2 Acceptable electrical outlet area 25 2-1/2 29-7/8 7 14-1/2 A* 25-3/8 47-5/8 7-1/2 On models with baking or warming drawers, electrical outlet must be installed directly against wall. PB910DP/TP GE Profile™ 30" Free-Standing Electric Range with Warming Drawer Dimensions and Installation Information (in this...
... a minimum of electrical outlet box. Listed by Underwriters Laboratories Specification Revised 11/10 221012 Installation Information: Before installing, consult installation instructions packed with product for current dimensional data. 30 2-1/2 Acceptable electrical outlet area 25 2-1/2 29-7/8 7 14-1/2 A* 25-3/8 47-5/8 7-1/2 On models with baking or warming drawers, electrical outlet must be installed directly against wall. PB910DP/TP GE Profile™ 30" Free-Standing Electric Range with Warming Drawer Dimensions and Installation Information (in this...
Quick Specs
Page 2
... - OFF HI 8 6 4 2 LO 2 FRONT OFF MELT HI 81 62 3 4 4 5 HI 9 8 7 6 REAR OVEN CONTROLS CONVECTION BAKE 1 RACK/MULTI CONVECTION ROAST AUTO RECIPE CONVERSION BROIL HI/LO BAKE PROBE WARMING ZONE SET/OFF SET WARMING ZONE TrueTemp LO MED HI 12 3 45 6 7 8 90 CONTROL LOCKOUT CLEAR OFF START TIME CONTROLS COOKING TIME DELAY START KITCHEN TIMER ON/OFF CLOCK OVEN LIGHT ON/OFF SELF CLEAN OFF LO HI MED WARMING ZONE OFF MELT 1 2 3 4 5 REAR HI 9 HI 8 5 82 7 6 LO HI 8 5 OFF LO 2 5 8 HI 2 LO FRONT...
... - OFF HI 8 6 4 2 LO 2 FRONT OFF MELT HI 81 62 3 4 4 5 HI 9 8 7 6 REAR OVEN CONTROLS CONVECTION BAKE 1 RACK/MULTI CONVECTION ROAST AUTO RECIPE CONVERSION BROIL HI/LO BAKE PROBE WARMING ZONE SET/OFF SET WARMING ZONE TrueTemp LO MED HI 12 3 45 6 7 8 90 CONTROL LOCKOUT CLEAR OFF START TIME CONTROLS COOKING TIME DELAY START KITCHEN TIMER ON/OFF CLOCK OVEN LIGHT ON/OFF SELF CLEAN OFF LO HI MED WARMING ZONE OFF MELT 1 2 3 4 5 REAR HI 9 HI 8 5 82 7 6 LO HI 8 5 OFF LO 2 5 8 HI 2 LO FRONT...


