Use and Care Manual
Page 1
Gas Downdraft Cooktop ge.com Safety Instructions . . . .2-5 Operating Instructions Accessories 7 Controls 8, 9 Cookware 9 Electric Ignition 8 Features 6 Griddle 14 Grill Module 10-13 Surface Burner Modules 6, 8-10 Ventilation System 6, 9 Installation Owner's Manual Instructions 18-29 & Installation LP Conversion ... Grease Jar 15 Griddle Accessory 17 Grill Burner 16 Grill Grate 16 Igniters 17 Porcelain Burner Basin . . . . . 17 Porcelain Cooktop 15 Sealed Burner Module . . . . . 17 Stainless Steel Surfaces . . . . .15 Vent Grille and Filter 16 Printed in Korea Write the...
Gas Downdraft Cooktop ge.com Safety Instructions . . . .2-5 Operating Instructions Accessories 7 Controls 8, 9 Cookware 9 Electric Ignition 8 Features 6 Griddle 14 Grill Module 10-13 Surface Burner Modules 6, 8-10 Ventilation System 6, 9 Installation Owner's Manual Instructions 18-29 & Installation LP Conversion ... Grease Jar 15 Griddle Accessory 17 Grill Burner 16 Grill Grate 16 Igniters 17 Porcelain Burner Basin . . . . . 17 Porcelain Cooktop 15 Sealed Burner Module . . . . . 17 Stainless Steel Surfaces . . . . .15 Vent Grille and Filter 16 Printed in Korea Write the...
Use and Care Manual
Page 6
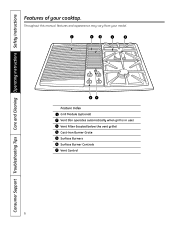
Consumer Support Troubleshooting Tips Care and Cleaning Operating Instructions Safety Instructions Features of your model. 1 2 3 4 5 67 Feature Index 1 Grill Module (optional) 2 Vent (fan operates automatically when grill is in use) 3 Vent Filter (located below the vent grille) 4 Cast-Iron Burner Grate 5 Surface Burners 6 Surface Burner Controls 7 Vent Control 6 Throughout this manual, features and appearance may vary from your cooktop.
Consumer Support Troubleshooting Tips Care and Cleaning Operating Instructions Safety Instructions Features of your model. 1 2 3 4 5 67 Feature Index 1 Grill Module (optional) 2 Vent (fan operates automatically when grill is in use) 3 Vent Filter (located below the vent grille) 4 Cast-Iron Burner Grate 5 Surface Burners 6 Surface Burner Controls 7 Vent Control 6 Throughout this manual, features and appearance may vary from your cooktop.
Use and Care Manual
Page 7
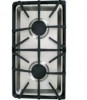
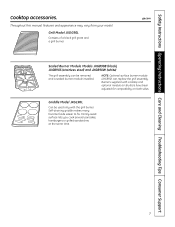
Safety Instructions Operating Instructions Care and Cleaning Troubleshooting Tips Consumer Support Cooktop accessories. NOTE: Optional surface burner module (JXGB90) can be used only with cooktop and optional module air shutters have been adjusted for compatibility on both sides. Family-sized...features and appearance may vary from your model. Self-draining griddle makes many favorite foods easier to fix. ge.com Sealed Burner Module Models JXGB90B (black), JXGB90S (stainless steel) and JXGB90W (white) The grill assembly can replace the grill assembly. Griddle Model JXGL90L...
Safety Instructions Operating Instructions Care and Cleaning Troubleshooting Tips Consumer Support Cooktop accessories. NOTE: Optional surface burner module (JXGB90) can be used only with cooktop and optional module air shutters have been adjusted for compatibility on both sides. Family-sized...features and appearance may vary from your model. Self-draining griddle makes many favorite foods easier to fix. ge.com Sealed Burner Module Models JXGB90B (black), JXGB90S (stainless steel) and JXGB90W (white) The grill assembly can replace the grill assembly. Griddle Model JXGL90L...
Use and Care Manual
Page 8
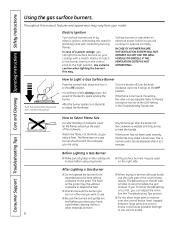
... then turn it to the LITE position. DO NOT USE THE GRILL MODULE OR GRIDDLE IF THE VENTILATION SYSTEM IS NOT OPERATIONAL. If the flame is normal, and it will continue to 5 minutes. The flame size on a gas burner should dissipate after 4 to operate normally. This is too low ... How to simmer delicate foods, extended period of the unit for standing pilots with a match. s Only surface burners may vary from your cooktop with constantly burning flames. Use extreme caution when lighting the burners this manual, features and appearance may be sure the burner you turn the knob...
... then turn it to the LITE position. DO NOT USE THE GRILL MODULE OR GRIDDLE IF THE VENTILATION SYSTEM IS NOT OPERATIONAL. If the flame is normal, and it will continue to 5 minutes. The flame size on a gas burner should dissipate after 4 to operate normally. This is too low ... How to simmer delicate foods, extended period of the unit for standing pilots with a match. s Only surface burners may vary from your cooktop with constantly burning flames. Use extreme caution when lighting the burners this manual, features and appearance may be sure the burner you turn the knob...
Use and Care Manual
Page 9
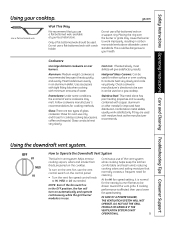
...built-in an aluminum skillet. Cast Iron: If heated slowly, most skillets will turn on the vent fan, use a flat-bottomed wok on a gas cooktop. Stainless Steel: This metal alone has poor heating properties and is usually combined with a wok holder. Cookware Use large diameter cookware on the...SYSTEM WILL NOT OPERATE. ge.com Use a flat-bottomed wok. Most foods brown evenly in vent system helps remove cooking vapors, odors and smoke from foods prepared on rear burners. It conducts heat very slowly and cools very slowly. DO NOT USE THE GRILL MODULE OR GRIDDLE IF THE ...
...built-in an aluminum skillet. Cast Iron: If heated slowly, most skillets will turn on the vent fan, use a flat-bottomed wok on a gas cooktop. Stainless Steel: This metal alone has poor heating properties and is usually combined with a wok holder. Cookware Use large diameter cookware on the...SYSTEM WILL NOT OPERATE. ge.com Use a flat-bottomed wok. Most foods brown evenly in vent system helps remove cooking vapors, odors and smoke from foods prepared on rear burners. It conducts heat very slowly and cools very slowly. DO NOT USE THE GRILL MODULE OR GRIDDLE IF THE ...
Use and Care Manual
Page 10
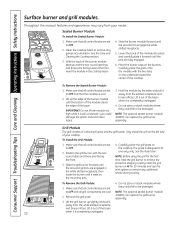
See the Care and Cleaning the Cooktop section. 3. To Remove the Sealed Burner Module: 1. IMPORTANT: Do not lift the module too high while it away from the white slotted receptacle and brass orifices. NOTE: The optional sealed burner module JXGB90 can replace the grill burner assembly. 3. Heat the grill burner on the mounting pins. 4. Remove the...
See the Care and Cleaning the Cooktop section. 3. To Remove the Sealed Burner Module: 1. IMPORTANT: Do not lift the module too high while it away from the white slotted receptacle and brass orifices. NOTE: The optional sealed burner module JXGB90 can replace the grill burner assembly. 3. Heat the grill burner on the mounting pins. 4. Remove the...

Use and Care Manual
Page 11
...grill control knobs to produce the smoke needed for the first time, wash grill grate in hot soapy water. ge.com Using the Grill • The vent fan will occasionally ignite to prevent flare-ups. • Do not... pans, skillets, etc., on automatically and operate continuously while the grill burner module is in use charcoal or wood chips in the meat or that smoked "outdoor" flavor. DO NOT USE ...THE GRILL MODULE OR GRIDDLE IF THE VENTILATION SYSTEM IS NOT OPERATIONAL. • Do not use aluminum foil inside...
...grill control knobs to produce the smoke needed for the first time, wash grill grate in hot soapy water. ge.com Using the Grill • The vent fan will occasionally ignite to prevent flare-ups. • Do not... pans, skillets, etc., on automatically and operate continuously while the grill burner module is in use charcoal or wood chips in the meat or that smoked "outdoor" flavor. DO NOT USE ...THE GRILL MODULE OR GRIDDLE IF THE VENTILATION SYSTEM IS NOT OPERATIONAL. • Do not use aluminum foil inside...
Use and Care Manual
Page 14
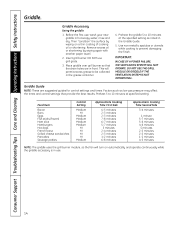
...is in the grease container. 4. This will turn on a thin coating of cooking oil or shortening. DO NOT USE THE GRILL MODULE OR GRIDDLE IF THE VENTILATION SYSTEM IS NOT OPERATIONAL. Food Item Bacon Buns Eggs Fish sticks (frozen) Ham slice Hamburgers Hot dogs ...5-6 minutes 4-6 minutes 5 minutes 2-3 minutes 2-3 minutes 1-2 minutes 4-5 minutes NOTE: The griddle uses the grill burner module, so the fan will permit excess grease to 10 minutes at the specified setting as low gas pressure may affect the times and control settings that the drain holes are suggested guides for control...
...is in the grease container. 4. This will turn on a thin coating of cooking oil or shortening. DO NOT USE THE GRILL MODULE OR GRIDDLE IF THE VENTILATION SYSTEM IS NOT OPERATIONAL. Food Item Bacon Buns Eggs Fish sticks (frozen) Ham slice Hamburgers Hot dogs ...5-6 minutes 4-6 minutes 5 minutes 2-3 minutes 2-3 minutes 1-2 minutes 4-5 minutes NOTE: The griddle uses the grill burner module, so the fan will permit excess grease to 10 minutes at the specified setting as low gas pressure may affect the times and control settings that the drain holes are suggested guides for control...
Use and Care Manual
Page 17
...cooktop module and are blocked, use steel wool or coarse scouring pads. Do not use a twist tie or paper clip to remove any clogs in hot, soapy water and rinse with a cleaner such as the cooktop has cooled, because these spills may scour with a plastic scouring pad to avoid ignition failure and possible gas... Burner Basin This area is durable, it will not seep underneath the cooktop. Rinse and dry. 17 Safety Instructions Operating Instructions Care and Cleaning Troubleshooting Tips Consumer Support ge.com Igniters It is important to keep the electrode clean. Remove stubborn...
...cooktop module and are blocked, use steel wool or coarse scouring pads. Do not use a twist tie or paper clip to remove any clogs in hot, soapy water and rinse with a cleaner such as the cooktop has cooled, because these spills may scour with a plastic scouring pad to avoid ignition failure and possible gas... Burner Basin This area is durable, it will not seep underneath the cooktop. Rinse and dry. 17 Safety Instructions Operating Instructions Care and Cleaning Troubleshooting Tips Consumer Support ge.com Igniters It is important to keep the electrode clean. Remove stubborn...
Use and Care Manual
Page 19
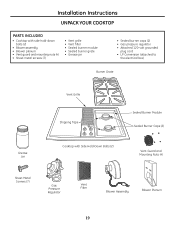
... • Attached 120-volt grounded plug cord • LP Conversion (attached to the electrical box) Burner Grate Grease Jar Vent Grille Shipping Tape Cooktop with Side Hold-Down Bolts (2) Sealed Burner Module Sealed Burner Caps (2) Vent Guard and Mounting Nuts (4) Sheet Metal Screws (7) Gas Pressure Regulator Vent Filter Blower Assembly Blower Plenum 19
... • Attached 120-volt grounded plug cord • LP Conversion (attached to the electrical box) Burner Grate Grease Jar Vent Grille Shipping Tape Cooktop with Side Hold-Down Bolts (2) Sealed Burner Module Sealed Burner Caps (2) Vent Guard and Mounting Nuts (4) Sheet Metal Screws (7) Gas Pressure Regulator Vent Filter Blower Assembly Blower Plenum 19
Use and Care Manual
Page 26
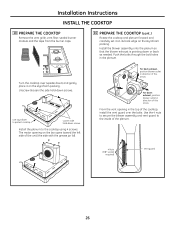
Installation Instructions INSTALL THE COOKTOP 10 PREPARE THE COOKTOP Remove the vent grille, vent filter, sealed burner module and the tape from the burner caps. 10 PREPARE THE COOKTOP (cont.) Rotate the cooktop and plenum forward and carefully set it on the styrofoam packing. Install the blower assembly onto ...pointing down screws Install the plenum to the inside of the plenum. 4 Nuts (3/8″ socket required) Vent guard 26 Turn the cooktop over the bolts. For back exhaust, position blower outlet in direction of this arrow For down exhaust, position blower outlet in direction of...
Installation Instructions INSTALL THE COOKTOP 10 PREPARE THE COOKTOP Remove the vent grille, vent filter, sealed burner module and the tape from the burner caps. 10 PREPARE THE COOKTOP (cont.) Rotate the cooktop and plenum forward and carefully set it on the styrofoam packing. Install the blower assembly onto ...pointing down screws Install the plenum to the inside of the plenum. 4 Nuts (3/8″ socket required) Vent guard 26 Turn the cooktop over the bolts. For back exhaust, position blower outlet in direction of this arrow For down exhaust, position blower outlet in direction of...
Use and Care Manual
Page 29
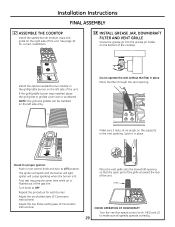
...the unit. Place the vent grille onto the downdraft opening . NOTE: The grill and griddle can be installed on the left side of the gas line. Make sure it as desired. First test may require some time while air is flushed out of the unit. Grille CHECK OPERATION OF DOWNDRAFT... fan speed control to HI, MED and LO 29 to OFF. Installation Instructions FINAL ASSEMBLY 17 ASSEMBLE THE COOKTOP Install the sealed burner module, caps and grate on the right side of the cooktop. Adjust the air shutters (see LP Conversion Instructions). If the grill/griddle burner was installed, place the ...
...the unit. Place the vent grille onto the downdraft opening . NOTE: The grill and griddle can be installed on the left side of the gas line. Make sure it as desired. First test may require some time while air is flushed out of the unit. Grille CHECK OPERATION OF DOWNDRAFT... fan speed control to HI, MED and LO 29 to OFF. Installation Instructions FINAL ASSEMBLY 17 ASSEMBLE THE COOKTOP Install the sealed burner module, caps and grate on the right side of the cooktop. Adjust the air shutters (see LP Conversion Instructions). If the grill/griddle burner was installed, place the ...
Use and Care Manual
Page 32
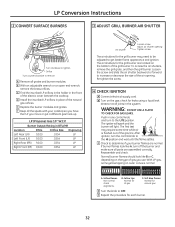
...E Replace the burner modules and grates. Reassemble and check. Loosen the screw and slide the air shutter backward or forward to the LITE position. WARNING: DO NOT USE A FLAME TO CHECK FOR GAS LEAKS. The first test may need to be adjusted to determine if your cooktop so you have them... if you use. B With an adjustable wrench or an open end wrench, remove the brass orifices. C Find the inscribed LP orifices in the holder in the system. F Keep all grates and burner modules. C Check to get a different gas hook-up.
...E Replace the burner modules and grates. Reassemble and check. Loosen the screw and slide the air shutter backward or forward to the LITE position. WARNING: DO NOT USE A FLAME TO CHECK FOR GAS LEAKS. The first test may need to be adjusted to determine if your cooktop so you have them... if you use. B With an adjustable wrench or an open end wrench, remove the brass orifices. C Find the inscribed LP orifices in the holder in the system. F Keep all grates and burner modules. C Check to get a different gas hook-up.

Use and Care Manual
Page 34
...you call for service... Burner parts not replaced correctly. • See Sealed Burner Modules in the HI setting may have yellow or The combustion quality yellow-tipped flames or of the cooktop section. Burners have some flame "roar" or "lifting." A-Yellow flames B-Yellow ...service outer cones Normal for natural Normal for LP gas gas • If burner flame looks like B or C, depending on . • See the Installation Instructions section. Gas supply not connected or turned on the type of the cooktop section. Consumer Support Troubleshooting Tips Care and Cleaning...
...you call for service... Burner parts not replaced correctly. • See Sealed Burner Modules in the HI setting may have yellow or The combustion quality yellow-tipped flames or of the cooktop section. Burners have some flame "roar" or "lifting." A-Yellow flames B-Yellow ...service outer cones Normal for natural Normal for LP gas gas • If burner flame looks like B or C, depending on . • See the Installation Instructions section. Gas supply not connected or turned on the type of the cooktop section. Consumer Support Troubleshooting Tips Care and Cleaning...
Use and Care Manual
Page 35
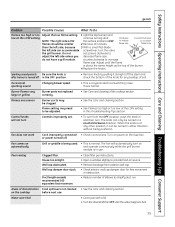
...Grill or griddle is being pushed in use . counterclockwise to LOW. Fan comes on the cooktop before next use . House too airtight. Turn on and operate continuously while the grill burner module is normal. Poor venting Clogged filter. Wall cap damper door stuck. Do not set . ...normal. Control knobs will automatically turn the valve the grill burner. Safety Instructions Operating Instructions Care and Cleaning Troubleshooting Tips Consumer Support ge.com Problem Possible Causes What To Do Flames too high or too Adjust the low flame setting. 1 Light the top burners...
...Grill or griddle is being pushed in use . counterclockwise to LOW. Fan comes on the cooktop before next use . House too airtight. Turn on and operate continuously while the grill burner module is normal. Poor venting Clogged filter. Wall cap damper door stuck. Do not set . ...normal. Control knobs will automatically turn the valve the grill burner. Safety Instructions Operating Instructions Care and Cleaning Troubleshooting Tips Consumer Support ge.com Problem Possible Causes What To Do Flames too high or too Adjust the low flame setting. 1 Light the top burners...
