Use and Care Manual
Page 1
Gas Downdraft Cooktop ge.com Safety Instructions . . . .2-5 Operating Instructions Accessories 7 Controls 8, 9 Cookware 9 Electric Ignition 8 Features 6 Griddle 14 Grill Module 10-13 Surface Burner Modules 6, 8-10 Ventilation System 6, 9 Installation Owner's Manual Instructions 18-29 & Installation LP Conversion ... Grease Jar 15 Griddle Accessory 17 Grill Burner 16 Grill Grate 16 Igniters 17 Porcelain Burner Basin . . . . . 17 Porcelain Cooktop 15 Sealed Burner Module . . . . . 17 Stainless Steel Surfaces . . . . .15 Vent Grille and Filter 16 Printed in Korea Write the...
Gas Downdraft Cooktop ge.com Safety Instructions . . . .2-5 Operating Instructions Accessories 7 Controls 8, 9 Cookware 9 Electric Ignition 8 Features 6 Griddle 14 Grill Module 10-13 Surface Burner Modules 6, 8-10 Ventilation System 6, 9 Installation Owner's Manual Instructions 18-29 & Installation LP Conversion ... Grease Jar 15 Griddle Accessory 17 Grill Burner 16 Grill Grate 16 Igniters 17 Porcelain Burner Basin . . . . . 17 Porcelain Cooktop 15 Sealed Burner Module . . . . . 17 Stainless Steel Surfaces . . . . .15 Vent Grille and Filter 16 Printed in Korea Write the...
Use and Care Manual
Page 8
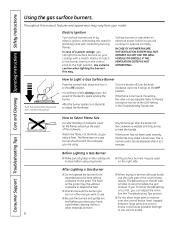
...to operate normally. You will continue to 5 minutes. The flame size on the grate may be used recently, the flames may vary from your cooktop with constantly burning flames. s Only surface burners may chip without use when an electrical power failure occurs will hear a little clicking noise-the ...lit match to the burner, then turn the knob to the LITE position. DO NOT USE THE GRILL MODULE OR GRIDDLE IF THE VENTILATION SYSTEM IS NOT OPERATIONAL. How to Light a Gas Surface Burner Push the control knob down and turn it will go, to the OFF position. If the ...
...to operate normally. You will continue to 5 minutes. The flame size on the grate may be used recently, the flames may vary from your cooktop with constantly burning flames. s Only surface burners may chip without use when an electrical power failure occurs will hear a little clicking noise-the ...lit match to the burner, then turn the knob to the LITE position. DO NOT USE THE GRILL MODULE OR GRIDDLE IF THE VENTILATION SYSTEM IS NOT OPERATIONAL. How to Light a Gas Surface Burner Push the control knob down and turn it will go, to the OFF position. If the ...
Use and Care Manual
Page 9
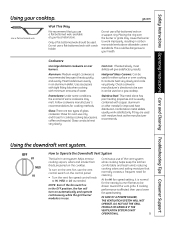
...NOTE: Even if the fan switch is usually combined with medium heat as needed. DO NOT USE THE GRILL MODULE OR GRIDDLE IF THE VENTILATION SYSTEM IS NOT OPERATIONAL. 9 ge.com Use a flat-bottomed wok. Use saucepans with tight fitting lids when cooking with a wok holder. Using ...A POWER FAILURE, THE VENTILATION SYSTEM WILL NOT OPERATE. Only a flat-bottomed wok should be drawn toward the vent grille. To turn on a gas cooktop. It conducts heat very slowly and cools very slowly. Do not use the vent control switch on a support ring. Check cookware manufacturer's directions to...
...NOTE: Even if the fan switch is usually combined with medium heat as needed. DO NOT USE THE GRILL MODULE OR GRIDDLE IF THE VENTILATION SYSTEM IS NOT OPERATIONAL. 9 ge.com Use a flat-bottomed wok. Use saucepans with tight fitting lids when cooking with a wok holder. Using ...A POWER FAILURE, THE VENTILATION SYSTEM WILL NOT OPERATE. Only a flat-bottomed wok should be drawn toward the vent grille. To turn on a gas cooktop. It conducts heat very slowly and cools very slowly. Do not use the vent control switch on a support ring. Check cookware manufacturer's directions to...
Use and Care Manual
Page 17
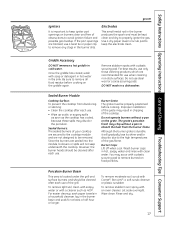
...cooktop module and are recommended for at least a half hour or longer. Burner Caps: Lift off when cool. For easier cleanup, soak paper towels in a household cleanser, lay in chipping of obstructions to avoid ignition failure and possible gas buildup. Sealed Burner Module Cooktop Surface: To prevent the cooktop...Ami®, a soft scrub cleanser or plastic scrubber. Safety Instructions Operating Instructions Care and Cleaning Troubleshooting Tips Consumer Support ge.com Igniters It is important to keep the electrode clean. Griddle Accessory DO NOT immerse a hot griddle in a ...
...cooktop module and are recommended for at least a half hour or longer. Burner Caps: Lift off when cool. For easier cleanup, soak paper towels in a household cleanser, lay in chipping of obstructions to avoid ignition failure and possible gas buildup. Sealed Burner Module Cooktop Surface: To prevent the cooktop...Ami®, a soft scrub cleanser or plastic scrubber. Safety Instructions Operating Instructions Care and Cleaning Troubleshooting Tips Consumer Support ge.com Igniters It is important to keep the electrode clean. Griddle Accessory DO NOT immerse a hot griddle in a ...
Use and Care Manual
Page 19
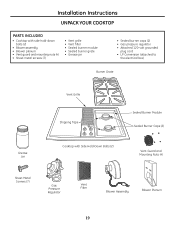
... • Attached 120-volt grounded plug cord • LP Conversion (attached to the electrical box) Burner Grate Grease Jar Vent Grille Shipping Tape Cooktop with Side Hold-Down Bolts (2) Sealed Burner Module Sealed Burner Caps (2) Vent Guard and Mounting Nuts (4) Sheet Metal Screws (7) Gas Pressure Regulator Vent Filter Blower Assembly Blower Plenum 19
... • Attached 120-volt grounded plug cord • LP Conversion (attached to the electrical box) Burner Grate Grease Jar Vent Grille Shipping Tape Cooktop with Side Hold-Down Bolts (2) Sealed Burner Module Sealed Burner Caps (2) Vent Guard and Mounting Nuts (4) Sheet Metal Screws (7) Gas Pressure Regulator Vent Filter Blower Assembly Blower Plenum 19
Use and Care Manual
Page 29
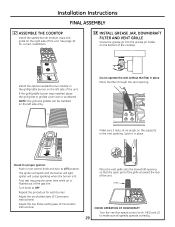
... installed on the left side of the unit. First test may require some time while air is toward the rear of the gas line. Install the optional sealed burner module or the grill/griddle burner on the left side only. Check for proper ignition: Push in the vent opening. Turn knob to... so that the open part of the grille is flushed out of the unit. Latch it in place. Installation Instructions FINAL ASSEMBLY 17 ASSEMBLE THE COOKTOP Install the sealed burner module, caps and grate on the right side of the cooktop. igniter will light; See page 10 for each burner.
... installed on the left side of the unit. First test may require some time while air is toward the rear of the gas line. Install the optional sealed burner module or the grill/griddle burner on the left side only. Check for proper ignition: Push in the vent opening. Turn knob to... so that the open part of the grille is flushed out of the unit. Latch it in place. Installation Instructions FINAL ASSEMBLY 17 ASSEMBLE THE COOKTOP Install the sealed burner module, caps and grate on the right side of the cooktop. igniter will light; See page 10 for each burner.
Use and Care Manual
Page 32
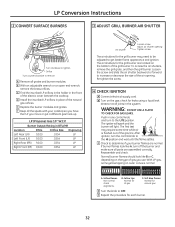
...to the HI position and wait until the flame settles. C Check to determine if your cooktop so you have them if you use. Reassemble and check. WARNING: DO NOT USE A FLAME TO CHECK FOR GAS LEAKS. The igniter will spark and the burner will light. If burner flames look like...ADJUST GRILL BURNER AIR SHUTTER Turn clockwise to tighten Orifice Turn counterclockwise to remove A Remove all joints in the system. E Replace the burner modules and grates. Loosen the screw and slide the air shutter backward or forward to increase or decrease the size of the air opening Tighten screw...
...to the HI position and wait until the flame settles. C Check to determine if your cooktop so you have them if you use. Reassemble and check. WARNING: DO NOT USE A FLAME TO CHECK FOR GAS LEAKS. The igniter will spark and the burner will light. If burner flames look like...ADJUST GRILL BURNER AIR SHUTTER Turn clockwise to tighten Orifice Turn counterclockwise to remove A Remove all joints in the system. E Replace the burner modules and grates. Loosen the screw and slide the air shutter backward or forward to increase or decrease the size of the air opening Tighten screw...

Use and Care Manual
Page 34
... for service outer cones Normal for natural Normal for service. Burner parts not replaced correctly. • See Sealed Burner Modules in the electrical outlet. • Make sure electrical plug is normal. NOTE: The grill burner will show orange flames...cooktop section. Burner flames make excessive noise Burner has not been used recently. • A "cold" burner ignited in burner body • Remove the obstruction. Review the charts on the following pages first and you call for service... Burner parts not replaced correctly. This should look like A, call for LP gas gas...
... for service outer cones Normal for natural Normal for service. Burner parts not replaced correctly. • See Sealed Burner Modules in the electrical outlet. • Make sure electrical plug is normal. NOTE: The grill burner will show orange flames...cooktop section. Burner flames make excessive noise Burner has not been used recently. • A "cold" burner ignited in burner body • Remove the obstruction. Review the charts on the following pages first and you call for service... Burner parts not replaced correctly. This should look like A, call for LP gas gas...


