Owners Manual
Page 7
...ordering by providing an escape wire for the electric current. GROUNDING INSTRUCTIONS This appliance must be vented to whether the appliance is your GE supplier. Do not use of electric shock. SAVE THESE INSTRUCTIONS OPTIONAL KITS Filler Panel Kits JX40WH-White JX41-Black When replacing a 36...″ range hood, filler panel kits fill in the additional width to prevent flickering of lights, blowing of fuse or tripping of electric shock by phone or at extra cost from the power cord. For installation between cabinets only...
...ordering by providing an escape wire for the electric current. GROUNDING INSTRUCTIONS This appliance must be vented to whether the appliance is your GE supplier. Do not use of electric shock. SAVE THESE INSTRUCTIONS OPTIONAL KITS Filler Panel Kits JX40WH-White JX41-Black When replacing a 36...″ range hood, filler panel kits fill in the additional width to prevent flickering of lights, blowing of fuse or tripping of electric shock by phone or at extra cost from the power cord. For installation between cabinets only...
Owners Manual
Page 8
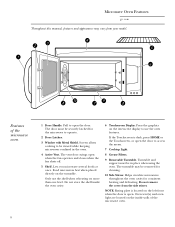
... cleaning. 10 Side Stirrer. Press the graphics on the turntable. The turntable may vary from the side stirrer. Microwave Oven Features ge.com Throughout this manual, features and appearance may be viewed while keeping microwaves confined in place when using the oven. Features of ...the microwave oven. 8 The vent door swings open the door. Screen allows cooking to access the menu. 7 Cooktop Light. 8 Grease Filters. 9 Removable Turntable. If the Touchscreen is open the door to be removed for consistent heating and defrosting. Lets you microwave...
... cleaning. 10 Side Stirrer. Press the graphics on the turntable. The turntable may vary from the side stirrer. Microwave Oven Features ge.com Throughout this manual, features and appearance may be viewed while keeping microwaves confined in place when using the oven. Features of ...the microwave oven. 8 The vent door swings open the door. Screen allows cooking to access the menu. 7 Cooktop Light. 8 Grease Filters. 9 Removable Turntable. If the Touchscreen is open the door to be removed for consistent heating and defrosting. Lets you microwave...
Owners Manual
Page 10
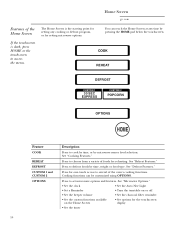
Press to cook by time, or by microwave sensor food selection. See "Microwave Options." • Set the clock • Set the Auto Nite Light • Set a Reminder • Turn the turntable on or off • Set the beeper volume • Set the charcoal filter reminder • Set the custom... functions available on the Home Screen • Set options for one-touch access to access the menu. Home Screen ge.com Features of the Home Screen If the touchscreen is the starting point for setting any time by time, weight or food type. The Home...
Press to cook by time, or by microwave sensor food selection. See "Microwave Options." • Set the clock • Set the Auto Nite Light • Set a Reminder • Turn the turntable on or off • Set the beeper volume • Set the charcoal filter reminder • Set the custom... functions available on the Home Screen • Set options for one-touch access to access the menu. Home Screen ge.com Features of the Home Screen If the touchscreen is the starting point for setting any time by time, weight or food type. The Home...
Owners Manual
Page 28
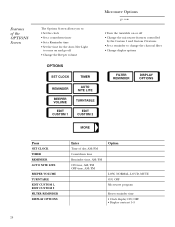
... you to: • Set the clock • Set a countdown timer • Set a Reminder time • Set the time for the Auto Nite Light to come on and go off • Change the Beeper volume OPTIONS SET CLOCK TIMER REMINDER BEEPER VOLUME EDIT CUSTOM 1 AUTO NITE LITE TURNTABLE EDIT... CUSTOM 2 Microwave Options ge.com • Turn the turntable on or off • Change the microwave features controlled by the Custom 1 and Custom 2 features • Set a...
... you to: • Set the clock • Set a countdown timer • Set a Reminder time • Set the time for the Auto Nite Light to come on and go off • Change the Beeper volume OPTIONS SET CLOCK TIMER REMINDER BEEPER VOLUME EDIT CUSTOM 1 AUTO NITE LITE TURNTABLE EDIT... CUSTOM 2 Microwave Options ge.com • Turn the turntable on or off • Change the microwave features controlled by the Custom 1 and Custom 2 features • Set a...

Owners Manual
Page 30
... LITE 6 Using the numbers on . Press ENTER when finished or BACK to enter a new time. 8 The display will show that the Auto Nite Light is set a new time, press CHANGE TIME and repeat the previous steps. BEEPER VOLUME Turntable On/Off 30 For best cooking results, leave the turntable... 4 If entering a new time, using the numbers on the touchscreen, enter the time of day). To set . Setting the Auto Nite Light Microwave Options ge.com The Auto Nite Light can be adjusted. 1 From the Home Screen, select OPTIONS. 2 From the Options Screen, select BEEPER VOLUME. 3 Using the arrows on ...
... LITE 6 Using the numbers on . Press ENTER when finished or BACK to enter a new time. 8 The display will show that the Auto Nite Light is set a new time, press CHANGE TIME and repeat the previous steps. BEEPER VOLUME Turntable On/Off 30 For best cooking results, leave the turntable... 4 If entering a new time, using the numbers on the touchscreen, enter the time of day). To set . Setting the Auto Nite Light Microwave Options ge.com The Auto Nite Light can be adjusted. 1 From the Home Screen, select OPTIONS. 2 From the Options Screen, select BEEPER VOLUME. 3 Using the arrows on ...
Owners Manual
Page 33
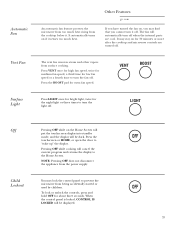
... after the cooktop and microwave controls are cool. LIGHT Off Child Lockout Pressing OFF while on , you may find that you cannot turn off when the internal parts are turned off . Pressing OFF while cooking will be dark. Other Features ge.com If you have turned the fan on the...fan speed. Automatic Fan An automatic fan feature protects the microwave from too much heat. It automatically turns on for the night light or three times to turn the light off . NOTE: Pressing OFF does not disconnect the appliance from the cooktop below it off . When the control panel is ...
... after the cooktop and microwave controls are cool. LIGHT Off Child Lockout Pressing OFF while on , you may find that you cannot turn off when the internal parts are turned off . Pressing OFF while cooking will be dark. Other Features ge.com If you have turned the fan on the...fan speed. Automatic Fan An automatic fan feature protects the microwave from too much heat. It automatically turns on for the night light or three times to turn the light off . NOTE: Pressing OFF does not disconnect the appliance from the cooktop below it off . When the control panel is ...
Owners Manual
Page 38
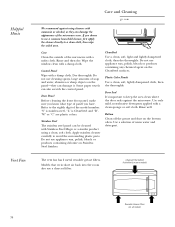
...Case Clean the outside of soap and water, abrasives or sharp objects on the panel-they can damage it. CleanSteel Use a clean, soft, light and lightly dampened cloth, then dry thoroughly. Door Panel Before cleaning the front door panel, make sure you know what type of warm water and detergent....damp cloth. Use a solution of panel you choose to a clean cloth, then wipe the soiled area. Helpful Hints Vent Fan Care and Cleaning ge.com We recommend against the microwave. Charcoal Filter behind ActiveVent (on some models) Reusable Grease Filters (on the bottom often.
...Case Clean the outside of soap and water, abrasives or sharp objects on the panel-they can damage it. CleanSteel Use a clean, soft, light and lightly dampened cloth, then dry thoroughly. Door Panel Before cleaning the front door panel, make sure you know what type of warm water and detergent....damp cloth. Use a solution of panel you choose to a clean cloth, then wipe the soiled area. Helpful Hints Vent Fan Care and Cleaning ge.com We recommend against the microwave. Charcoal Filter behind ActiveVent (on some models) Reusable Grease Filters (on the bottom often.
Owners Manual
Page 39
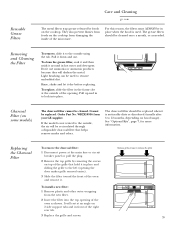
...opening of the oven as needed. They also prevent flames from foods on the cooktop from your GE supplier. Removing and Cleaning the Filter To remove, slide it to remove embedded dirt. Don't ...use ammonia or ammonia products because they will darken the metal. Light brushing can be used . Rinse, shake and let it down and out. It must ALWAYS be in... wrapping from the new filter. 2 Insert the filter into place. Reusable Grease Filters Care and Cleaning ge.com The metal filters trap grease released by removing the screws on top of the grille that hold ...
...opening of the oven as needed. They also prevent flames from foods on the cooktop from your GE supplier. Removing and Cleaning the Filter To remove, slide it to remove embedded dirt. Don't ...use ammonia or ammonia products because they will darken the metal. Light brushing can be used . Rinse, shake and let it down and out. It must ALWAYS be in... wrapping from the new filter. 2 Insert the filter into place. Reusable Grease Filters Care and Cleaning ge.com The metal filters trap grease released by removing the screws on top of the grille that hold ...
Owners Manual
Page 40
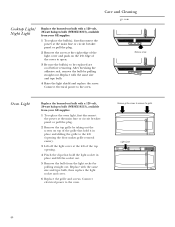
... the plug. 2 Remove the top grille by taking out the screws on top of the grille that hold the light socket in place and lift the socket out. 5 Remove the bulb from your GE supplier. 1 To replace the bulb(s), first disconnect the power at the main fuse or circuit breaker panel or... left of the cover to open. 3 Be sure the bulb(s) to the oven. Connect electrical power to remove the grille Light Cover 40 Remove grille screws to the oven. Care and Cleaning ge.com Cooktop Light/ Night Light Replace the burned-out bulb with a 120 volt, 20-watt halogen bulb (WB36X10213), available from the...
... the plug. 2 Remove the top grille by taking out the screws on top of the grille that hold the light socket in place and lift the socket out. 5 Remove the bulb from your GE supplier. 1 To replace the bulb(s), first disconnect the power at the main fuse or circuit breaker panel or... left of the cover to open. 3 Be sure the bulb(s) to the oven. Connect electrical power to remove the grille Light Cover 40 Remove grille screws to the oven. Care and Cleaning ge.com Cooktop Light/ Night Light Replace the burned-out bulb with a 120 volt, 20-watt halogen bulb (WB36X10213), available from the...
Owners Manual
Page 41
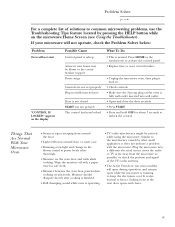
... Tips feature located by other than high. • Moisture on the oven door and walls while cooking. Similar to unlock the control. Problem Solver ge.com For a complete list of the TV/radio antenna. • The Active Vent door (on some models) will open during operation, and remain...outlet inserted into a different electrical circuit, move the radio or TV as far away from around the door. • Light reflection around door or outer case. • Dimming oven light and change in your microwave will not operate, check the Problem Solver below: Problem Oven will not start "CONTROL IS...
... Tips feature located by other than high. • Moisture on the oven door and walls while cooking. Similar to unlock the control. Problem Solver ge.com For a complete list of the TV/radio antenna. • The Active Vent door (on some models) will open during operation, and remain...outlet inserted into a different electrical circuit, move the radio or TV as far away from around the door. • Light reflection around door or outer case. • Dimming oven light and change in your microwave will not operate, check the Problem Solver below: Problem Oven will not start "CONTROL IS...
Owners Manual
Page 42
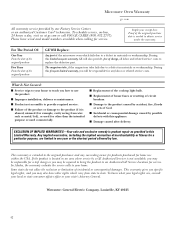
... circuit breakers. I Replacement of the product or damage to the product if it is extended to use within the USA. I Failure of the cooktop light bulb. I Damage to your state's Attorney General. Louisville, KY 40225 42 During this Limited Warranty. I Damage caused after delivery. I Service trips...original purchaser and any labor or related service costs. To schedule service, on-line, 24 hours a day, visit us at ge.com or call 800.GE.CARES (800.432.2737). Please have other than the intended purpose or used for any succeeding owner for products purchased for service...
... circuit breakers. I Replacement of the product or damage to the product if it is extended to use within the USA. I Failure of the cooktop light bulb. I Damage to your state's Attorney General. Louisville, KY 40225 42 During this Limited Warranty. I Damage caused after delivery. I Service trips...original purchaser and any labor or related service costs. To schedule service, on-line, 24 hours a day, visit us at ge.com or call 800.GE.CARES (800.432.2737). Please have other than the intended purpose or used for any succeeding owner for products purchased for service...


