Quick Specs
Page 1
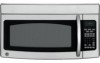
...Requires 120V grounded outlet. see Filter Kit drawing) Installation Information: This information is not intended to your Monogram,® GE Profile™ or GE® appliance questions, visit our website at ge.com or call GE Answer Center® service, ...by Underwriters Laboratories Specification Revised 8/07 340136 Before installing, consult installation instructions packed with the Spacemaker microwave oven. JVM1850SMSS GE Spacemaker® Over-the-Range MicrowavDOeivmOeerv-ntehsenio-nRsa(ningeinMchicerso)wave Oven Dimensions and Installation Information (in many cases....
...Requires 120V grounded outlet. see Filter Kit drawing) Installation Information: This information is not intended to your Monogram,® GE Profile™ or GE® appliance questions, visit our website at ge.com or call GE Answer Center® service, ...by Underwriters Laboratories Specification Revised 8/07 340136 Before installing, consult installation instructions packed with the Spacemaker microwave oven. JVM1850SMSS GE Spacemaker® Over-the-Range MicrowavDOeivmOeerv-ntehsenio-nRsa(ningeinMchicerso)wave Oven Dimensions and Installation Information (in many cases....

Quick Specs
Page 2
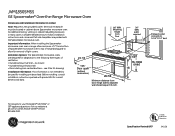
... straight duct which is to provide a custom built-in appearance. Listed by leaving enough space between the wall studs to accommodate exhaust. JVM1850SMSS GE Spacemaker® Over-the-Range Microwave Oven Dimensions and Installation Information (in the additional width to be used . Do not use less ...filler panels. not for end-of some typical ducts. For answers to mate with space between cabinets only; Recirculating Charcoal Filter KitTo be used when the Spacemaker microwave oven cannot be prepared at additional cost) 12" Filler Panel Kits JX41-Black JX40WH-White...
... straight duct which is to provide a custom built-in appearance. Listed by leaving enough space between the wall studs to accommodate exhaust. JVM1850SMSS GE Spacemaker® Over-the-Range Microwave Oven Dimensions and Installation Information (in the additional width to be used . Do not use less ...filler panels. not for end-of some typical ducts. For answers to mate with space between cabinets only; Recirculating Charcoal Filter KitTo be used when the Spacemaker microwave oven cannot be prepared at additional cost) 12" Filler Panel Kits JX41-Black JX40WH-White...
Use and Care Manual
Page 9
... high heat on surface units only when necessary. Take care to build up on the microwave or the fan filter. s Use care when cleaning the vent fan filter. Do not allow grease to prevent the starting and spreading of accidental cooking fires while the vent fan is ...operating. Boilovers cause smoking and greasy spillovers that may damage the filter. Safety Instructions Operating Instructions ge.com THE VENT FAN The fan will operate automatically under the microwave, turn the fan on. SAVE THESE INSTRUCTIONS 9 Troubleshooting...
... high heat on surface units only when necessary. Take care to build up on the microwave or the fan filter. s Use care when cleaning the vent fan filter. Do not allow grease to prevent the starting and spreading of accidental cooking fires while the vent fan is ...operating. Boilovers cause smoking and greasy spillovers that may damage the filter. Safety Instructions Operating Instructions ge.com THE VENT FAN The fan will operate automatically under the microwave, turn the fan on. SAVE THESE INSTRUCTIONS 9 Troubleshooting...
Use and Care Manual
Page 10
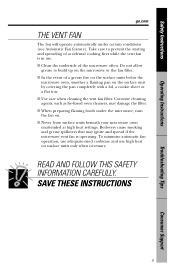
... filler panel kits fill in appearance. not for ordering by phone or at extra cost from your GE supplier. Operating Instructions Troubleshooting Tips Consumer Support 10 Recirculating Charcoal Filter Kit (1800 and 3600 Series models) JX81H - See the back cover for end-of-cabinet installation...-in the additional width to the outside. Each kit contains two 3″-wide filler panels. Available at ge.com. White JX52BL - Filter Kits JX81B - JX52 For installation between cabinets only; OPTIONAL KITS Filler Panel Kits JX52WH - Safety Instructions About optional kits....
... filler panel kits fill in appearance. not for ordering by phone or at extra cost from your GE supplier. Operating Instructions Troubleshooting Tips Consumer Support 10 Recirculating Charcoal Filter Kit (1800 and 3600 Series models) JX81H - See the back cover for end-of-cabinet installation...-in the additional width to the outside. Each kit contains two 3″-wide filler panels. Available at ge.com. White JX52BL - Filter Kits JX81B - JX52 For installation between cabinets only; OPTIONAL KITS Filler Panel Kits JX52WH - Safety Instructions About optional kits....
Use and Care Manual
Page 11
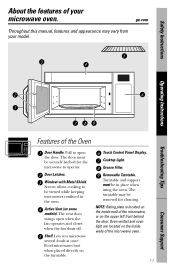
ge.com Throughout this manual, features and appearance may be securely latched for cleaning. Pull to open when the fan operates and closes when the fan ... must be removed for the microwave to be in the oven. The turntable may vary from your microwave oven. Screen allows cooking to operate. Grease Filter. Safety Instructions About the features of the Oven Door Handle. Food microwaves best when placed directly on some models). NOTE: Rating plate is located on...
ge.com Throughout this manual, features and appearance may be securely latched for cleaning. Pull to open when the fan operates and closes when the fan ... must be removed for the microwave to be in the oven. The turntable may vary from your microwave oven. Screen allows cooking to operate. Grease Filter. Safety Instructions About the features of the Oven Door Handle. Food microwaves best when placed directly on some models). NOTE: Rating plate is located on...
Use and Care Manual
Page 29
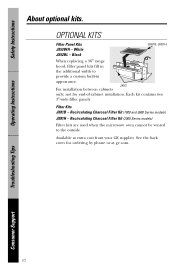
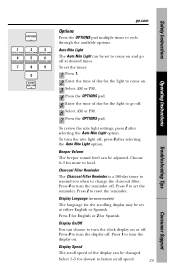
...set the reminder. To review the nite light settings, press 2 after selecting the Auto Nite Light option. Charcoal Filter Reminder The Charcoal Filter Reminder is a 180-day timer to remind you when to reset the reminder. Press 2 to change the charcoal... display on or off . 6 Select AM or PM. 7 Press the OPTIONS pad. Choose 0-3 for the light to cycle through the available options. Safety Instructions ge.com Operating Instructions Troubleshooting Tips OPTIONS 1 2 3 EXPRESS COOK EXPRESS COOK EXPRESS COOK 4 5 6 EXPRESS COOK EXPRESS COOK EXPRESS COOK 7 8 9 0 CLOCK AM...
...set the reminder. To review the nite light settings, press 2 after selecting the Auto Nite Light option. Charcoal Filter Reminder The Charcoal Filter Reminder is a 180-day timer to remind you when to reset the reminder. Press 2 to change the charcoal... display on or off . 6 Select AM or PM. 7 Press the OPTIONS pad. Choose 0-3 for the light to cycle through the available options. Safety Instructions ge.com Operating Instructions Troubleshooting Tips OPTIONS 1 2 3 EXPRESS COOK EXPRESS COOK EXPRESS COOK 4 5 6 EXPRESS COOK EXPRESS COOK EXPRESS COOK 7 8 9 0 CLOCK AM...
Use and Care Manual
Page 37
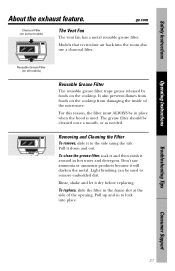
... also prevents flames from foods on the cooktop from damaging the inside of the opening. Reusable Grease Filter (on all models) Reusable Grease Filter The reusable grease filter traps grease released by foods on some models) The Vent Fan The vent fan has a metal ...products because it will darken the metal. To clean the grease filter, soak it and then swish it dry before replacing. Models that recirculate air back into place. Don't use a charcoal filter. ge.com Charcoal Filter (on the cooktop. Safety Instructions Operating Instructions About the exhaust feature...
... also prevents flames from foods on the cooktop from damaging the inside of the opening. Reusable Grease Filter (on all models) Reusable Grease Filter The reusable grease filter traps grease released by foods on some models) The Vent Fan The vent fan has a metal ...products because it will darken the metal. To clean the grease filter, soak it and then swish it dry before replacing. Models that recirculate air back into place. Don't use a charcoal filter. ge.com Charcoal Filter (on the cooktop. Safety Instructions Operating Instructions About the exhaust feature...
Use and Care Manual
Page 38
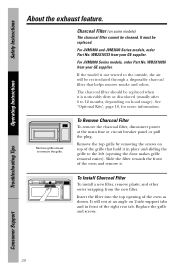
... oven and remove it in front of the oven as shown. WB2X10733 from your GE supplier. Slide the filter towards the front of the grille that helps remove smoke and odors. Charcoal Filter (on 2 side support tabs and in place and sliding the grille to 12 months... page 10, for more information. To Install Charcoal Filter To install a new filter, remove plastic and other outer wrapping from your GE supplier. Replace the grille and screws. WB2X10956 from the new filter. To Remove Charcoal Filter To remove the charcoal filter, disconnect power at an angle on some models) The...
... oven and remove it in front of the oven as shown. WB2X10733 from your GE supplier. Slide the filter towards the front of the grille that helps remove smoke and odors. Charcoal Filter (on 2 side support tabs and in place and sliding the grille to 12 months... page 10, for more information. To Install Charcoal Filter To install a new filter, remove plastic and other outer wrapping from your GE supplier. Replace the grille and screws. WB2X10956 from the new filter. To Remove Charcoal Filter To remove the charcoal filter, disconnect power at an angle on some models) The...

Installation Instructions
Page 2
... Preparation of Top Cabinet 19 Check Microwave Assembly 20 Adapting Microwave Blower for Recirculation 20, 21 Mount the Microwave Oven ..........21, 22 Installing the Charcoal Filter 22 Before You Use Your Microwave 23 Step-by-step installation guide Placement of Mounting Plate 8-10 Removing the Mounting Plate 8 Finding the Wall Studs...
... Preparation of Top Cabinet 19 Check Microwave Assembly 20 Adapting Microwave Blower for Recirculation 20, 21 Mount the Microwave Oven ..........21, 22 Installing the Charcoal Filter 22 Before You Use Your Microwave 23 Step-by-step installation guide Placement of Mounting Plate 8-10 Removing the Mounting Plate 8 Finding the Wall Studs...
Installation Instructions
Page 6
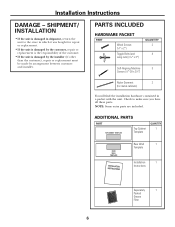
... have all these parts. NOTE: Some extra parts are included. ADDITIONAL PARTS PART Top Cabinet Template QUANTITY 1 Rear Wall 1 Template Installation 1 Instructions Separately 1 Packed Grease Filter 6 SHIPMENT/ INSTALLATION • If the unit is damaged by the installer (if other than the customer), repair or replacement must be made by arrangement between...
... have all these parts. NOTE: Some extra parts are included. ADDITIONAL PARTS PART Top Cabinet Template QUANTITY 1 Rear Wall 1 Template Installation 1 Instructions Separately 1 Packed Grease Filter 6 SHIPMENT/ INSTALLATION • If the unit is damaged by the installer (if other than the customer), repair or replacement must be made by arrangement between...

Installation Instructions
Page 8
... tap lightly across the mounting surface to find a solid sound. REMOVING THE MICROWAVE OVEN FROM THE CARTON/ REMOVING THE MOUNTING PLATE 1 Remove the installation instructions, filters, glass tray and the small hardware bag. FINDING THE WALL STUDS Wall Studs Center Carton Styrofoam 3 Pull the carton up and off the oven. 4 Remove...
... tap lightly across the mounting surface to find a solid sound. REMOVING THE MICROWAVE OVEN FROM THE CARTON/ REMOVING THE MOUNTING PLATE 1 Remove the installation instructions, filters, glass tray and the small hardware bag. FINDING THE WALL STUDS Wall Studs Center Carton Styrofoam 3 Pull the carton up and off the oven. 4 Remove...

Installation Instructions
Page 11
... Place for Outside Top Exhaust B OUTSIDE BACK EXHAUST (HORIZONTAL DUCT) See page 12 See page 15 C RECIRCULATING (NON-VENTED DUCTLESS) See page 19 11 A Charcoal Filter Accessory Kit is required for the kit number.) Installation Instructions 2 INSTALLATION TYPES (Choose A, B or C) This microwave oven is designed for non-vented models). Recirculating (Non...
... Place for Outside Top Exhaust B OUTSIDE BACK EXHAUST (HORIZONTAL DUCT) See page 12 See page 15 C RECIRCULATING (NON-VENTED DUCTLESS) See page 19 11 A Charcoal Filter Accessory Kit is required for the kit number.) Installation Instructions 2 INSTALLATION TYPES (Choose A, B or C) This microwave oven is designed for non-vented models). Recirculating (Non...
Installation Instructions
Page 14
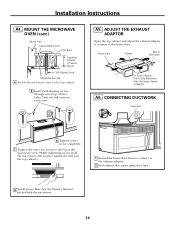
... Cabinet Recess Self-Aligning Screw Microwave Oven Top 4 Attach the microwave oven to the exhaust adaptor. 2 Seal exhaust duct joints using duct tape. 8 Install grease filter. Turn two full turns on each screw. ADJUST THE EXHAUST ADAPTOR Open the top cabinet and adjust the exhaust adaptor to connect to -Side Adjustment...
... Cabinet Recess Self-Aligning Screw Microwave Oven Top 4 Attach the microwave oven to the exhaust adaptor. 2 Seal exhaust duct joints using duct tape. 8 Install grease filter. Turn two full turns on each screw. ADJUST THE EXHAUST ADAPTOR Open the top cabinet and adjust the exhaust adaptor to connect to -Side Adjustment...
Installation Instructions
Page 18
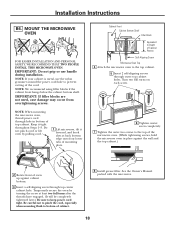
... throughout Steps 1-3. Do not pinch cord or lift oven by turning the screw at back bottom edge onto four lower tabs of cabinet. 8 Install grease filter. See the Owner's Manual packed with the microwave. 18 NOTE: If your cabinet is metal, use handle during installation. IMPORTANT: If filler blocks are not...
... throughout Steps 1-3. Do not pinch cord or lift oven by turning the screw at back bottom edge onto four lower tabs of cabinet. 8 Install grease filter. See the Owner's Manual packed with the microwave. 18 NOTE: If your cabinet is metal, use handle during installation. IMPORTANT: If filler blocks are not...

Installation Instructions
Page 19
... for the top support screws and a hole large enough for Toggles More Than Wall Thickness Toggle Wings Toggle Bolt Wall Bolt End C2. Install Charcoal Filter C1. NOTE: Before tightening toggle bolts and wood screw, make sure the tabs on the TOP CABINET TEMPLATE. Mount the Microwave Oven C6. ATTACH THE...
... for the top support screws and a hole large enough for Toggles More Than Wall Thickness Toggle Wings Toggle Bolt Wall Bolt End C2. Install Charcoal Filter C1. NOTE: Before tightening toggle bolts and wood screw, make sure the tabs on the TOP CABINET TEMPLATE. Mount the Microwave Oven C6. ATTACH THE...

Installation Instructions
Page 22
... visible from the front. 5 Replace the grille and the screws. 6 Close the door. Charcoal Filter 4 Install the charcoal filter. Installation Instructions C5. Insert mesh-side up 22 INSTALLING THE CHARCOAL FILTER 1 On 1400 and 1600 Series models, remove screws on top front of the microwave oven. (...While tightening screws, hold the microwave oven in place against the wall and the top cabinet.) 8 Install grease filter. See the Owner's Manual packed with the microwave. On 1400 and 1600 Series models, pull the grille straight off . When properly installed,...
... visible from the front. 5 Replace the grille and the screws. 6 Close the door. Charcoal Filter 4 Install the charcoal filter. Installation Instructions C5. Insert mesh-side up 22 INSTALLING THE CHARCOAL FILTER 1 On 1400 and 1600 Series models, remove screws on top front of the microwave oven. (...While tightening screws, hold the microwave oven in place against the wall and the top cabinet.) 8 Install grease filter. See the Owner's Manual packed with the microwave. On 1400 and 1600 Series models, pull the grille straight off . When properly installed,...


