Use and Care Manual
Page 1
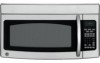
... DVM1850 EMO4000 Write the model and serial numbers here: Model Serial Find these numbers on a label inside the oven. Para consultar una version en español de este manual de instrucciones, visite nuestro sitio de internet ge.com. DE68-03327A 49... ge.com Safety Instructions . . . .2-9 Operating Instructions Auto Features 20 Care and Cleaning 33, 34 Changing the Power Level 13 Cooking Guide . . . . .15, 16 Defrosting Guide . . . . . .18 Exhaust Feature . . . .37, 38 Features of Your Microwave Oven . . . .11, 12 Microwave Terms . . . . . .32 Other Features . . . . 25-31 Replacing...
... DVM1850 EMO4000 Write the model and serial numbers here: Model Serial Find these numbers on a label inside the oven. Para consultar una version en español de este manual de instrucciones, visite nuestro sitio de internet ge.com. DE68-03327A 49... ge.com Safety Instructions . . . .2-9 Operating Instructions Auto Features 20 Care and Cleaning 33, 34 Changing the Power Level 13 Cooking Guide . . . . .15, 16 Defrosting Guide . . . . . .18 Exhaust Feature . . . .37, 38 Features of Your Microwave Oven . . . .11, 12 Microwave Terms . . . . . .32 Other Features . . . . 25-31 Replacing...
Use and Care Manual
Page 10
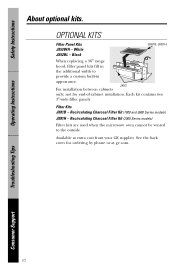
... Charcoal Filter Kit (1800 and 3600 Series models) JX81H - Available at ge.com. Safety Instructions About optional kits. not for ordering by phone or at extra cost from your GE supplier. Filter Kits JX81B - See the back cover for end-of-cabinet installation. Black JX81B, JX81H When replacing a 36″ range hood, filler panel...
... Charcoal Filter Kit (1800 and 3600 Series models) JX81H - Available at ge.com. Safety Instructions About optional kits. not for ordering by phone or at extra cost from your GE supplier. Filter Kits JX81B - See the back cover for end-of-cabinet installation. Black JX81B, JX81H When replacing a 36″ range hood, filler panel...
Use and Care Manual
Page 35
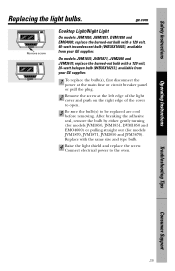
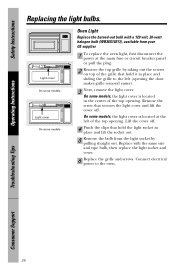
...either gently turning (for models JVM1850, JNM1851, DVM1850 and EMO4000) or pulling straight out (for models JVM1870, JVM1871, JVM2050 and JVM3670). Troubleshooting Tips Consumer Support 35 Replace with a 120 volt, 20-watt halogen bulb (WB36X10213), available from your GE supplier. 1 To replace the bulb(s), first disconnect...right edge of the cover to open. 3 Be sure the bulb(s) to the oven. ge.com Remove screw Cooktop Light/Night Light On models JVM1850, JNM1851, DVM1850 and EMO4000, replace the burned-out bulb with a 120 volt, 40-watt incandescent bulb (WB36X10003), available ...
...either gently turning (for models JVM1850, JNM1851, DVM1850 and EMO4000) or pulling straight out (for models JVM1870, JVM1871, JVM2050 and JVM3670). Troubleshooting Tips Consumer Support 35 Replace with a 120 volt, 20-watt halogen bulb (WB36X10213), available from your GE supplier. 1 To replace the bulb(s), first disconnect...right edge of the cover to open. 3 Be sure the bulb(s) to the oven. ge.com Remove screw Cooktop Light/Night Light On models JVM1850, JNM1851, DVM1850 and EMO4000, replace the burned-out bulb with a 120 volt, 40-watt incandescent bulb (WB36X10003), available ...
Use and Care Manual
Page 36
Light cover On some models Light cover On some models Oven Light Replace the burned-out bulb with the same size and type bulb, then replace the light socket and cover. 6 Replace the grille and screws. On some models, the light cover is located at the main fuse or circuit breaker panel or pull the plug...and lift the cover off . 4 Pinch the clips that hold it in place and lift the socket out. 5 Remove the bulb from your GE supplier. 1 To replace the oven light, first disconnect the power at the left (opening the door makes grille removal easier). 3 Next, remove the light cover. Remove...
Light cover On some models Light cover On some models Oven Light Replace the burned-out bulb with the same size and type bulb, then replace the light socket and cover. 6 Replace the grille and screws. On some models, the light cover is located at the main fuse or circuit breaker panel or pull the plug...and lift the cover off . 4 Pinch the clips that hold it in place and lift the socket out. 5 Remove the bulb from your GE supplier. 1 To replace the oven light, first disconnect the power at the left (opening the door makes grille removal easier). 3 Next, remove the light cover. Remove...
Use and Care Manual
Page 37
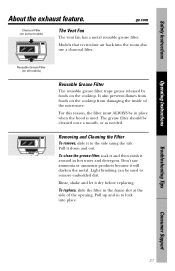
Reusable Grease Filter (on all models) Reusable Grease Filter The reusable grease filter traps grease released by foods on the cooktop from damaging the inside of the opening. It also prevents ... the frame slot at the side of the microwave. Pull it dry before replacing. Light brushing can be used . Models that recirculate air back into place. To replace, slide the filter in hot water and detergent. ge.com Charcoal Filter (on some models) The Vent Fan The vent fan has a metal reusable grease filter. Don...
Reusable Grease Filter (on all models) Reusable Grease Filter The reusable grease filter traps grease released by foods on the cooktop from damaging the inside of the opening. It also prevents ... the frame slot at the side of the microwave. Pull it dry before replacing. Light brushing can be used . Models that recirculate air back into place. To replace, slide the filter in hot water and detergent. ge.com Charcoal Filter (on some models) The Vent Fan The vent fan has a metal reusable grease filter. Don...
Use and Care Manual
Page 38
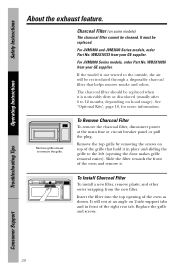
... a new filter, remove plastic and other outer wrapping from your GE supplier. Replace the grille and screws. Troubleshooting Tips Consumer Support 38 Charcoal Filter (on hood usage). For JVM2000 Series models, order Part No. If the model is noticeably dirty or discolored (usually after 6 to the outside,...Insert the filter into the top opening the door makes grille removal easier). For JVM1800 and JVM3600 Series models, order Part No. It will be replaced. WB2X10733 from your GE supplier. To Remove Charcoal Filter To remove the charcoal filter, disconnect power at an angle on top...
... a new filter, remove plastic and other outer wrapping from your GE supplier. Replace the grille and screws. Troubleshooting Tips Consumer Support 38 Charcoal Filter (on hood usage). For JVM2000 Series models, order Part No. If the model is noticeably dirty or discolored (usually after 6 to the outside,...Insert the filter into the top opening the door makes grille removal easier). For JVM1800 and JVM3600 Series models, order Part No. It will be replaced. WB2X10733 from your GE supplier. To Remove Charcoal Filter To remove the charcoal filter, disconnect power at an angle on top...

Use and Care Manual
Page 43
... or used for a particular purpose, are , consult your local or state consumer affairs office or your home. For The Period Of: GE Will Replace: For GE and GE Profile Models: One Year From the date of the original purchase Any part of the original purchase date is abused, misused (for example, cavity arcing... the warranty excludes the service calls to replace the defective part. To schedule service, on-line, 24 hours a day, visit us at ge.com, or call 800.GE.CARES (800.432.2737). Staple your home to teach you may also have serial and model numbers available when calling for home use ...
... or used for a particular purpose, are , consult your local or state consumer affairs office or your home. For The Period Of: GE Will Replace: For GE and GE Profile Models: One Year From the date of the original purchase Any part of the original purchase date is abused, misused (for example, cavity arcing... the warranty excludes the service calls to replace the defective part. To schedule service, on-line, 24 hours a day, visit us at ge.com, or call 800.GE.CARES (800.432.2737). Staple your home to teach you may also have serial and model numbers available when calling for home use ...

Installation Instructions
Page 22
...up 22 Turn two full turns on top front of grille using a #2 Phillips screwdriver. 2 Open the door. 3 Remove the grille. On 1800 Series models, remove screws on each screw. 6 Tighten center screw completely. 7 Tighten the outer two screws to the left and pull it straight off . Installation ...charcoal filter. MOUNT THE MICROWAVE OVEN (cont.) 5 Insert 2 self-aligning screws through outer top cabinet holes. On 1800 Series models, slide the grille to the top of the filter should be visible from the front. 5 Replace the grille and the screws. 6 Close the door. C6. On 1400 and 1600 Series...
...up 22 Turn two full turns on top front of grille using a #2 Phillips screwdriver. 2 Open the door. 3 Remove the grille. On 1800 Series models, remove screws on each screw. 6 Tighten center screw completely. 7 Tighten the outer two screws to the left and pull it straight off . Installation ...charcoal filter. MOUNT THE MICROWAVE OVEN (cont.) 5 Insert 2 self-aligning screws through outer top cabinet holes. On 1800 Series models, slide the grille to the top of the filter should be visible from the front. 5 Replace the grille and the screws. 6 Close the door. C6. On 1400 and 1600 Series...


