Installation Instructions
Page 7
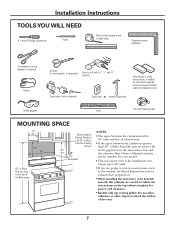
...; If the space between the cabinets is for installation over ranges up to 36″ wide. • If you are going to vent your model. • This microwave oven is greater than 30″, a Filler Panel Kit may be used on the top cabinet template for power cord clearance. •...; Models with 3⁄16″, 1⁄2″ and 5⁄8″ drill bits Filler blocks or scrap wood pieces, if needed for top cabinet spacing (used to fill in the gap between the microwave oven and the cabinets. Your Owner's Manual contains the...
...; If the space between the cabinets is for installation over ranges up to 36″ wide. • If you are going to vent your model. • This microwave oven is greater than 30″, a Filler Panel Kit may be used on the top cabinet template for power cord clearance. •...; Models with 3⁄16″, 1⁄2″ and 5⁄8″ drill bits Filler blocks or scrap wood pieces, if needed for top cabinet spacing (used to fill in the gap between the microwave oven and the cabinets. Your Owner's Manual contains the...
Installation Instructions
Page 11
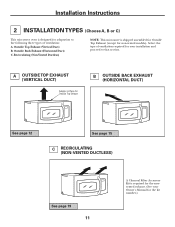
... shipped assembled for Outside Top Exhaust (except for the kit number.) Installation Instructions 2 INSTALLATION TYPES (Choose A, B or C) This microwave oven is designed for adaptation to that section. A OUTSIDE TOP EXHAUST (VERTICAL DUCT) Adaptor in Place for Outside Top Exhaust B OUTSIDE BACK EXHAUST (HORIZONTAL DUCT) ... required for the nonvented exhaust. (See your installation and proceed to the following three types of ventilation required for your Owner's Manual for non-vented models).
... shipped assembled for Outside Top Exhaust (except for the kit number.) Installation Instructions 2 INSTALLATION TYPES (Choose A, B or C) This microwave oven is designed for adaptation to that section. A OUTSIDE TOP EXHAUST (VERTICAL DUCT) Adaptor in Place for Outside Top Exhaust B OUTSIDE BACK EXHAUST (HORIZONTAL DUCT) ... required for the nonvented exhaust. (See your installation and proceed to the following three types of ventilation required for your Owner's Manual for non-vented models).
Use and Care Manual
Page 1
... Convenience Features 20 Other Features 24 Oven Shelf 29 Helpful Information 30 Microwave Terms 30 Care and Cleaning 31 If Something Goes Wrong 36 Before You Call For Service 36 GE Service Numbers 38 Warranty Back Cover Write the model and serial numbers here: Model Serial Find these numbers on a label inside the oven.
... Convenience Features 20 Other Features 24 Oven Shelf 29 Helpful Information 30 Microwave Terms 30 Care and Cleaning 31 If Something Goes Wrong 36 Before You Call For Service 36 GE Service Numbers 38 Warranty Back Cover Write the model and serial numbers here: Model Serial Find these numbers on a label inside the oven.

Use and Care Manual
Page 10
.... 5 Touch Control Panel You must be securely latched for cleaning. 9 Convenience Guide. Screen allows cooking to be removed for the microwave to open the door. The turntable may vary from your model.) Features 3 4 2 1 7 896 5 7 1 Door Handle. Pull to operate. 2 Door Latches. 3 Window with Metal Shield. The door must be in the oven...
.... 5 Touch Control Panel You must be securely latched for cleaning. 9 Convenience Guide. Screen allows cooking to be removed for the microwave to open the door. The turntable may vary from your model.) Features 3 4 2 1 7 896 5 7 1 Door Handle. Pull to operate. 2 Door Latches. 3 Window with Metal Shield. The door must be in the oven...
Use and Care Manual
Page 11
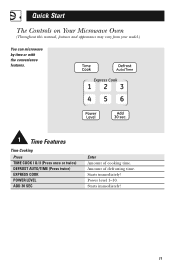
Quick Start The Controls on Your Microwave Oven (Throughout this manual, features and appearance may vary from your model.) You can microwave by time or with the convenience features. 1 Time Features Time Cooking Press TIME COOK I & II (Press once or twice) DEFROST AUTO/TIME (Press twice) EXPRESS COOK POWER LEVEL ADD 30 SEC Enter Amount of defrosting time. Starts immediately! Starts immediately! 11 Amount of cooking time. Power level 1-10.
Quick Start The Controls on Your Microwave Oven (Throughout this manual, features and appearance may vary from your model.) You can microwave by time or with the convenience features. 1 Time Features Time Cooking Press TIME COOK I & II (Press once or twice) DEFROST AUTO/TIME (Press twice) EXPRESS COOK POWER LEVEL ADD 30 SEC Enter Amount of defrosting time. Starts immediately! Starts immediately! 11 Amount of cooking time. Power level 1-10.

Use and Care Manual
Page 12
...when you begin, check the guide located on some models) Press this pad and any feature pad for usage instructions and tips. Food type 1-9 + weight Food type 1-6 Starts immediately! GUIDE ON MICROWAVE Before you open the door. Starts immediately! Food ...weight Option more/less time 1-3 servings 1-3 servings 1-4 potatoes food type/serving size 12 Starts immediately! Quick Start HELP (on some models) DEFROST AUTO/TIME (Press once) Enter Starts immediately...
...when you begin, check the guide located on some models) Press this pad and any feature pad for usage instructions and tips. Food type 1-9 + weight Food type 1-6 Starts immediately! GUIDE ON MICROWAVE Before you open the door. Starts immediately! Food ...weight Option more/less time 1-3 servings 1-3 servings 1-4 potatoes food type/serving size 12 Starts immediately! Quick Start HELP (on some models) DEFROST AUTO/TIME (Press once) Enter Starts immediately...

Use and Care Manual
Page 22
... Guide below). 3 Enter weight in ounces. 4 Press START. Place potatoes on some models) The Cook feature automatically sets the cooking times and power levels for each layer with fork. Use microwave-safe casserole or bowl. Operating Instructions Convenience Features Cook (on oven floor or turntable. Comments... Guide Food Type 1 Canned Vegetables 2 Frozen Vegetables 3 Fresh Vegetables 4 Potatoes 5 Fish 6 Chicken Pieces 7 Ground Meat (beef, pork, turkey) 8 Bacon 9 Pizza (frozen, microwaveable) 22 Weight 4 to 20 oz. 4 to 20 oz. 4 to 16 oz. 8 to 40 oz. 4 to 16 oz. 4 to 40 oz. 8 to 48 oz...
... Guide below). 3 Enter weight in ounces. 4 Press START. Place potatoes on some models) The Cook feature automatically sets the cooking times and power levels for each layer with fork. Use microwave-safe casserole or bowl. Operating Instructions Convenience Features Cook (on oven floor or turntable. Comments... Guide Food Type 1 Canned Vegetables 2 Frozen Vegetables 3 Fresh Vegetables 4 Potatoes 5 Fish 6 Chicken Pieces 7 Ground Meat (beef, pork, turkey) 8 Bacon 9 Pizza (frozen, microwaveable) 22 Weight 4 to 20 oz. 4 to 20 oz. 4 to 16 oz. 8 to 40 oz. 4 to 16 oz. 4 to 40 oz. 8 to 48 oz...

Use and Care Manual
Page 24
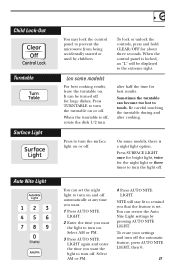
Operating Instructions Other Features Your Model May Have Cooking Complete Reminder To remind you that you have food in the oven, the oven will display "FOOD IS READY" and beep once a minute until you either open the oven door or press CLEAR/OFF. Clock Press to enter the time of day or to check the time of day while microwaving. 1 Press CLOCK. 2 Enter time of day. 3 Select AM or PM. 4 Press START or CLOCK. 24
Operating Instructions Other Features Your Model May Have Cooking Complete Reminder To remind you that you have food in the oven, the oven will display "FOOD IS READY" and beep once a minute until you either open the oven door or press CLEAR/OFF. Clock Press to enter the time of day or to check the time of day while microwaving. 1 Press CLOCK. 2 Enter time of day. 3 Select AM or PM. 4 Press START or CLOCK. 24

Use and Care Manual
Page 25
To redisplay the clock, repeat. Delay Start (on some models) Delay Start allows you to set the microwave to delay cooking up the display. Press and hold 0 for slow to start at the delayed time. To turn the clock display off, press and ... the AM/PM pad about 3 seconds. The oven will be displayed by pressing CLOCK. 25 The Delay Start time will automatically start . (Be sure the microwave clock shows the correct time of day.) 3 Select AM or PM. 4 Select any combination of the display can be changed. Scroll Speed Display On/Off...
To redisplay the clock, repeat. Delay Start (on some models) Delay Start allows you to set the microwave to delay cooking up the display. Press and hold 0 for slow to start at the delayed time. To turn the clock display off, press and ... the AM/PM pad about 3 seconds. The oven will be displayed by pressing CLOCK. 25 The Delay Start time will automatically start . (Be sure the microwave clock shows the correct time of day.) 3 Select AM or PM. 4 Select any combination of the display can be changed. Scroll Speed Display On/Off...

Use and Care Manual
Page 26
... Reminder before it off the timer signal, press TIMER ON/OFF. Operating Instructions Other Features Your Model May Have Timer On/Off Start/Pause Timer On/Off operates as a minute timer and can ...OFF. 2 Enter time you to turn off . The Reminder time can be lit. Reminder 26 (on some models) The Reminder feature can be used like an alarm clock and can be set . When time is up to ...OFF to start. NOTE: The timer indicator will remain lit to remind you. (Be sure the microwave clock shows the correct time of day.) 3 Select AM or PM. 4 Press REMINDER. NOTE: The REM indicator...
... Reminder before it off the timer signal, press TIMER ON/OFF. Operating Instructions Other Features Your Model May Have Timer On/Off Start/Pause Timer On/Off operates as a minute timer and can ...OFF. 2 Enter time you to turn off . The Reminder time can be lit. Reminder 26 (on some models) The Reminder feature can be used like an alarm clock and can be set . When time is up to ...OFF to start. NOTE: The timer indicator will remain lit to remind you. (Be sure the microwave clock shows the correct time of day.) 3 Select AM or PM. 4 Press REMINDER. NOTE: The REM indicator...
Use and Care Manual
Page 27
... To lock or unlock the controls, press and hold CLEAR/OFF for the night light or three times to turn the light off . On some models) For best cooking results, leave the turntable on or off . Select AM or PM. 3 Press AUTO NITE LIGHT again and enter the time you want... time you that the feature is set the night light to turn the turntable on some models, there is off the automatic feature, press AUTO NITE LIGHT, then 0. 27 You can be displayed to prevent the microwave from being accidentally started or used by pressing AUTO NITE LIGHT. Select AM or PM...
... To lock or unlock the controls, press and hold CLEAR/OFF for the night light or three times to turn the light off . On some models) For best cooking results, leave the turntable on or off . Select AM or PM. 3 Press AUTO NITE LIGHT again and enter the time you want... time you that the feature is set the night light to turn the turntable on some models, there is off the automatic feature, press AUTO NITE LIGHT, then 0. 27 You can be displayed to prevent the microwave from being accidentally started or used by pressing AUTO NITE LIGHT. Select AM or PM...

Use and Care Manual
Page 28
... too much heat. If you have turned the fan on for 30 minutes or more after the cooktop and microwave controls are cool. It may stay on you may find that you cannot turn it . The fan will automatically turn the fan off . Press BEEPER ...VOLUME. It automatically turns on some models) The beeper sound level can be adjusted. Choose 0-3 for low fan speed or a third time to loud. Press VENT FAN once for high fan speed...
... too much heat. If you have turned the fan on for 30 minutes or more after the cooktop and microwave controls are cool. It may stay on you may find that you cannot turn it . The fan will automatically turn the fan off . Press BEEPER ...VOLUME. It automatically turns on some models) The beeper sound level can be adjusted. Choose 0-3 for low fan speed or a third time to loud. Press VENT FAN once for high fan speed...
Use and Care Manual
Page 29
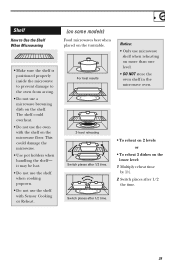
...shelf with the shelf on the turntable. This could overheat. • Do not use microwave shelf when reheating on more than one level. • DO NOT store the oven shelf in the microwave oven. 2-level reheating Switch places after 1/2 time. 29 For best results Notice: &#...8226; Only use the oven with Sensor Cooking or Reheat. (on some models) Food microwaves best when placed on the microwave floor. The shelf could damage the microwave. • Use pot holders when handling the shelf- Switch places after 1/2 time. • To reheat on...
...shelf with the shelf on the turntable. This could overheat. • Do not use microwave shelf when reheating on more than one level. • DO NOT store the oven shelf in the microwave oven. 2-level reheating Switch places after 1/2 time. 29 For best results Notice: &#...8226; Only use the oven with Sensor Cooking or Reheat. (on some models) Food microwaves best when placed on the microwave floor. The shelf could damage the microwave. • Use pot holders when handling the shelf- Switch places after 1/2 time. • To reheat on...
Use and Care Manual
Page 32
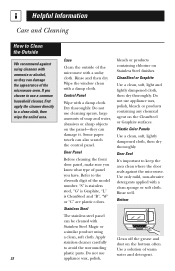
... of warm water and detergent. Stainless Steel The stainless steel panel can damage the appearance of the microwave with a damp cloth. Bottom Clean off the grease and dust on the panel-they can be ...cleaner directly to a clean cloth, then wipe the soiled area. 32 Case Clean the outside of the microwave oven. Use only mild, non-abrasive detergents applied with ammonia or alcohol, as they can also scratch...and Cleaning How to Clean the Outside We recommend against the microwave. Plastic Color Panels Use a clean, soft, lightly dampened cloth, then dry thoroughly. If you know...
... of warm water and detergent. Stainless Steel The stainless steel panel can damage the appearance of the microwave with a damp cloth. Bottom Clean off the grease and dust on the panel-they can be ...cleaner directly to a clean cloth, then wipe the soiled area. 32 Case Clean the outside of the microwave oven. Use only mild, non-abrasive detergents applied with ammonia or alcohol, as they can also scratch...and Cleaning How to Clean the Outside We recommend against the microwave. Plastic Color Panels Use a clean, soft, lightly dampened cloth, then dry thoroughly. If you know...
Use and Care Manual
Page 34
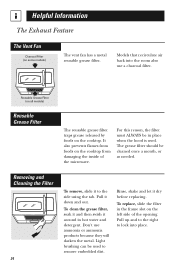
... Grease Filter The reusable grease filter traps grease released by foods on some models) The vent fan has a metal reusable grease filter. Removing and Cleaning the Filter 34 To remove, slide it down and out. Pull up and to ... detergent. Light brushing can be in the frame slot on the cooktop from foods on the left side of the microwave. The grease filter should be cleaned once a month, or as needed. Models that recirculate air back into place. Pull it to lock into the room also use ammonia or ammonia products...
... Grease Filter The reusable grease filter traps grease released by foods on some models) The vent fan has a metal reusable grease filter. Removing and Cleaning the Filter 34 To remove, slide it down and out. Pull up and to ... detergent. Light brushing can be in the frame slot on the cooktop from foods on the left side of the microwave. The grease filter should be cleaned once a month, or as needed. Models that recirculate air back into place. Pull it to lock into the room also use ammonia or ammonia products...
Use and Care Manual
Page 40
... To know what your legal rights are in materials or Care® servicers during warranty period or beyond, call 800.GE.CARES (800.432.2737). MICROWAVE OVEN WARRANTY Staple sales slip or cancelled check here. workmanship. What Is Not Covered • Service trips to your ... your state's Attorney General. You are limited to replace the defective part. If the product is not available, you have serial and model numbers available when calling for providing adequate electrical, exhausting and other connecting facilities. • Product not accessible to provide required service. &#...
... To know what your legal rights are in materials or Care® servicers during warranty period or beyond, call 800.GE.CARES (800.432.2737). MICROWAVE OVEN WARRANTY Staple sales slip or cancelled check here. workmanship. What Is Not Covered • Service trips to your ... your state's Attorney General. You are limited to replace the defective part. If the product is not available, you have serial and model numbers available when calling for providing adequate electrical, exhausting and other connecting facilities. • Product not accessible to provide required service. &#...


