
Installation Instructions
Page 6
... by the installer (if other than the customer), repair or replacement must be made by arrangement between customer and installer. ADDITIONAL PARTS PART Top Cabinet Template QUANTITY 1 Rear Wall 1 Template Installation 1 Instructions Separately 1 Packed Grease Filter 6
... by the installer (if other than the customer), repair or replacement must be made by arrangement between customer and installer. ADDITIONAL PARTS PART Top Cabinet Template QUANTITY 1 Rear Wall 1 Template Installation 1 Instructions Separately 1 Packed Grease Filter 6
Installation Instructions
Page 7
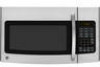
...preparation. • When installing the microwave oven beneath smooth, flat cabinets, be careful to follow the instructions on the top cabinet template for top cabinet spacing (used on recessed bottom cabinet installations only) Saw (saber, hole or keyhole) Stud finder or Hammer (...screwdriver Pencil Ruler or tape measure and straight edge Carpenter square (optional) Tin snips (for cutting damper, if required) Gloves Scissors (to cut template, if necessary) Electric drill with 3⁄16″, 1⁄2″ and 5⁄8″ drill bits Filler blocks or scrap wood pieces, ...
...preparation. • When installing the microwave oven beneath smooth, flat cabinets, be careful to follow the instructions on the top cabinet template for top cabinet spacing (used on recessed bottom cabinet installations only) Saw (saber, hole or keyhole) Stud finder or Hammer (...screwdriver Pencil Ruler or tape measure and straight edge Carpenter square (optional) Tin snips (for cutting damper, if required) Gloves Scissors (to cut template, if necessary) Electric drill with 3⁄16″, 1⁄2″ and 5⁄8″ drill bits Filler blocks or scrap wood pieces, ...

Installation Instructions
Page 8
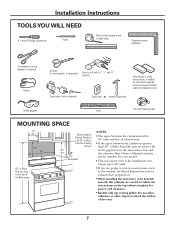
This will be used as the rear wall template and for mounting. This plate will indicate a stud location. 2 After locating the stud(s), find the center by probing the wall with a small nail to find ...
This will be used as the rear wall template and for mounting. This plate will indicate a stud location. 2 After locating the stud(s), find the center by probing the wall with a small nail to find ...
Installation Instructions
Page 10
... mounting plate on the wall at the center of electric shock. WARNING: Risk of the 30″ wide space. 2 Use the mounting plate as the template for toggle bolts.
... mounting plate on the wall at the center of electric shock. WARNING: Risk of the 30″ wide space. 2 Use the mounting plate as the template for toggle bolts.
Installation Instructions
Page 13
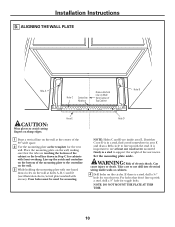
... cord. 1 Lift microwave, tilt it underneath the top cabinet. • Drill the holes, following the instructions on the TOP CABINET TEMPLATE. • Tape it forward, and hook slots at least two full turns after the microwave is removed and damper pivots easily before ...is installed. 2 Rotate front of the cord. Installation Instructions A2. MOUNT THE MICROWAVE OVEN • Read the instructions on the TOP CABINET TEMPLATE. Blower Plate Exhaust Adaptor Retaining Hooks Back of the unit facing up against cabinet bottom. 3 Insert a self-aligning screw through , and...
... cord. 1 Lift microwave, tilt it underneath the top cabinet. • Drill the holes, following the instructions on the TOP CABINET TEMPLATE. • Tape it forward, and hook slots at least two full turns after the microwave is removed and damper pivots easily before ...is installed. 2 Rotate front of the cord. Installation Instructions A2. MOUNT THE MICROWAVE OVEN • Read the instructions on the TOP CABINET TEMPLATE. Blower Plate Exhaust Adaptor Retaining Hooks Back of the unit facing up against cabinet bottom. 3 Insert a self-aligning screw through , and...
Installation Instructions
Page 15
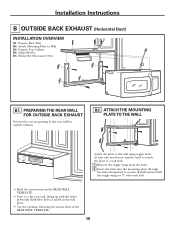
... reattach the toggle wings to 3⁄4″ onto each bolt. • Read the instructions on the REAR WALL TEMPLATE. • Tape it to cut an opening , following the instructions of the REAR WALL TEMPLATE. 15 Attach Mounting Plate to the wall using toggle bolts. Installation Instructions B OUTSIDE BACK EXHAUST (Horizontal Duct) INSTALLATION...
... reattach the toggle wings to 3⁄4″ onto each bolt. • Read the instructions on the REAR WALL TEMPLATE. • Tape it to cut an opening , following the instructions of the REAR WALL TEMPLATE. 15 Attach Mounting Plate to the wall using toggle bolts. Installation Instructions B OUTSIDE BACK EXHAUST (Horizontal Duct) INSTALLATION...
Installation Instructions
Page 16
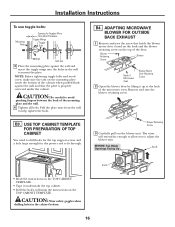
... Screw 2 Open the blower door by lifting it underneath the top cabinet. • Drill the holes, following the instructions on the TOP CABINET TEMPLATE. The wires will extend far enough to allow you to mount the plate. ADAPTING MICROWAVE BLOWER FOR OUTSIDE BACK EXHAUST 1 Remove and save the ...on the top of the microwave oven. BEFORE: Fan Blade Openings Facing Up End B End A • Read the instructions on the TOP CABINET TEMPLATE. • Tape it up at the back of the door. Remove and save the screw that the plate is properly centered under the cabinet. Installation...
... Screw 2 Open the blower door by lifting it underneath the top cabinet. • Drill the holes, following the instructions on the TOP CABINET TEMPLATE. The wires will extend far enough to allow you to mount the plate. ADAPTING MICROWAVE BLOWER FOR OUTSIDE BACK EXHAUST 1 Remove and save the ...on the top of the microwave oven. BEFORE: Fan Blade Openings Facing Up End B End A • Read the instructions on the TOP CABINET TEMPLATE. • Tape it up at the back of the door. Remove and save the screw that the plate is properly centered under the cabinet. Installation...

Installation Instructions
Page 19
Mount the Microwave Oven C5. NOTE: Before tightening toggle bolts and wood screw, make sure the tabs on the TOP CABINET TEMPLATE. USE TOP CABINET TEMPLATE FOR PREPARATION OF TOP CABINET You need to drill holes for the top support screws and a hole large enough for Toggles More Than ...plate. Pull the plate away from the bolts. 2 Insert the bolts into the mounting plate through . • Read the instructions on the TOP CABINET TEMPLATE. • Tape it underneath the top cabinet. • Drill the holes, following the instructions on the mounting plate touch the bottom of the mounting ...
Mount the Microwave Oven C5. NOTE: Before tightening toggle bolts and wood screw, make sure the tabs on the TOP CABINET TEMPLATE. USE TOP CABINET TEMPLATE FOR PREPARATION OF TOP CABINET You need to drill holes for the top support screws and a hole large enough for Toggles More Than ...plate. Pull the plate away from the bolts. 2 Insert the bolts into the mounting plate through . • Read the instructions on the TOP CABINET TEMPLATE. • Tape it underneath the top cabinet. • Drill the holes, following the instructions on the mounting plate touch the bottom of the mounting ...
Quick Specs
Page 1
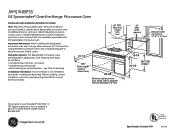
... 4/09 340148 Ventilation Options: The Spacemaker microwave ovens are designed for adaptation to -follow installation instructions and convenient full-size templates are packed with product/kit for removal of ventilation: • Outside exhaust (vertical - width required 13" MAX. 12...MIN. see Filter Kit drawing) Installation Information: This information is not intended to be located in many cases. JVM1740SPSS Over-the-Range Microwave Oven GE Spacemaker® Over-the-Range MicrowavDeimOevnesnions (in inches) Dimensions and Installation Information (in inches) Note: Requires ...
... 4/09 340148 Ventilation Options: The Spacemaker microwave ovens are designed for adaptation to -follow installation instructions and convenient full-size templates are packed with product/kit for removal of ventilation: • Outside exhaust (vertical - width required 13" MAX. 12...MIN. see Filter Kit drawing) Installation Information: This information is not intended to be located in many cases. JVM1740SPSS Over-the-Range Microwave Oven GE Spacemaker® Over-the-Range MicrowavDeimOevnesnions (in inches) Dimensions and Installation Information (in inches) Note: Requires ...


