GE JVM1540DNBB Support and Manuals
Get Help and Manuals for this General Electric item

View All Support Options Below
Free GE JVM1540DNBB manuals!
Problems with GE JVM1540DNBB?
Ask a Question
Free GE JVM1540DNBB manuals!
Problems with GE JVM1540DNBB?
Ask a Question
Most Recent GE JVM1540DNBB Questions

Profile Oven Code F7
(Posted by Anonymous-50008 12 years ago)
Popular GE JVM1540DNBB Manual Pages
Use and Care Manual - Page 3

... over ranges no wider than 36″. Connect only to heat, dry or cook food, and is not working properly, or if it must be replaced by General Electric Service or an authorized service agent using electrical appliances, basic safety precautions should be followed, including the following:
SAFETY PRECAUTIONS
This microwave oven is intended for marine use .
3
Use and Care Manual - Page 36

... on to cool internal parts while the microwave is on display
The control has been locked.
• Press and hold CLEAR/OFF for more time. Wait for the microwave to turn off and the fan will either go off automatically or you will not start
A fuse in your home • Replace fuse or reset circuit...
Use and Care Manual - Page 40

... date is extended to obtain service under warranty. Warrantor: General Electric Company. MICROWAVE OVEN WARRANTY
Staple sales slip or cancelled check here. Proof of merchantability or fitness for home use the product.
• Improper installation, delivery or maintenance.
You are in the microwave oven Service Centers or by a GE Authorized Servicer is abused, misused (for example...
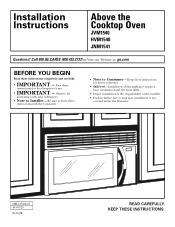
Installation Instructions - Page 1
... level - Be sure to Consumer -
Observe all governing codes and ordinances.
• Note to improper installation is the responsibility of the installer.
• Product failure due to Installer - Installation Instructions
Above the Cooktop Oven
JVM1540
HVM1540
JNM1541
Questions? MFL31918601 49- 40529
09-06 JR
READ CAREFULLY. Call 800.GE.CARES (800.432.2737) or Visit our Website...
Installation Instructions - Page 2
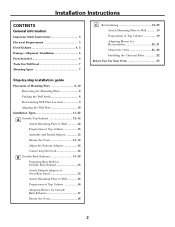
Installation Instructions
CONTENTS
General information
Important Safety Instructions 3 Electrical Requirements 3 Hood Exhaust 4, 5 Damage-Shipment/Installation 6 Parts Included 6 Tools You Will Need 7 Mounting Space 7
Step-by-step installation guide
Placement of Mounting Plate 8-10 Removing the Mounting Plate 8 Finding the Wall Studs 8 Determining Wall Plate Location 9 Aligning the ...
Installation Instructions - Page 6

... (if other
than the customer), repair or replacement must be made by arrangement between customer and installer. Installation
1
Instructions
Separately
2
Packed
Grease
Filters
Charcoal
1
Filter
(on some
models)
Exhaust
1
Adaptor
Damper
1
6
NOTE: Some extra parts are included. Installation Instructions
DAMAGE - SHIPMENT/ INSTALLATION
• If the unit is damaged...
Installation Instructions - Page 7
...; If the space between the oven and the cabinets. Installation Instructions
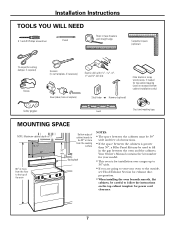
TOOLS YOU WILL NEED
# 1 and #2 Phillips screwdriver
Pencil...to cut template, if necessary)
Saw (saber, hole or keyhole)
Electric drill with 3⁄16″, 7⁄16″, 3⁄8″,...; min. Your Owner's Manual contains the kit number for your model.
• This oven is for installation over ranges up to
36...
Installation Instructions - Page 10

...Set... plate marked with a stud, drill a 5⁄8″ hole for mounting.
Installation Instructions
D. Area E
1 Draw a vertical line on the wall at the center ... C
CAUTION: Wear gloves to the center line on Wall from your model. If neither C nor D is a stud, drill a 3⁄16...somewhere in area E and draw a fifth circle to support the weight of the cabinet or the level line drawn...
Installation Instructions - Page 11
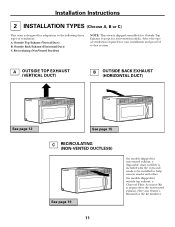
... EXHAUST (HORIZONTAL DUCT)
See page 12
See page 15
C RECIRCULATING (NON-VENTED DUCTLESS)
See page 19
On models shipped for non-vented exhaust, a disposable charcoal filter is shipped assembled for Outside Top Exhaust (except for non-vented models).
Installation Instructions
2 INSTALLATION TYPES (Choose A, B or C)
This oven is required for the non-vented exhaust. (See your...
Installation Instructions - Page 18

...
5 Install grease filters. Be careful not to pinch the cord, especially when mounting flush to bottom of cabinet.
4 Tighten the two screws to keep power cord tight. See the Owner's Manual packed ... the top cabinet by pulling cord.
1 Lift oven, tilt it tight throughout Steps 1-3. Installation Instructions
B6.
Keep it forward and hook slots at back bottom edge onto two lower tabs of...
Installation Instructions - Page 20

Installation Instructions
C3. You may want to save screws that fan blade openings are facing toward the front of the oven. BEFORE: Fan...FOR RECIRCULATION
NOTE: The exhaust adaptor with damper is not needed for possible future use.
1 Remove and save them for recirculating models. Retaining Flange
Blower Plate
AFTER: Fan Blade Openings Facing Forward
3 Carefully pull out the blower unit.
Installation Instructions - Page 22
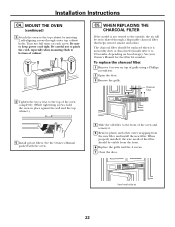
... each screw. Insert mesh-side up
22
WHEN REPLACING THE CHARCOAL FILTER
If the model is not vented to the front of the oven completely. (While tightening screws, hold the oven in place against the wall and the top cabinet.)
5 Install grease filters.
See the Owner's Manual packed with the oven.
4 Slide the old...
Installation Instructions - Page 23

Plug power cord into a dedicated 15 to instructions.
6. Replace house fuse or turn breaker back on.
7. Installation Instructions BEFORE YOU USE YOUR OVEN
1. Install turntable and wheeled ring in cavity. 4. KEEP INSTALLATION INSTRUCTIONS FOR THE LOCAL INSPECTOR'S USE.
5.
Read the Owner's Manual.
2.
Insure proper ground exists before use
23 Remove all packing material from the oven...
Dimensions - Page 1

... adaptation to -follow installation instructions and convenient full-size templates are designed for current dimensional data. Mounting
height from
oor
24-1/2
105 ° Door open
(without obstruction)
29-7/8
Minimum distance from bottom of Spacemaker microwave oven to allow minimum of 2" from door hinge side to your Monogram,® GE Profile™ or GE® appliance questions...
Dimensions - Page 2

... their actual physical size. JV M1540DNWW/CC/BB
GE Spacemaker® 1.5 Cu. Read the following carefully. For installation between the wall studs to be used . Roof Cap
Equivalent Feet 5 ft.
40 ft. 10 ft. 5 ft. 25 ft. 5 ft. 24 ft. Capacity Over-the-Range Microwave
Dimensions and Installation Information (in appearance. Wall Cap C. 90°...
GE JVM1540DNBB Reviews
We have not received any reviews for GE yet.