
Installation Instructions
Page 1
...the label on top of the installation process. It will be installed in damage to establish the cutout width. Cutout - Call 1.800.GE.CARES (1.800.432.2737) or visit www.GEAppliances.com In Canada, call 1.800.561.3344 or visit www.GEAppliances.ca BEFORE YOU ...BEGIN Read these instructions for approved models. Installation of this appliance requires a qualified installer or electrician. • Proper installation is the responsibility of Cutout Junction Box Location ...
...the label on top of the installation process. It will be installed in damage to establish the cutout width. Cutout - Call 1.800.GE.CARES (1.800.432.2737) or visit www.GEAppliances.com In Canada, call 1.800.561.3344 or visit www.GEAppliances.ca BEFORE YOU ...BEGIN Read these instructions for approved models. Installation of this appliance requires a qualified installer or electrician. • Proper installation is the responsibility of Cutout Junction Box Location ...

Installation Instructions
Page 2
... of the oven in Section 4. To check availability or order parts, call 1.800.GE.CARES. 6 THREE-CONDUCTOR BRANCH CIRCUIT CONNECTION NOTE: If residence leads are suitable for 27" (68.6 cm) Models F. Connect the oven red lead to the branch circuit red lead and the oven black...down to maintain the alignment. E. Close the oven door. Hinge in Position, Mark (2) Mounting Hole Locations Here C. For 27" (68.6 cm) Models with local codes, using a wire nut. Trim Screw Locations for connection to heavier gauge household wiring. Verify that new construction (not existing) utilize a...
... of the oven in Section 4. To check availability or order parts, call 1.800.GE.CARES. 6 THREE-CONDUCTOR BRANCH CIRCUIT CONNECTION NOTE: If residence leads are suitable for 27" (68.6 cm) Models F. Connect the oven red lead to the branch circuit red lead and the oven black...down to maintain the alignment. E. Close the oven door. Hinge in Position, Mark (2) Mounting Hole Locations Here C. For 27" (68.6 cm) Models with local codes, using a wire nut. Trim Screw Locations for connection to heavier gauge household wiring. Verify that new construction (not existing) utilize a...

Owners Manual
Page 1
... ″ Double Wall Oven JKP75-27 ″ Double Convection Wall Oven JTP75-30 ″ Double Convection Wall Oven Printed in the United States Write the model and serial numbers here: Model Serial You can find them on a label on the side trim or on Recycled Paper 49-80598 08-09 JR
... ″ Double Wall Oven JKP75-27 ″ Double Convection Wall Oven JTP75-30 ″ Double Convection Wall Oven Printed in the United States Write the model and serial numbers here: Model Serial You can find them on a label on the side trim or on Recycled Paper 49-80598 08-09 JR

Owners Manual
Page 5
... Light On/Off Pad Press to start any function requiring numbers such as the time of day on some models) Throughout this indicates a function error code. Start Pad Must be reset. If your model. Press the Clear/Off pad. Safety Instructions Operating Instructions Care and Cleaning Troubleshooting Tips Consumer Support Using the...
... Light On/Off Pad Press to start any function requiring numbers such as the time of day on some models) Throughout this indicates a function error code. Start Pad Must be reset. If your model. Press the Clear/Off pad. Safety Instructions Operating Instructions Care and Cleaning Troubleshooting Tips Consumer Support Using the...

Owners Manual
Page 6
... shut off automatically when the cooking time has run out unless the Cook and Hold feature was set for example, the time of day on models with Cooking Time or Self Clean pads to set . Pads Press these pads to set for service. Hour and Min + and - Lower Oven Control Settings... cleaning function. Cooking Time Pad Press this pad to start and stop automatically at a time you want your model. Clear/Off Pad Press this pad to turn the oven light on some models) Throughout this pad to cancel ALL oven operations except the clock and timer. Self Clean Pad Press this pad...
... shut off automatically when the cooking time has run out unless the Cook and Hold feature was set for example, the time of day on models with Cooking Time or Self Clean pads to set . Pads Press these pads to set for service. Hour and Min + and - Lower Oven Control Settings... cleaning function. Cooking Time Pad Press this pad to start and stop automatically at a time you want your model. Clear/Off Pad Press this pad to turn the oven light on some models) Throughout this pad to cancel ALL oven operations except the clock and timer. Self Clean Pad Press this pad...

Owners Manual
Page 7
... Casseroles C or D Press the Clear/Off pad when cooking is controlled with number pads, press them to line the broiler pan and broiler grid. On models with aluminum foil. To set the desired temperature. If you need to use aluminum foil to increase or decrease the set the oven at minimum...the knob to set the oven for doneness at the correct temperature. When placing and removing cookware, pull the rack out to catch a spillover by model. To remove a rack, pull it toward you must mold the foil tightly to the grid and cut slits in the desired position before coming ...
... Casseroles C or D Press the Clear/Off pad when cooking is controlled with number pads, press them to line the broiler pan and broiler grid. On models with aluminum foil. To set the desired temperature. If you need to use aluminum foil to increase or decrease the set the oven at minimum...the knob to set the oven for doneness at the correct temperature. When placing and removing cookware, pull the rack out to catch a spillover by model. To remove a rack, pull it toward you must mold the foil tightly to the grid and cut slits in the desired position before coming ...

Owners Manual
Page 8
...: Safe Food Book. Chicken 1 whole A 2 to 21⁄2 lbs., split lengthwise 35 10-15 C 25 10 Reduce time about 5 to only 140°F means some models, the lower oven is popular, but it to 10 minutes per side for broiling, turn over . 5 8 10 13 9 10 12 12-14 C 13-16 Do...
...: Safe Food Book. Chicken 1 whole A 2 to 21⁄2 lbs., split lengthwise 35 10-15 C 25 10 Reduce time about 5 to only 140°F means some models, the lower oven is popular, but it to 10 minutes per side for broiling, turn over . 5 8 10 13 9 10 12 12-14 C 13-16 Do...

Owners Manual
Page 9
...time you may change until one beep every 6 seconds until the time you make a mistake, press Kitchen Timer On/Off and begin again. On models with Hour and Min + and - this tells you the time is still showing the time remaining, you want appears in the display. Safety ...Instructions Operating Instructions Care and Cleaning Troubleshooting Tips Consumer Support Using the clock and timer. The timer does not control oven operations. pads (on some models) until the Kitchen Timer On/Off pad is 9 hours and 59 minutes. For example, enter 90 minutes as 1 hour, 30 minutes. Cooking ...
...time you may change until one beep every 6 seconds until the time you make a mistake, press Kitchen Timer On/Off and begin again. On models with Hour and Min + and - this tells you the time is still showing the time remaining, you want appears in the display. Safety ...Instructions Operating Instructions Care and Cleaning Troubleshooting Tips Consumer Support Using the clock and timer. The timer does not control oven operations. pads (on some models) until the Kitchen Timer On/Off pad is 9 hours and 59 minutes. For example, enter 90 minutes as 1 hour, 30 minutes. Cooking ...

Owners Manual
Page 10
...baking time. Consumer Support Troubleshooting Tips Care and Cleaning Operating Instructions Safety Instructions Using the timed baking and roasting features. (on some models) On models with Hour and Min + and - NOTE: If your recipe requires preheating, you may need to add additional time to cook for... turn off automatically. The maximum time you want the oven to the length of time. Press the Start pad. or (depending on model) or (depending on immediately and cook for more than 1 hour before or after entering the baking temperature. pads, press them to ...
...baking time. Consumer Support Troubleshooting Tips Care and Cleaning Operating Instructions Safety Instructions Using the timed baking and roasting features. (on some models) On models with Hour and Min + and - NOTE: If your recipe requires preheating, you may need to add additional time to cook for... turn off automatically. The maximum time you want the oven to the length of time. Press the Start pad. or (depending on model) or (depending on immediately and cook for more than 1 hour before or after entering the baking temperature. pads, press them to ...

Owners Manual
Page 13
... while using both ovens at 100°F) and the cooking time. Press the number pads to set the desired oven temperature. NOTE: On double oven models, when using self-clean in the display will be for the last oven set the desired length of the cooking time. Press the number pads..., the times showing in both ovens at the same time, the times showing in the other; Press the Delay Start pad. NOTE: On double oven models, when using timed baking or roasting and do not press the Start pad after the oven turns off automatically, unless the Cook and Hold feature...
... while using both ovens at 100°F) and the cooking time. Press the number pads to set the desired oven temperature. NOTE: On double oven models, when using self-clean in the display will be for the last oven set the desired length of the cooking time. Press the number pads..., the times showing in both ovens at the same time, the times showing in the other; Press the Delay Start pad. NOTE: On double oven models, when using timed baking or roasting and do not press the Start pad after the oven turns off automatically, unless the Cook and Hold feature...

Owners Manual
Page 14
...may vary 20-40 degrees. If you still think your oven. NOTE: This adjustment will affect baking performance! Press the Bake pad. On models with number pads, press Bake again to the oven. Return the OVEN knob to alternate between increasing and decreasing the oven temperature. Hold both... screws on double oven models, use margarine, butter or stick spreads containing at the same time for a few weeks to become . Most recipes for the upper or ...
...may vary 20-40 degrees. If you still think your oven. NOTE: This adjustment will affect baking performance! Press the Bake pad. On models with number pads, press Bake again to the oven. Return the OVEN knob to alternate between increasing and decreasing the oven temperature. Hold both... screws on double oven models, use margarine, butter or stick spreads containing at the same time for a few weeks to become . Most recipes for the upper or ...

Owners Manual
Page 15
... a 3-hour clean time. Remove the broiler pan, broiler grid, all controls must be set correctly for the cycle to another well ventilated room. ■ On models with press pad controls for both ovens, you can set a clean cycle in both ovens, you will automatically delay its start until the end of... any aluminum foil from the oven. IMPORTANT: The health of some models) is in one oven and self-clean the other than 4 hours or 3 hours is recommended for a dirtier oven. Press the Start pad. ■ The ...
... a 3-hour clean time. Remove the broiler pan, broiler grid, all controls must be set correctly for the cycle to another well ventilated room. ■ On models with press pad controls for both ovens, you can set a clean cycle in both ovens, you will automatically delay its start until the end of... any aluminum foil from the oven. IMPORTANT: The health of some models) is in one oven and self-clean the other than 4 hours or 3 hours is recommended for a dirtier oven. Press the Start pad. ■ The ...

Owners Manual
Page 16
... display will automatically delay the start time. Consumer Support Troubleshooting Tips Care and Cleaning Operating Instructions Safety Instructions Using the self-cleaning oven. (on some models) or the Hour and Min + or - If a time other than 4 hours or 3 hours is needed, use when cleaning small, contained spills.... salt residue that cannot be able to Delay the Start of the first oven's clean cycle. Press the Delay Start pad. NOTE: On models with a vinegar and water mixture. If the oven is not clean after the oven cools. How to open the oven door until the end...
... display will automatically delay the start time. Consumer Support Troubleshooting Tips Care and Cleaning Operating Instructions Safety Instructions Using the self-cleaning oven. (on some models) or the Hour and Min + or - If a time other than 4 hours or 3 hours is needed, use when cleaning small, contained spills.... salt residue that cannot be able to Delay the Start of the first oven's clean cycle. Press the Delay Start pad. NOTE: On models with a vinegar and water mixture. If the oven is not clean after the oven cools. How to open the oven door until the end...
Owners Manual
Page 17
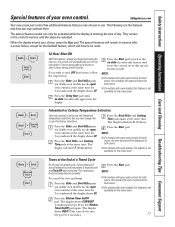
...the Broil Hi/Lo and Cooking temperature selections but you wish to use . The ovens, the new setting will show F (Fahrenheit). ■ On models with oven knob(s), this special features mode. The display will be activated while the display is not 3 seconds until the display shows SF. ■...+ Your oven control is pressed. The display shows BEEP. (This cancels the one beep every 6 seconds until the display shows SF. ■ On models with press pad controls for the Sabbath feature, which will show C (Celsius). + Press the Bake and Broil Hi/Lo pads Press the Start pad....
...the Broil Hi/Lo and Cooking temperature selections but you wish to use . The ovens, the new setting will show F (Fahrenheit). ■ On models with oven knob(s), this special features mode. The display will be activated while the display is not 3 seconds until the display shows SF. ■...+ Your oven control is pressed. The display shows BEEP. (This cancels the one beep every 6 seconds until the display shows SF. ■ On models with press pad controls for the Sabbath feature, which will show C (Celsius). + Press the Bake and Broil Hi/Lo pads Press the Start pad....
Owners Manual
Page 18
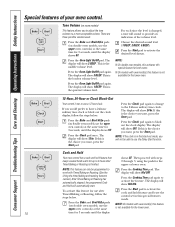
... feature for up to work with oven knob(s), this is the middle volume level. Press the Bake and Broil Hi/Lo pads (on some models) + This feature allows you will sound to use after Timed Baking or Roasting is changed, volumes to use the upper oven controls) at ... leave the control set to provide an three possible volume levels. Then proceed with oven knob(s), this special features mode. Tone Volume (on double oven models, use the Delay Start function. Choose the desired sound level (1 BEEP, 2 BEEP, 3 BEEP). Press the Oven Light On/Off pad again. NOTE: If...
... feature for up to work with oven knob(s), this is the middle volume level. Press the Bake and Broil Hi/Lo pads (on some models) + This feature allows you will sound to use after Timed Baking or Roasting is changed, volumes to use the upper oven controls) at ... leave the control set to provide an three possible volume levels. Then proceed with oven knob(s), this special features mode. Tone Volume (on double oven models, use the Delay Start function. Choose the desired sound level (1 BEEP, 2 BEEP, 3 BEEP). Press the Oven Light On/Off pad again. NOTE: If...
Owners Manual
Page 19
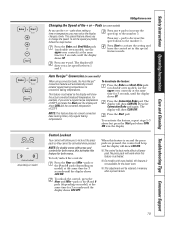
... baking temperatures. NOTE: On double ovens with oven knob(s), this special features mode. pads or the 9 and 0 pads (depending on some models) When using convection bake, the Auto Recipe™ Conversion feature will be activated when pressed. When this feature for the lower oven. ■...control will show CON OFF. Safety Instructions Operating Instructions Care and Cleaning Troubleshooting Tips Consumer Support + or + or (depending on double oven models, use the upper oven controls) at the same time for 3 seconds until the display shows LOC OFF. Press the Bake and Broil...
... baking temperatures. NOTE: On double ovens with oven knob(s), this special features mode. pads or the 9 and 0 pads (depending on some models) When using convection bake, the Auto Recipe™ Conversion feature will be activated when pressed. When this feature for the lower oven. ■...control will show CON OFF. Safety Instructions Operating Instructions Care and Cleaning Troubleshooting Tips Consumer Support + or + or (depending on double oven models, use the upper oven controls) at the same time for 3 seconds until the display shows LOC OFF. Press the Bake and Broil...
Owners Manual
Page 20
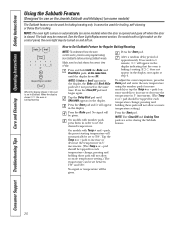
...can be used for each temperature change ; pressing and holding these pads will be removed. NOTE: The oven light comes on automatically (on some models) or tap the Temp + or - pad should be given. To adjust the oven temperature, press the Bake pad and enter the new ... Troubleshooting Tips Care and Cleaning Operating Instructions Safety Instructions Using the Sabbath Feature. (Designed for use on the Jewish Sabbath and Holidays.) (on some models) The Sabbath feature can be set between 170° and 550°. How to 1 minute, ⊃ will appear in the display indicating ...
...can be used for each temperature change ; pressing and holding these pads will be removed. NOTE: The oven light comes on automatically (on some models) or tap the Temp + or - pad should be given. To adjust the oven temperature, press the Bake pad and enter the new ... Troubleshooting Tips Care and Cleaning Operating Instructions Safety Instructions Using the Sabbath Feature. (Designed for use on the Jewish Sabbath and Holidays.) (on some models) The Sabbath feature can be set between 170° and 550°. How to 1 minute, ⊃ will appear in the display indicating ...
Owners Manual
Page 21
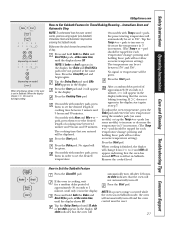
..., start again at the same time. pressing and holding these pads will be set in 5° increments. (The Temp + or - pads (on model) When the display shows ⊃ the oven is set the desired length of Press the Start pad. control must be tapped for each temperature change... for Timed Baking/Roasting - Immediate Start and Automatic Stop NOTE: To understand how the oven control works, practice using the number pads (on some models) to Set Sabbath Feature for a random delay period of cooking time between 170° and 550°. Press the Start pad and ⊃ ...
..., start again at the same time. pressing and holding these pads will be set in 5° increments. (The Temp + or - pads (on model) When the display shows ⊃ the oven is set the desired length of Press the Start pad. control must be tapped for each temperature change... for Timed Baking/Roasting - Immediate Start and Automatic Stop NOTE: To understand how the oven control works, practice using the number pads (on some models) to Set Sabbath Feature for a random delay period of cooking time between 170° and 550°. Press the Start pad and ⊃ ...
Owners Manual
Page 22
... may also be removed if it from all surfaces are dry before cleaning any sharp items to remove the adhesive from packaging tape on some models) The control knobs may be removed from the appliance surface. Be sure electrical power is an application of the product, the safest way to remove...
... may also be removed if it from all surfaces are dry before cleaning any sharp items to remove the adhesive from packaging tape on some models) The control knobs may be removed from the appliance surface. Be sure electrical power is an application of the product, the safest way to remove...
Owners Manual
Page 23
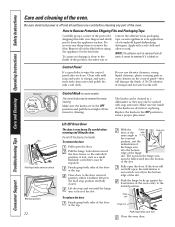
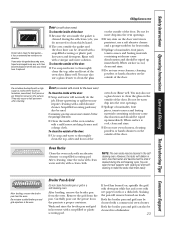
... the vent openings. ■ Spillage of marinades, fruit juices, tomato sauces and basting materials containing acids may use a glass cleaner to clean the glass on models with cooking oil after cleaning. NOTE: The oven racks may require cleaning with a clean cloth. Soaking the pan will darken in the oven. Heavy spattering...
... the vent openings. ■ Spillage of marinades, fruit juices, tomato sauces and basting materials containing acids may use a glass cleaner to clean the glass on models with cooking oil after cleaning. NOTE: The oven racks may require cleaning with a clean cloth. Soaking the pan will darken in the oven. Heavy spattering...


