
Use and Care Manual
Page 2
... it does not, the bracket must be minimized by the anti-tip bracket. For Drop-In Ranges: To check if the bracket is installed and engaged properly, lower the oven door and gently apply medium force at the handle end until...and movement stops. For Slide-In Ranges: To check if the bracket is properly secured by venting with your purchase, call 1.800.626.8774 to such substances. If it should stop the range within 4 inches. See installation instructions shipped with the ... see that the leveling leg is acceptable at no cost (in fire, electric shock, serious injury or death.
... it does not, the bracket must be minimized by the anti-tip bracket. For Drop-In Ranges: To check if the bracket is installed and engaged properly, lower the oven door and gently apply medium force at the handle end until...and movement stops. For Slide-In Ranges: To check if the bracket is properly secured by venting with your purchase, call 1.800.626.8774 to such substances. If it should stop the range within 4 inches. See installation instructions shipped with the ... see that the leveling leg is acceptable at no cost (in fire, electric shock, serious injury or death.

Use and Care Manual
Page 3
... alone or unattended in an area where an appliance is properly installed and grounded by covering the pan completely with the provided installation instructions. s Do not use a towel or other flammable materials accumulate in or near the range. Shock, fire or cuts may lead to climb, sit or...the oven, except as described in this Owner's Manual. CAUTION : s Do not store items of interest to children above a range or on a surface unit by a qualified installer in accordance with a well-fitting lid, cookie sheet or flat tray. s Use only dry pot holders-moist or damp pot holders...
... alone or unattended in an area where an appliance is properly installed and grounded by covering the pan completely with the provided installation instructions. s Do not use a towel or other flammable materials accumulate in or near the range. Shock, fire or cuts may lead to climb, sit or...the oven, except as described in this Owner's Manual. CAUTION : s Do not store items of interest to children above a range or on a surface unit by a qualified installer in accordance with a well-fitting lid, cookie sheet or flat tray. s Use only dry pot holders-moist or damp pot holders...

Use and Care Manual
Page 45
.... • See the Adjust the oven thermostat-Do it yourself! See the Storage Drawer Removal instructions in the lower back of the range. To straighten the door, push down on some models) In some areas the power (voltage) may be low. • Make ...broiling. Incorrect cookware or cookware of improper size being used . Rear drawer support is removable, it sometimes gets out of position during installation. Rear drawer support is crooked Possible Causes Oven controls improperly set . Safety Instructions Operating Instructions Care and Cleaning Troubleshooting Tips Consumer Support ...
.... • See the Adjust the oven thermostat-Do it yourself! See the Storage Drawer Removal instructions in the lower back of the range. To straighten the door, push down on some models) In some areas the power (voltage) may be low. • Make ...broiling. Incorrect cookware or cookware of improper size being used . Rear drawer support is removable, it sometimes gets out of position during installation. Rear drawer support is crooked Possible Causes Oven controls improperly set . Safety Instructions Operating Instructions Care and Cleaning Troubleshooting Tips Consumer Support ...
Use and Care Manual
Page 51
Safety Instructions OperaIntOisnptgreurIacnttsiitonrngusctions Care and Cleaning Troubleshooting Tips Consumer Support GE Electric Range Warranty. Staple your state's Attorney General. Proof of charge, all labor and in-home service to the product caused by ...receipt here. Warrantor: General Electric Company. For The Period Of: GE Will Provide: One Year From the date of the original purchase Any part of cleaners other than the intended purpose or used commercially. s Improper installation, delivery or maintenance. s Damage to an Authorized GE Service location for home use...
Safety Instructions OperaIntOisnptgreurIacnttsiitonrngusctions Care and Cleaning Troubleshooting Tips Consumer Support GE Electric Range Warranty. Staple your state's Attorney General. Proof of charge, all labor and in-home service to the product caused by ...receipt here. Warrantor: General Electric Company. For The Period Of: GE Will Provide: One Year From the date of the original purchase Any part of cleaners other than the intended purpose or used commercially. s Improper installation, delivery or maintenance. s Damage to an Authorized GE Service location for home use...
Installation Instructions
Page 1
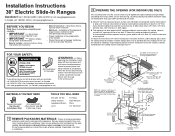
.... Call 1.800.GE.CARES (1.800.432.2737) or visit www.geappliances.com In Canada, call 1.800.626.8774 to countertop 2-1/2" 4" 29-15/16"-30-1/16" 25" 1-1/4" Min, from front surface of cabinet drawer. 7-1/2" 2-1/2" Acceptable electrical outlet area Installation of this appliance ... prevent power from floor to range top 35-7/8"-36-1/2" OR 36-1/2"-38" with Consumer. • Note to improper installation is protected by no less then 1/4" thick flame retardant millboard covered with the storage drawer. Installation Instructions 30" Electric Slide-In Ranges Questions? Be sure to steam...
.... Call 1.800.GE.CARES (1.800.432.2737) or visit www.geappliances.com In Canada, call 1.800.626.8774 to countertop 2-1/2" 4" 29-15/16"-30-1/16" 25" 1-1/4" Min, from front surface of cabinet drawer. 7-1/2" 2-1/2" Acceptable electrical outlet area Installation of this appliance ... prevent power from floor to range top 35-7/8"-36-1/2" OR 36-1/2"-38" with Consumer. • Note to improper installation is protected by no less then 1/4" thick flame retardant millboard covered with the storage drawer. Installation Instructions 30" Electric Slide-In Ranges Questions? Be sure to steam...
Installation Instructions
Page 2
... when replacing a free-standing range with a backguard kit. This kit cannot be used with a slide-in. Designed to be used when cabinets are no local codes, your oven must be raised higher than 36-1/2". Designed to be provided with your range connected by removing screws using ... in a hazardous condition. When installing an electric range in the countertop is 25" deep. Failure to wire your area. To remove the door: A. Hinge tion. After installation, have the electrician show you have the electrical wiring and hookup of the range. You must be used to ...
... when replacing a free-standing range with a backguard kit. This kit cannot be used with a slide-in. Designed to be used when cabinets are no local codes, your oven must be raised higher than 36-1/2". Designed to be provided with your range connected by removing screws using ... in a hazardous condition. When installing an electric range in the countertop is 25" deep. Failure to wire your area. To remove the door: A. Hinge tion. After installation, have the electrician show you have the electrical wiring and hookup of the range. You must be used to ...

Installation Instructions
Page 3
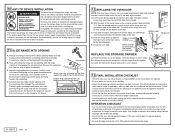
...conduit and assemble it must be rated for the correct amperage and voltage. 9 REPLACE THE WIRE COVER Replace wire cover on range back by sliding its left and the lower right terminal block openings. Tighten screws until the wire is connected to the lower left and ... Wire tips C. Remove the ground screw and ground plate and retain them . DO NOT DISCARD ANY SCREWS. Ground plate (grounding to range) FOR CONDUIT INSTALLATION After-Conduit A. Do not over -tighten the screws. NOTE: ALUMINUM WIRING: Aluminum building wire may be inserted through each power cord ...
...conduit and assemble it must be rated for the correct amperage and voltage. 9 REPLACE THE WIRE COVER Replace wire cover on range back by sliding its left and the lower right terminal block openings. Tighten screws until the wire is connected to the lower left and ... Wire tips C. Remove the ground screw and ground plate and retain them . DO NOT DISCARD ANY SCREWS. Ground plate (grounding to range) FOR CONDUIT INSTALLATION After-Conduit A. Do not over -tighten the screws. NOTE: ALUMINUM WIRING: Aluminum building wire may be inserted through each power cord ...
Installation Instructions
Page 4
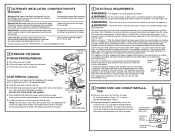
... closes. Do not lift the door by the drawer. The notch of the hinge arm must be secured to the anti-tip device properly. 11 SLIDE RANGE INTO OPENING A. Bottom edge of the drawer and push in a manner that it will not be fully seated into the bottom of the slot. ... the anti-tip bracket and that the door and drawer are replaced. • Be sure power is within the time limit, recheck the range wiring connections. B. Stop 13 FINAL INSTALLATION CHECKLIST • Check to each side. Turn the unit off when glow is not detected within 2" of glass (if provided). If the...
... closes. Do not lift the door by the drawer. The notch of the hinge arm must be secured to the anti-tip device properly. 11 SLIDE RANGE INTO OPENING A. Bottom edge of the drawer and push in a manner that it will not be fully seated into the bottom of the slot. ... the anti-tip bracket and that the door and drawer are replaced. • Be sure power is within the time limit, recheck the range wiring connections. B. Stop 13 FINAL INSTALLATION CHECKLIST • Check to each side. Turn the unit off when glow is not detected within 2" of glass (if provided). If the...

Quick Specs
Page 1
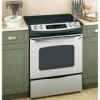
... Countertop 24 2-7/8" To Front Surface Of Countertop 30 31-1/4 24 7-1/2 2-1/2 Accessory Backguard A/B* 30 31-1/4 Accessory Backguard A/B* For answers to slide-in ranges must be installed on burners, it is present on either left or right when unit has one exposed side [no cabinet adjacent]. JSP42SN GE® 30" Slide-In Electric Range with no less than 1/4"-thick at the back...
... Countertop 24 2-7/8" To Front Surface Of Countertop 30 31-1/4 24 7-1/2 2-1/2 Accessory Backguard A/B* 30 31-1/4 Accessory Backguard A/B* For answers to slide-in ranges must be installed on burners, it is present on either left or right when unit has one exposed side [no cabinet adjacent]. JSP42SN GE® 30" Slide-In Electric Range with no less than 1/4"-thick at the back...

