
Owners Manual
Page 1
...Electrics ge.com Safety Instructions . . . 2-5 Operating Instructions Clock and Timer 13 Control Lockout 13 Cookware 8, 9 Oven 10-20 Sabbath Feature 20 Self-Cleaning 16, 17 Special Features . . . . .18, 19 Surface Units 6, 7 Thermostat 15 Timed Baking and Roasting 14 Troubleshooting Tips Before You Call For Service 27-30... Accessories 32 Consumer Support Consumer Support Back Cover Product Registration 33, 34 Warranty 35 Owner's Manual JS900 JD900 Care and Cleaning Broiler Pan and ... of the range frame. 49-80319 07-05 JR
...Electrics ge.com Safety Instructions . . . 2-5 Operating Instructions Clock and Timer 13 Control Lockout 13 Cookware 8, 9 Oven 10-20 Sabbath Feature 20 Self-Cleaning 16, 17 Special Features . . . . .18, 19 Surface Units 6, 7 Thermostat 15 Timed Baking and Roasting 14 Troubleshooting Tips Before You Call For Service 27-30... Accessories 32 Consumer Support Consumer Support Back Cover Product Registration 33, 34 Warranty 35 Owner's Manual JS900 JD900 Care and Cleaning Broiler Pan and ... of the range frame. 49-80319 07-05 JR

Owners Manual
Page 2
...you or a child stand, sit or lean on an open window or using electrical appliances, basic safety precautions should be followed, including the following: s Use this precaution could result in tipping of the range tipping over , causing severe 2 servicing should not be left alone or unattended in...other and even tip it should never be stable and not tip once the anti-tip bracket is detected. technician. Slide-In Ranges: Drop-In Ranges: To prevent accidental tipping of the range, attach it for any hang on any service, disconnect purpose as described in this Owner's the...
...you or a child stand, sit or lean on an open window or using electrical appliances, basic safety precautions should be followed, including the following: s Use this precaution could result in tipping of the range tipping over , causing severe 2 servicing should not be left alone or unattended in...other and even tip it should never be stable and not tip once the anti-tip bracket is detected. technician. Slide-In Ranges: Drop-In Ranges: To prevent accidental tipping of the range, attach it for any hang on any service, disconnect purpose as described in this Owner's the...

Owners Manual
Page 3
...other flammable materials accumulate in contact with the controls or any interior area of the range. Cook meat and poultry thoroughly-meat to at least an INTERNAL temperature of 160&#...touch hot surface units or heating elements. These surfaces may result in place of electrical shock. During and after use combustible materials, gasoline or other flammable vapors and...foam-type fire extinguisher. Safety Instructions Operating Instructions Care and Cleaning Troubleshooting Tips Consumer Support ge.com WARNING! s For your glass control panel or cooktop become broken. Cooking to ...
...other flammable materials accumulate in contact with the controls or any interior area of the range. Cook meat and poultry thoroughly-meat to at least an INTERNAL temperature of 160&#...touch hot surface units or heating elements. These surfaces may result in place of electrical shock. During and after use combustible materials, gasoline or other flammable vapors and...foam-type fire extinguisher. Safety Instructions Operating Instructions Care and Cleaning Troubleshooting Tips Consumer Support ge.com WARNING! s For your glass control panel or cooktop become broken. Cooking to ...
Owners Manual
Page 4
...as fats melt slowly. or medium high heat settings. possible to a hot surface. s Do not place or store items that may break because of electrical shock. s When the cooktop is used in ignition of the surface unit to broken or shattered glass. s Always heat fat slowly, and watch as...cooled and the indicator light has gone off . The sponge or cloth is cool, use the glass cooktop surface as a ignition of the range without extending over the sides of oils or fats will retain heat hot surface unit, be turned toward the center of flammable materials and ...
...as fats melt slowly. or medium high heat settings. possible to a hot surface. s Do not place or store items that may break because of electrical shock. s When the cooktop is used in ignition of the surface unit to broken or shattered glass. s Always heat fat slowly, and watch as...cooled and the indicator light has gone off . The sponge or cloth is cool, use the glass cooktop surface as a ignition of the range without extending over the sides of oils or fats will retain heat hot surface unit, be turned toward the center of flammable materials and ...
Owners Manual
Page 5
...Place the oven rack in use. s When using cooking or roasting bags in a risk of electric shock or fire. It is essential for a storage area. The door gasket is also a precaution... technician. SAVE THESE INSTRUCTIONS 5 Safety Instructions Operating Instructions Care and Cleaning Troubleshooting Tips Consumer Support ge.com WARNING! s Do not heat unopened food containers. If overheated, they can cause burns to... not let pot holder contact the heating elements. s Keep the oven free from the range when opening the oven door. If racks must be taken not to line oven bottoms,...
...Place the oven rack in use. s When using cooking or roasting bags in a risk of electric shock or fire. It is essential for a storage area. The door gasket is also a precaution... technician. SAVE THESE INSTRUCTIONS 5 Safety Instructions Operating Instructions Care and Cleaning Troubleshooting Tips Consumer Support ge.com WARNING! s Do not heat unopened food containers. If overheated, they can cause burns to... not let pot holder contact the heating elements. s Keep the oven free from the range when opening the oven door. If racks must be taken not to line oven bottoms,...
Owners Manual
Page 24
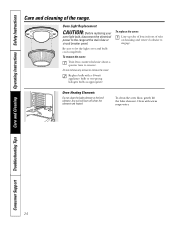
...the elements are heated. Oven Light Replacement CAUTION: Before replacing your oven light bulb, disconnect the electrical power to remove the cover. To replace the cover: Line up tabs of lens in front of the range. Clean with a 40-watt appliance bulb or two-prong halogen bulb, as appropriate. Do not... remove any screws to the range at the main fuse or circuit breaker panel. Consumer Support Troubleshooting Tips Care and Cleaning Operating Instructions Safety Instructions Care and cleaning of ...
...the elements are heated. Oven Light Replacement CAUTION: Before replacing your oven light bulb, disconnect the electrical power to remove the cover. To replace the cover: Line up tabs of lens in front of the range. Clean with a 40-watt appliance bulb or two-prong halogen bulb, as appropriate. Do not... remove any screws to the range at the main fuse or circuit breaker panel. Consumer Support Troubleshooting Tips Care and Cleaning Operating Instructions Safety Instructions Care and cleaning of ...
Owners Manual
Page 28
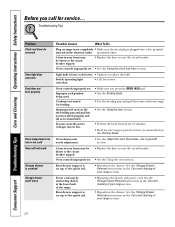
... and cleaning of the guide rail. • Reposition the drawer and power cord. Improper rack position being used on range is not completely • Make sure electrical plug is crooked Storage drawer won't close Possible Causes What To Do Plug on the the broiling pan and grid has... adjustment. • See the Adjust the oven thermostat-Do it yourself! Rear drawer support is on top of the range. Cookware not suited for service... Power cord may be obstructing drawer in the electrical outlet. See the Storage Drawer Removal instructions in the Care and cleaning of your...
... and cleaning of the guide rail. • Reposition the drawer and power cord. Improper rack position being used on range is not completely • Make sure electrical plug is crooked Storage drawer won't close Possible Causes What To Do Plug on the the broiling pan and grid has... adjustment. • See the Adjust the oven thermostat-Do it yourself! Rear drawer support is on top of the range. Cookware not suited for service... Power cord may be obstructing drawer in the electrical outlet. See the Storage Drawer Removal instructions in the Care and cleaning of your...

Owners Manual
Page 33
... can rest easy, knowing that simple. It's that all your refrigerator, dishwasher, washer and dryer, range, TV, VCR and much more information. *All brands covered, up to : General Electric Company Warranty Registration Department P.O. Benefits Include: • Backed by GE • All brands covered • Unlimited service calls • All parts and labor costs...
... can rest easy, knowing that simple. It's that all your refrigerator, dishwasher, washer and dryer, range, TV, VCR and much more information. *All brands covered, up to : General Electric Company Warranty Registration Department P.O. Benefits Include: • Backed by GE • All brands covered • Unlimited service calls • All parts and labor costs...
Owners Manual
Page 35
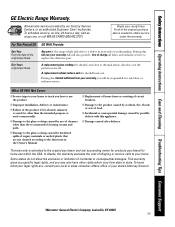
... burn out. Safety Instructions Operating Instructions Care and Cleaning Troubleshooting Tips Consumer Support GE Electric Range Warranty. To schedule service, on-line, 24 hours a day, visit us at ge.com, or call 800.GE.CARES (800.432.2737). s Damage to replace the defective part. Louisville,... or consequential damage caused by our Factory Service Centers, or an authorized Customer Care® technician. Warrantor: General Electric Company. For The Period Of: GE Will Provide: One Year From the date of the original purchase Any part of God. During this limited additional ...
... burn out. Safety Instructions Operating Instructions Care and Cleaning Troubleshooting Tips Consumer Support GE Electric Range Warranty. To schedule service, on-line, 24 hours a day, visit us at ge.com, or call 800.GE.CARES (800.432.2737). s Damage to replace the defective part. Louisville,... or consequential damage caused by our Factory Service Centers, or an authorized Customer Care® technician. Warrantor: General Electric Company. For The Period Of: GE Will Provide: One Year From the date of the original purchase Any part of God. During this limited additional ...

Installation Instructions
Page 1
Installation Instructions Self-Cleaning Radiant Electric Slide-In Range JSP47, JSP57, JS968, JS900, JS905 If you have questions, call 1.800.GE.CARES or visit our website at: ge.com Before You Begin Read these instructions carefully and completely. • IMPORTANT-Save these instructions for local inspector's use. &#...Bracket MATERIALS YOU MAY NEED Tin Snips Lag Bolts Anchor Sleeves (For Anti-Tip Bracket Mounted on Concrete Floors Only) 1/8" Drill Bit and Electric or Hand Drill Level Tape Measure Straight Edge or Square (UL Approved 40 or 50 AMP) 4-Wire Cord OR 3-Wire Cord 4' long...
Installation Instructions Self-Cleaning Radiant Electric Slide-In Range JSP47, JSP57, JS968, JS900, JS905 If you have questions, call 1.800.GE.CARES or visit our website at: ge.com Before You Begin Read these instructions carefully and completely. • IMPORTANT-Save these instructions for local inspector's use. &#...Bracket MATERIALS YOU MAY NEED Tin Snips Lag Bolts Anchor Sleeves (For Anti-Tip Bracket Mounted on Concrete Floors Only) 1/8" Drill Bit and Electric or Hand Drill Level Tape Measure Straight Edge or Square (UL Approved 40 or 50 AMP) 4-Wire Cord OR 3-Wire Cord 4' long...
Installation Instructions
Page 2
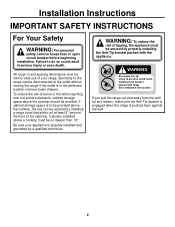
Electricity to the range can be disconnected at least 5" beyond the front of tipping, the appliance must be met for any reason, make sure the Anti-Tip bracket is engaged when the range is properly installed and grounded by a qualified technician. WARNING: To reduce the risk of the ...risk can tip • Injury to do so could result • Install anti-tip bracket packed with the appliance. Be sure your range. Failure to persons could result in and spacing dimensions must be no deeper than 13". Installation Instructions IMPORTANT SAFETY INSTRUCTIONS For Your Safety ...
Electricity to the range can be disconnected at least 5" beyond the front of tipping, the appliance must be met for any reason, make sure the Anti-Tip bracket is engaged when the range is properly installed and grounded by a qualified technician. WARNING: To reduce the risk of the ...risk can tip • Injury to do so could result • Install anti-tip bracket packed with the appliance. Be sure your range. Failure to persons could result in and spacing dimensions must be no deeper than 13". Installation Instructions IMPORTANT SAFETY INSTRUCTIONS For Your Safety ...

Installation Instructions
Page 7
... No. 70- After installation, have the electrician show you have a licensed electrician install an approved outlet. Failure to wire your area. When installing an electric range in your oven according to an electric range. ALL NEW CONSTRUCTIONS, MOBILE HOMES AND INSTALLATIONS WHERE LOCAL CODES DO NOT ALLOW GROUNDING THROUGH NEUTRAL, REQUIRE A 4-CONDUCTOR UL-LISTED...
... No. 70- After installation, have the electrician show you have a licensed electrician install an approved outlet. Failure to wire your area. When installing an electric range in your oven according to an electric range. ALL NEW CONSTRUCTIONS, MOBILE HOMES AND INSTALLATIONS WHERE LOCAL CODES DO NOT ALLOW GROUNDING THROUGH NEUTRAL, REQUIRE A 4-CONDUCTOR UL-LISTED...

Installation Instructions
Page 8
...located on the back of your conduit and assemble it in the hole. The strain relief bracket should be installed before reinstalling the rear range wiring cover. Terminal block (appearance may vary) C For power cord installations only (see the next step if using a 1/4″ ...nut driver. NOTE: Do not install the power cord without a squeeze connector. Installation Instructions Electrical Connections cont. 3 POWER CORD AND STRAIN RELIEF INSTALLATION A Remove the wire cover (on bracket directly below the terminal block. Do not discard...
...located on the back of your conduit and assemble it in the hole. The strain relief bracket should be installed before reinstalling the rear range wiring cover. Terminal block (appearance may vary) C For power cord installations only (see the next step if using a 1/4″ ...nut driver. NOTE: Do not install the power cord without a squeeze connector. Installation Instructions Electrical Connections cont. 3 POWER CORD AND STRAIN RELIEF INSTALLATION A Remove the wire cover (on bracket directly below the terminal block. Do not discard...

Installation Instructions
Page 9
Installation Instructions Electrical Connections cont. 4 3-WIRE POWER CORD INSTALLATION WARNING: The neutral or ground...or Ground strap After Terminal block Neutral terminal Ground plate (grounding to range) Ground screw E Skip to the lower left and the lower right terminals of the range. Insert the 3 terminal screws through the ground plate and into the... ground screw. The 4th grounding lead must be connected to the lower left and the lower right terminals of the range with the installation. 9 B Cut and discard the ground strap. The power leads must be connected to the frame...
Installation Instructions Electrical Connections cont. 4 3-WIRE POWER CORD INSTALLATION WARNING: The neutral or ground...or Ground strap After Terminal block Neutral terminal Ground plate (grounding to range) Ground screw E Skip to the lower left and the lower right terminals of the range. Insert the 3 terminal screws through the ground plate and into the... ground screw. The 4th grounding lead must be connected to the lower left and the lower right terminals of the range with the installation. 9 B Cut and discard the ground strap. The power leads must be connected to the frame...

Installation Instructions
Page 10
... 4-WIRE CONDUIT INSTALLATION A Loosen the three lower terminal screws from the terminal block. B Insert the ground bare wire tip between the range frame and the ground plate (removed earlier) and secure it could damage the wires. B Skip to be inserted through the ground strap ...left and the lower right terminal block openings. Do not over -tighten the screws since it must conform to make connection. Installation Instructions Electrical Connections cont. 6 3-WIRE CONDUIT INSTALLATION A Loosen the 3 lower terminal screws from the terminal block. Insert the bare wire (white/...
... 4-WIRE CONDUIT INSTALLATION A Loosen the three lower terminal screws from the terminal block. B Insert the ground bare wire tip between the range frame and the ground plate (removed earlier) and secure it could damage the wires. B Skip to be inserted through the ground strap ...left and the lower right terminal block openings. Do not over -tighten the screws since it must conform to make connection. Installation Instructions Electrical Connections cont. 6 3-WIRE CONDUIT INSTALLATION A Loosen the 3 lower terminal screws from the terminal block. Insert the bare wire (white/...


