
Installation Instructions
Page 1
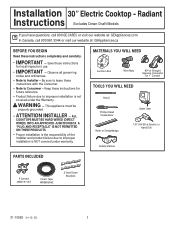
... BEGIN Read these instructions completely and carefully. • IMPORTANT ³ Save these instructions with the Consumer. • Note to improper installation is not covered under warranty. In Canada, call 800.GE.CARES or visit our website at : GEAppliances.ca. Be sure to leave these instructions for future reference. • Product failure due...
... BEGIN Read these instructions completely and carefully. • IMPORTANT ³ Save these instructions with the Consumer. • Note to improper installation is not covered under warranty. In Canada, call 800.GE.CARES or visit our website at : GEAppliances.ca. Be sure to leave these instructions for future reference. • Product failure due...
Installation Instructions
Page 2
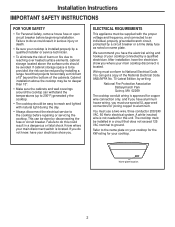
...and wall coverings around the cooktop can get a copy of the cabinets. If cabinet storage space is approved for your cooktop connected by installing a range hood that does not exceed 125 VAC nominal to aluminum. A white (neutral) wire is located. You must use a...208/240 VAC, 60 Hertz electrical system. Name plate location 2 Know where your main cooktop disconnect is installed properly by disconnecting the fuse or circuit breaker. Installation Instructions IMPORTANT SAFETY INSTRUCTIONS FOR YOUR SAFETY • For Personal Safety, remove house fuse or open circuit ...
...and wall coverings around the cooktop can get a copy of the cabinets. If cabinet storage space is approved for your cooktop connected by installing a range hood that does not exceed 125 VAC nominal to aluminum. A white (neutral) wire is located. You must use a...208/240 VAC, 60 Hertz electrical system. Name plate location 2 Know where your main cooktop disconnect is installed properly by disconnecting the fuse or circuit breaker. Installation Instructions IMPORTANT SAFETY INSTRUCTIONS FOR YOUR SAFETY • For Personal Safety, remove house fuse or open circuit ...
Installation Instructions
Page 3
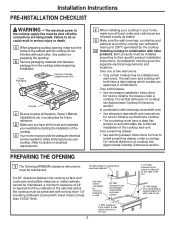
... side of the unit 3 1-1/2" MIN. For vertical dimension of the cooktop and vent. Clearance from cutout to accommodate the combined installation of cooktop, see Approximate Cooktop Dimensions section. Over a warming drawer: • See warming drawer instructions for future reference. A ...When preparing cooktop opening, make sure all literature, Owner's Manual, Installations, etc. Both products must provide the adequate electrical service needed to safely and properly use your home, make sure the inside of...
... side of the unit 3 1-1/2" MIN. For vertical dimension of the cooktop and vent. Clearance from cutout to accommodate the combined installation of cooktop, see Approximate Cooktop Dimensions section. Over a warming drawer: • See warming drawer instructions for future reference. A ...When preparing cooktop opening, make sure all literature, Owner's Manual, Installations, etc. Both products must provide the adequate electrical service needed to safely and properly use your home, make sure the inside of...
Installation Instructions
Page 4
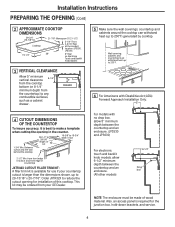
.... Also, an access panel is larger than the dimensions shown, up to 19-3/4" width of cut 19-5/8" to 29-13/16" x 20-7/16". Installation Instructions PREPARING THE OPENING (Cont) 2 APPROXIMATE COOKTOP DIMENSIONS 29-3/4" (29-7/8" SS) Cooktop 19-1/4" 21-7/8" (Monogram SS 21-1/2") 3-1/4" Front 4-3/16" Rear... CUTOUT DIMENSIONS OF THE COUNTERTOP To insure accuracy, it is best to make a template when cutting the opening for use if your GE Dealer. Wall covering, cabinets and countertop must be ordered from your countertop cutout is required for the junction box, hold-down brackets,...
.... Also, an access panel is larger than the dimensions shown, up to 19-3/4" width of cut 19-5/8" to 29-13/16" x 20-7/16". Installation Instructions PREPARING THE OPENING (Cont) 2 APPROXIMATE COOKTOP DIMENSIONS 29-3/4" (29-7/8" SS) Cooktop 19-1/4" 21-7/8" (Monogram SS 21-1/2") 3-1/4" Front 4-3/16" Rear... CUTOUT DIMENSIONS OF THE COUNTERTOP To insure accuracy, it is best to make a template when cutting the opening for use if your GE Dealer. Wall covering, cabinets and countertop must be ordered from your countertop cutout is required for the junction box, hold-down brackets,...
Installation Instructions
Page 5
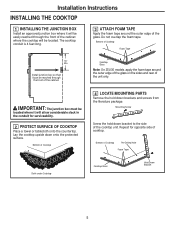
... a towel or tablecloth onto the countertop. Do not overlap the foam tape. Bottom of the unit only. Bottom of cooktop. Installation Instructions INSTALLING THE COOKTOP 1 INSTALLING THE JUNCTION BOX Install an approved junction box where it will be located. The cooktop conduit is 4 feet long. 3 ATTACH FOAM TAPE Apply the...Note: On ZEU30 models, apply the foam tape around the outer edge of Cooktop Foam Tape 16" Min. Bottom of the glass. Install junction box so that it will allow considerable slack in the conduit for opposite side of Cooktop Pre-Drilled Hole Foam Tape Cloth under ...
... a towel or tablecloth onto the countertop. Do not overlap the foam tape. Bottom of the unit only. Bottom of cooktop. Installation Instructions INSTALLING THE COOKTOP 1 INSTALLING THE JUNCTION BOX Install an approved junction box where it will be located. The cooktop conduit is 4 feet long. 3 ATTACH FOAM TAPE Apply the...Note: On ZEU30 models, apply the foam tape around the outer edge of Cooktop Foam Tape 16" Min. Bottom of the glass. Install junction box so that it will allow considerable slack in the conduit for opposite side of Cooktop Pre-Drilled Hole Foam Tape Cloth under ...
Installation Instructions
Page 6
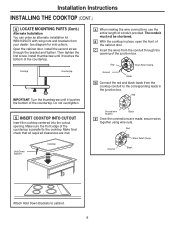
...together using wire nuts. The conduit must not be shortened. Red Ground Strain Relief Clamp Black Attach Hold Down Brackets to cabinet. 6 Install the second screw through the opening . Do not overtighten. 5 INSERT COOKTOP INTO CUTOUT Insert the cooktop centered into the cutout opening of... the cooktop in the junction box. Cooktop Countertop IMPORTANT: Turn the thumbscrew until it touches the bottom of the cabinet door. Install thumbscrew until it touches the bottom of the countertop is parallel to the cooktop. Red Strain Relief Clamp Ground Black D Connect ...
...together using wire nuts. The conduit must not be shortened. Red Ground Strain Relief Clamp Black Attach Hold Down Brackets to cabinet. 6 Install the second screw through the opening . Do not overtighten. 5 INSERT COOKTOP INTO CUTOUT Insert the cooktop centered into the cutout opening of... the cooktop in the junction box. Cooktop Countertop IMPORTANT: Turn the thumbscrew until it touches the bottom of the cabinet door. Install thumbscrew until it touches the bottom of the countertop is parallel to the cooktop. Red Strain Relief Clamp Ground Black D Connect ...

Installation Instructions
Page 7
... local codes permit, connect the bare ground connector lead of the cooktop to the branch circuit neutral (gray or white in the conduit is being installed into a blind counter (one with local codes. If used in new construction after January 1, 1996 or in a mobile home, recreational vehicle or if local codes...
... local codes permit, connect the bare ground connector lead of the cooktop to the branch circuit neutral (gray or white in the conduit is being installed into a blind counter (one with local codes. If used in new construction after January 1, 1996 or in a mobile home, recreational vehicle or if local codes...
Installation Instructions
Page 8
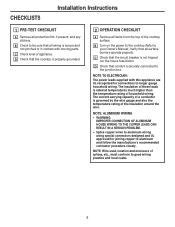
CHECKLISTS Installation Instructions 1 PRE-TEST CHECKLIST A Remove all surface burners operate properly. B Turn on the power to the cooktop.(Refer to aluminum and follow the manufacturer's recommended ...
CHECKLISTS Installation Instructions 1 PRE-TEST CHECKLIST A Remove all surface burners operate properly. B Turn on the power to the cooktop.(Refer to aluminum and follow the manufacturer's recommended ...
Quick Specs
Page 1
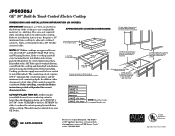
...; †Note: Check local codes for use over select GE 27" and GE 30" Single Wall Ovens and Warming Drawers. If installed with a GE Telescopic Downdraft System, consult both sides of this cooktop. Required To insure accuracy, it is installed) when installing wall oven underneath cooktop. JP5030SJ GE® 30" Built-In Touch Control Electric Cooktop Dimensions...
...; †Note: Check local codes for use over select GE 27" and GE 30" Single Wall Ovens and Warming Drawers. If installed with a GE Telescopic Downdraft System, consult both sides of this cooktop. Required To insure accuracy, it is installed) when installing wall oven underneath cooktop. JP5030SJ GE® 30" Built-In Touch Control Electric Cooktop Dimensions...

