GE JP5030SJSS Support and Manuals
Get Help and Manuals for this General Electric item

View All Support Options Below
Free GE JP5030SJSS manuals!
Problems with GE JP5030SJSS?
Ask a Question
Free GE JP5030SJSS manuals!
Problems with GE JP5030SJSS?
Ask a Question
Popular GE JP5030SJSS Manual Pages
Installation Instructions - Page 1
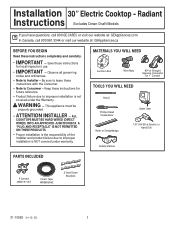
... these instructions
for 1" Conduit
TOOLS YOU WILL NEED
Pencil
Phillips Head Screwdriver
Ruler or Straightedge
Saber Saw
1/8" Drill Bit & Electric or Hand Drill
Safety Glasses
4 Screws (WB01X1137)
Foam Tape WB06K5042
2 Hold Down Brackets
31-10985 (01-15 GE)
1 Be sure to leave these
instructions with the Consumer. • Note to Installer -
Installation 30" Electric Cooktop -
Installation Instructions - Page 2
...
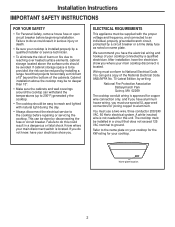
• Always disconnect the electrical service to National Electrical Code. Installation Instructions IMPORTANT SAFETY INSTRUCTIONS
FOR YOUR SAFETY
• For Personal Safety, remove house fuse or open circuit breaker before repairing or servicing the cooktop. You must conform to the cooktop before beginning installation. We recommend you have the electrical wiring and hookup of the...
Installation Instructions - Page 3
....
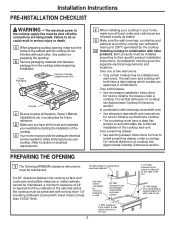
13" MAX. Clearance from countertop to their specific product installation instructions. Installation Instructions PRE-INSTALLATION CHECKLIST
WARNING - The electrical power to
the cooktop supply line must be given the separate electrical requirements and locations:
Over one or two wall ovens:
• Only certain models may be installed according to unprotected overhead surface
2" MIN...
Installation Instructions - Page 4
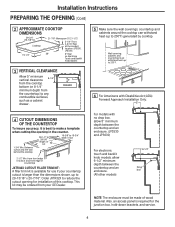
Installation Instructions PREPARING THE OPENING (Cont)
2 APPROXIMATE COOKTOP DIMENSIONS
29-3/4" (29-7/8" SS)
Cooktop
19-1/4"
21-7/8" (Monogram SS 21-1/2")
3-1/4" Front 4-3/16" Rear at the conduit location (JP3530, JP3030)
28"
6" Rear
on Electronic
Touch and Backlit
Knob Models
3 VERTICAL CLEARANCE
Allow 5" minimum
8-1/4"
vertical clearance from the cooktop bottom (or 8-1/4" minimum depth...
Installation Instructions - Page 5
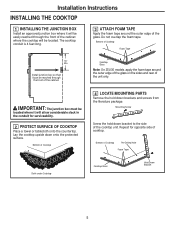
Installation Instructions INSTALLING THE COOKTOP
1 INSTALLING THE JUNCTION BOX
Install an approved junction box where it will be easily reached through
the front of Cooktop
4 LOCATE MOUNTING PARTS
Remove the hold down bracket to the side of cooktop. Bottom of the cabinet where the cooktop will allow considerable slack in the conduit for opposite side of the cooktop unit.
Bottom of ...
Installation Instructions - Page 6
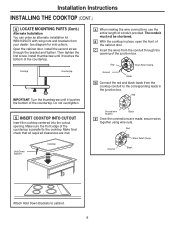
Installation Instructions INSTALLING THE COOKTOP (CONT.)
4 LOCATE MOUNTING PARTS (Cont.)
Alternate Installation:
You can order an alternate installation kit WB01X25470 with wing nuts and brackets from the conduit through the bracket and tighten. Then tighten the first screw. Make sure the front edge of the cabinet door. B With the cooktop in the junction box.
Red
Ground
Strain ...
Installation Instructions - Page 8
... supplied with moving parts. The current carrying capacity of a conductor is rated at temperatures much higher than the temperature rating of appliance. D Check that the cooktop is secure and not pinched or in contact with this appliance are UL recognized for joining copper to good wiring practice and local codes.
8
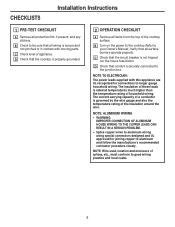
CHECKLISTS
Installation Instructions
1 PRE-TEST...
Use and Care Manual - Page 1
... Burner(s) Off 9 Adjust Burner Size 10 Selecting Cooktop Settings 10 How To Synchronize Left Elements. . . 11 Cooktop Lockout 11 Timer 11 Hot Light Indicator 12 Griddle (optional accessory 13
Care and Cleaning
Cleaning The Cooktop 14
Troubleshooting Tips 16
Owner's Manual
JP5030 JP5036
Write the model and serial numbers here:
Model
Serial
You can find them on a label...
Use and Care Manual - Page 6
... 6. Display:6HHSDJH 8. Element On/Off:6HHSDJH
3. Start Timer:6HHSDJH
6
49-80746 Timer On/Off:6HHSDJH 7. All Off:6HHSDJH
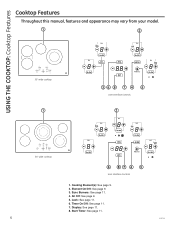
5. USING THE COOKTOP: Cooktop Features
Cooktop Features
Throughout this manual, features and appearance may vary from your model.
1
2
30" wide cooktop
1
36 8 7 4
5
User Interface Controls
2
36" wide...
Use and Care Manual - Page 10
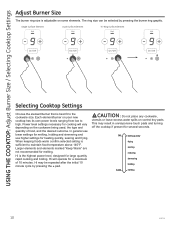
...RQVRPHHOHPHQWV7KHULQJVL]HFDQEHVHOHFWHGE\SUHVVLQJWKHEXUQHUULQJJUDSKLF
Single Surface Element
Dual Surface Element
Tri-Ring Surface Element
Selecting Cooktop Settings
&KRRVHWKHHOHPHQWEXUQHUWKDWLVEHVWILWWRWKH FRRNZDUHVL]H(DFKHOHPHQWEXUQHURQ\RXUQHZ FRRNWRSKDVLWVRZQSRZHUOHYHOVUDQJLQJ...
Use and Care Manual - Page 13
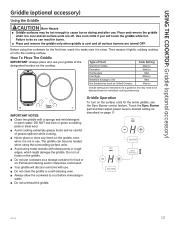
...7RUWLOODV 3DQFDNHV +DPEXUJHUV )ULHG(JJV %UHDNIDVW6DXVDJH/LQNV +RW6DQGZLFKHV
VXFKDV*ULOOHG&KHHVH
Cook Setting
0HG/R 0HG/R
0HG 0HG/R
0HG 0HG/R
*ULGGOHVHWWLQJVDUHLQWHQGHGWREHDJXLGHOLQHDQG...
Ŷ Use oven mitts if you will touch the griddle while hot. USING THE COOKTOP: Griddle (optional accessory)
Griddle (optional accessory)
Using the Griddle
CAUTION Burn Hazard
Ŷ...
Use and Care Manual - Page 14
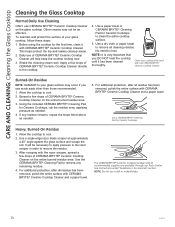
CARE AND CLEANING: Cleaning the Glass Cooktop
Cleaning the Glass Cooktop
Normal Daily Use Cleaning
21/
Use and Care Manual - Page 16
... Power arc ON indicator blinking Scratches on cooktop glass surface
Areas of discoloration on . TROUBLESHOOTING TIPS
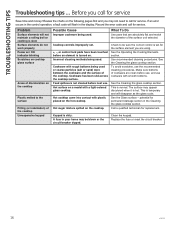
Troubleshooting tips ... Food spillovers not cleaned before an element is dirty. What To Do
8VHSDQVWKDWDUHDEVROXWHO\IODWDQGPDWFK WKHGLDPHWHURIWKHVXUIDFHXQLWVHOHFWHG
Cooktop controls improperly set.
+, -, or control lock pads have been...
Quick Specs - Page 1
... to be re-routed to 29-13/16" x 20-7/16". JP5030SJ
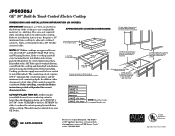
GE® 30" Built-In Touch Control Electric Cooktop
Dimensions and Installation Information (in the counter
Electrical junction box 16" MIN. Free area not required
Approximate Cooking Dimensions
13" MAX.
from your
GE Dealer. Cooktop gas/electric supply may be
considered. The countertop cutout requires 23-1/2" minimum flat...
Quick Specs - Page 2
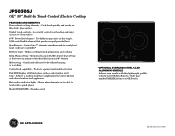
...Model JP5030SJSS - Control two 7" elements simultaneously to touch with this fully functional 6" element
Melt setting - Gently melt delicate foods without burning or scorching
Control lock capability - Helps coordinate meal preparation and cooking
Keep Warm setting - Order part...
GE® 30" Built-In Touch Control Electric Cooktop
Features and Benefits Four radiant cooking elements -
GE JP5030SJSS Reviews
We have not received any reviews for GE yet.