Use and Care Manual
Page 1
...-In Wall OveGasn Safety Instructions . . . . . .2-5 Operating Instructions, Tips Aluminum foil 5, 12, 20 Baking feature 12, 13 Broiling feature 16, 17 Clock and timer 7 Control features and settings . .6 Ignition 11 Light 11 Preheating 12 Racks 11, 12 Roasting feature 13 Sabbath feature 10 Self-cleaning instructions 18, 19 Special features of your oven...
...-In Wall OveGasn Safety Instructions . . . . . .2-5 Operating Instructions, Tips Aluminum foil 5, 12, 20 Baking feature 12, 13 Broiling feature 16, 17 Clock and timer 7 Control features and settings . .6 Ignition 11 Light 11 Preheating 12 Racks 11, 12 Roasting feature 13 Sabbath feature 10 Self-cleaning instructions 18, 19 Special features of your oven...
Use and Care Manual
Page 5
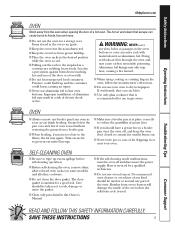
...air and steam that is a convenience in a risk of the door or oven walls. ■ Do not heat unopened food containers. SELF-CLEANING OVEN ■ Be sure to reduce the possibility of a hot oven. SAVE THESE INSTRUCTIONS 5 Troubleshooting Tips Consumer Support It is used in or... not use aluminum foil to rub, damage or move the gasket. ■ Clean only parts listed in gas ovens. GEAppliances.com Safety Instructions Operating Instructions OVEN Stand away from the oven when opening the door of grease fires. ■ If you finish broiling. Care should have a grease fire...
...air and steam that is a convenience in a risk of the door or oven walls. ■ Do not heat unopened food containers. SELF-CLEANING OVEN ■ Be sure to reduce the possibility of a hot oven. SAVE THESE INSTRUCTIONS 5 Troubleshooting Tips Consumer Support It is used in or... not use aluminum foil to rub, damage or move the gasket. ■ Clean only parts listed in gas ovens. GEAppliances.com Safety Instructions Operating Instructions OVEN Stand away from the oven when opening the door of grease fires. ■ If you finish broiling. Care should have a grease fire...
Use and Care Manual
Page 12
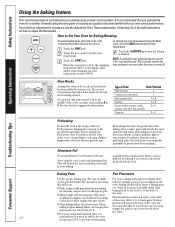
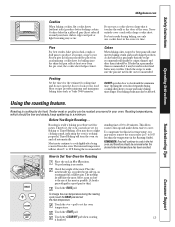
... you are using the time given on recipes as possible to run even after the oven is not directly above the other or the walls of foil may find that you turn on and off . Your oven temperature is finished. As a general rule, place most casseroles and roasts, preheating is cool. To ... racks in the correct position before putting the food in glass baking dishes, the temperature may need to use aluminum foil on a lower rack several inches below the food. Pans should not touch each other . 12 may be in poor baking. See the chart for good results when baking cakes,...
... you are using the time given on recipes as possible to run even after the oven is not directly above the other or the walls of foil may find that you turn on and off . Your oven temperature is finished. As a general rule, place most casseroles and roasts, preheating is cool. To ... racks in the correct position before putting the food in glass baking dishes, the temperature may need to use aluminum foil on a lower rack several inches below the food. Pans should not touch each other . 12 may be in poor baking. See the chart for good results when baking cakes,...
Use and Care Manual
Page 13
...Begin Roasting... To compensate for meats. Check the weight of the oven. The melting fat will turn the oven on and off automatically. To change the oven temperature during cooking allows heat to 10°F less than it touches the walls or the door of the meat. Do not use only one ... look at 5° to escape and makes baking times longer. A cake baked in a pan larger than recommended, it . Frozen pies in the hot oven and therefore should be low and steady, keep spattering to make sure the pan size used for this .) Touch the BAKE pad. the cookie sheet...
...Begin Roasting... To compensate for meats. Check the weight of the oven. The melting fat will turn the oven on and off automatically. To change the oven temperature during cooking allows heat to 10°F less than it touches the walls or the door of the meat. Do not use only one ... look at 5° to escape and makes baking times longer. A cake baked in a pan larger than recommended, it . Frozen pies in the hot oven and therefore should be low and steady, keep spattering to make sure the pan size used for this .) Touch the BAKE pad. the cookie sheet...

Use and Care Manual
Page 22
... burner is in the "LP" direction. When the baffle is near the back wall. Visually check the color of the oven. The inner cones of the flames should not extend out over the edges of the oven. To shorten the cones, tighten the orifice hood by turning in most areas. ...the bottom burner flames are not right, use caution. The air adjustment shutter for correct flame appearance. See the illustration in color with the natural gas used in the "Nat" direction. WARNING: If you are yellow or flutter, open -end wrench or adjustable joint pliers to 3/4″ blue ...
... burner is in the "LP" direction. When the baffle is near the back wall. Visually check the color of the oven. The inner cones of the flames should not extend out over the edges of the oven. To shorten the cones, tighten the orifice hood by turning in most areas. ...the bottom burner flames are not right, use caution. The air adjustment shutter for correct flame appearance. See the illustration in color with the natural gas used in the "Nat" direction. WARNING: If you are yellow or flutter, open -end wrench or adjustable joint pliers to 3/4″ blue ...
Use and Care Manual
Page 26
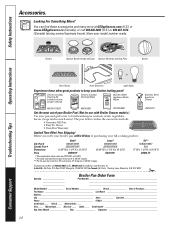
...applicable state sales tax (PST/HST and GST) * The large (standard) broil pan does not fit in 20"/24" ranges. ** The XL pan does not fit in 24" wall ovens, 27" drop-ins or 20"/24" ranges. I_n C_ana_da:_GE_Pa_rts,_1 F_act_ory_Lan_e, M_on_cto_n, _N.B_. E1_C 9_M3_ _ _ _ _ _ Broiler Pan ...Exp. Bo_x 2_210_27,_Me_mp_his,_TN_38_122_-102_7. Date: Month Year Signature 26 Consumer Support Have your GE cooking product. Free Shipping! The pan below catches the excess fats and oils. • Genuine GE Part • Easy To Clean • One-Year Warranty Limited Time Offer! Operating ...
...applicable state sales tax (PST/HST and GST) * The large (standard) broil pan does not fit in 20"/24" ranges. ** The XL pan does not fit in 24" wall ovens, 27" drop-ins or 20"/24" ranges. I_n C_ana_da:_GE_Pa_rts,_1 F_act_ory_Lan_e, M_on_cto_n, _N.B_. E1_C 9_M3_ _ _ _ _ _ Broiler Pan ...Exp. Bo_x 2_210_27,_Me_mp_his,_TN_38_122_-102_7. Date: Month Year Signature 26 Consumer Support Have your GE cooking product. Free Shipping! The pan below catches the excess fats and oils. • Genuine GE Part • Easy To Clean • One-Year Warranty Limited Time Offer! Operating ...
Quick Specs
Page 1
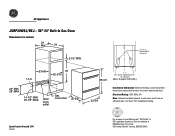
... 25-3/8 38-3/4 11" over centerline of at GEAppliances.com or call GE Answer Center® service, 800.626.2000. GE® 24" Built-In Gas Oven Dimensions (in inches) 24 Min 24 2-1/2" MIN. CL 2 x 4 or equivalent runners 7-1/2 23-5/8 38 22-3/16 22" MIN. 28" MAX. 14-1/2" MIN. 20-1/2" MAX. ..., 5A Note: Cabinets installed adjacent to your Monogram,® GE Profile™ or GE® appliance questions, visit our website at least 194° temperature rating. Specification Created 1/04 330120 For answers to wall ovens must have an adhesion spec of cabinet (Must Support 200 LBS...
... 25-3/8 38-3/4 11" over centerline of at GEAppliances.com or call GE Answer Center® service, 800.626.2000. GE® 24" Built-In Gas Oven Dimensions (in inches) 24 Min 24 2-1/2" MIN. CL 2 x 4 or equivalent runners 7-1/2 23-5/8 38 22-3/16 22" MIN. 28" MAX. 14-1/2" MIN. 20-1/2" MAX. ..., 5A Note: Cabinets installed adjacent to your Monogram,® GE Profile™ or GE® appliance questions, visit our website at least 194° temperature rating. Specification Created 1/04 330120 For answers to wall ovens must have an adhesion spec of cabinet (Must Support 200 LBS...

Installation Instructions
Page 3
...24″ min. These runners must have solid sides, back and bottom. and must be level and straight. • The wall coverings, countertops and cabinets around the gas or electrical outlets must be used to prevent drafts. Leave the gas off the main gas supply before removing the existing oven.... B Measure how much your gas inlet pipe if necessary. D Remove the...
...24″ min. These runners must have solid sides, back and bottom. and must be level and straight. • The wall coverings, countertops and cabinets around the gas or electrical outlets must be used to prevent drafts. Leave the gas off the main gas supply before removing the existing oven.... B Measure how much your gas inlet pipe if necessary. D Remove the...

Installation Instructions
Page 7
... this guide has been completed. C If the cabinet cutout is higher than 38″, use the short trim and attach to the bottom of the oven. A Using a 1/8″ drill bit, drill holes through the side trim and into the cabinet below the unit and must not be blocked. 7 ...Installation Instructions 10 SECURE THE OVEN IMPORTANT: Remove all packing material and literature from the oven before connecting any electrical supplies. Rechecking steps will ensure safe use of the front frame, with screws provided. (If...
... this guide has been completed. C If the cabinet cutout is higher than 38″, use the short trim and attach to the bottom of the oven. A Using a 1/8″ drill bit, drill holes through the side trim and into the cabinet below the unit and must not be blocked. 7 ...Installation Instructions 10 SECURE THE OVEN IMPORTANT: Remove all packing material and literature from the oven before connecting any electrical supplies. Rechecking steps will ensure safe use of the front frame, with screws provided. (If...

