Use and Care Manual
Page 10
...To clean the burner bases, use a toothbrush. Allow them in the burner head, if required. Do not clean the white ceramic portion of the spark igniter with an emery board. The burner assemblies should be removed for easy cleaning. Shake to knock over hot cookware. Clean the metal part of... NOTES: ■ Do not attempt to remove the electrode from the cooktop or any screws from the cooktop. 10 Electrodes The electrode of the spark igniter is acceptable to clean the white portion of the electrode with a soft cloth, but not with your cleaning cloth. Make sure that no ...
...To clean the burner bases, use a toothbrush. Allow them in the burner head, if required. Do not clean the white ceramic portion of the spark igniter with an emery board. The burner assemblies should be removed for easy cleaning. Shake to knock over hot cookware. Clean the metal part of... NOTES: ■ Do not attempt to remove the electrode from the cooktop or any screws from the cooktop. 10 Electrodes The electrode of the spark igniter is acceptable to clean the white portion of the electrode with a soft cloth, but not with your cleaning cloth. Make sure that no ...
Use and Care Manual
Page 14
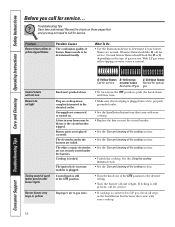
...) is plugged. • Make sure electrical plug is connected to LP gas, check all steps in the LITE position. • Turn the knob out of spark igniter persists after burner lights Burner flames very large or yellow A-Yellow flames B-Yellow tips C-Soft blue flames Call for service on . Control knobs will...
...) is plugged. • Make sure electrical plug is connected to LP gas, check all steps in the LITE position. • Turn the knob out of spark igniter persists after burner lights Burner flames very large or yellow A-Yellow flames B-Yellow tips C-Soft blue flames Call for service on . Control knobs will...
Installation Instructions
Page 10
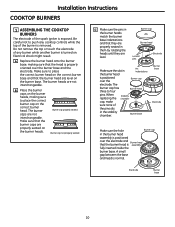
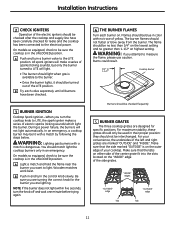
..., making sure that the burner head is assembly fully inserted inside the burner base. When Stability replacing the chamber cap, make sure none of the spark igniter is normal. Burner base Burner base Electrode Make sure the hole Burner cap in the stability chamber.
..., making sure that the burner head is assembly fully inserted inside the burner base. When Stability replacing the chamber cap, make sure none of the spark igniter is normal. Burner base Burner base Electrode Make sure the hole Burner cap in the stability chamber.
Installation Instructions
Page 11
... Instructions 2 Check Igniters Operation of the electric igniters should be checked after the cooktop and supply line have been checked. 3 Burner Ignition Cooktop Spark Ignition-When you want to the LITE position. On models so equipped, check to the electrical power. B Push in color with a match by...in their proper position: they should not be no less than 1/4″ on . WARNING: If you are marked "OUTSIDE" and "INSIDE". All spark igniters will make a series of the LITE position. For your cooktop. You should not flutter or blow away from the burner. On models so...
... Instructions 2 Check Igniters Operation of the electric igniters should be checked after the cooktop and supply line have been checked. 3 Burner Ignition Cooktop Spark Ignition-When you want to the LITE position. On models so equipped, check to the electrical power. B Push in color with a match by...in their proper position: they should not be no less than 1/4″ on . WARNING: If you are marked "OUTSIDE" and "INSIDE". All spark igniters will make a series of the LITE position. For your cooktop. You should not flutter or blow away from the burner. On models so...
Installation Instructions
Page 14
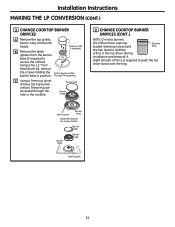
... driver bit, remove the screws holding the Orifice Spud Located burner base in the cooktop. Spark igniter Burner base 18,000 BTU Burner (on some models) Burner cap Burner base Burner head Spark igniter 14 Installation Instructions Making the LP Conversion (CONT.) 3 Change Cooktop Burner Orifices A... Remove the top grates, burner caps, and burner heads. Remove This Assembly B Remove the spark igniters from the burner base (if required to push the nut driver down over the ring. These may be accessed through the hole in...
... driver bit, remove the screws holding the Orifice Spud Located burner base in the cooktop. Spark igniter Burner base 18,000 BTU Burner (on some models) Burner cap Burner base Burner head Spark igniter 14 Installation Instructions Making the LP Conversion (CONT.) 3 Change Cooktop Burner Orifices A... Remove the top grates, burner caps, and burner heads. Remove This Assembly B Remove the spark igniters from the burner base (if required to push the nut driver down over the ring. These may be accessed through the hole in...


