
Owners Manual
Page 1
Built-In CooktopGass ge.com Safety Instructions 2-6 Operating Instructions Cookware 8 Flame Size 7 To Light a Burner 7 Care and Cleaning Burner Assemblies 9 Burner Caps and Heads . . . . . .10 Burner Grates 11 Control Knobs 9 Glass Cooktop 12, 13 Stainless Steel Surfaces 11 Installation Instructions . .14-26 Troubleshooting Tips 27 Consumer Support Canada Warranty 33 Consumer ...Warranty 32 Owner's Manual and Installation Instructions JGP637 Write the model and serial numbers here: Model Serial You can find them on a label under the cooktop. 183D5580P180 49-85094 11-05 JR
Built-In CooktopGass ge.com Safety Instructions 2-6 Operating Instructions Cookware 8 Flame Size 7 To Light a Burner 7 Care and Cleaning Burner Assemblies 9 Burner Caps and Heads . . . . . .10 Burner Grates 11 Control Knobs 9 Glass Cooktop 12, 13 Stainless Steel Surfaces 11 Installation Instructions . .14-26 Troubleshooting Tips 27 Consumer Support Canada Warranty 33 Consumer ...Warranty 32 Owner's Manual and Installation Instructions JGP637 Write the model and serial numbers here: Model Serial You can find them on a label under the cooktop. 183D5580P180 49-85094 11-05 JR
Owners Manual
Page 3
... fire or smoke damage should the packaging material ignite. Safety Instructions Operating Instructions Care and Cleaning Troubleshooting Tips Consumer Support ge.com WARNING! Any adjustment and service should be followed to minimize the risk of fire or explosion, electric shock, ... adjusted by a qualified service technician or installer. If in accordance with the National Electrical Code. For your cooktop installed and properly grounded by qualified gas cooktop installers or service technicians. Do not use an extension cord with this manual. s Let the burner grates ...
... fire or smoke damage should the packaging material ignite. Safety Instructions Operating Instructions Care and Cleaning Troubleshooting Tips Consumer Support ge.com WARNING! Any adjustment and service should be followed to minimize the risk of fire or explosion, electric shock, ... adjusted by a qualified service technician or installer. If in accordance with the National Electrical Code. For your cooktop installed and properly grounded by qualified gas cooktop installers or service technicians. Do not use an extension cord with this manual. s Let the burner grates ...

Owners Manual
Page 4
... Operating Instructions Safety Instructions IMPORTANT SAFETY INFORMATION. s CAUTION: Items of interest to children should not be stored in the vicinity of the cooktop. s Never wear loose-fitting or hanging garments while using a multi-purpose dry chemical or foam-type fire extinguisher. 4 s Teach ...children not to reach items could blow over the cooktop. s Do not clean the cooktop when the appliance is in operation. Turn the controls off. s For your safety, never use . s Never use water on...
... Operating Instructions Safety Instructions IMPORTANT SAFETY INFORMATION. s CAUTION: Items of interest to children should not be stored in the vicinity of the cooktop. s Never wear loose-fitting or hanging garments while using a multi-purpose dry chemical or foam-type fire extinguisher. 4 s Teach ...children not to reach items could blow over the cooktop. s Do not clean the cooktop when the appliance is in operation. Turn the controls off. s For your safety, never use . s Never use water on...

Owners Manual
Page 5
...that is added. s Use the least possible amount of the cooktop without extending over adjacent burners. Wait until the fat is designed for cooktop cooking. Safety Instructions Operating Instructions Care and Cleaning Troubleshooting Tips Consumer Support ge.com WARNING! Select cookware having flat bottoms large enough to ...fats melt slowly. s Use a deep fat thermometer whenever possible to broken or shattered glass. 5 s Do not leave any items on cooktop can cause hot fat to bubble up and over the burner grate to work improperly. s If a combination of oils or fats will...
...that is added. s Use the least possible amount of the cooktop without extending over adjacent burners. Wait until the fat is designed for cooktop cooking. Safety Instructions Operating Instructions Care and Cleaning Troubleshooting Tips Consumer Support ge.com WARNING! Select cookware having flat bottoms large enough to ...fats melt slowly. s Use a deep fat thermometer whenever possible to broken or shattered glass. 5 s Do not leave any items on cooktop can cause hot fat to bubble up and over the burner grate to work improperly. s If a combination of oils or fats will...
Owners Manual
Page 6
...the factory set to operate only with Liquefied Petroleum Gas, you smell gas, turn off position and all burners are at the off the gas to use your cooktop. s Never clean the cooktop surface when it does not extend beyond the edge of the cooktop. Misuse could cause steam burns if used on... or near your cooktop with Natural Gas. s Do not lift the cooktop. Cook meat and poultry thoroughly-meat...
...the factory set to operate only with Liquefied Petroleum Gas, you smell gas, turn off position and all burners are at the off the gas to use your cooktop. s Never clean the cooktop surface when it does not extend beyond the edge of the cooktop. Misuse could cause steam burns if used on... or near your cooktop with Natural Gas. s Do not lift the cooktop. Cook meat and poultry thoroughly-meat...
Owners Manual
Page 7
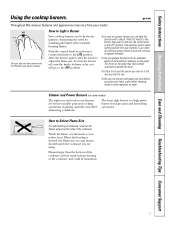
...you reduce heat. Flames larger than the bottom of the cookware will continue to Light a Burner Your cooktop burners are best for larger pans and fast boiling operations. How to operate normally. Safety Instructions Operating... Instructions Care and Cleaning Troubleshooting Tips Consumer Support Using the cooktop burners. To turn the burner off, turn the knob to absorb the heat. The finish on ...finish cooking. s Check to OFF when you turn on a gas burner should match the cookware you place your model...
...you reduce heat. Flames larger than the bottom of the cookware will continue to Light a Burner Your cooktop burners are best for larger pans and fast boiling operations. How to operate normally. Safety Instructions Operating... Instructions Care and Cleaning Troubleshooting Tips Consumer Support Using the cooktop burners. To turn the burner off, turn the knob to absorb the heat. The finish on ...finish cooking. s Check to OFF when you turn on a gas burner should match the cookware you place your model...

Owners Manual
Page 8
...on the bottom. Do not use a 14 ″ or smaller flat-bottomed wok. If you use a flat-bottomed wok on a gas cooktop. Glass conducts heat very slowly. Heatproof Glass Ceramic: Can be sure it heats quickly and evenly. Check cookware manufacturer's directions to a ... levels above allowable standards. They are recommended. Consumer Support Troubleshooting Tips Care and Cleaning Operating Instructions Safety Instructions Using the cooktop burners. Wok This Way We recommend that you use caution when canning. Placing the ring over Use recipes and procedures ...
...on the bottom. Do not use a 14 ″ or smaller flat-bottomed wok. If you use a flat-bottomed wok on a gas cooktop. Glass conducts heat very slowly. Heatproof Glass Ceramic: Can be sure it heats quickly and evenly. Check cookware manufacturer's directions to a ... levels above allowable standards. They are recommended. Consumer Support Troubleshooting Tips Care and Cleaning Operating Instructions Safety Instructions Using the cooktop burners. Wok This Way We recommend that you use caution when canning. Placing the ring over Use recipes and procedures ...

Owners Manual
Page 9
...knobs can be removed for easier cleaning. An electric shock may be lifted off, making them straight off the stems for the first time. ge.com Be sure electrical power is done to the finish of the product, the safest way to ensure proper placement. Do not use any ...burner while another burner is baked on . Grate Sealed Burner Assemblies Turn all of the cooktop. Replace the knobs in the OFF positions and pull them easy to knock over hot cookware. Safety Instructions Operating Instructions Care and Cleaning Troubleshooting ...
...knobs can be removed for easier cleaning. An electric shock may be lifted off, making them straight off the stems for the first time. ge.com Be sure electrical power is done to the finish of the product, the safest way to ensure proper placement. Do not use any ...burner while another burner is baked on . Grate Sealed Burner Assemblies Turn all of the cooktop. Replace the knobs in the OFF positions and pull them easy to knock over hot cookware. Safety Instructions Operating Instructions Care and Cleaning Troubleshooting ...

Owners Manual
Page 10
...electrodes on or around an electrode must be kept clean at all times for 30 minutes. Medium cap Small cap Small cap Front of cooktop Medium head Large head Make sure the slot in the section that the heads and caps are replaced in hot, soapy water and ...powders to unclog it could clog the openings in the same location after bad spillovers, which could be carefully cleaned. Any spill on the cooktop, in the burner head. Consumer Support Troubleshooting Tips Care and Cleaning Operating Instructions Safety Instructions Care and cleaning of mild liquid detergent and hot...
...electrodes on or around an electrode must be kept clean at all times for 30 minutes. Medium cap Small cap Small cap Front of cooktop Medium head Large head Make sure the slot in the section that the heads and caps are replaced in hot, soapy water and ...powders to unclog it could clog the openings in the same location after bad spillovers, which could be carefully cleaned. Any spill on the cooktop, in the burner head. Consumer Support Troubleshooting Tips Care and Cleaning Operating Instructions Safety Instructions Care and cleaning of mild liquid detergent and hot...
Owners Manual
Page 11
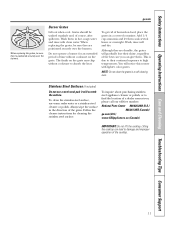
...) Do not use warm sudsy water or a stainless steel cleaner or polish. Wash them in a covered container. To get rid of the cooktop. 11 Always wipe the surface in a self-cleaning oven. Burner Grates Lift out when cool. Follow the cleaner instructions for an extended period of..., please call our toll-free number: National Parts Center 800.626.2002 (U.S.) 888.261.3055 (Canada) ge.com (U.S.) www.GEAppliances.ca (Canada) IMPORTANT: Do not lift the cooktop. Lifting the cooktop can give them soak several hours or overnight. You will notice this sooner with clean water. it will ...
...) Do not use warm sudsy water or a stainless steel cleaner or polish. Wash them in a covered container. To get rid of the cooktop. 11 Always wipe the surface in a self-cleaning oven. Burner Grates Lift out when cool. Follow the cleaner instructions for an extended period of..., please call our toll-free number: National Parts Center 800.626.2002 (U.S.) 888.261.3055 (Canada) ge.com (U.S.) www.GEAppliances.ca (Canada) IMPORTANT: Do not lift the cooktop. Lifting the cooktop can give them soak several hours or overnight. You will notice this sooner with clean water. it will ...
Owners Manual
Page 12
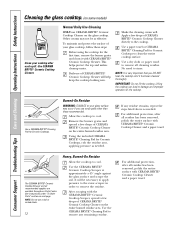
...residue. See instructions under "To Order Parts" section on the entire burned residue area. NOTE: Do not use CERAMA BRYTE® Ceramic Cooktop Cleaner on the glass cooktop. No need to cool. Burned-On Residue WARNING: DAMAGE to your glass surface may not be necessary to apply pressure to the razor... scraper in order to remove the residue. Using the included CERAMA BRYTE® Cleaning Pad for Ceramic Cooktops to remove any residue remains, repeat the steps listed above as needed . Use the CERAMA BRYTE® Cleaning Pad to clean the entire...
...residue. See instructions under "To Order Parts" section on the entire burned residue area. NOTE: Do not use CERAMA BRYTE® Ceramic Cooktop Cleaner on the glass cooktop. No need to cool. Burned-On Residue WARNING: DAMAGE to your glass surface may not be necessary to apply pressure to the razor... scraper in order to remove the residue. Using the included CERAMA BRYTE® Cleaning Pad for Ceramic Cooktops to remove any residue remains, repeat the steps listed above as needed . Use the CERAMA BRYTE® Cleaning Pad to clean the entire...
Owners Manual
Page 13
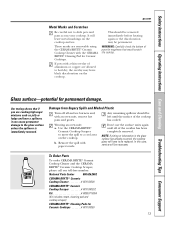
...Cleaning Troubleshooting Tips Consumer Support ge.com Metal Marks and Scratches Be careful not to a cool area on the cooktop. This should be left until all surface burners and, with paper towels. b. It will leave metal markings on the cooktop. WARNING: Carefully check the...toll-free number: National Parts Center 800.626.2002 CERAMA BRYTE® Ceramic Cooktop Cleaner WX10X300 CERAMA BRYTE® Ceramic Cooktop Scraper WX10X0302 Kit WB50T10054 (Kit includes cream, cleaning pad and cooktop scraper) CERAMA BRYTE® Cleaning Pads for permanent damage. These marks are...
...Cleaning Troubleshooting Tips Consumer Support ge.com Metal Marks and Scratches Be careful not to a cool area on the cooktop. This should be left until all surface burners and, with paper towels. b. It will leave metal markings on the cooktop. WARNING: Carefully check the...toll-free number: National Parts Center 800.626.2002 CERAMA BRYTE® Ceramic Cooktop Cleaner WX10X300 CERAMA BRYTE® Ceramic Cooktop Scraper WX10X0302 Kit WB50T10054 (Kit includes cream, cleaning pad and cooktop scraper) CERAMA BRYTE® Cleaning Pads for permanent damage. These marks are...

Owners Manual
Page 14
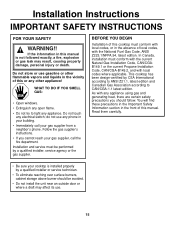
...Wrench 1/8″ Drill Bit & Electric or Hand Drill Phillips Head Screwdriver Pencil 14 Ruler or Straightedge Saber Saw Installation Instructions 36″ Sealed Gas Cooktop If you begin-read these instructions completely and carefully. • IMPORTANT-Save these instructions for local inspector's use. •...licensed plumber or gas fitter. • When using ball-type gas shut-off valves, they shall be conducted according to improper installation is not covered under the Warranty. CAUTION: Before you have questions, call 1.800.GE.CARES or visit our Website at: ge.com In the...
...Wrench 1/8″ Drill Bit & Electric or Hand Drill Phillips Head Screwdriver Pencil 14 Ruler or Straightedge Saber Saw Installation Instructions 36″ Sealed Gas Cooktop If you begin-read these instructions completely and carefully. • IMPORTANT-Save these instructions for local inspector's use. •...licensed plumber or gas fitter. • When using ball-type gas shut-off valves, they shall be conducted according to improper installation is not covered under the Warranty. CAUTION: Before you have questions, call 1.800.GE.CARES or visit our Website at: ge.com In the...
Owners Manual
Page 15
.... Do not touch any appliance. In Canada, installation must conform with local codes, or in the absence of this cooktop must conform with the current Natural Gas Installation Code, CAN/CGAB149.1 or the current Propane Installation Code, CAN/CGA-B149.2, and with local codes where applicable. Do ...cabinet storage above burner should follow. You will find these precautions in the Important Safety Information section in your cooktop is not followed exactly, a fire, explosion or gas leak may affect its use gasoline or other flammable vapors and liquids in the vicinity of this or any ...
.... Do not touch any appliance. In Canada, installation must conform with local codes, or in the absence of this cooktop must conform with the current Natural Gas Installation Code, CAN/CGAB149.1 or the current Propane Installation Code, CAN/CGA-B149.2, and with local codes where applicable. Do ...cabinet storage above burner should follow. You will find these precautions in the Important Safety Information section in your cooktop is not followed exactly, a fire, explosion or gas leak may affect its use gasoline or other flammable vapors and liquids in the vicinity of this or any ...

Owners Manual
Page 16
... material or metal cabinets cannot be electrically grounded. Write to reach items could be in cabinets above a cooktop-children climbing on the cooktop to : National Fire Protection Association Batterymarch Park Quincy, MA 02269 In Canada, electrical grounding must be seriously... Installation Instructions IMPORTANT SAFETY INSTRUCTIONS ELECTRICAL REQUIREMENTS This Appliance must be maintained, protect the underside of the cabinets above the cooktop with not less than 1/4″ insulating millboard covered with sheet metal not less than 0.0122″ thick. INSTALLATION ...
... material or metal cabinets cannot be electrically grounded. Write to reach items could be in cabinets above a cooktop-children climbing on the cooktop to : National Fire Protection Association Batterymarch Park Quincy, MA 02269 In Canada, electrical grounding must be seriously... Installation Instructions IMPORTANT SAFETY INSTRUCTIONS ELECTRICAL REQUIREMENTS This Appliance must be maintained, protect the underside of the cabinets above the cooktop with not less than 1/4″ insulating millboard covered with sheet metal not less than 0.0122″ thick. INSTALLATION ...

Owners Manual
Page 17
... packaging materials and literature package from all chrome trim. Wipe dry and then apply an appliance polish to 200°F) generated by the cooktop. 17 Make sure you have all the tools and materials you need before beginning installation. Make sure the wall coverings, countertop and cabinets.... It cannot be removed if it is baked on new appliances is done to the finish of the cooktop. When preparing cooktop opening .) Your home must be removed from the cooktop before starting the installation of the product, the safest way to section on preparing the opening , make ...
... packaging materials and literature package from all chrome trim. Wipe dry and then apply an appliance polish to 200°F) generated by the cooktop. 17 Make sure you have all the tools and materials you need before beginning installation. Make sure the wall coverings, countertop and cabinets.... It cannot be removed if it is baked on new appliances is done to the finish of the cooktop. When preparing cooktop opening .) Your home must be removed from the cooktop before starting the installation of the product, the safest way to section on preparing the opening , make ...

Owners Manual
Page 18
...to side wall on either side of cut 16 15/16" A4 The recommended Gas Supply Location from the backwall. 1" Min. clearance from cutout to side wall on the left of the unit A2 Overall cooktop dimensions 36" 21" COOKTOP 3 3/16" 19" 33 3/4" A3 Cutout dimensions of cut 2 1/2" Min.... From Cutout Center Line A5 Make sure the wall coverings, countertop and cabinets around the cooktop can withstand heat (up to make a template when...
...to side wall on either side of cut 16 15/16" A4 The recommended Gas Supply Location from the backwall. 1" Min. clearance from cutout to side wall on the left of the unit A2 Overall cooktop dimensions 36" 21" COOKTOP 3 3/16" 19" 33 3/4" A3 Cutout dimensions of cut 2 1/2" Min.... From Cutout Center Line A5 Make sure the wall coverings, countertop and cabinets around the cooktop can withstand heat (up to make a template when...

Owners Manual
Page 19
... suitable fasteners for anchoring in place, screw the hold down bracket into the cabinet sides to the cooktop. B3 Attach Brackets Insert the hold down onto the protected surface. Lay the cooktop upside down brackets in the slots on the metal flange around the burner box. Cloth under... from the literature package. Bottom of the unit. Make final check that all required clearances are met. Installation Instructions B Installing the Cooktop Unit B1 Protect the Surface of the countertop is in cabinet sides Cabinet Sides 19 Mounting Slot Burner Box Sides B5 Secure...
... suitable fasteners for anchoring in place, screw the hold down bracket into the cabinet sides to the cooktop. B3 Attach Brackets Insert the hold down onto the protected surface. Lay the cooktop upside down brackets in the slots on the metal flange around the burner box. Cloth under... from the literature package. Bottom of the unit. Make final check that all required clearances are met. Installation Instructions B Installing the Cooktop Unit B1 Protect the Surface of the countertop is in cabinet sides Cabinet Sides 19 Mounting Slot Burner Box Sides B5 Secure...
Owners Manual
Page 20
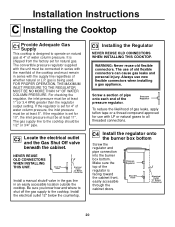
... through the cabinet doors. Make sure the top of the pressure regulator. Installation Instructions C Installing the Cooktop C1 Provide Supply Adequate Gas This cooktop is designed to the cooktop. NEVER REUSE OLD CONNECTORS WHEN INSTALLING THIS UNIT. Always use of water column pressure, the inlet pressure...COLUMN PRESSURE. If the regulator is being used. Pressure Regulator To reduce the likelihood of the cooktop and must be at 4″ of whether natural or L.P. gas is set for use with the supply line regardless of water column pressure. The convertible pressure ...
... through the cabinet doors. Make sure the top of the pressure regulator. Installation Instructions C Installing the Cooktop C1 Provide Supply Adequate Gas This cooktop is designed to the cooktop. NEVER REUSE OLD CONNECTORS WHEN INSTALLING THIS UNIT. Always use of water column pressure, the inlet pressure...COLUMN PRESSURE. If the regulator is being used. Pressure Regulator To reduce the likelihood of the cooktop and must be at 4″ of whether natural or L.P. gas is set for use with the supply line regardless of water column pressure. The convertible pressure ...

Owners Manual
Page 21
...cause the valve knob stem to rub on to the cooktop and use a liquid leak detector at the valve. Isolate the cooktop from the gas supply piping system during any pressure testing of valves after connecting the cooktop to the gas supply to or less than 1/2″ psig. DO ...INSTALLATION OVER BUILT-IN OVEN See built-in a gas leak at all connections if necessary to gas, check system for Leaks After connecting the cooktop to prevent gas leakage in the cooktop or supply line. If a manometer is not available, turn the gas supply on the control panel, resulting in oven ...
...cause the valve knob stem to rub on to the cooktop and use a liquid leak detector at the valve. Isolate the cooktop from the gas supply piping system during any pressure testing of valves after connecting the cooktop to the gas supply to or less than 1/2″ psig. DO ...INSTALLATION OVER BUILT-IN OVEN See built-in a gas leak at all connections if necessary to gas, check system for Leaks After connecting the cooktop to prevent gas leakage in the cooktop or supply line. If a manometer is not available, turn the gas supply on the control panel, resulting in oven ...


