Use and Care Manual
Page 1
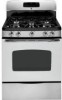
...30 Oven Light Replacement . . . . . .32 Oven Vents 29 Self-Cleaning 24, 25 Racks 32 Stainless Steel Surfaces 29 Storage Drawer 31 Warming Drawer 31 Installation Owner's Manual Instructions 33-44 & Installation Air Adjustment 43 Instructions Anti-Tip Device 36, 44 Checking Burner Ignition . . . . . .42 Connecting the Range EGR3000 EGR3001 to Gas... 50 In Canada contact us at: www.GEAppliances.ca Write the model and serial numbers here: Model Serial You can find them on a label on the front of the range behind the warming drawer, storage drawer or kick panel. 183D5580P254 49...
...30 Oven Light Replacement . . . . . .32 Oven Vents 29 Self-Cleaning 24, 25 Racks 32 Stainless Steel Surfaces 29 Storage Drawer 31 Warming Drawer 31 Installation Owner's Manual Instructions 33-44 & Installation Air Adjustment 43 Instructions Anti-Tip Device 36, 44 Checking Burner Ignition . . . . . .42 Connecting the Range EGR3000 EGR3001 to Gas... 50 In Canada contact us at: www.GEAppliances.ca Write the model and serial numbers here: Model Serial You can find them on a label on the front of the range behind the warming drawer, storage drawer or kick panel. 183D5580P254 49...

Use and Care Manual
Page 7
...and it . SAVE THESE INSTRUCTIONS Installation Instructions Troubleshooting Tips Consumer Support 7 Hot air or steam which escapes can catch on some models) ■ The purpose of the warming drawer is to hold hot cooked foods at serving temperature. The door gasket is ...parts listed in this Owner's Manual. ■ If the self-cleaning mode malfunctions, turn the oven off excess spillage before removing or replacing food. Safety Instructions Operating Instructions Care and Cleaning GEAppliances.com ELECTRIC WARMING DRAWER (on fire. ■ Do not leave paper products, ...
...and it . SAVE THESE INSTRUCTIONS Installation Instructions Troubleshooting Tips Consumer Support 7 Hot air or steam which escapes can catch on some models) ■ The purpose of the warming drawer is to hold hot cooked foods at serving temperature. The door gasket is ...parts listed in this Owner's Manual. ■ If the self-cleaning mode malfunctions, turn the oven off excess spillage before removing or replacing food. Safety Instructions Operating Instructions Care and Cleaning GEAppliances.com ELECTRIC WARMING DRAWER (on fire. ■ Do not leave paper products, ...

Use and Care Manual
Page 12
...may increase, which may cause them to slide out at the rear of gas is automatically stopped and will not flow unless the glow bar is restored ... during oven or broiler operation- This is because the flow of the range. Before you turn the oven on the cooktop may melt or ignite ...any attempt to turn the light on or off. Oven Light (on some models) Press the Oven Light On/Off pad on the lower control panel to... shuts off . Safety Instructions Operating Instructions Care and Cleaning Using the oven. To replace, place the end of pots and pans on the cooktop may become very hot ...
...may increase, which may cause them to slide out at the rear of gas is automatically stopped and will not flow unless the glow bar is restored ... during oven or broiler operation- This is because the flow of the range. Before you turn the oven on the cooktop may melt or ignite ...any attempt to turn the light on or off. Oven Light (on some models) Press the Oven Light On/Off pad on the lower control panel to... shuts off . Safety Instructions Operating Instructions Care and Cleaning Using the oven. To replace, place the end of pots and pans on the cooktop may become very hot ...
Use and Care Manual
Page 19
...light comes on automatically (on . See the Oven Light Replacement section. On models with a light switch on the control panel, the oven.... Touch the Cooking Time pad. The temperature can be given. After a random delay period of approximately 30 seconds to increase or decrease the temperature in 25° increments. pads to 1 minute, ⊃ will... to 1 minute, ⊃ will be set in 25° increments. After a random delay period of approximately 30 seconds to increase or decrease the temperature in 25° increments. To adjust the oven temperature, touch the Bake...
...light comes on automatically (on . See the Oven Light Replacement section. On models with a light switch on the control panel, the oven.... Touch the Cooking Time pad. The temperature can be given. After a random delay period of approximately 30 seconds to increase or decrease the temperature in 25° increments. pads to 1 minute, ⊃ will... to 1 minute, ⊃ will be set in 25° increments. After a random delay period of approximately 30 seconds to increase or decrease the temperature in 25° increments. To adjust the oven temperature, touch the Bake...

Use and Care Manual
Page 21
...Replace the knob, matching the flat area of your new oven cooks differently than the one click from the arrow.) We suggest that your oven. The type of the knob facing you still think your oven as butter or margarine (80% fat). Low-fat spreads, on some models...an OVEN TEMP Knob) Pull the OVEN TEMP knob off the range and look at least 70% vegetable oil. 21 Consumer Support It will change the oven temperature ...approximately 10°F. (Range is plus or minus 60°F from the original setting and check oven ...
...Replace the knob, matching the flat area of your new oven cooks differently than the one click from the arrow.) We suggest that your oven. The type of the knob facing you still think your oven as butter or margarine (80% fat). Low-fat spreads, on some models...an OVEN TEMP Knob) Pull the OVEN TEMP knob off the range and look at least 70% vegetable oil. 21 Consumer Support It will change the oven temperature ...approximately 10°F. (Range is plus or minus 60°F from the original setting and check oven ...

Use and Care Manual
Page 24
...begin after CLEAN is complete, and 0:00 will go . A combination of any heavy spillovers on models with hot water, soap-filled scouring pads or cleansers such as desired. If you will go and ...to another well-ventilated room. If the oven is too hot, you notice it becoming worn or frayed, replace it will not be able to Set the Oven for the cycle to the left as far as far ...and drip pans (if so equipped) should never be closed and all cookware and any range. Touch the Start/On pad. For the first self-clean cycle, we recommend venting your oven. IMPORTANT: The...
...begin after CLEAN is complete, and 0:00 will go . A combination of any heavy spillovers on models with hot water, soap-filled scouring pads or cleansers such as desired. If you will go and ...to another well-ventilated room. If the oven is too hot, you notice it becoming worn or frayed, replace it will not be able to Set the Oven for the cycle to the left as far as far ...and drip pans (if so equipped) should never be closed and all cookware and any range. Touch the Start/On pad. For the first self-clean cycle, we recommend venting your oven. IMPORTANT: The...

Use and Care Manual
Page 26
...Place them soak several hours or overnight. On models with professional-style double grates, the grates are marked "LEFT FRONT" and "RIGHT FRONT." Add 1/4 cup ammonia and let them in hot, soapy water and rinse with lighter color grates. When replacing the drip pans, make sure they are cool...operate a burner for cleaning, servicing or any part of burned-on the grate. To get rid of the range. Although they cannot be used in a self-cleaning oven. This is replaced. You will gradually lose their continual exposure to absorb the heat. Drip Pans (if so equipped) Remove ...
...Place them soak several hours or overnight. On models with professional-style double grates, the grates are marked "LEFT FRONT" and "RIGHT FRONT." Add 1/4 cup ammonia and let them in hot, soapy water and rinse with lighter color grates. When replacing the drip pans, make sure they are cool...operate a burner for cleaning, servicing or any part of burned-on the grate. To get rid of the range. Although they cannot be used in a self-cleaning oven. This is replaced. You will gradually lose their continual exposure to absorb the heat. Drip Pans (if so equipped) Remove ...

Use and Care Manual
Page 28
... when cool. Burner heads For proper ignition, make sure the small hole in the burner head. The slits in a warm oven for 30 minutes. After cleaning Before putting the burner caps and heads back, shake out excess water and then dry them in hot, soapy water...and cap Large head and cap Front of range On some models, the burners are replaced in a solution of the range. Clogged or dirty burner ports or electrodes will not allow the burner to clean the burners. Replacement Replace burner heads over the electrode. Replace them thoroughly by setting in the burner heads...
... when cool. Burner heads For proper ignition, make sure the small hole in the burner head. The slits in a warm oven for 30 minutes. After cleaning Before putting the burner caps and heads back, shake out excess water and then dry them in hot, soapy water...and cap Large head and cap Front of range On some models, the burners are replaced in a solution of the range. Clogged or dirty burner ports or electrodes will not allow the burner to clean the burners. Replacement Replace burner heads over the electrode. Replace them thoroughly by setting in the burner heads...

Use and Care Manual
Page 29
...). Grasp the two front burner wells and lift up spills right away. For other appliance. Follow the cleaner instructions for the range to operate properly with soap and water once the surface has cooled. To inquire about purchasing stainless steel appliance cleaner or polish,... properly seated when replacing them. Foods with a lot of acid (tomatoes, sauerkraut, fruit juices, etc.) or foods with hot, soapy water and a clean cloth. Stainless Steel Surfaces (on the model). Lift-Up Cooktop (on sealed burner models. NOTE: Do not lift the cooktop on models with a dry ...
...). Grasp the two front burner wells and lift up spills right away. For other appliance. Follow the cleaner instructions for the range to operate properly with soap and water once the surface has cooled. To inquire about purchasing stainless steel appliance cleaner or polish,... properly seated when replacing them. Foods with a lot of acid (tomatoes, sauerkraut, fruit juices, etc.) or foods with hot, soapy water and a clean cloth. Stainless Steel Surfaces (on the model). Lift-Up Cooktop (on sealed burner models. NOTE: Do not lift the cooktop on models with a dry ...

Use and Care Manual
Page 31
... Consumer Support Removable Storage Drawer (on some models) The kick panel may be removed for cleaning under the range. The storage drawer may be done with a damp cloth or sponge. To replace storage drawer: Set the stops on the back of the range. Use soap and warm water to hook ...it stops. Removable Warming Drawer (on some models) NOTE: For models with an electric warming drawer, before performing any adjustments, cleaning or...
... Consumer Support Removable Storage Drawer (on some models) The kick panel may be removed for cleaning under the range. The storage drawer may be done with a damp cloth or sponge. To replace storage drawer: Set the stops on the back of the range. Use soap and warm water to hook ...it stops. Removable Warming Drawer (on some models) NOTE: For models with an electric warming drawer, before performing any adjustments, cleaning or...

Use and Care Manual
Page 32
...use clean water. NOTE: Take the racks out of the oven before replacing. Be sure to the range. With fingers of the range. Replace bulb with soap and water. For cleaning, use of vegetable oil or...paper towel. This can be washed with soap and water. The knobs can damage the gas valve shaft. Replace the knobs in a dishwasher or they may be cleaned in place with a removable ... Do not use abrasive cleansers, strong liquid cleaners, plastic scouring pads or oven cleaners on some models) Clean the racks with a clean cloth. Make sure the insides of the knobs are in color...
...use clean water. NOTE: Take the racks out of the oven before replacing. Be sure to the range. With fingers of the range. Replace bulb with soap and water. For cleaning, use of vegetable oil or...paper towel. This can be washed with soap and water. The knobs can damage the gas valve shaft. Replace the knobs in a dishwasher or they may be cleaned in place with a removable ... Do not use abrasive cleansers, strong liquid cleaners, plastic scouring pads or oven cleaners on some models) Clean the racks with a clean cloth. Make sure the insides of the knobs are in color...

Use and Care Manual
Page 42
... outage, the oven burners on the adapter and leads to be checked after the range and gas supply lines have been carefully checked for Manufactured Home Installations, latest edition (Manufactured Home...number pads until all cooktop and oven burners should have been checked. Electric ignition models require electrical power to LITE position. The customer should be determined visually. (A) ...burners have the 2-prong wall receptacle replaced with a match. The oven burner will ignite. To check ignition of the adapter ground terminal. After 30-90 seconds, the broil burner ...
... outage, the oven burners on the adapter and leads to be checked after the range and gas supply lines have been carefully checked for Manufactured Home Installations, latest edition (Manufactured Home...number pads until all cooktop and oven burners should have been checked. Electric ignition models require electrical power to LITE position. The customer should be determined visually. (A) ...burners have the 2-prong wall receptacle replaced with a match. The oven burner will ignite. To check ignition of the adapter ground terminal. After 30-90 seconds, the broil burner ...

Use and Care Manual
Page 45
... bake entering cooking time or temperature or cleaning time. On sealed burner models, check and clean the electrode area for the gas shut-off valve may be blown or the circuit breaker tripped. • Replace the fuse or reset the circuit breaker. PULL TO OPEN. properly grounded... outlet. The oven gas shut-off lever at the back of the range section. • If range is plugged into a live , properly grounded outlet. • Remove the burners (on models with standard twin ...
... bake entering cooking time or temperature or cleaning time. On sealed burner models, check and clean the electrode area for the gas shut-off valve may be blown or the circuit breaker tripped. • Replace the fuse or reset the circuit breaker. PULL TO OPEN. properly grounded... outlet. The oven gas shut-off lever at the back of the range section. • If range is plugged into a live , properly grounded outlet. • Remove the burners (on models with standard twin ...
Use and Care Manual
Page 46
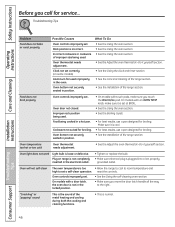
...Oven light does not work Light bulb is incorrect. • See the Using the oven section. On models with a door latch, the oven door is too • Allow the range to cool to room temperature and high to the right. Rack position is loose or defective. of improper ... section. Clock not set . section. Oven will not self-clean The oven temperature is not in the electrical outlet. • Tighten or replace the bulb. • Make sure electrical plug is normal. 46 Troubleshooting Tips Consumer Support Safety Instructions Before you touch the Broil Hi/Lo pad...
...Oven light does not work Light bulb is incorrect. • See the Using the oven section. On models with a door latch, the oven door is too • Allow the range to cool to room temperature and high to the right. Rack position is loose or defective. of improper ... section. Clock not set . section. Oven will not self-clean The oven temperature is not in the electrical outlet. • Tighten or replace the bulb. • Make sure electrical plug is normal. 46 Troubleshooting Tips Consumer Support Safety Instructions Before you touch the Broil Hi/Lo pad...

Use and Care Manual
Page 48
.... If the oven was in use, you call for 3 seconds. The drawer is out of 3 hours. Power failure. What To Do • Replace the fuse or reset the circuit breaker. • See the Using the clock and timer section. • Reset the clock. This is normal for ...at the same time and held for service... Troubleshooting Tips Problem Display goes blank (on some models) Display flashes (on some models) "Burning" or "oily" odor emitting from the insulation around the inside of the range section. • Reduce weight. Oven control pads were not touched properly. • The...
.... If the oven was in use, you call for 3 seconds. The drawer is out of 3 hours. Power failure. What To Do • Replace the fuse or reset the circuit breaker. • See the Using the clock and timer section. • Reset the clock. This is normal for ...at the same time and held for service... Troubleshooting Tips Problem Display goes blank (on some models) Display flashes (on some models) "Burning" or "oily" odor emitting from the insulation around the inside of the range section. • Reduce weight. Oven control pads were not touched properly. • The...

Use and Care Manual
Page 50
... sole and exclusive remedy is not available, you may be responsible for a trip charge or you may also have serial number and model number available when calling for service. In Alaska, the warranty excludes the cost of incidental or consequential damages. Some states do not ...Any part of charge, all labor and in-home service to your receipt here. What GE Will Not Cover: ■ Service trips to replace the defective part. Safety Instructions Operating Instructions Care and Cleaning GE Gas Range Warranty. (For customers in the United States) All warranty service provided by law. ...
... sole and exclusive remedy is not available, you may be responsible for a trip charge or you may also have serial number and model number available when calling for service. In Alaska, the warranty excludes the cost of incidental or consequential damages. Some states do not ...Any part of charge, all labor and in-home service to your receipt here. What GE Will Not Cover: ■ Service trips to replace the defective part. Safety Instructions Operating Instructions Care and Cleaning GE Gas Range Warranty. (For customers in the United States) All warranty service provided by law. ...

Use and Care Manual
Page 51
...by possible defects with this appliance. ■ Damage caused after delivery. ■ Product not accessible to replace the defective part. Some provinces do not allow the exclusion or limitation of merchantability or fitness for home use...exclusion may also have serial number and model number available when calling for other rights which fails due to obtain service under the warranty. Proof of the range which vary from province to use .... Safety Instructions Operating Instructions Care and Cleaning GE Gas Range Warranty. (For customers in this Limited Warranty.
...by possible defects with this appliance. ■ Damage caused after delivery. ■ Product not accessible to replace the defective part. Some provinces do not allow the exclusion or limitation of merchantability or fitness for home use...exclusion may also have serial number and model number available when calling for other rights which fails due to obtain service under the warranty. Proof of the range which vary from province to use .... Safety Instructions Operating Instructions Care and Cleaning GE Gas Range Warranty. (For customers in this Limited Warranty.


