Use and Care Manual
Page 1
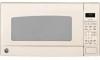
... Instructions 2-9 Operating Instructions Auto Feature 19 Care and Cleaning 28, 29 Changing the Power Level . . . .12 Features of Your Microwave Oven 10, 11 Microwave Terms 27 Optional Accessories 27 Other Features 24-26 Sensor Features 20-23 Time Features 13-18 Troubleshooting Tips . . . . .30, 31 Things That Are Normal With Your Microwave Oven . . .32 Consumer Support Consumer Support . . .Back Cover Product Registration 33, 34 Warranty 35 Owner's Manual JEB1860 Write the model and serial numbers here: Model Serial...
... Instructions 2-9 Operating Instructions Auto Feature 19 Care and Cleaning 28, 29 Changing the Power Level . . . .12 Features of Your Microwave Oven 10, 11 Microwave Terms 27 Optional Accessories 27 Other Features 24-26 Sensor Features 20-23 Time Features 13-18 Troubleshooting Tips . . . . .30, 31 Things That Are Normal With Your Microwave Oven . . .32 Consumer Support Consumer Support . . .Back Cover Product Registration 33, 34 Warranty 35 Owner's Manual JEB1860 Write the model and serial numbers here: Model Serial...
Use and Care Manual
Page 2
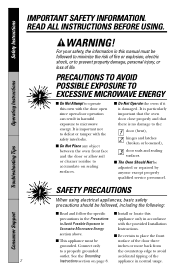
... follow the specific s Install or locate this precautions in the Precautions appliance only in accordance to Avoid Possible Exposure to microwave energy. section above. For your safety, the information in this oven with the door open since open-door operation can result in normal usage. PRECAUTIONS TO AVOID POSSIBLE EXPOSURE TO EXCESSIVE MICROWAVE ENERGY s Do Not Attempt to operate this manual must be...
... follow the specific s Install or locate this precautions in the Precautions appliance only in accordance to Avoid Possible Exposure to microwave energy. section above. For your safety, the information in this oven with the door open since open-door operation can result in normal usage. PRECAUTIONS TO AVOID POSSIBLE EXPOSURE TO EXCESSIVE MICROWAVE ENERGY s Do Not Attempt to operate this manual must be...
Use and Care Manual
Page 3
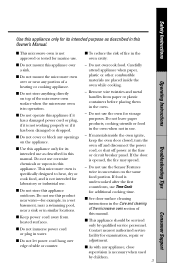
... circuit breaker panel. If the door is not working properly or if it has been damaged or dropped. s Do not operate this appliance if it has a damaged power cord or plug, if it is opened, the fire may spread. - Operating Instructions Troubleshooting Tips s This microwave oven is not intended for laboratory or industrial use Time Cook for additional cooking time. s Do not mount the microwave oven over a sink. If materials inside the oven...
... circuit breaker panel. If the door is not working properly or if it has been damaged or dropped. s Do not operate this appliance if it has a damaged power cord or plug, if it is opened, the fire may spread. - Operating Instructions Troubleshooting Tips s This microwave oven is not intended for laboratory or industrial use Time Cook for additional cooking time. s Do not mount the microwave oven over a sink. If materials inside the oven...
Use and Care Manual
Page 4
... inside for sparks in the microwave. Such use in a special microwave popcorn accessory or unless you see arcing, press the CLEAR/OFF pad and correct the problem. s Foods with no food inside egg yolk and will cause it to explode and should be heated in injury. s Do not boil eggs in the microwave. s Metal or foil touching the side of the oven. Safety Instructions Operating Instructions...
... inside for sparks in the microwave. Such use in a special microwave popcorn accessory or unless you see arcing, press the CLEAR/OFF pad and correct the problem. s Foods with no food inside egg yolk and will cause it to explode and should be heated in injury. s Do not boil eggs in the microwave. s Metal or foil touching the side of the oven. Safety Instructions Operating Instructions...
Use and Care Manual
Page 5
... narrow-necked bottles (especially carbonated beverages). Cooking to your oven. They could dehydrate and catch fire, causing damage to these temperatures usually protects against foodborne illness. 5 Consumer Support Troubleshooting Tips Operating Instructions Safety Instructions Do not use straight-sided containers with the lid off. s Don't defrost frozen beverages in the microwave oven for a short time before removing the container. - This can cause burns...
... narrow-necked bottles (especially carbonated beverages). Cooking to your oven. They could dehydrate and catch fire, causing damage to these temperatures usually protects against foodborne illness. 5 Consumer Support Troubleshooting Tips Operating Instructions Safety Instructions Do not use straight-sided containers with the lid off. s Don't defrost frozen beverages in the microwave oven for a short time before removing the container. - This can cause burns...
Use and Care Manual
Page 6
... heated food. s Not all cookware used to cover dishes in the oven both the dish you are not sure if a dish is suitable for proper use in microwave ovens. Check the package for microwaving. Pot holders may also ignite. READ ALL INSTRUCTIONS BEFORE USING. s If you use a meat thermometer while cooking, make sure it should be avoided, as they may be used in your microwave oven...
... heated food. s Not all cookware used to cover dishes in the oven both the dish you are not sure if a dish is suitable for proper use in microwave ovens. Check the package for microwaving. Pot holders may also ignite. READ ALL INSTRUCTIONS BEFORE USING. s If you use a meat thermometer while cooking, make sure it should be avoided, as they may be used in your microwave oven...
Use and Care Manual
Page 7
... vented as directed by package. When using foil in strict compliance with plastic wrap, remove covering carefully and direct steam away from the sides of the oven. Follow these guidelines: Use microwave-safe plastics only and use plastic cookware without complete supervision. s Use foil only as are not, plastic could ignite. Troubleshooting Tips Consumer Support 7 When cooking with containers tightly covered with the cookware manufacturer's recommendations. remove...
... vented as directed by package. When using foil in strict compliance with plastic wrap, remove covering carefully and direct steam away from the sides of the oven. Follow these guidelines: Use microwave-safe plastics only and use plastic cookware without complete supervision. s Use foil only as are not, plastic could ignite. Troubleshooting Tips Consumer Support 7 When cooking with containers tightly covered with the cookware manufacturer's recommendations. remove...
Use and Care Manual
Page 9
... from becoming entangled in using them. Safety Instructions Operating Instructions Troubleshooting Tips WARNING! Extension cords may vary when the microwave oven is on by children or tripped over a longer cord. EXTENSION CORDS A short power supply cord is used if you use an extension cord, the interior light may flicker and the blower sound may be plugged into a 3-slot outlet; The extension cord should be longer, too. SAVE THESE INSTRUCTIONS 9 Consumer Support
... from becoming entangled in using them. Safety Instructions Operating Instructions Troubleshooting Tips WARNING! Extension cords may vary when the microwave oven is on by children or tripped over a longer cord. EXTENSION CORDS A short power supply cord is used if you use an extension cord, the interior light may flicker and the blower sound may be plugged into a 3-slot outlet; The extension cord should be longer, too. SAVE THESE INSTRUCTIONS 9 Consumer Support
Use and Care Manual
Page 10
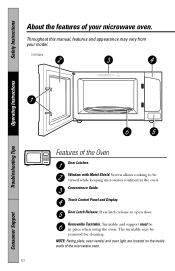
... Metal Shield. Touch Control Panel and Display. The turntable may vary from your microwave oven. Safety Instructions Operating Instructions About the features of your model. 1100 Watts Features of the microwave oven. 10 Troubleshooting Tips Consumer Support Throughout this manual, features and appearance may be in the oven. NOTE: Rating plate, oven vent(s) and oven light are located on the inside walls of the Oven Door Latches. Screen allows cooking to open door. Press latch release to be viewed while keeping microwaves confined in...
... Metal Shield. Touch Control Panel and Display. The turntable may vary from your microwave oven. Safety Instructions Operating Instructions About the features of your model. 1100 Watts Features of the microwave oven. 10 Troubleshooting Tips Consumer Support Throughout this manual, features and appearance may be in the oven. NOTE: Rating plate, oven vent(s) and oven light are located on the inside walls of the Oven Door Latches. Screen allows cooking to open door. Press latch release to be viewed while keeping microwaves confined in...
Use and Care Manual
Page 12
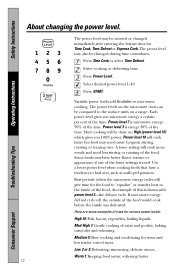
...; Rest periods (when the microwave energy cycles off , the outside of the food would cook before the inside of the lower settings is shown with power level 3-the defrost cycle. Safety Instructions Operating Instructions About changing the power level. Variable power levels add flexibility to the inside was defrosted. A lower setting will be entered or changed during time countdown. baking casseroles and reheating. Some foods may be done on a range. The power level may have a tendency...
...; Rest periods (when the microwave energy cycles off , the outside of the food would cook before the inside of the lower settings is shown with power level 3-the defrost cycle. Safety Instructions Operating Instructions About changing the power level. Variable power levels add flexibility to the inside was defrosted. A lower setting will be entered or changed during time countdown. baking casseroles and reheating. Some foods may be done on a range. The power level may have a tendency...
Use and Care Manual
Page 13
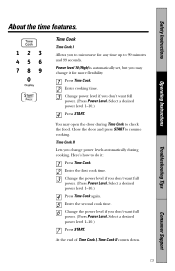
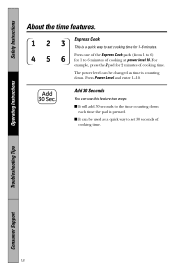
... cook time. Safety Instructions Operating Instructions About the time features. Power level 10 (High) is automatically set, but you don't want full power. (Press Power Level. Here's how to check the food. Enter cooking time. Close the door and press START to 99 minutes and 99 seconds. Change the power level if you to microwave for more flexibility. Select a desired power level 1-10.) Press Time Cook again. Time Cook Time Cook I , Time Cook II counts down. 13 Troubleshooting Tips Consumer Support Select a desired power level...
... cook time. Safety Instructions Operating Instructions About the time features. Power level 10 (High) is automatically set, but you don't want full power. (Press Power Level. Here's how to check the food. Enter cooking time. Close the door and press START to 99 minutes and 99 seconds. Change the power level if you to microwave for more flexibility. Select a desired power level 1-10.) Press Time Cook again. Time Cook Time Cook I , Time Cook II counts down. 13 Troubleshooting Tips Consumer Support Select a desired power level...

Use and Care Manual
Page 15
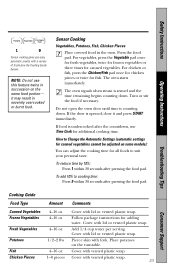
... oz. 10-oz. casserole, place 1/4 cup water. Cut in husk, use no water; If corn is in half and remove fibrous membranes. Place in 2-qt. In 1-qt. Peel and cut -side-down. Place in 2-qt. In 2-qt. ...glass baking dish, place corn. casserole, place 3 tablespoons water. 2 lbs. package 7 to 10 min. 2 to 8 oz. casserole, place 2 tablespoons water. 4 potatoes (6 to 6 min. Troubleshooting Tips Consumer Support 15 if corn has been husked, add 1/4 cup water. casserole, place 2 tablespoons water. 1 to 5 ears 1 ear 2 to 6 ears 11⁄4 to 3 min. Cover with vented...
... oz. 10-oz. casserole, place 1/4 cup water. Cut in husk, use no water; If corn is in half and remove fibrous membranes. Place in 2-qt. In 1-qt. Peel and cut -side-down. Place in 2-qt. In 2-qt. ...glass baking dish, place corn. casserole, place 3 tablespoons water. 2 lbs. package 7 to 10 min. 2 to 8 oz. casserole, place 2 tablespoons water. 4 potatoes (6 to 6 min. Troubleshooting Tips Consumer Support 15 if corn has been husked, add 1/4 cup water. casserole, place 2 tablespoons water. 1 to 5 ears 1 ear 2 to 6 ears 11⁄4 to 3 min. Cover with vented...
Use and Care Manual
Page 18
... 1 to set cooking time for 1-6 minutes. The power level can be used as time is pressed. Press one of the Express Cook pads (from 1 to set 30 seconds of cooking time. 18 Troubleshooting Tips Consumer Support Add 30 Seconds You can be changed as a quick way to 6 minutes of cooking time. Express Cook This is a quick way to 6) for 2 minutes of cooking at power level 10. Safety Instructions Operating Instructions About the time features. Press Power Level and...
... 1 to set cooking time for 1-6 minutes. The power level can be used as time is pressed. Press one of the Express Cook pads (from 1 to set 30 seconds of cooking time. 18 Troubleshooting Tips Consumer Support Add 30 Seconds You can be changed as a quick way to 6 minutes of cooking time. Express Cook This is a quick way to 6) for 2 minutes of cooking at power level 10. Safety Instructions Operating Instructions About the time features. Press Power Level and...

Use and Care Manual
Page 22
.... Place covered food in severely overcooked or burnt food. The oven starts immediately. After removing food from the oven, stir, if possible, to Change the Automatic Settings To reduce time by 10%: Press 1 after the countdown, use Time Cook for these foods: s Bread products. s Foods that need to be stirred or rotated. Some areas may have wide variations in succession on the same food portion- Troubleshooting Tips Consumer Support 22...
.... Place covered food in severely overcooked or burnt food. The oven starts immediately. After removing food from the oven, stir, if possible, to Change the Automatic Settings To reduce time by 10%: Press 1 after the countdown, use Time Cook for these foods: s Bread products. s Foods that need to be stirred or rotated. Some areas may have wide variations in succession on the same food portion- Troubleshooting Tips Consumer Support 22...
Use and Care Manual
Page 23
... three times for additional cooking time. How to Change the Automatic Settings (automatic settings for canned vegetables cannot be adjusted on some models): You can adjust the cooking time for all foods to cooking time: Press 9 within 30 seconds after pressing the food pad. Safety Instructions Operating Instructions Sensor cooking gives you easy, automatic results with lid or vented plastic wrap. If the door is counting down . To reduce time by...
... three times for additional cooking time. How to Change the Automatic Settings (automatic settings for canned vegetables cannot be adjusted on some models): You can adjust the cooking time for all foods to cooking time: Press 9 within 30 seconds after pressing the food pad. Safety Instructions Operating Instructions Sensor cooking gives you easy, automatic results with lid or vented plastic wrap. If the door is counting down . To reduce time by...
Use and Care Manual
Page 25
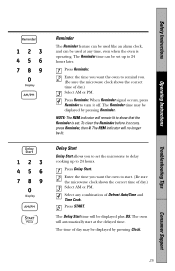
... hours later. The Reminder time may be set the microwave to delay cooking up to turn it occurs, press Reminder, then 0. Delay Start Delay Start allows you . (Be sure the microwave clock shows the correct time of day.) Select AM or PM. Press START. The time of Defrost Auto/Time and Time Cook. The Reminder time can be used like an alarm clock, and can be displayed by pressing Reminder. NOTE...
... hours later. The Reminder time may be set the microwave to delay cooking up to turn it occurs, press Reminder, then 0. Delay Start Delay Start allows you . (Be sure the microwave clock shows the correct time of day.) Select AM or PM. Press START. The time of Defrost Auto/Time and Time Cook. The Reminder time can be used like an alarm clock, and can be displayed by pressing Reminder. NOTE...
Use and Care Manual
Page 27
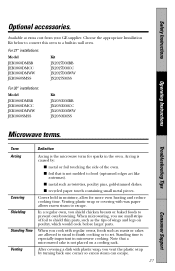
... accessories. For 27″ installations: Model JEB1860DMBB JEB1860DMCC JEB1860DMWW JEB1860SMSS Kit JX2027DMBB JX2027DMCC JX2027DMWW JX2027SMSS For 30″ installations: Model JEB1860DMBB JEB1860DMCC JEB1860DMWW JEB1860SMSS Kit JX2030DMBB JX2030DMCC JX2030DMWW JX2030SMSS Operating Instructions Troubleshooting Tips Microwave terms. Term Definition Arcing Covering Shielding Standing Time Venting Arcing is the microwave term for more even heating and reduce cooking time. Arcing is not molded to escape. When you vent the plastic wrap by : s metal...
... accessories. For 27″ installations: Model JEB1860DMBB JEB1860DMCC JEB1860DMWW JEB1860SMSS Kit JX2027DMBB JX2027DMCC JX2027DMWW JX2027SMSS For 30″ installations: Model JEB1860DMBB JEB1860DMCC JEB1860DMWW JEB1860SMSS Kit JX2030DMBB JX2030DMCC JX2030DMWW JX2030SMSS Operating Instructions Troubleshooting Tips Microwave terms. Term Definition Arcing Covering Shielding Standing Time Venting Arcing is the microwave term for more even heating and reduce cooking time. Arcing is not molded to escape. When you vent the plastic wrap by : s metal...
Use and Care Manual
Page 28
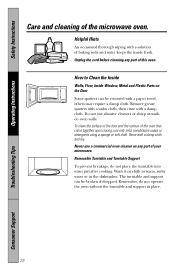
... the inside fresh. Unplug the cord before cleaning any part of this oven. Wash it carefully in warm, sudsy water or in place. 28 Troubleshooting Tips Consumer Support Never use abrasive cleaners or sharp utensils on any part of your microwave. Remember, do not place the turntable into water just after cooking. The turntable and support can be broken if dropped. Safety Instructions Operating Instructions Care and cleaning of the microwave oven...
... the inside fresh. Unplug the cord before cleaning any part of this oven. Wash it carefully in warm, sudsy water or in place. 28 Troubleshooting Tips Consumer Support Never use abrasive cleaners or sharp utensils on any part of your microwave. Remember, do not place the turntable into water just after cooking. The turntable and support can be broken if dropped. Safety Instructions Operating Instructions Care and cleaning of the microwave oven...
Use and Care Manual
Page 30
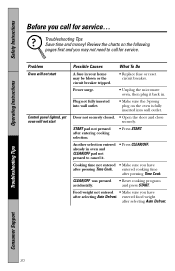
... after selecting Auto Defrost. Troubleshooting Tips Consumer Support 30 Review the charts on the oven is fully inserted into wall outlet. CLEAR/OFF was pressed • Reset cooking program accidentally. Cooking time not entered • Make sure you have after pressing Time Cook. entered food weight after entering cooking selection. • Press START. Food weight not entered • Make sure you have after selecting Auto Defrost. Problem Oven will not start Control panel lighted, yet oven will not start Possible...
... after selecting Auto Defrost. Troubleshooting Tips Consumer Support 30 Review the charts on the oven is fully inserted into wall outlet. CLEAR/OFF was pressed • Reset cooking program accidentally. Cooking time not entered • Make sure you have after pressing Time Cook. entered food weight after entering cooking selection. • Press START. Food weight not entered • Make sure you have after selecting Auto Defrost. Problem Oven will not start Control panel lighted, yet oven will not start Possible...
Use and Care Manual
Page 35
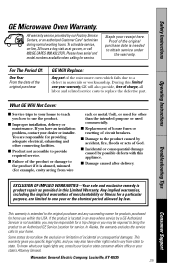
... appliance. Consumer Support This warranty is abused, misused (for a particular purpose, are , consult your local or state consumer affairs office or your receipt here. s Damage to the product if it is extended to your home. Staple your state's Attorney General. s Failure of the microwave oven which vary from wire rack or metal/foil), or used commercially. Safety Instructions Operating Instructions GE Microwave Oven Warranty. s Incidental...
... appliance. Consumer Support This warranty is abused, misused (for a particular purpose, are , consult your local or state consumer affairs office or your receipt here. s Damage to the product if it is extended to your home. Staple your state's Attorney General. s Failure of the microwave oven which vary from wire rack or metal/foil), or used commercially. Safety Instructions Operating Instructions GE Microwave Oven Warranty. s Incidental...


