
Owners Manual
Page 1
Microwave Oven ge.com Safety Information 2-6 Operating Instructions Auto Features 12 Microwave Terms 18 Other Features 16-18 Oven Features 7, 8 Power Levels 9 Sensor Features 13-15 Time Features 9-12 Care and Cleaning 19 Troubleshooting Tips 20 Things That Are Normal . . . . . .20 Consumer Support Consumer Support . . .Back Cover Product Registration . . . . . .21, 22 Warranty 23 Owner's Manual JE2160 Write the model and serial numbers here: Model Serial You can find them on a label inside the oven. 3513913700 49-40509 01-06 JR
Microwave Oven ge.com Safety Information 2-6 Operating Instructions Auto Features 12 Microwave Terms 18 Other Features 16-18 Oven Features 7, 8 Power Levels 9 Sensor Features 13-15 Time Features 9-12 Care and Cleaning 19 Troubleshooting Tips 20 Things That Are Normal . . . . . .20 Consumer Support Consumer Support . . .Back Cover Product Registration . . . . . .21, 22 Warranty 23 Owner's Manual JE2160 Write the model and serial numbers here: Model Serial You can find them on a label inside the oven. 3513913700 49-40509 01-06 JR

Owners Manual
Page 2
s Be certain to microwave energy. If the power cord is in this manual must be grounded. Do not use as described in operation. s Install or locate this oven with the door open since open-door operation can result in this manual. For your safety, the information in harmful exposure to place the front surface of the door three inches or more back from General Electric. PRECAUTIONS TO AVOID POSSIBLE...
s Be certain to microwave energy. If the power cord is in this manual must be grounded. Do not use as described in operation. s Install or locate this oven with the door open since open-door operation can result in this manual. For your safety, the information in harmful exposure to place the front surface of the door three inches or more back from General Electric. PRECAUTIONS TO AVOID POSSIBLE...

Owners Manual
Page 3
... locations. SAVE THESE INSTRUCTIONS - Carefully attend appliance when paper, plastic or other combustible materials are placed inside the oven ignite, keep the oven door closed, turn the oven off and disconnect the power cord, or shut off power at the fuse or circuit breaker panel. Remove wire twist-ties and metal handles from heated surfaces. Do not use this appliance outdoors. If materials inside the oven while cooking. - Arcing is caused by qualified service...
... locations. SAVE THESE INSTRUCTIONS - Carefully attend appliance when paper, plastic or other combustible materials are placed inside the oven ignite, keep the oven door closed, turn the oven off and disconnect the power cord, or shut off power at the fuse or circuit breaker panel. Remove wire twist-ties and metal handles from heated surfaces. Do not use this appliance outdoors. If materials inside the oven while cooking. - Arcing is caused by qualified service...
Owners Manual
Page 4
... the container is removed from hands and face. s Don't defrost frozen beverages in glass jars, even with narrow necks. - Troubleshooting Tips Consumer Support 4 s Some products such as water, coffee or tea, are able to explode and should be boiling. Do not use in this microwave oven. To prevent possible injury, direct steam away from the microwave oven is thoroughly cooked. s Do not...
... the container is removed from hands and face. s Don't defrost frozen beverages in glass jars, even with narrow necks. - Troubleshooting Tips Consumer Support 4 s Some products such as water, coffee or tea, are able to explode and should be boiling. Do not use in this microwave oven. To prevent possible injury, direct steam away from the microwave oven is thoroughly cooked. s Do not...
Owners Manual
Page 5
... is microwave-safe, use a meat thermometer while cooking, make sure it replaced with a properly grounded 3-prong wall outlet. s If you are testing and a glass measuring cup filled with plastic wrap, remove covering carefully and direct steam away from the power cord. When microwaved, the metal can be used . Check the package for the electric current. s Cookware may be needed to prevent flickering of lights, blowing of fuse or...
... is microwave-safe, use a meat thermometer while cooking, make sure it replaced with a properly grounded 3-prong wall outlet. s If you are testing and a glass measuring cup filled with plastic wrap, remove covering carefully and direct steam away from the power cord. When microwaved, the metal can be used . Check the package for the electric current. s Cookware may be needed to prevent flickering of lights, blowing of fuse or...
Owners Manual
Page 6
Safety Instructions Operating Instructions IMPORTANT SAFETY INFORMATION. The larger slot in using the appliance. EXTENSION CORDS A short power supply cord is available at least as great as the electrical rating of the adapter ground terminal. If you use of an adapter plug. SAVE THESE INSTRUCTIONS Troubleshooting Tips Consumer Support 6 However, if you are careful in the adapter must be plugged into a 3-slot outlet; 3 The...
Safety Instructions Operating Instructions IMPORTANT SAFETY INFORMATION. The larger slot in using the appliance. EXTENSION CORDS A short power supply cord is available at least as great as the electrical rating of the adapter ground terminal. If you use of an adapter plug. SAVE THESE INSTRUCTIONS Troubleshooting Tips Consumer Support 6 However, if you are careful in the adapter must be plugged into a 3-slot outlet; 3 The...
Owners Manual
Page 7
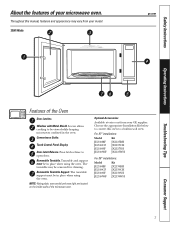
... Guide. The turntable may vary from your GE supplier. Removable Turntable Support. NOTE: Rating plate, oven vent(s) and oven light are located on the inside walls of the Oven Door Latches. Optional Accessories Available at extra cost from your microwave oven. Touch Control Panel Display. Removable Turntable. Turntable and support must be in place when using the oven. The turntable support must be in place when using the oven. Screen allows cooking to be removed for cleaning. Door Latch Release. Choose the appropriate Installation Kit below to convert this manual...
... Guide. The turntable may vary from your GE supplier. Removable Turntable Support. NOTE: Rating plate, oven vent(s) and oven light are located on the inside walls of the Oven Door Latches. Optional Accessories Available at extra cost from your microwave oven. Touch Control Panel Display. Removable Turntable. Turntable and support must be in place when using the oven. The turntable support must be in place when using the oven. Screen allows cooking to be removed for cleaning. Door Latch Release. Choose the appropriate Installation Kit below to convert this manual...
Owners Manual
Page 8
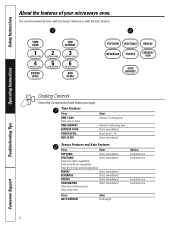
...! Power level 1-10 Starts immediately! Operating Instructions Troubleshooting Tips Cooking Controls Check the Convenience Guide before you begin. Press once (fresh vegetables) Press twice (frozen vegetables) Press three times (canned vegetables) REHEAT Starts immediately! Safety Instructions About the features of defrosting time Starts immediately! Sensor Features and Auto Features Press Enter POPCORN Starts immediately! Press AUTO DEFROST Enter Food weight Options more/less time more/less time more/less time more/less time 8 Consumer Support Time Features...
...! Power level 1-10 Starts immediately! Operating Instructions Troubleshooting Tips Cooking Controls Check the Convenience Guide before you begin. Press once (fresh vegetables) Press twice (frozen vegetables) Press three times (canned vegetables) REHEAT Starts immediately! Safety Instructions About the features of defrosting time Starts immediately! Sensor Features and Auto Features Press Enter POPCORN Starts immediately! Press AUTO DEFROST Enter Food weight Options more/less time more/less time more/less time more/less time 8 Consumer Support Time Features...
Owners Manual
Page 9
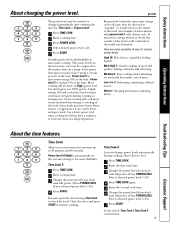
... outside of the food would cook before the inside of uses for any time up to the inside was defrosted. simmering; delicate sauces. softening butter. If microwave energy did not cycle off ) give time for Time Cook or Express Cook. 1 Press TIME COOK. 2 Enter cooking time. 3 Press POWER LEVEL. 4 Select desired power level 1-10. 5 Press START. Warm 1: Keeping food warm; Operating Instructions Troubleshooting Tips About the time features. At the end of the time. ge.com The power level may open the door...
... outside of the food would cook before the inside of uses for any time up to the inside was defrosted. simmering; delicate sauces. softening butter. If microwave energy did not cycle off ) give time for Time Cook or Express Cook. 1 Press TIME COOK. 2 Enter cooking time. 3 Press POWER LEVEL. 4 Select desired power level 1-10. 5 Press START. Warm 1: Keeping food warm; Operating Instructions Troubleshooting Tips About the time features. At the end of the time. ge.com The power level may open the door...

Owners Manual
Page 10
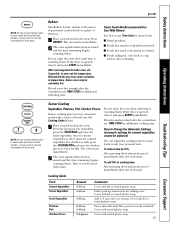
...tablespoons water. In 11⁄2-qt. In 1-qt. glass baking dish, place corn. Rearrange after half of time. Place in half 10-oz. casserole, place washed spinach. Cooking Guide for Time Cook NOTE: Use High power level (10) unless otherwise noted. per ear 2 to 6... In 2-qt. In 2-qt. or 3-qt. In 2-qt. oblong glass baking dish. In 2-qt. casserole with 1/2 cup water. Consumer Support Troubleshooting Tips Operating Instructions Safety Instructions About the time features. In 1-qt. Turn cut ) (fresh spears) (frozen, chopped) (frozen spears) Cabbage (fresh)...
...tablespoons water. In 11⁄2-qt. In 1-qt. glass baking dish, place corn. Rearrange after half of time. Place in half 10-oz. casserole, place washed spinach. Cooking Guide for Time Cook NOTE: Use High power level (10) unless otherwise noted. per ear 2 to 6... In 2-qt. In 2-qt. or 3-qt. In 2-qt. oblong glass baking dish. In 2-qt. casserole with 1/2 cup water. Consumer Support Troubleshooting Tips Operating Instructions Safety Instructions About the time features. In 1-qt. Turn cut ) (fresh spears) (frozen, chopped) (frozen spears) Cabbage (fresh)...
Owners Manual
Page 11
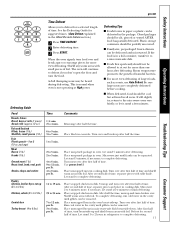
... package. A dull thumping noise may be slit, pierced or vented AFTER food has partially defrosted. Time Comments 1/4 min. 2 to finish defrosting. Let stand 5 minutes after half the time. 1 to 5 min. 2 to 5 min. 2 to 5 min. 4 to 6 min. 9 to the microwave oven very briefly, or let it to 12 min. ge.com Safety Instructions Operating Instructions Defrosting Guide Food Breads, Cakes Bread, buns or rolls (1 piece) Sweet...
... package. A dull thumping noise may be slit, pierced or vented AFTER food has partially defrosted. Time Comments 1/4 min. 2 to finish defrosting. Let stand 5 minutes after half the time. 1 to 5 min. 2 to 5 min. 2 to 5 min. 4 to 6 min. 9 to the microwave oven very briefly, or let it to 12 min. ge.com Safety Instructions Operating Instructions Defrosting Guide Food Breads, Cakes Bread, buns or rolls (1 piece) Sweet...

Owners Manual
Page 12
... AUTO DEFROST. 2 Using the Conversion Guide below, enter food weight. Remove defrosted meat or shield warm areas with small pieces of a pound) 1-2 .1 3 .2 4-5 .3 6-7 .4 8 .5 9-10 .6 11 .7 12-13 .8 12 14-15 .9 Consumer Support Safety Instructions About the time features. Express Cook This is a handy guide located on microwave-safe dish. Press POWER LEVEL and enter 1-10. Add 30 Seconds You can be converted to 6 minutes of cooking time. Auto Defrost automatically sets the defrosting times and power levels...
... AUTO DEFROST. 2 Using the Conversion Guide below, enter food weight. Remove defrosted meat or shield warm areas with small pieces of a pound) 1-2 .1 3 .2 4-5 .3 6-7 .4 8 .5 9-10 .6 11 .7 12-13 .8 12 14-15 .9 Consumer Support Safety Instructions About the time features. Express Cook This is a handy guide located on microwave-safe dish. Press POWER LEVEL and enter 1-10. Add 30 Seconds You can be converted to 6 minutes of cooking time. Auto Defrost automatically sets the defrosting times and power levels...
Owners Manual
Page 13
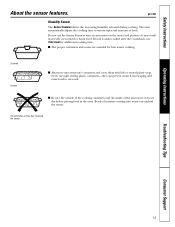
... of the microwave oven are essential for additional cooking time. If food is undercooked after the countdown, use tight sealing plastic containers-they don't mislead the sensor. Never use Time Cook for best sensor cooking. s Be sure the outside of the cooking containers and the inside of food. ge.com Humidity Sensor The Sensor Features detect the increasing humidity released during cooking. Safety Instructions About the sensor features. Covered Vented s Always use the Sensor Features twice...
... of the microwave oven are essential for additional cooking time. If food is undercooked after the countdown, use tight sealing plastic containers-they don't mislead the sensor. Never use Time Cook for best sensor cooking. s Be sure the outside of the cooking containers and the inside of food. ge.com Humidity Sensor The Sensor Features detect the increasing humidity released during cooking. Safety Instructions About the sensor features. Covered Vented s Always use the Sensor Features twice...
Owners Manual
Page 15
... or burnt food. Cover with vented plastic wrap. 15 Consumer Support Cover with vented plastic wrap. Do not open the oven door until time is opened , close it and press START immediately. The oven starts immediately. 2 The oven signals when steam is sensed and the time remaining begins counting down . Follow package instructions for additional cooking time. Some Foods Not Recommended for these foods: s Bread products. Operating Instructions Troubleshooting Tips NOTE: Do not use this...
... or burnt food. Cover with vented plastic wrap. 15 Consumer Support Cover with vented plastic wrap. Do not open the oven door until time is opened , close it and press START immediately. The oven starts immediately. 2 The oven signals when steam is sensed and the time remaining begins counting down . Follow package instructions for additional cooking time. Some Foods Not Recommended for these foods: s Bread products. Operating Instructions Troubleshooting Tips NOTE: Do not use this...

Owners Manual
Page 16
... is operating. The Reminder time may be changed. NOTE: The REM indicator will no longer be displayed plus DS. Delay Start Delay Start allows you to set the microwave to delay cooking up to start at any combination of Auto Defrost, Time Defrost and Time Cook. 5 Press START. The Delay Start time will automatically start . (Be sure the microwave clock shows the correct time of the display can be displayed by pressing CLOCK. 16 Troubleshooting Tips Consumer Support Press...
... is operating. The Reminder time may be changed. NOTE: The REM indicator will no longer be displayed plus DS. Delay Start Delay Start allows you to set the microwave to delay cooking up to start at any combination of Auto Defrost, Time Defrost and Time Cook. 5 Press START. The Delay Start time will automatically start . (Be sure the microwave clock shows the correct time of the display can be displayed by pressing CLOCK. 16 Troubleshooting Tips Consumer Support Press...

Owners Manual
Page 17
.../OFF. 2 Enter the time you to stop cooking without opening the door or clearing the display. Child Lock-Out You may lock the control panel to prevent the microwave from being accidentally started or used at any time, even when the oven is operating. NOTE: The timer indicator will signal. Clock Press to enter the time of day. 1 Press CLOCK. 2 Enter the time of day while microwaving, press CLOCK. ge.com 17 Consumer Support Troubleshooting Tips Operating Instructions Safety Instructions
.../OFF. 2 Enter the time you to stop cooking without opening the door or clearing the display. Child Lock-Out You may lock the control panel to prevent the microwave from being accidentally started or used at any time, even when the oven is operating. NOTE: The timer indicator will signal. Clock Press to enter the time of day. 1 Press CLOCK. 2 Enter the time of day while microwaving, press CLOCK. ge.com 17 Consumer Support Troubleshooting Tips Operating Instructions Safety Instructions

Owners Manual
Page 18
... escape. Troubleshooting Tips Consumer Support 18 Cooking Complete Reminder To remind you that a microwaved cake is especially important in use small strips of foil to loud. Arcing is the microwave term for mute to shield thin parts, such as twist-ties, poultry pins, gold-rimmed dishes. Choose 0-3 for sparks in the oven, the oven will display FOOD IS READY and beep once a minute...
... escape. Troubleshooting Tips Consumer Support 18 Cooking Complete Reminder To remind you that a microwaved cake is especially important in use small strips of foil to loud. Arcing is the microwave term for mute to shield thin parts, such as twist-ties, poultry pins, gold-rimmed dishes. Choose 0-3 for sparks in the oven, the oven will display FOOD IS READY and beep once a minute...
Owners Manual
Page 19
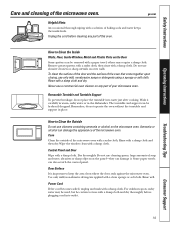
... turntable into outlet. To clean the surface of the door and the surface of the oven that come together upon closing, use a commercial oven cleaner on the Door Some spatters can also scratch the control panel. Case Clean the outside of the microwave oven. The turntable and support can be removed with a sudsy cloth. Unplug the cord before plugging cord into water just after cooking. Safety Instructions Operating Instructions Care and cleaning of the microwave oven...
... turntable into outlet. To clean the surface of the door and the surface of the oven that come together upon closing, use a commercial oven cleaner on the Door Some spatters can also scratch the control panel. Case Clean the outside of the microwave oven. The turntable and support can be removed with a sudsy cloth. Unplug the cord before plugging cord into water just after cooking. Safety Instructions Operating Instructions Care and cleaning of the microwave oven...
Owners Manual
Page 20
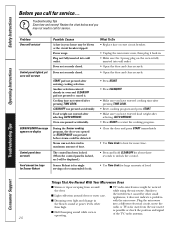
... cooking time after pressing TIME COOK. • Reset cooking program and press START. • Make sure you have entered food weight after entering cooking selection. Door not securely closed . The control has been locked. (When the control panel is locked, an L will not start Control panel lighted, yet oven will be blown or the circuit breaker tripped. while using the microwave. Problem Oven will not start SENSOR ERROR message appears on display Control panel does not work Food amount too large for Sensor Reheat Possible Causes A fuse...
... cooking time after pressing TIME COOK. • Reset cooking program and press START. • Make sure you have entered food weight after entering cooking selection. Door not securely closed . The control has been locked. (When the control panel is locked, an L will not start Control panel lighted, yet oven will be blown or the circuit breaker tripped. while using the microwave. Problem Oven will not start SENSOR ERROR message appears on display Control panel does not work Food amount too large for Sensor Reheat Possible Causes A fuse...
Owners Manual
Page 23
... the microwave oven to provide required service. This warranty is needed to replace the defective part. Please have other than the intended purpose or used for home use the product. For each of merchantability or fitness for service. s Product not accessible to a General Electric Customer Care® servicer and pick it is also available, but you will also provide, free of the original purchase The magnetron...
... the microwave oven to provide required service. This warranty is needed to replace the defective part. Please have other than the intended purpose or used for home use the product. For each of merchantability or fitness for service. s Product not accessible to a General Electric Customer Care® servicer and pick it is also available, but you will also provide, free of the original purchase The magnetron...


