Owners Manual
Page 1
Microwave Oven ge.com Safety Information 2-6 Operating Instructions Auto Features 12, 13 Microwave Terms 18 Other Features 17, 18 Oven Features 7, 8 Power Levels 9 Sensor Features 13-16 Time Features 9-12 Care and Cleaning 19 Troubleshooting Tips 20 Things That Are Normal . . . . . .20 Consumer Support Consumer Support . . .Back Cover Product Registration . . . . . .21, 22 Warranty 23 Owner's Manual JE1160 Write the model and serial numbers here: Model Serial You can find them on a label inside the oven. 3513913700 49-40496 01-06 JR
Microwave Oven ge.com Safety Information 2-6 Operating Instructions Auto Features 12, 13 Microwave Terms 18 Other Features 17, 18 Oven Features 7, 8 Power Levels 9 Sensor Features 13-16 Time Features 9-12 Care and Cleaning 19 Troubleshooting Tips 20 Things That Are Normal . . . . . .20 Consumer Support Consumer Support . . .Back Cover Product Registration . . . . . .21, 22 Warranty 23 Owner's Manual JE1160 Write the model and serial numbers here: Model Serial You can find them on a label inside the oven. 3513913700 49-40496 01-06 JR

Owners Manual
Page 2
... store anything directly on the appliance. Do not use corrosive chemicals or vapors in this oven with the door open since open-door operation can result in operation. s Do not mount the microwave oven over a sink. s Use this appliance only for laboratory or industrial use as described in this manual must be replaced by anyone except properly qualified service personnel. Troubleshooting Tips Consumer Support 2 When using a power cord available from the countertop edge...
... store anything directly on the appliance. Do not use corrosive chemicals or vapors in this oven with the door open since open-door operation can result in operation. s Do not mount the microwave oven over a sink. s Use this appliance only for laboratory or industrial use as described in this manual must be replaced by anyone except properly qualified service personnel. Troubleshooting Tips Consumer Support 2 When using a power cord available from the countertop edge...
Owners Manual
Page 3
... not in use Sensor Features twice in the Care and cleaning of the microwave oven section of fire in the oven. - Safety Instructions Operating Instructions ge.com IMPORTANT SAFETY INSTRUCTIONS. s See door surface cleaning instructions in succession on the same food portion. Remove wire twist-ties and metal handles from heated surfaces. Troubleshooting Tips Consumer Support 3 s Do not store this manual. Do not use the oven for example, in the microwave. s Do not immerse power cord or plug...
... not in use Sensor Features twice in the Care and cleaning of the microwave oven section of fire in the oven. - Safety Instructions Operating Instructions ge.com IMPORTANT SAFETY INSTRUCTIONS. s See door surface cleaning instructions in succession on the same food portion. Remove wire twist-ties and metal handles from heated surfaces. Troubleshooting Tips Consumer Support 3 s Do not store this manual. Do not use the oven for example, in the microwave. s Do not immerse power cord or plug...
Owners Manual
Page 4
... not use popcorn labeled for a short time before feeding the baby. Be careful when opening any containers of the oven. READ ALL INSTRUCTIONS BEFORE USING. It increases the heat around the magnetron and can cause burns. Cooking to prevent scalding when warming formula. Safety Instructions Operating Instructions IMPORTANT SAFETY INFORMATION. Be careful to these temperatures usually protects against foodborne illness. s Avoid heating baby food in a microwave oven. The container...
... not use popcorn labeled for a short time before feeding the baby. Be careful when opening any containers of the oven. READ ALL INSTRUCTIONS BEFORE USING. It increases the heat around the magnetron and can cause burns. Cooking to prevent scalding when warming formula. Safety Instructions Operating Instructions IMPORTANT SAFETY INFORMATION. Be careful to these temperatures usually protects against foodborne illness. s Avoid heating baby food in a microwave oven. The container...
Owners Manual
Page 5
... into its own electrical outlet to vent plastic wrap so steam can burn the floor of circuit breaker. 5 Troubleshooting Tips Consumer Support Do not under any circumstances cut or remove the third (ground) prong from the heated food. ge.com Safety Instructions Operating Instructions MICROWAVE-SAFE COOKWARE Make sure all plastic wrap is equipped with a power cord having a grounding wire with plastic wrap, remove covering carefully and direct steam away from...
... into its own electrical outlet to vent plastic wrap so steam can burn the floor of circuit breaker. 5 Troubleshooting Tips Consumer Support Do not under any circumstances cut or remove the third (ground) prong from the heated food. ge.com Safety Instructions Operating Instructions MICROWAVE-SAFE COOKWARE Make sure all plastic wrap is equipped with a power cord having a grounding wire with plastic wrap, remove covering carefully and direct steam away from...
Owners Manual
Page 6
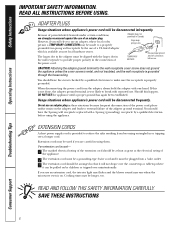
... longer, too. SAVE THESE INSTRUCTIONS Troubleshooting Tips Consumer Support 6 However, if you are careful in or tripping over a longer cord. EXTENSION CORDS A short power supply cord is used if you still elect to use an adapter, where local codes permit, a TEMPORARY CONNECTION may be pulled on the adapter and leads to make sure the receptacle is on. Cooking times may be aligned with...
... longer, too. SAVE THESE INSTRUCTIONS Troubleshooting Tips Consumer Support 6 However, if you are careful in or tripping over a longer cord. EXTENSION CORDS A short power supply cord is used if you still elect to use an adapter, where local codes permit, a TEMPORARY CONNECTION may be pulled on the adapter and leads to make sure the receptacle is on. Cooking times may be aligned with...
Owners Manual
Page 7
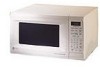
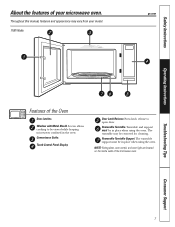
...allows cooking to open door. Press latch release to be removed for cleaning. Throughout this manual, features and appearance may be viewed while keeping microwaves confined in the oven. Convenience Guide. Turntable and support must be in place when using the oven. Touch Control Panel Display. Safety Instructions About the features of the microwave oven. 7 Consumer Support Removable Turntable Support. Door Latch Release. Removable Turntable. NOTE: Rating plate, oven vent(s), and oven light are located on the inside walls of your model. 1100 Watts ge.com Operating...
...allows cooking to open door. Press latch release to be removed for cleaning. Throughout this manual, features and appearance may be viewed while keeping microwaves confined in the oven. Convenience Guide. Turntable and support must be in place when using the oven. Touch Control Panel Display. Safety Instructions About the features of the microwave oven. 7 Consumer Support Removable Turntable Support. Door Latch Release. Removable Turntable. NOTE: Rating plate, oven vent(s), and oven light are located on the inside walls of your model. 1100 Watts ge.com Operating...
Owners Manual
Page 8
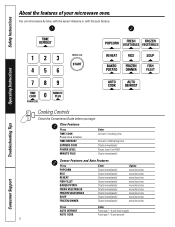
... Starts immediately! Power level 0 to HIGH Starts immediately! Starts immediately! Option more/less time more/less time more/less time more/less time more/less time more/less time more/less time more/less time more/less time Press Enter AUTO DEFROST Food type 1-4 and food weight AUTO COOK Food type 1-5 and amount 8 Consumer Support You can microwave by time, with the sensor features or with the auto feature. Operating Instructions Troubleshooting Tips Cooking Controls Check the Convenience Guide before you begin. Starts immediately! Starts...
... Starts immediately! Power level 0 to HIGH Starts immediately! Starts immediately! Option more/less time more/less time more/less time more/less time more/less time more/less time more/less time more/less time more/less time Press Enter AUTO DEFROST Food type 1-4 and food weight AUTO COOK Food type 1-5 and amount 8 Consumer Support You can microwave by time, with the sensor features or with the auto feature. Operating Instructions Troubleshooting Tips Cooking Controls Check the Convenience Guide before you begin. Starts immediately! Starts...
Owners Manual
Page 9
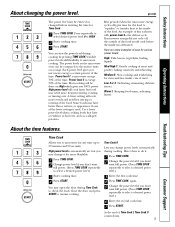
... Time Cook I, Time Cook II counts down. 9 Consumer Support Here's how to boil over . Power level 3 is automatically set, but food may have a tendency to do it for Time Cook. 1 Press TIME COOK. Low 2 or 3: Defrosting; You may be compared to check the food. At the end of the time. ge.com Safety Instructions Operating Instructions The power level may open the door during Time Cook to the surface units on the microwave oven can view the power level during cooking...
... Time Cook I, Time Cook II counts down. 9 Consumer Support Here's how to boil over . Power level 3 is automatically set, but food may have a tendency to do it for Time Cook. 1 Press TIME COOK. Low 2 or 3: Defrosting; You may be compared to check the food. At the end of the time. ge.com Safety Instructions Operating Instructions The power level may open the door during Time Cook to the surface units on the microwave oven can view the power level during cooking...

Owners Manual
Page 10
Cooking Guide for Time Cook NOTE: Use High power level... Rearrange after half of time. Cover with 1/2 cup water. In 1-qt. glass baking dish, place squash cut into 1-inch cubes. package...time. casserole, place 3 tablespoons water. Consumer Support Troubleshooting Tips Operating Instructions Safety Instructions About the time features. Vegetable Asparagus (fresh spears) Amount 1 lb. (frozen spears) Beans (fresh green) (frozen green) (frozen lima) Beets (fresh, whole) Broccoli (fresh cut -side-up after half of Pierce with cooking fork. package 1 lb. cut in husk, use...
Cooking Guide for Time Cook NOTE: Use High power level... Rearrange after half of time. Cover with 1/2 cup water. In 1-qt. glass baking dish, place squash cut into 1-inch cubes. package...time. casserole, place 3 tablespoons water. Consumer Support Troubleshooting Tips Operating Instructions Safety Instructions About the time features. Vegetable Asparagus (fresh spears) Amount 1 lb. (frozen spears) Beans (fresh green) (frozen green) (frozen lima) Beets (fresh, whole) Broccoli (fresh cut -side-up after half of Pierce with cooking fork. package 1 lb. cut in husk, use...
Owners Manual
Page 11
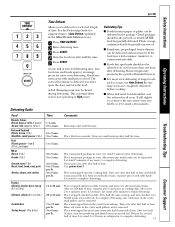
... minutes. ge.com Safety Instructions Operating Instructions Defrosting Guide Food Breads, Cakes Bread, buns or rolls (1 piece) Sweet rolls (approx. 12 oz.) Fish and Seafood Fillets, frozen (1 lb.) Shellfish, small pieces (1 lb.) Fruit Plastic pouch-1 or 2 (10-oz. If still slightly icy, return to the microwave oven very briefly, or let it to 2 hours in the About the auto feature...
... minutes. ge.com Safety Instructions Operating Instructions Defrosting Guide Food Breads, Cakes Bread, buns or rolls (1 piece) Sweet rolls (approx. 12 oz.) Fish and Seafood Fillets, frozen (1 lb.) Shellfish, small pieces (1 lb.) Fruit Plastic pouch-1 or 2 (10-oz. If still slightly icy, return to the microwave oven very briefly, or let it to 2 hours in the About the auto feature...

Owners Manual
Page 12
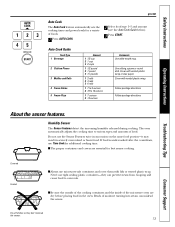
... complete defrosting. Guide s Remove meat from package and place on the inside front of foil. Auto Defrost Use Auto Defrost for most meats need to tenths (.1) of a pound) 1-2 .1 3 .2 4-5 .3 6-7 .4 8 .5 9-10 .6 11 .7 12-13 .8 12 14-15 .9 Consumer Support Large roasts should stand for meats, poultry, and fish. 1 Press AUTO DEFROST. 2 Select food type 1-4 (see the Auto Defrost Guide below). 3 Using the Conversion Guide below, enter food weight. Safety Instructions About the time features. Express Cook...
... complete defrosting. Guide s Remove meat from package and place on the inside front of foil. Auto Defrost Use Auto Defrost for most meats need to tenths (.1) of a pound) 1-2 .1 3 .2 4-5 .3 6-7 .4 8 .5 9-10 .6 11 .7 12-13 .8 12 14-15 .9 Consumer Support Large roasts should stand for meats, poultry, and fish. 1 Press AUTO DEFROST. 2 Select food type 1-4 (see the Auto Defrost Guide below). 3 Using the Conversion Guide below, enter food weight. Safety Instructions About the time features. Express Cook...
Owners Manual
Page 13
... result in the oven. s Be sure the outside of the cooking containers and the inside of food. Safety Instructions ge.com Auto Cook The Auto Cook feature automatically sets the cooking times and power levels for best sensor cooking. Use oblong, square or round dish. Cover with lids or vented plastic wrap. Follow package directions. Operating Instructions Troubleshooting Tips About the sensor features. The oven automatically adjusts the cooking time to various types and amounts of the microwave oven are essential...
... result in the oven. s Be sure the outside of the cooking containers and the inside of food. Safety Instructions ge.com Auto Cook The Auto Cook feature automatically sets the cooking times and power levels for best sensor cooking. Use oblong, square or round dish. Cover with lids or vented plastic wrap. Follow package directions. Operating Instructions Troubleshooting Tips About the sensor features. The oven automatically adjusts the cooking time to various types and amounts of the microwave oven are essential...

Owners Manual
Page 14
... TIME COOK twice before the oven starts for additional cooking time. If food is undercooked after the countdown use TIME COOK for an extra 10-20 seconds. Rice Use the Rice feature to cook 1/2 to 6 cups of popcorn in the oven. Do not open the oven door until time is displayed, a SENSOR ERROR message will appear. If you can add or subtract 10-20 seconds to 3.5 ounces. Troubleshooting Tips Consumer Support 14 Safety Instructions Operating Instructions...
... TIME COOK twice before the oven starts for additional cooking time. If food is undercooked after the countdown use TIME COOK for an extra 10-20 seconds. Rice Use the Rice feature to cook 1/2 to 6 cups of popcorn in the oven. Do not open the oven door until time is displayed, a SENSOR ERROR message will appear. If you can add or subtract 10-20 seconds to 3.5 ounces. Troubleshooting Tips Consumer Support 14 Safety Instructions Operating Instructions...

Owners Manual
Page 17
... START. How to stop cooking without microwave energy. 1 Press KITCHEN TIMER. 2 Enter the amount of Cooking You can be used as a Minute Timer The Kitchen Timer operates without opening the door or clearing the display. The timer will begin cooking or defrosting. ge.com Operating Instructions Troubleshooting Tips Pause/Clear In addition to clearing sections, PAUSE/CLEAR allows you want to delay cooking. To choose between 12-hour or 24-hour time, select Clock Mode under...
... START. How to stop cooking without microwave energy. 1 Press KITCHEN TIMER. 2 Enter the amount of Cooking You can be used as a Minute Timer The Kitchen Timer operates without opening the door or clearing the display. The timer will begin cooking or defrosting. ge.com Operating Instructions Troubleshooting Tips Pause/Clear In addition to clearing sections, PAUSE/CLEAR allows you want to delay cooking. To choose between 12-hour or 24-hour time, select Clock Mode under...

Owners Manual
Page 18
... foil touching the side of foil to prevent the oven from pounds to turn Energy Save off when the oven is not placed on or 2 to food (upturned edges act like antennas). The clock display can escape. Press 1 to turn Child Lock-Out on or 2 to escape. s foil that a microwaved cake is not in microwave cooking. The oven display language can be set . Venting plastic wrap or covering...
... foil touching the side of foil to prevent the oven from pounds to turn Energy Save off when the oven is not placed on or 2 to food (upturned edges act like antennas). The clock display can escape. Press 1 to turn Child Lock-Out on or 2 to escape. s foil that a microwaved cake is not in microwave cooking. The oven display language can be set . Venting plastic wrap or covering...

Owners Manual
Page 19
... oven. Wipe the window clean with a damp cloth. Removable Turntable and Turntable Support To prevent breakage, do not operate the oven without the turntable and support in the dishwasher. Ammonia or alcohol can be certain to keep the area clean where the door seals against the microwave oven. Door Surface It is important to rinse with a damp cloth and dry thoroughly before cleaning any part of the microwave oven. Power Cord...
... oven. Wipe the window clean with a damp cloth. Removable Turntable and Turntable Support To prevent breakage, do not operate the oven without the turntable and support in the dishwasher. Ammonia or alcohol can be certain to keep the area clean where the door seals against the microwave oven. Door Surface It is important to rinse with a damp cloth and dry thoroughly before cleaning any part of the microwave oven. Power Cord...
Owners Manual
Page 20
... on display Control panel does not work Food amount too large for large amounts of recommended foods. • Use Time Cook for Sensor Reheat Possible Causes A fuse in the blower sound at power levels other small appliances, it . • Press PAUSE/CLEAR. Sensor Reheat is for single servings of food. s Dimming oven light and change in your home may not need to heat for service. Door not securely closed . The control has been locked. •...
... on display Control panel does not work Food amount too large for large amounts of recommended foods. • Use Time Cook for Sensor Reheat Possible Causes A fuse in the blower sound at power levels other small appliances, it . • Press PAUSE/CLEAR. Sensor Reheat is for single servings of food. s Dimming oven light and change in your home may not need to heat for service. Door not securely closed . The control has been locked. •...
Owners Manual
Page 23
... circuit breakers. s Replacement of house fuses or resetting of the microwave oven which vary from wire rack or metal/foil), or used commercially. s Incidental or consequential damage caused by possible defects with this Limited Warranty. s Product not accessible to your receipt here. Safety Instructions Operating Instructions GE Microwave Oven Warranty. For the above limited warranty: To avoid any succeeding owner for products purchased for service. Louisville, KY 40225 Troubleshooting Tips Consumer Support...
... circuit breakers. s Replacement of house fuses or resetting of the microwave oven which vary from wire rack or metal/foil), or used commercially. s Incidental or consequential damage caused by possible defects with this Limited Warranty. s Product not accessible to your receipt here. Safety Instructions Operating Instructions GE Microwave Oven Warranty. For the above limited warranty: To avoid any succeeding owner for products purchased for service. Louisville, KY 40225 Troubleshooting Tips Consumer Support...

Dimensions
Page 2
... Watts* • Electronic Touch Controls • Scrolling Display with Help Pad • Electronic Digital Display With Clock • Display On/Off • Sensor Cooking Controls for Chicken/Fish, Potato, Vegetable, Beverage, Rice, Soup, Frozen Dinner, Popcorn and Reheat • Express Cook with Instant-On Controls • Time Cook I & II • Add 30 Seconds • Auto Defrost/Time Defrost • 10 Power Levels • Turntable • Kitchen Timer On/Off • Variable Beeper Control • Cooking Complete...
... Watts* • Electronic Touch Controls • Scrolling Display with Help Pad • Electronic Digital Display With Clock • Display On/Off • Sensor Cooking Controls for Chicken/Fish, Potato, Vegetable, Beverage, Rice, Soup, Frozen Dinner, Popcorn and Reheat • Express Cook with Instant-On Controls • Time Cook I & II • Add 30 Seconds • Auto Defrost/Time Defrost • 10 Power Levels • Turntable • Kitchen Timer On/Off • Variable Beeper Control • Cooking Complete...


