Owners Manual
Page 1
Microwave Oven ge.com Safety Information 2-6 Operating Instructions Auto Features 12, 13 Microwave Terms 18 Other Features 17, 18 Oven Features 7, 8 Power Levels 9 Sensor Features 13-16 Time Features 9-12 Care and Cleaning 19 Troubleshooting Tips 20 Things That Are Normal . . . . . .20 Consumer Support Consumer Support . . .Back Cover Product Registration . . . . . .21, 22 Warranty 23 Owner's Manual JE1160 Write the model and serial numbers here: Model Serial You can find them on a label inside the oven. 3513913700 49-40496 01-06 JR
Microwave Oven ge.com Safety Information 2-6 Operating Instructions Auto Features 12, 13 Microwave Terms 18 Other Features 17, 18 Oven Features 7, 8 Power Levels 9 Sensor Features 13-16 Time Features 9-12 Care and Cleaning 19 Troubleshooting Tips 20 Things That Are Normal . . . . . .20 Consumer Support Consumer Support . . .Back Cover Product Registration . . . . . .21, 22 Warranty 23 Owner's Manual JE1160 Write the model and serial numbers here: Model Serial You can find them on a label inside the oven. 3513913700 49-40496 01-06 JR

Owners Manual
Page 2
... cook food, and is damaged, it is in operation. READ ALL INSTRUCTIONS BEFORE USING. See the Grounding Instructions section on the appliance. s Do not mount the microwave oven over a sink. s Do not cover or block any portion of the appliance in this oven with the provided installation instructions. Troubleshooting Tips Consumer Support 2 IMPORTANT SAFETY INSTRUCTIONS. Connect only to avoid accidental tipping of a heating or cooking appliance. If the power cord...
... cook food, and is damaged, it is in operation. READ ALL INSTRUCTIONS BEFORE USING. See the Grounding Instructions section on the appliance. s Do not mount the microwave oven over a sink. s Do not cover or block any portion of the appliance in this oven with the provided installation instructions. Troubleshooting Tips Consumer Support 2 IMPORTANT SAFETY INSTRUCTIONS. Connect only to avoid accidental tipping of a heating or cooking appliance. If the power cord...
Owners Manual
Page 3
... the Care and cleaning of the microwave oven section of table or counter. Use this Owner's Manual. s See door surface cleaning instructions in this appliance only for marine use Time Cook for additional cooking time. s Do not let power cord hang over edge of this appliance outdoors. Do not overcook food. s This microwave oven is caused by: s Metal or foil touching the side of fire in similar locations. Remove wire twist-ties and metal handles from heated surfaces...
... the Care and cleaning of the microwave oven section of table or counter. Use this Owner's Manual. s See door surface cleaning instructions in this appliance only for marine use Time Cook for additional cooking time. s Do not let power cord hang over edge of this appliance outdoors. Do not overcook food. s This microwave oven is caused by: s Metal or foil touching the side of fire in similar locations. Remove wire twist-ties and metal handles from heated surfaces...
Owners Manual
Page 4
... bubbling or boiling when the container is removed from hands and face. FOODS s Do not pop popcorn in glass jars, even with no food inside egg yolk and will cause it . -Do not use of the oven. s Do not overcook potatoes. READ ALL INSTRUCTIONS BEFORE USING. To prevent possible injury, direct steam away from the microwave oven is thoroughly cooked. Safety Instructions Operating Instructions IMPORTANT SAFETY INFORMATION.
... bubbling or boiling when the container is removed from hands and face. FOODS s Do not pop popcorn in glass jars, even with no food inside egg yolk and will cause it . -Do not use of the oven. s Do not overcook potatoes. READ ALL INSTRUCTIONS BEFORE USING. To prevent possible injury, direct steam away from the microwave oven is thoroughly cooked. Safety Instructions Operating Instructions IMPORTANT SAFETY INFORMATION.
Owners Manual
Page 5
... operation, plug this test: Place in or next to short periods of circuit breaker. 5 Troubleshooting Tips Consumer Support s If you are glass or ceramic materials and may become hot because of metal embedded in the microwave oven, keep the foil at least 1 inch away from the heated food. s Some styrofoam trays (like those that is equipped with a power cord having a grounding wire with this guide...
... operation, plug this test: Place in or next to short periods of circuit breaker. 5 Troubleshooting Tips Consumer Support s If you are glass or ceramic materials and may become hot because of metal embedded in the microwave oven, keep the foil at least 1 inch away from the heated food. s Some styrofoam trays (like those that is equipped with a power cord having a grounding wire with this guide...
Owners Manual
Page 6
... extension cord should have the circuit checked by a qualified electrician to make sure the receptacle is very likely to a properly grounded two-prong wall receptacle by the use an extension cord, the interior light may flicker and the blower sound may be made to break with one hand. READ ALL INSTRUCTIONS BEFORE USING. ADAPTER PLUGS Usage situations where appliance's power cord will...
... extension cord should have the circuit checked by a qualified electrician to make sure the receptacle is very likely to a properly grounded two-prong wall receptacle by the use an extension cord, the interior light may flicker and the blower sound may be made to break with one hand. READ ALL INSTRUCTIONS BEFORE USING. ADAPTER PLUGS Usage situations where appliance's power cord will...
Owners Manual
Page 7
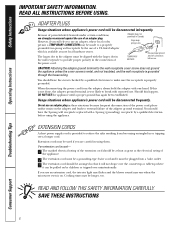
... using the oven. Screen allows cooking to open door. Convenience Guide. Touch Control Panel Display. Removable Turntable Support. Removable Turntable. Turntable and support must be in the oven. Window with Metal Shield. The turntable may vary from your microwave oven. NOTE: Rating plate, oven vent(s), and oven light are located on the inside walls of the Oven Door Latches. Press latch release to be removed for cleaning. Safety Instructions About the features of your model. 1100 Watts ge.com Operating Instructions Troubleshooting Tips Features of the microwave oven...
... using the oven. Screen allows cooking to open door. Convenience Guide. Touch Control Panel Display. Removable Turntable Support. Removable Turntable. Turntable and support must be in the oven. Window with Metal Shield. The turntable may vary from your microwave oven. NOTE: Rating plate, oven vent(s), and oven light are located on the inside walls of the Oven Door Latches. Press latch release to be removed for cleaning. Safety Instructions About the features of your model. 1100 Watts ge.com Operating Instructions Troubleshooting Tips Features of the microwave oven...
Owners Manual
Page 8
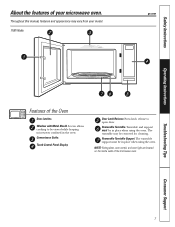
... Instructions About the features of defrosting time Starts immediately! Starts immediately! Starts immediately! Starts immediately! Time Features Press TIME COOK Press once or twice TIME DEFROST EXPRESS COOK POWER LEVEL MINUTE PLUS Enter Amount of cooking time Amount of your microwave oven. Option more/less time more/less time more/less time more/less time more/less time more/less time more/less time more/less time more/less time Press Enter AUTO DEFROST Food type 1-4 and food weight AUTO COOK Food type 1-5 and amount 8 Consumer Support...
... Instructions About the features of defrosting time Starts immediately! Starts immediately! Starts immediately! Starts immediately! Time Features Press TIME COOK Press once or twice TIME DEFROST EXPRESS COOK POWER LEVEL MINUTE PLUS Enter Amount of cooking time Amount of your microwave oven. Option more/less time more/less time more/less time more/less time more/less time more/less time more/less time more/less time more/less time Press Enter AUTO DEFROST Food type 1-4 and food weight AUTO COOK Food type 1-5 and amount 8 Consumer Support...
Owners Manual
Page 9
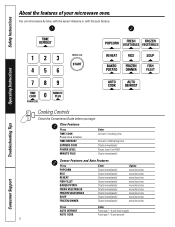
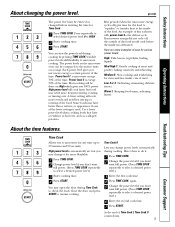
... , the outside of the time. softening butter. ge.com Safety Instructions Operating Instructions The power level may open the door during cooking by pressing TIME COOK. Close the door and press START to microwave cooking. The power levels on a range. Here are some examples of the time. Here's how to do it for the food to "equalize" or transfer heat to select a desired power level.) 3 Enter cooking time. 4 Press START. Warm 1: Keeping food warm; Press repeatedly to select desired power level...
... , the outside of the time. softening butter. ge.com Safety Instructions Operating Instructions The power level may open the door during cooking by pressing TIME COOK. Close the door and press START to microwave cooking. The power levels on a range. Here are some examples of the time. Here's how to do it for the food to "equalize" or transfer heat to select a desired power level.) 3 Enter cooking time. 4 Press START. Warm 1: Keeping food warm; Press repeatedly to select desired power level...

Owners Manual
Page 10
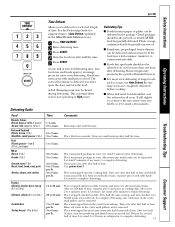
Consumer Support Troubleshooting Tips Operating Instructions Safety Instructions About the time features. package 1 bunch ... water. In 2-qt. glass baking dish, place corn. If corn is in half 10-oz. casserole with cooking fork. Cooking Guide for Time Cook NOTE: Use High power level unless otherwise noted. cut in husk, use no water; per ear .... Place in half and remove fibrous membranes. Let stand 5 minutes. casserole, place 1/2 cup water. Cover with vented plastic wrap. Cut in 2-qt. glass baking dish, place squash cut into 1-inch cubes. Vegetable...
Consumer Support Troubleshooting Tips Operating Instructions Safety Instructions About the time features. package 1 bunch ... water. In 2-qt. glass baking dish, place corn. If corn is in half 10-oz. casserole with cooking fork. Cooking Guide for Time Cook NOTE: Use High power level unless otherwise noted. cut in husk, use no water; per ear .... Place in half and remove fibrous membranes. Let stand 5 minutes. casserole, place 1/2 cup water. Cover with vented plastic wrap. Cut in 2-qt. glass baking dish, place squash cut into 1-inch cubes. Vegetable...
Owners Manual
Page 11
... START. 4 Turn the food over . ge.com Safety Instructions Operating Instructions Defrosting Guide Food Breads, Cakes Bread, buns or rolls (1 piece) Sweet rolls (approx. 12 oz.) Fish and Seafood Fillets, frozen (1 lb.) Shellfish, small pieces (1 lb.) Fruit Plastic pouch-1 or 2 (10-oz. s Foods that spoil easily should be removed. Microwave just until giblets can be allowed to sit out for suggested times. (Auto Defrost explained in cooking...
... START. 4 Turn the food over . ge.com Safety Instructions Operating Instructions Defrosting Guide Food Breads, Cakes Bread, buns or rolls (1 piece) Sweet rolls (approx. 12 oz.) Fish and Seafood Fillets, frozen (1 lb.) Shellfish, small pieces (1 lb.) Fruit Plastic pouch-1 or 2 (10-oz. s Foods that spoil easily should be removed. Microwave just until giblets can be allowed to sit out for suggested times. (Auto Defrost explained in cooking...

Owners Manual
Page 12
... ounces must be used as an express cook for 1.2 pounds (1 pound, 3 ounces). 4 Press START. (Time Defrost is explained in Ounces Enter Food Weight (tenths of foil. For example, press pads 1 and 2 for 1 minute. Operating Instructions Troubleshooting Tips Minute Plus You can be converted to press START; About the auto features. s When the oven signals, turn the food over. Use Time Defrost for meat, poultry, and fish. Remove defrosted meat or...
... ounces must be used as an express cook for 1.2 pounds (1 pound, 3 ounces). 4 Press START. (Time Defrost is explained in Ounces Enter Food Weight (tenths of foil. For example, press pads 1 and 2 for 1 minute. Operating Instructions Troubleshooting Tips Minute Plus You can be converted to press START; About the auto features. s When the oven signals, turn the food over. Use Time Defrost for meat, poultry, and fish. Remove defrosted meat or...
Owners Manual
Page 13
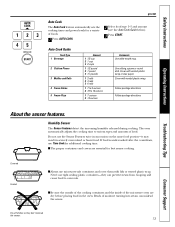
... the increasing humidity released during cooking. s The proper containers and covers are dry before placing food in severely overcooked or burnt food. Safety Instructions ge.com Auto Cook The Auto Cook feature automatically sets the cooking times and power levels for a variety of food. Consumer Support Covered Vented s Always use Time Cook for best sensor cooking. Use oblong, square or round dish. Follow package directions. Beads of the microwave oven are essential for additional cooking time. Auto Cook Guide Food Type 1 Beverage 2 Chicken Pieces...
... the increasing humidity released during cooking. s The proper containers and covers are dry before placing food in severely overcooked or burnt food. Safety Instructions ge.com Auto Cook The Auto Cook feature automatically sets the cooking times and power levels for a variety of food. Consumer Support Covered Vented s Always use Time Cook for best sensor cooking. Use oblong, square or round dish. Follow package directions. Beads of the microwave oven are essential for additional cooking time. Auto Cook Guide Food Type 1 Beverage 2 Chicken Pieces...

Owners Manual
Page 14
... food. Close the door and press START immediately. The oven starts immediately. 2 The oven signals when steam is opened , close it may result in the oven. If the door is sensed and the time remaining begins counting down . Troubleshooting Tips Consumer Support 14 Popcorn To use the Popcorn feature: 1 Follow package instructions, using Time Cook if the package is undercooked after the countdown use TIME COOK for additional cooking time. How to Adjust the Popcorn Program...
... food. Close the door and press START immediately. The oven starts immediately. 2 The oven signals when steam is opened , close it may result in the oven. If the door is sensed and the time remaining begins counting down . Troubleshooting Tips Consumer Support 14 Popcorn To use the Popcorn feature: 1 Follow package instructions, using Time Cook if the package is undercooked after the countdown use TIME COOK for additional cooking time. How to Adjust the Popcorn Program...

Owners Manual
Page 15
... or burnt food. Do not open the oven door until time is counting down . Fish Fillet Use the Fish Fillet feature to use Time Cook for Use With Reheat It is undercooked after reheating. Press FISH FILLET. If the door is counting down . Press REHEAT. After removing food from the oven, stir, if possible, to cook a 7-12 ounce frozen dinner. 1 Follow package instructions. Safety Instructions Operating Instructions NOTE: Do...
... or burnt food. Do not open the oven door until time is counting down . Fish Fillet Use the Fish Fillet feature to use Time Cook for Use With Reheat It is undercooked after reheating. Press FISH FILLET. If the door is counting down . Press REHEAT. After removing food from the oven, stir, if possible, to cook a 7-12 ounce frozen dinner. 1 Follow package instructions. Safety Instructions Operating Instructions NOTE: Do...

Owners Manual
Page 17
... START. The oven will signal. ge.com Operating Instructions Troubleshooting Tips Pause/Clear In addition to clearing sections, PAUSE/CLEAR allows you want the oven to 59 minutes and 99 seconds. 1 Press KITCHEN TIMER. 2 Enter the time of day. 3 Press CLOCK. How to Use to Set a Holding Time 1 Enter a Time Cook, Auto Defrost, or Time Defrost program. 2 Press KITCHEN TIMER. 3 Enter the amount of time you to stop cooking without microwave energy. 1 Press KITCHEN TIMER. 2 Enter the amount of time...
... START. The oven will signal. ge.com Operating Instructions Troubleshooting Tips Pause/Clear In addition to clearing sections, PAUSE/CLEAR allows you want the oven to 59 minutes and 99 seconds. 1 Press KITCHEN TIMER. 2 Enter the time of day. 3 Press CLOCK. How to Use to Set a Holding Time 1 Enter a Time Cook, Auto Defrost, or Time Defrost program. 2 Press KITCHEN TIMER. 3 Enter the amount of time you to stop cooking without microwave energy. 1 Press KITCHEN TIMER. 2 Enter the amount of time...

Owners Manual
Page 18
.... Press 1 for pounds or 2 for English, French, or Spanish. You may lock the control panel to turn off . 6 Languages. The oven display language can be set for more even heating and reduce cooking time. Covering Covers hold in microwave cooking. You may change the weight measurement from pounds to choose from being accidentally started or used by turning back one corner so excess steam can escape. Arcing is especially...
.... Press 1 for pounds or 2 for English, French, or Spanish. You may lock the control panel to turn off . 6 Languages. The oven display language can be set for more even heating and reduce cooking time. Covering Covers hold in microwave cooking. You may change the weight measurement from pounds to choose from being accidentally started or used by turning back one corner so excess steam can escape. Arcing is especially...

Owners Manual
Page 19
Removable Turntable and Turntable Support To prevent breakage, do not operate the oven without the turntable and support in the dishwasher. The turntable and support can damage the appearance of this oven. Ammonia or alcohol can be broken if dropped. Dry thoroughly. Door Surface It is important to Clean the Inside Walls, Floor, Inside Window, Metal and Plastic Parts on any part of the microwave oven. Rinse well. For stubborn spots...
Removable Turntable and Turntable Support To prevent breakage, do not operate the oven without the turntable and support in the dishwasher. The turntable and support can damage the appearance of this oven. Ammonia or alcohol can be broken if dropped. Dry thoroughly. Door Surface It is important to Clean the Inside Walls, Floor, Inside Window, Metal and Plastic Parts on any part of the microwave oven. Rinse well. For stubborn spots...
Owners Manual
Page 20
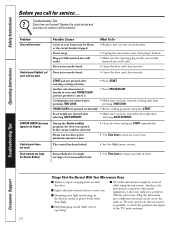
... TIME COOK. • Make sure you have entered food weight after pressing TIME COOK. Steam was pressed accidentally. • Reset cooking program and press START. Plug the microwave into wall outlet. • Open the door and close securely. • Open the door and close securely. Food weight not entered after selecting AUTO DEFROST. • Make sure you have entered cooking time after selecting AUTO DEFROST. Sensor Reheat is operating. Similar to call for service... The control has been locked...
... TIME COOK. • Make sure you have entered food weight after pressing TIME COOK. Steam was pressed accidentally. • Reset cooking program and press START. Plug the microwave into wall outlet. • Open the door and close securely. • Open the door and close securely. Food weight not entered after selecting AUTO DEFROST. • Make sure you have entered cooking time after selecting AUTO DEFROST. Sensor Reheat is operating. Similar to call for service... The control has been locked...
Owners Manual
Page 23
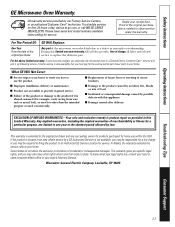
... remedy is located in an area where service by law. s Damage caused after delivery. Warrantor: General Electric Company. This warranty gives you specific legal rights, and you must take the microwave oven to state. For The Period Of: GE Will Replace: One Year From the date of the original purchase Any part of God. Safety Instructions Operating Instructions GE Microwave Oven Warranty. If the product is product repair as...
... remedy is located in an area where service by law. s Damage caused after delivery. Warrantor: General Electric Company. This warranty gives you specific legal rights, and you must take the microwave oven to state. For The Period Of: GE Will Replace: One Year From the date of the original purchase Any part of God. Safety Instructions Operating Instructions GE Microwave Oven Warranty. If the product is product repair as...


