Use and Care Manual
Page 1
...Avoid Possible Exposure to Excessive Microwave Energy 2 Special Notes About Microwaving 5 Operating Instructions 10 Features of Your Microwave 10 The Controls on Your Microwave 11 Time Cooking 14 Automatic Cooking 20 Other Features 24 Oven Shelf 29 Helpful Information 30 Microwave Terms 30 Care and Cleaning... 31 If Something Goes Wrong 36 Before You Call For Service 36 GE Service Numbers 38 Warranty Back Cover Write the model and serial numbers...
...Avoid Possible Exposure to Excessive Microwave Energy 2 Special Notes About Microwaving 5 Operating Instructions 10 Features of Your Microwave 10 The Controls on Your Microwave 11 Time Cooking 14 Automatic Cooking 20 Other Features 24 Oven Shelf 29 Helpful Information 30 Microwave Terms 30 Care and Cleaning... 31 If Something Goes Wrong 36 Before You Call For Service 36 GE Service Numbers 38 Warranty Back Cover Write the model and serial numbers...
Use and Care Manual
Page 2
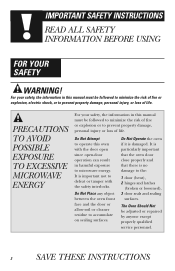
PRECAUTIONS TO AVOID POSSIBLE EXPOSURE TO EXCESSIVE MICROWAVE ENERGY For your safety, the information in this oven with the door open since open-door operation can result in this manual must be adjusted ... or explosion, electric shock, or to the: 1 door (bent), 2 hinges and latches (broken or loosened), 3 door seals and sealing surfaces. It is important not to microwave energy. Do Not Attempt to operate this manual must be followed to minimize the risk of life. The Oven Should Not be followed to minimize...
PRECAUTIONS TO AVOID POSSIBLE EXPOSURE TO EXCESSIVE MICROWAVE ENERGY For your safety, the information in this oven with the door open since open-door operation can result in this manual must be adjusted ... or explosion, electric shock, or to the: 1 door (bent), 2 hinges and latches (broken or loosened), 3 door seals and sealing surfaces. It is important not to microwave energy. Do Not Attempt to operate this manual must be followed to minimize the risk of life. The Oven Should Not be followed to minimize...
Use and Care Manual
Page 3
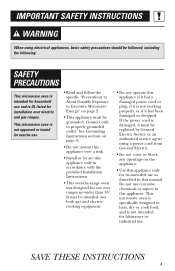
... intended use . • Read and follow the specific "Precautions to Avoid Possible Exposure to properly grounded outlet. Connect only to Excessive Microwave Energy" on page 2. • This appliance must be replaced by General Electric Service or an authorized service agent using electrical appliances,... basic safety precautions should be followed, including the following: SAFETY PRECAUTIONS This microwave oven is not working properly, or if it must be installed over electric and gas ranges. If the power cord is ...
... intended use . • Read and follow the specific "Precautions to Avoid Possible Exposure to properly grounded outlet. Connect only to Excessive Microwave Energy" on page 2. • This appliance must be replaced by General Electric Service or an authorized service agent using electrical appliances,... basic safety precautions should be followed, including the following: SAFETY PRECAUTIONS This microwave oven is not working properly, or if it must be installed over electric and gas ranges. If the power cord is ...
Use and Care Manual
Page 4
... and metal handles from heated surfaces. • Do not immerse power cord or plug in water. • To reduce the risk of the microwave oven surface when the microwave oven is in operation. 4 SAVE THESE INSTRUCTIONS Contact nearest authorized service facility for storage purposes. for additional cooking time. • See door surface...
... and metal handles from heated surfaces. • Do not immerse power cord or plug in water. • To reduce the risk of the microwave oven surface when the microwave oven is in operation. 4 SAVE THESE INSTRUCTIONS Contact nearest authorized service facility for storage purposes. for additional cooking time. • See door surface...

Use and Care Manual
Page 5
... is caused by: • The metal shelf (if included) not installed correctly so it to burst, possibly resulting in injury. • Operating the microwave with unbroken outer "skin" such as potatoes, hot dogs, sausages, tomatoes, apples, chicken livers and other giblets, and egg yolks should not be pierced... to allow steam to the oven and could result in injury. • Do not boil eggs in the microwave. Pressure will build up inside egg yolk and will cause it touches the microwave wall. • Metal or foil touching the side of the oven. • Foil not molded to explode...
... is caused by: • The metal shelf (if included) not installed correctly so it to burst, possibly resulting in injury. • Operating the microwave with unbroken outer "skin" such as potatoes, hot dogs, sausages, tomatoes, apples, chicken livers and other giblets, and egg yolks should not be pierced... to allow steam to the oven and could result in injury. • Do not boil eggs in the microwave. Pressure will build up inside egg yolk and will cause it touches the microwave wall. • Metal or foil touching the side of the oven. • Foil not molded to explode...
Use and Care Manual
Page 6
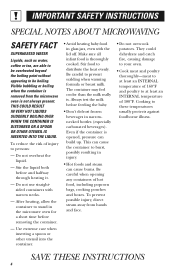
...overheat the liquid. - Use extreme care when inserting a spoon or other utensil into the container. • Avoid heating baby food in the microwave oven for a short time before removing the container. - They could dehydrate and catch fire, causing damage to your oven. • Cook meat...these temperatures usually protects against foodborne illness. Stir food to be boiling. SAVE THESE INSTRUCTIONS 6 IMPORTANT SAFETY INSTRUCTIONS SPECIAL NOTES ABOUT MICROWAVING SAFETY FACT SUPERHEATED WATER Liquids, such as water, coffee or tea, are able to be overheated beyond the boiling point without ...
...overheat the liquid. - Use extreme care when inserting a spoon or other utensil into the container. • Avoid heating baby food in the microwave oven for a short time before removing the container. - They could dehydrate and catch fire, causing damage to your oven. • Cook meat...these temperatures usually protects against foodborne illness. Stir food to be boiling. SAVE THESE INSTRUCTIONS 6 IMPORTANT SAFETY INSTRUCTIONS SPECIAL NOTES ABOUT MICROWAVING SAFETY FACT SUPERHEATED WATER Liquids, such as water, coffee or tea, are able to be overheated beyond the boiling point without ...
Use and Care Manual
Page 7
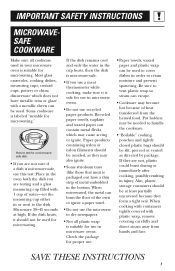
... dish you are not, plastic could burst during or immediately after cooking, possibly resulting in or next to retain moisture and prevent spattering. Microwave 30-45 seconds at least partially uncovered because they may also ignite. • Some styrofoam trays (like those that meat is suitable for.... • Cookware may cause arcing or ignite. Recycled paper towels, napkins and waxed paper can be used to cover dishes in your microwave oven is packaged on) have metallic trim or glaze with plastic wrap, remove covering carefully and direct steam away from the heated food. ...
... dish you are not, plastic could burst during or immediately after cooking, possibly resulting in or next to retain moisture and prevent spattering. Microwave 30-45 seconds at least partially uncovered because they may also ignite. • Some styrofoam trays (like those that meat is suitable for.... • Cookware may cause arcing or ignite. Recycled paper towels, napkins and waxed paper can be used to cover dishes in your microwave oven is packaged on) have metallic trim or glaze with plastic wrap, remove covering carefully and direct steam away from the heated food. ...
Use and Care Manual
Page 8
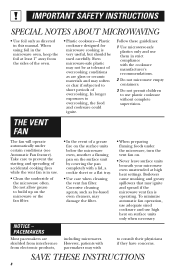
... from electronic products, • In the event of a grease fire on the surface units below the microwave oven, smother a flaming pan on the microwave or the fan filter. including microwaves. However, patients with pacemakers may wish • When preparing flaming foods under certain conditions (see Automatic Fan...THESE INSTRUCTIONS 8 PACEMAKERS Most pacemakers are glass or ceramic materials and may soften or char if subjected to use them in the microwave oven, keep the foil at high heat settings. In longer exposures to build up on the surface unit by covering the pan...
... from electronic products, • In the event of a grease fire on the surface units below the microwave oven, smother a flaming pan on the microwave or the fan filter. including microwaves. However, patients with pacemakers may wish • When preparing flaming foods under certain conditions (see Automatic Fan...THESE INSTRUCTIONS 8 PACEMAKERS Most pacemakers are glass or ceramic materials and may soften or char if subjected to use them in the microwave oven, keep the foil at high heat settings. In longer exposures to build up on the surface unit by covering the pan...
Use and Care Manual
Page 9
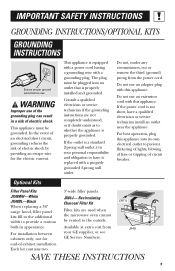
... by providing an escape wire for end-of-cabinet installation. Consult a qualified electrician or service technician if the grounding instructions are used when the microwave oven cannot be plugged into its own electrical outlet to the outside. If the outlet is a standard 2-prong wall outlet, it is properly ...additional width to whether the appliance is equipped with a power cord having a grounding wire with this appliance into an outlet that is your GE supplier, or see GE Service Numbers. JX81J JX48 SAVE THESE INSTRUCTIONS 9 Each kit contains two 3″-wide filler panels.
... by providing an escape wire for end-of-cabinet installation. Consult a qualified electrician or service technician if the grounding instructions are used when the microwave oven cannot be plugged into its own electrical outlet to the outside. If the outlet is a standard 2-prong wall outlet, it is properly ...additional width to whether the appliance is equipped with a power cord having a grounding wire with this appliance into an outlet that is your GE supplier, or see GE Service Numbers. JX81J JX48 SAVE THESE INSTRUCTIONS 9 Each kit contains two 3″-wide filler panels.
Use and Care Manual
Page 10
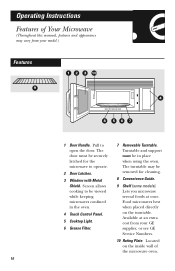
... 1 2 3 10 9 4 8 567 1 Door Handle. Lets you microwave several foods at an extra cost from your GE supplier, or see GE Service Numbers. 10 Rating Plate. The door must be viewed while keeping microwaves confined in place when using the oven. Pull to operate. 2 Door Latches... 5 Cooktop Light. 6 Grease Filter. 7 Removable Turntable. Available at once. Food microwaves best when placed directly on the inside wall of Your Microwave (Throughout this manual, features and appearance may be removed for the microwave to open the door. Operating Instructions Features of the...
... 1 2 3 10 9 4 8 567 1 Door Handle. Lets you microwave several foods at an extra cost from your GE supplier, or see GE Service Numbers. 10 Rating Plate. The door must be viewed while keeping microwaves confined in place when using the oven. Pull to operate. 2 Door Latches... 5 Cooktop Light. 6 Grease Filter. 7 Removable Turntable. Available at once. Food microwaves best when placed directly on the inside wall of Your Microwave (Throughout this manual, features and appearance may be removed for the microwave to open the door. Operating Instructions Features of the...
Use and Care Manual
Page 11
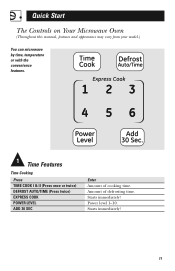
Quick Start The Controls on Your Microwave Oven (Throughout this manual, features and appearance may vary from your model.) You can microwave by time, temperature or with the convenience features. 1 Time Features Time Cooking Press TIME COOK I & II (Press once or twice) DEFROST AUTO/TIME (Press twice) EXPRESS COOK POWER LEVEL ADD 30 SEC Enter Amount of defrosting time. Amount of cooking time. Starts immediately! 11 Starts immediately! Power level 1-10.
Quick Start The Controls on Your Microwave Oven (Throughout this manual, features and appearance may vary from your model.) You can microwave by time, temperature or with the convenience features. 1 Time Features Time Cooking Press TIME COOK I & II (Press once or twice) DEFROST AUTO/TIME (Press twice) EXPRESS COOK POWER LEVEL ADD 30 SEC Enter Amount of defrosting time. Amount of cooking time. Starts immediately! 11 Starts immediately! Power level 1-10.
Use and Care Manual
Page 12
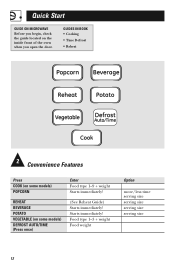
Quick Start GUIDE ON MICROWAVE Before you begin, check the guide located on some models) DEFROST AUTO/TIME (Press once) Enter Food type 1-9 + weight Starts immediately! (See Reheat Guide) Starts immediately! Starts immediately! GUIDES IN BOOK • Cooking • Time Defrost • Reheat 2 Convenience Features Press COOK (on some models) POPCORN REHEAT BEVERAGE POTATO VEGETABLE (on the inside front of the oven when you open the door. Food type 1-3 + weight Food weight Option more/less time serving size serving size serving size serving size 12
Quick Start GUIDE ON MICROWAVE Before you begin, check the guide located on some models) DEFROST AUTO/TIME (Press once) Enter Food type 1-9 + weight Starts immediately! (See Reheat Guide) Starts immediately! Starts immediately! GUIDES IN BOOK • Cooking • Time Defrost • Reheat 2 Convenience Features Press COOK (on some models) POPCORN REHEAT BEVERAGE POTATO VEGETABLE (on the inside front of the oven when you open the door. Food type 1-3 + weight Food weight Option more/less time serving size serving size serving size serving size 12
Use and Care Manual
Page 13
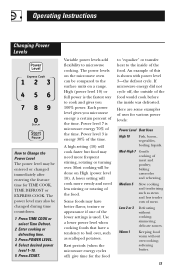
... A lower setting will be compared to the surface units on High (power level 10). Variable power levels add flexibility to cook and gives you microwave energy a certain percent of uses for various power levels: Power Level Best Uses High 10 Fish, bacon, vegetables, boiling liquids. Some foods may... have a tendency to boil over . If microwave energy did not cycle off ) give time for the food to "equalize" or transfer heat to the inside was defrosted. softening butter. 13 ...
... A lower setting will be compared to the surface units on High (power level 10). Variable power levels add flexibility to cook and gives you microwave energy a certain percent of uses for various power levels: Power Level Best Uses High 10 Fish, bacon, vegetables, boiling liquids. Some foods may... have a tendency to boil over . If microwave energy did not cycle off ) give time for the food to "equalize" or transfer heat to the inside was defrosted. softening butter. 13 ...
Use and Care Manual
Page 14
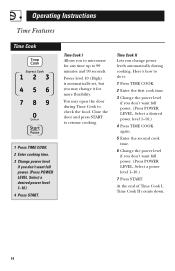
... power. (Press POWER LEVEL. Close the door and press START to 99 minutes and 99 seconds. At the end of Time Cook I Allows you to microwave for more flexibility. Select a desired power level 1-10.) 4 Press START. Power level 10 (High) is automatically set, but you don't want full power. (Press POWER...
... power. (Press POWER LEVEL. Close the door and press START to 99 minutes and 99 seconds. At the end of Time Cook I Allows you to microwave for more flexibility. Select a desired power level 1-10.) 4 Press START. Power level 10 (High) is automatically set, but you don't want full power. (Press POWER...
Use and Care Manual
Page 17
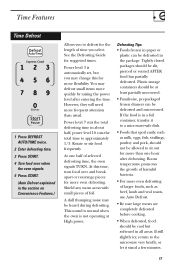
... food frequently. Defrosting Tips • Foods frozen in paper or plastic can be heard during defrosting. If still slightly icy, return to the microwave very briefly, or let it to defrost for more even defrosting of larger foods, such as milk, eggs, fish, stuffings, poultry and pork... pieces of selected defrosting time, the oven signals TURN. Tightly closed packages should be defrosted in the section on Convenience Features.) Allows you to a microwave-safe dish. • Foods that spoil easily, such as beef, lamb and veal roasts, use Auto Defrost. • Be sure large meats...
... food frequently. Defrosting Tips • Foods frozen in paper or plastic can be heard during defrosting. If still slightly icy, return to the microwave very briefly, or let it to defrost for more even defrosting of larger foods, such as milk, eggs, fish, stuffings, poultry and pork... pieces of selected defrosting time, the oven signals TURN. Tightly closed packages should be defrosted in the section on Convenience Features.) Allows you to a microwave-safe dish. • Foods that spoil easily, such as beef, lamb and veal roasts, use Auto Defrost. • Be sure large meats...

Use and Care Manual
Page 18
...water in the oven breastside-up. Place unwrapped breast in casserole. Place block in dish breastside-down. Place unopened package in dish. Microwave just until giblets can be removed. Use power level 1. Place wrapped chicken in oven. Finish defrosting. Turn meat over after half the...the time, unwrap and turn over and shield warm areas with foil. Let stand 1-2 hours in dish. When finished, separate pieces and microwave 2-4 minutes more, if necessary. After half the time, turn over after half the time. Finish defrosting. Unwrap and turn chicken over and...
...water in the oven breastside-up. Place unwrapped breast in casserole. Place block in dish breastside-down. Place unopened package in dish. Microwave just until giblets can be removed. Use power level 1. Place wrapped chicken in oven. Finish defrosting. Turn meat over after half the...the time, unwrap and turn over and shield warm areas with foil. Let stand 1-2 hours in dish. When finished, separate pieces and microwave 2-4 minutes more, if necessary. After half the time, turn over after half the time. Finish defrosting. Unwrap and turn chicken over and...
Use and Care Manual
Page 20
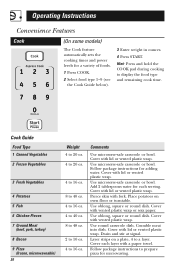
... Cook Guide Food Type 1 Canned Vegetables 2 Frozen Vegetables 3 Fresh Vegetables 4 Potatoes 5 Fish 6 Chicken Pieces 7 Ground Meat (beef, pork, turkey) 8 Bacon 9 Pizza (frozen, microwaveable) 20 Weight 4 to 20 oz. 4 to 20 oz. 4 to 16 oz. 8 to 40 oz. 4 to 16 oz. 4 to 40 oz. 8 to 48 oz.... 2 to 10 oz. 4 to display the food type and remaining cook time. Follow package instructions for microwaving. Cover each serving. Operating Instructions Convenience Features Cook (On some models) The Cook feature automatically sets the cooking times and power levels for each...
... Cook Guide Food Type 1 Canned Vegetables 2 Frozen Vegetables 3 Fresh Vegetables 4 Potatoes 5 Fish 6 Chicken Pieces 7 Ground Meat (beef, pork, turkey) 8 Bacon 9 Pizza (frozen, microwaveable) 20 Weight 4 to 20 oz. 4 to 20 oz. 4 to 16 oz. 8 to 40 oz. 4 to 16 oz. 4 to 40 oz. 8 to 48 oz.... 2 to 10 oz. 4 to display the food type and remaining cook time. Follow package instructions for microwaving. Cover each serving. Operating Instructions Convenience Features Cook (On some models) The Cook feature automatically sets the cooking times and power levels for each...
Use and Care Manual
Page 21
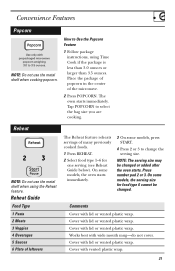
... (see Reheat Guide below). Tap POPCORN to change the serving size. Convenience Features Popcorn Use only with lid or vented plastic wrap. Cover with prepackaged microwave popcorn weighing 3.0 to Use the Popcorn Feature 1 Follow package instructions, using the Reheat feature. How to 3.5 ounces. On some models, press START. 4 Press 2 or... ounces or larger than 3.5 ounces. Reheat Guide Food Type 1 Pasta 2 Meats 3 Veggies 4 Beverages 5 Sauces 6 Plate of leftovers The Reheat feature reheats servings of the microwave. 2 Press POPCORN. Cover with lid or vented plastic wrap.
... (see Reheat Guide below). Tap POPCORN to change the serving size. Convenience Features Popcorn Use only with lid or vented plastic wrap. Cover with prepackaged microwave popcorn weighing 3.0 to Use the Popcorn Feature 1 Follow package instructions, using the Reheat feature. How to 3.5 ounces. On some models, press START. 4 Press 2 or... ounces or larger than 3.5 ounces. Reheat Guide Food Type 1 Pasta 2 Meats 3 Veggies 4 Beverages 5 Sauces 6 Plate of leftovers The Reheat feature reheats servings of the microwave. 2 Press POPCORN. Cover with lid or vented plastic wrap.
Use and Care Manual
Page 23
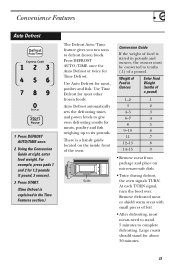
... Defrost or twice for meat, poultry and fish. Large roasts should stand for 1.2 pounds (1 pound, 3 ounces). 3 Press START. (Time Defrost is a handy guide located on microwave-safe dish. • Twice during defrost, the oven signals TURN. Guide Conversion Guide If the weight of food is stated in the Time Features section...
... Defrost or twice for meat, poultry and fish. Large roasts should stand for 1.2 pounds (1 pound, 3 ounces). 3 Press START. (Time Defrost is a handy guide located on microwave-safe dish. • Twice during defrost, the oven signals TURN. Guide Conversion Guide If the weight of food is stated in the Time Features section...
Use and Care Manual
Page 24
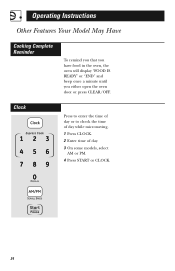
Operating Instructions Other Features Your Model May Have Cooking Complete Reminder To remind you that you have food in the oven, the oven will display "FOOD IS READY" or "END" and beep once a minute until you either open the oven door or press CLEAR/OFF. Clock Press to enter the time of day or to check the time of day while microwaving. 1 Press CLOCK. 2 Enter time of day. 3 On some models, select AM or PM. 4 Press START or CLOCK. 24
Operating Instructions Other Features Your Model May Have Cooking Complete Reminder To remind you that you have food in the oven, the oven will display "FOOD IS READY" or "END" and beep once a minute until you either open the oven door or press CLEAR/OFF. Clock Press to enter the time of day or to check the time of day while microwaving. 1 Press CLOCK. 2 Enter time of day. 3 On some models, select AM or PM. 4 Press START or CLOCK. 24


